Front suspension overhaul

spartacus 68

Registered User
Joined
Dec 17, 2008
Messages
755
Reaction score
207
Points
43
Location
Aberdeenshire
If you’ve not come across Dave Sterl on YouTube you’re missing out. He’s old school, do it by the book, complete with the right tools, and a few invaluable tips along the way. This is probably the most comprehensive set of videos I’ve come across for upper and lower suspension renewal on B8 and B8.5, including full torque specifications. he’s fitting Meyle HD kit.

Mods, consider making this a sticky.


  • Like
Reactions: audiwaterpump and EXSpartan36
Nice one, some good extra tips in there which would have been handy for me when doing all of mine. I used the FCP Euro one which didn't reference the uprated M14 ball joint, which I'm guessing is due to it being American.
 
  • Like
Reactions: audiwaterpump and spartacus68
If you’ve not come across Dave Sterl on YouTube you’re missing out. He’s old school, do it by the book, complete with the right tools, and a few invaluable tips along the way. This is probably the most comprehensive set of videos I’ve come across for upper and lower suspension renewal on B8 and B8.5, including full torque specifications. he’s fitting Meyle HD kit.

Mods, consider making this a sticky.


Kudos to anyone who can do that job properly without a car ramp lift.
 
Kudos to anyone who can do that job properly without a car ramp lift.
Most of the work is better done side on so not imperative to be done under the car on a ramp. I fitted same kit and would recommend for anyone who is competent to work on cars.

Devil is in the detail
 

Attachments

  • 2D45A8FF-3040-4D65-9FC9-D55DCF9E1DA9.jpeg
    2D45A8FF-3040-4D65-9FC9-D55DCF9E1DA9.jpeg
    646.5 KB · Views: 108
  • Like
Reactions: audiwaterpump
Most of the work is better done side on so not imperative to be done under the car on a ramp. I fitted same kit and would recommend for anyone who is competent to work on cars.

Devil is in the detail
Kudos to you my friend!
Nice photo.
Do you have any more photos that you could post on here.

"Devil is in the detail" - Any tips and tricks to watch out for. :icon thumright:
 
Kudos to anyone who can do that job properly without a car ramp lift.
I renewed the entire suspension on my wife's A2 TDI including front subframe console, the front suspension on my old B5 A4 2.5 TDI Quattro Avant, and now the rear spring rubber seat on my B8 Allroad all without a lift, which to be honest was an utter ball-ache. It's definitely a spring or summer job with decent daylight. I do have a garage but there's a boat in it - but that's another story!

This Christmas I'm treating myself to a Laser air hammer and compressor. I'm done with blow-torches and I don't have access to oxy-acetylene, which is the normal approach to the front suspension pinch bolts which are fused to the aluminium strut.

I think that's probably the hardest part. A decent 2-tonne trolley jack, axle stands, and good-quality hand-tools and this is relatively straight-forward if everything comes off. Some specialist tools such as separators for ball-joints are required, and and countless cups of tea.

Anyway - kudos to you on your B5 refit too. Quality work. :racer:
 
  • Like
Reactions: audiwaterpump
This Christmas I'm treating myself to a Laser air hammer and compressor.
Let us know which ones you go for. ie cost, links, how they perform in the real world, etc

& kudos to you for all that work on those cars.
 
  • Like
Reactions: spartacus68
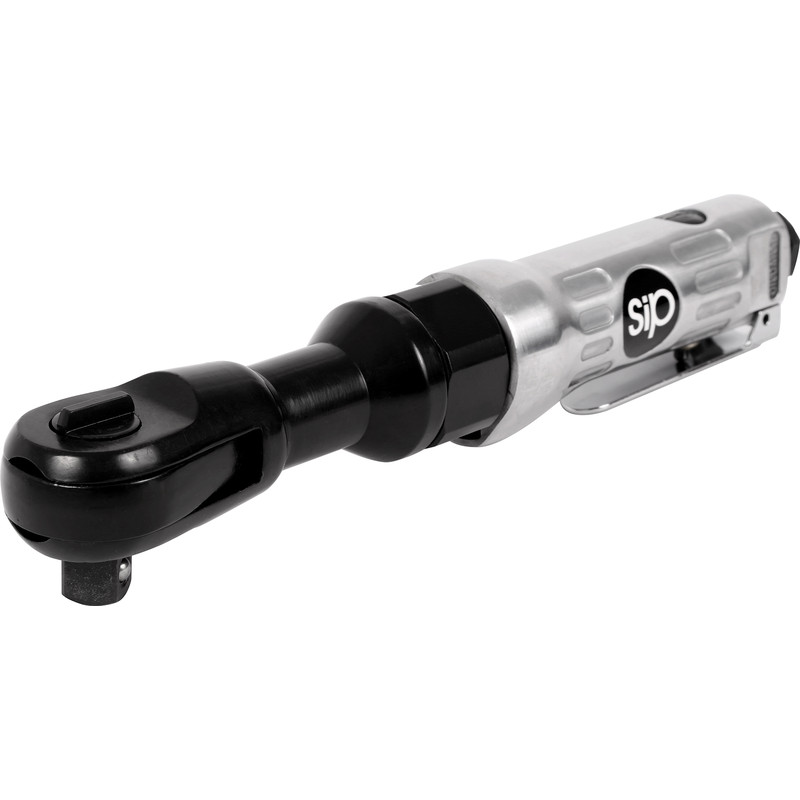
We used a lot of heat etc on the pinch bolts with little success. Then we tried a right angle air ratchet whilst using a spanner and banging outwards against the other side. They came out pretty fast using this method.

If they were threaded all the way through it would probably be easier to overcome the galvanic corrosion?
 
  • Like
Reactions: audiwaterpump
Let us know which ones you go for. ie cost, links, how they perform in the real world, etc

& kudos to you for all that work on those cars.
Don't want to start a new thread - but Dave Sterl has done this already on his channel.

I went for Laser Air Hammer (circa £80-150) depending where you shop, a 600mm Draper whip air hose (helps stop vibration), 5m of Draper reinforced 10mm air hose (£25). Shorter length hoses will deliver more functional pressure (think about bore size depending on tool pressure), as will minimizing linkages, a SGS 50 litre compressor 9.6 CFM (£120), Laser 100mm Vibro Air Chisel (6335) circa £12-16, ancillaries such as air tool oil, and decent ear protection - anything by 3M (£20). All in you're probably looking at £275(ish).

My brother has a E53 BMW X5 - the damn thing is a brute, and we've struggled in the past on any suspension work. On my Allroad - the front coil spring broke a couple of years ago the day before I was due to go on holiday, and I thought fair enough. So new spring from Sachs, but the pinch bolt was seized solid, so that was that - and ended up driving it (and towing a boat), and got it repaired at my destination. It's pointless hammering it with a lump hammer. It needs the kind of constant pressure from an air chisel. The Neilson pinch-bolt drift tool used by Dave in an earlier video is around £12. I see Laser make the same tool under (5863) for about £20. That should definitely be in your tool box.

I like working on cars - and there's nothing more frustrating to be stopped in your tracks by one bolt. I'll post back once I'm set up on real-world experiences. Thinks like the hex-head (round) caliper bolts on my Volkswagen Polo - are a good shot, as I cannot for the life of me understand why VAG didn't just use normal bolts? Wire brush, some penetrating oil, and put the air chisel on it to break the seize, then hammer an Allen-key bit in and ratchet off.
 
  • Like
Reactions: audiwaterpump
This is the one we used. Cheap and did the job.


1639604939462
 
  • Like
Reactions: audiwaterpump and spartacus68
Kudos to you my friend!
Nice photo.
Do you have any more photos that you could post on here.

"Devil is in the detail" - Any tips and tricks to watch out for. :icon thumright:
Patience, plenty brews, WD40, heat and a workshop manual for torque specs.
Not necessarily in that order :tearsofjoy:
 
  • Like
Reactions: audiwaterpump
We used a lot of heat etc on the pinch bolts with little success. Then we tried a right angle air ratchet whilst using a spanner and banging outwards against the other side. They came out pretty fast using this method.

If they were threaded all the way through it would probably be easier to overcome the galvanic corrosion?
Named bitch bolt in the trade. So bad, Audi themselves developed a workshop tool for removal.
I always go for heat, upper arms can be saved if wrapped in a cold towel.
Never over-tighten new bolt, think it’s only about 45NM.
 
Most of the work is better done side on so not imperative to be done under the car on a ramp. I fitted same kit and would recommend for anyone who is competent to work on cars.

Devil is in the detail
When did you install the new control arms?
 
Most of the work is better done side on so not imperative to be done under the car on a ramp. I fitted same kit and would recommend for anyone who is competent to work on cars.

Devil is in the detail
I may be wrong here, as I’ve not done this job before, so I may be talking a load of b*ll***s. :yes:

I would urgently have a look at that rubber dust boot on the left-hand-side, under the blue bar, to see if it chafed or ripped. Would be interesting to see some latest photos of it.

As the steering wheel is turned and the wheel goes up and down etc that tapered rubber boot will extend and contract & catch on that relatively sharp tip of that bolt that secures the control arm. I believe the other end of that bolt, is a profiled bolt head that is domed and smooth to prevent that sort of thing happening.

Hopefully, that will have the steering rack from damage and save some money in the process. :icon thumright: