

Stop the clock...Start the thread-My baby is home
- Thread starter tcg
- Start date
You are using an out of date browser. It may not display this or other websites correctly.
You should upgrade or use an alternative browser.
You should upgrade or use an alternative browser.
Sorry to hear about the neighbor pal, hope you get a decent price for it as a bit of compensation towards your therapy, at the rnd of the day cars are like women- you’ll put up with the hassle if U love screwing them when that goes it’s time to cut your losses
- Joined
- Nov 9, 2015
- Messages
- 1,060
- Reaction score
- 577
- Points
- 113
Cheers guys...would happily sell it today but I'll wait until the weather/state of our country improves so I can get some pictures of all the bad points...hope the site server has enough storage space for that!
Decided I'll get a cheap Fiesta ST150 and have a play with that, more ideal for ragging round the ring road my S3 is better suited for someone else who'll drive it more than me.
Decided I'll get a cheap Fiesta ST150 and have a play with that, more ideal for ragging round the ring road
my S3 is better suited for someone else who'll drive it more than me.- Joined
- Nov 9, 2015
- Messages
- 1,060
- Reaction score
- 577
- Points
- 113
Since I've had my S3, I've been treating the infamous driver's wing rust by painting it with Kurust periodically to try and extend it's lifespan. Thought I'd put up some photo's for anyone potentially interested in my car, hopefully won't scare off too many people...


Wonderful stuff as it turns black which is handy when you own a black S3
Spending most of it's life with me parked in my garage has certainly helped slow down the corrosion. Hopefully that will be the last time I have to do it
Wonderful stuff as it turns black which is handy when you own a black S3
Spending most of it's life with me parked in my garage has certainly helped slow down the corrosion. Hopefully that will be the last time I have to do it
- Joined
- Nov 9, 2015
- Messages
- 1,060
- Reaction score
- 577
- Points
- 113
Another small upgrade on the lighting front (or back should I say  ) . I got some reverse LED bulbs at some point in the past and found them yesterday
  so thought I'd give you guys a comparison.
Pictures taken in my garage during the day for reference.
Standard reverse bulbs...

LED replacements...

How they look from behind...

Crossed that job off the list now
) . I got some reverse LED bulbs at some point in the past and found them yesterday so thought I'd give you guys a comparison.Pictures taken in my garage during the day for reference.
Standard reverse bulbs...
LED replacements...
How they look from behind...
Crossed that job off the list now


Just read this thread from the start. Great read and great car sorry to hear about your neighbour

- Joined
- Nov 9, 2015
- Messages
- 1,060
- Reaction score
- 577
- Points
- 113
After five years of ownership I finally had a crack with my S3 last week...

On my care home trip a stone attacked my car!...didn't plan on replacing the windscreen any time soon still I can see clearly now the crack has gone...

The old screen did have plenty of road rash on it, obviously much nicer view of the world from my cockpit now.
Also a minor upgrade at the other end, fitted a pair of EM Tuning numberplate led's...


If I'm not careful my S3 might get to nice to sell it!
Next job on the list is to fit the Aux-in for my sat nav that I found at the weekend during another tidy up.
On my care home trip a stone attacked my car!...didn't plan on replacing the windscreen any time soon
still I can see clearly now the crack has gone...The old screen did have plenty of road rash on it, obviously much nicer view of the world from my cockpit now.
Also a minor upgrade at the other end, fitted a pair of EM Tuning numberplate led's...
If I'm not careful my S3 might get to nice to sell it!
Next job on the list is to fit the Aux-in for my sat nav that I found at the weekend during another tidy up.
- Joined
- Nov 9, 2015
- Messages
- 1,060
- Reaction score
- 577
- Points
- 113
A feeling of 'deja vu'...my birthday at the end of last month and this weekend my S3 started squealing like a pig again  only this time it was the alternator and I had read on here that it wasn't an enjoyable job, so I couldn't be 4r$ed to do it myself and gave the job to my mechanic...that's where my birthday money has gone again.
So far this year it's had a new windscreen, battery and alternator and we're only halfway through the year...can't see me selling it right now after sinking another few hundred quid into the money pit...when will I learn?
only this time it was the alternator and I had read on here that it wasn't an enjoyable job, so I couldn't be 4r$ed to do it myself and gave the job to my mechanic...that's where my birthday money has gone again.So far this year it's had a new windscreen, battery and alternator and we're only halfway through the year...can't see me selling it right now after sinking another few hundred quid into the money pit...when will I learn?

In another 6 months it'll be your Xmas money you'll be spending on it lol.A feeling of 'deja vu'...my birthday at the end of last month and this weekend my S3 started squealing like a pig again
So far this year it's had a new windscreen, battery and alternator and we're only halfway through the year...can't see me selling it right now after sinking another few hundred quid into the money pit...when will I learn?
Doesn't matter what car you drive they all require money spending on them when they get old or not even that old tbh, better the devil you know!
- Joined
- Nov 9, 2015
- Messages
- 1,060
- Reaction score
- 577
- Points
- 113
Too true mate, I've been thinking that when looking for my next car...I've just had too many Jap cars in the past and compared to my S3, it's night and day for reliability of parts...and those parts are so much cheaper when they do fail.better the devil you know!
Considering the cost per mileage of my S3, maybe I should be looking at a Ferrari next
- Joined
- Nov 9, 2015
- Messages
- 1,060
- Reaction score
- 577
- Points
- 113
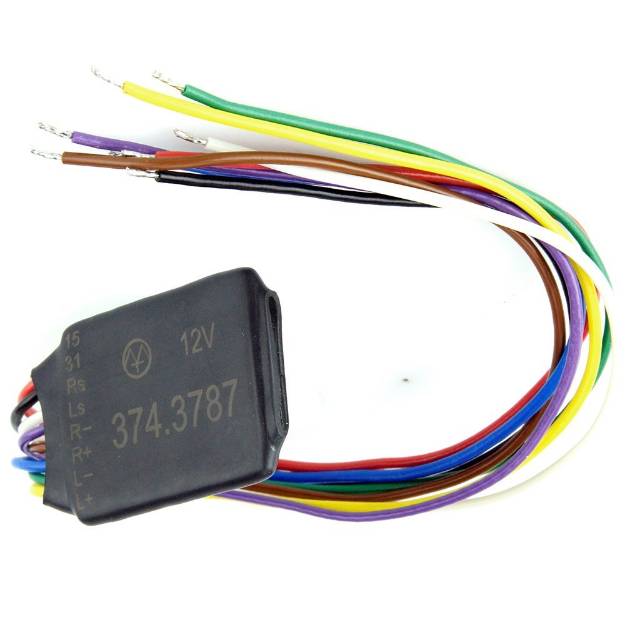
Hands up who fancies adding comfort indicators...one tap - three flashes?
I did, so I found a bargain trawling google, a flasher timer relay for how much?...surely not...Yes, and stop calling me Shirley!...
 www.carbuilder.com
This one has more wires than most but managed to get it to work perfectly
As always...I only take responsibility for my own installs.
First I removed the panel covering the hazard switch area and removed the cup holder and ESP switch housing by lifting the two tags on the console above each piece. Then I could get my spindle fingers behind the hazard switch and push it out. I'd read several people have struggled to get their hazard switch out but mine, luckily, was easy.
Note the cloth to protect the RNS-E screen as we are soldering here...remember guys.
With the plug disconnected, I used my pin remover tool to extract the required pins to add the timer relay...

I stripped back some of the sleeve of the required wire and soldered the new relay wires to the original ones then covered in heat shrink and a bit of loom tape to tidy up...

Plenty of room to tuck it away behind the ESP switch housing after fitting.
This is how I wired up the relay to the hazard relay wires, I spliced together the (Blue and Yellow wires) and the (Green and Violet wires) and also the (Brown and White wires).
Timer Relay/ Hazard Relay
Red Wire/ PIN 2
Black Wire/ PIN 9
Blue & Yellow Wires/ PIN 3
Green & Violet Wires/ PIN 5
Brown & White Wires/ PIN 7
The hazard switch connector plug has the PIN locations on the plug for ease.
Comfort indicators added
I did, so I found a bargain trawling google, a flasher timer relay for how much?...surely not...Yes, and stop calling me Shirley!...
Lane Changer Flasher TImer
Many column-mounted indicator switches make a momentary connection just before they latch in either left or right position. This unit uses this momentary ‘pulse’ to switch on the indicator for three flashes. NOTE: Your vehicles indicator lamps or flasher relay must have a permanent earth for...
This one has more wires than most but managed to get it to work perfectly
As always...I only take responsibility for my own installs.
First I removed the panel covering the hazard switch area and removed the cup holder and ESP switch housing by lifting the two tags on the console above each piece. Then I could get my spindle fingers behind the hazard switch and push it out. I'd read several people have struggled to get their hazard switch out but mine, luckily, was easy.
Note the cloth to protect the RNS-E screen as we are soldering here...remember guys.
With the plug disconnected, I used my pin remover tool to extract the required pins to add the timer relay...
I stripped back some of the sleeve of the required wire and soldered the new relay wires to the original ones then covered in heat shrink and a bit of loom tape to tidy up...
Plenty of room to tuck it away behind the ESP switch housing after fitting.
This is how I wired up the relay to the hazard relay wires, I spliced together the (Blue and Yellow wires) and the (Green and Violet wires) and also the (Brown and White wires).
Timer Relay/ Hazard Relay
Red Wire/ PIN 2
Black Wire/ PIN 9
Blue & Yellow Wires/ PIN 3
Green & Violet Wires/ PIN 5
Brown & White Wires/ PIN 7
The hazard switch connector plug has the PIN locations on the plug for ease.
Comfort indicators added
Legend! This is something I intend on doing at some point 
Nice find and well documented mate
Sent from my iPhone using Tapatalk

Nice find and well documented mate
Sent from my iPhone using Tapatalk
Cheers mate...couldn't believe how cheap it was...with all the overtaking you'll be doing in your monster, it'll come in handy.
Haha exactly mate

Sent from my iPhone using Tapatalk
- Joined
- Nov 9, 2015
- Messages
- 1,060
- Reaction score
- 577
- Points
- 113
More pictures than reading this time, to ease you back in after the Bank Holiday weekend...
Not one for the purists and will no doubt divide opinion, but I've never been a fan of the oem rear lights so I've been on the hunt for quite some time. I bought a pair of tinted/smoked Depo ones last year and tried to repair them but wasn't satisfied with the result of my work so they're up for sale now.
A few months ago another set came up on ebay, this time they were DEPO smoked LED rear lights so I bought them and then found out when I fitted them, they were not 'canbus error free', so set off the 'bulb out' alarm.
Some might see that as a problem but most jobs with the S3 are a challenge, so I just thought of it that way. It was just the tail and brake lights that are LED so for the brake lights I decided to use ballast resistors, one for each rear light. I'm not a fan of ballast resistors, as they can get hot, but the amount of time spent on the brake pedal is never normally longer than a few minutes, at a time, so I was happy to use them for this job.
I stripped back the wires on the lights and soldered the ballast resistor wires to each of the two wires, a bit of electrical tape followed by loom tape. The resistors need to be away from anything that can be affected by the heat they give off so I decided to mount them on one of the fixing posts for the lights. I managed to drill out a mounting hole on the resistor and using a nut from my collection fixed it once the light was fitted into the car, nice and clear of everything...


I was happy with that but wasn't happy using ballast resistors with the tail lights as they could be on for hours and get very hot, too hot for my liking. What I needed was to find a solution to draw enough current form the circuit to fool the 'bulb out' gremlin. I had the original oem pair of puddle lights in my stock box from when I put in LED S3 logo one's so I decided to convert them into footwell lights...but S3 8L's don't have footwell blanks...that's a good starting point.
The driver's side was relatively easy as all I had to do was cut out the correct size hole in the under dash panel below the steering approximately in the middle of the footwell...Hey Presto

The passenger side could have been quite tricky as we all know it's foam under there. I pulled back the foam and there is a gap behind the glovebox with a space big enough to fit the light fitting but nowhere to mount it. After emptying my bracket bin I found one that, after a little bending/folding, fitted up behind the glovebox and a mounting hole matched with the access panel bolt for the blower...lucky result there...


I now needed a feed from the rear lights and they were found down the passenger side after removing the sill plate and footwell trim and pulling back the carpet. I found the wires to the lights there to take my feed for the 'new' footwell lights.
Next job was to make up a loom so got some blue and brown cable and wrapped that in loom tape and I also wanted to get the correct connectors to the footwell lights so they can be unplugged, if ever needed. I got those from this site...
 www.auto-click.co.uk

Stripped back and soldered onto the feeds to the rear lights..

Then tidied up with loom tape...

I used the earth point behind the passenger footwell trim for both wires and ran the loom behind the carpet to a 'T' junction to the passenger and driver's side. The passenger one fits in nice and snug...

They are fitted with red, standard filament 5w bulbs, so when the rear lights are switched on, there is a red glow in the footwells and enough current is drawn to stop the alarm going off...

They're not as bright as the three red beams in the lower console so I'm happy with that and I'm even happier with the lights now I've fitted them, I've transferred over the LED indicator and reverse bulbs from my oem lights so just the fog bulb to change if I feel the need but it's bright enough.
I understand they'll look chavvy to some, plus I'm putting the car up for sale after it's had it's MOT at the end of October so the next owner can remove them, if they choose...but that's life..


And finally...


I'm thinking of also adding the auto lights function, as it's a cheap upgrade and a good one too. Can any of you guys tell me where's the best place in the windscreen to put the light sensor if I get round to doing it before it goes...if I can sell it that is!
Not one for the purists and will no doubt divide opinion, but I've never been a fan of the oem rear lights so I've been on the hunt for quite some time. I bought a pair of tinted/smoked Depo ones last year and tried to repair them but wasn't satisfied with the result of my work so they're up for sale now.
A few months ago another set came up on ebay, this time they were DEPO smoked LED rear lights so I bought them and then found out when I fitted them, they were not 'canbus error free', so set off the 'bulb out' alarm.
Some might see that as a problem but most jobs with the S3 are a challenge, so I just thought of it that way. It was just the tail and brake lights that are LED so for the brake lights I decided to use ballast resistors, one for each rear light. I'm not a fan of ballast resistors, as they can get hot, but the amount of time spent on the brake pedal is never normally longer than a few minutes, at a time, so I was happy to use them for this job.
I stripped back the wires on the lights and soldered the ballast resistor wires to each of the two wires, a bit of electrical tape followed by loom tape. The resistors need to be away from anything that can be affected by the heat they give off so I decided to mount them on one of the fixing posts for the lights. I managed to drill out a mounting hole on the resistor and using a nut from my collection fixed it once the light was fitted into the car, nice and clear of everything...
I was happy with that but wasn't happy using ballast resistors with the tail lights as they could be on for hours and get very hot, too hot for my liking. What I needed was to find a solution to draw enough current form the circuit to fool the 'bulb out' gremlin. I had the original oem pair of puddle lights in my stock box from when I put in LED S3 logo one's so I decided to convert them into footwell lights...but S3 8L's don't have footwell blanks...that's a good starting point.
The driver's side was relatively easy as all I had to do was cut out the correct size hole in the under dash panel below the steering approximately in the middle of the footwell...Hey Presto
The passenger side could have been quite tricky as we all know it's foam under there. I pulled back the foam and there is a gap behind the glovebox with a space big enough to fit the light fitting but nowhere to mount it. After emptying my bracket bin I found one that, after a little bending/folding, fitted up behind the glovebox and a mounting hole matched with the access panel bolt for the blower...lucky result there...
I now needed a feed from the rear lights and they were found down the passenger side after removing the sill plate and footwell trim and pulling back the carpet. I found the wires to the lights there to take my feed for the 'new' footwell lights.
Next job was to make up a loom so got some blue and brown cable and wrapped that in loom tape and I also wanted to get the correct connectors to the footwell lights so they can be unplugged, if ever needed. I got those from this site...
893 971 632 / 893971632
893 971 632 / 893971632 Terminals and seals are included 2 Way Automotive Connector We ship Worldwide daily and you can buy online safely using PayPal We are the UK's largest specialist stockist of Automotive Connectors, and we offer low cost
Stripped back and soldered onto the feeds to the rear lights..
Then tidied up with loom tape...
I used the earth point behind the passenger footwell trim for both wires and ran the loom behind the carpet to a 'T' junction to the passenger and driver's side. The passenger one fits in nice and snug...
They are fitted with red, standard filament 5w bulbs, so when the rear lights are switched on, there is a red glow in the footwells and enough current is drawn to stop the alarm going off...
They're not as bright as the three red beams in the lower console so I'm happy with that and I'm even happier with the lights now I've fitted them, I've transferred over the LED indicator and reverse bulbs from my oem lights so just the fog bulb to change if I feel the need but it's bright enough.
I understand they'll look chavvy to some, plus I'm putting the car up for sale after it's had it's MOT at the end of October so the next owner can remove them, if they choose...but that's life..
And finally...
I'm thinking of also adding the auto lights function, as it's a cheap upgrade and a good one too. Can any of you guys tell me where's the best place in the windscreen to put the light sensor if I get round to doing it before it goes...if I can sell it that is!
Last edited:
- Joined
- Nov 9, 2015
- Messages
- 1,060
- Reaction score
- 577
- Points
- 113
Thanks Sandra...it's a marmite thing...I think it 'freshens' the car up, a bit more modern. I think they will suit a black car best, not sure on lighter colour cars...but that's just my opinion, not the masses.
- Joined
- Sep 12, 2010
- Messages
- 34,879
- Reaction score
- 15,945
- Points
- 113
They really suit the car. The 8p chassis had a change of rear lights available that were darker, don’t think they suited all colours, but it’s down to personal choice. Your upgrade Has taken your car up a notch.Thanks Sandra...it's a marmite thing...I think it 'freshens' the car up, a bit more modern. I think they will suit a black car best, not sure on lighter colour cars...but that's just my opinion, not the masses.
- Joined
- Nov 9, 2015
- Messages
- 1,060
- Reaction score
- 577
- Points
- 113
Booked my S3 in for next month and hopefully it's last service and MOT in my ownership...if/when it passes, I'm going to stick it the classifieds and start looking for it's replacement.
Just like an old girlfriend, who won't accept it's over, I put the windows down after leaving my mechanic's garage then went to raise the passenger one from the driver's side and window no worky!...so now I'm on the hunt for a new pair of driver's side window switches and a trip to the scrapyard looks likely, as Audi don't stock them anymore plus my car has started the random '4 BEEPS' alarm battery low warning...oh, deep joy, It seems the nearer to the end, the more demanding my S3 is becoming, if that's possible. I'll need to sort that out before the sale as we all know what a lovely job that one is!
Finally got round to fitting the 'AUX IN' to the RNS-E and as I was going to put it in one of the blanks either side of the ESP switch, I thought I'd add a USB charging dock to match so picked up one from ebay. ..
https://www.ebay.co.uk/itm/40261001...spyEewMSftNYLmAm0%3D|ampid:PL_CLK|clp:2334524
The gloss black surround has rounded corners on the inside edge and the USB dock had two right angle corners and two rounded, so that meant it was best to the right of the ESP button. I rounded off the left side corners of the 'AUX IN' and that was a simple job of plugging it into the RNS-E (the RNS-E then had to be coded for 'AUX IN') then sliding the dock into the fascia.
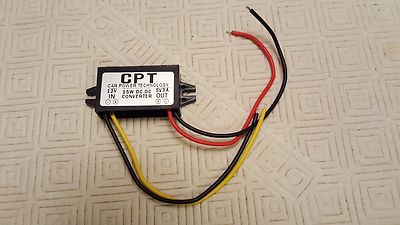
With the USB, I bought a 12v to 3v converter...
 I cut off the plug from the USB and soldered the power wires to the converter...

I took a power and earth from the back of the RNS-E, I stripped an earth wire and spliced the converter into that and I had a spare block connector 'pin' so took power from B10 (CD power out)

This means that the dock is only powered when the ignition is switched on. Then when you remove the ignition key, the power to the USB drops out after a few seconds. Put back together, with the fascia on and the problem is a gap either side of the ESP switch...

I thought I'd match up the chrome trim I used to fill the gap above the RNS-E. I cut up some tile trim again and hot glued a piece to the side of the 'AUX IN' and USB to look like this...

It's an 'open and shut case'

Excuse the grubby fingerprints...happy with that one, another plus when it comes to sale time...right off to search for parts, again.
Just like an old girlfriend, who won't accept it's over, I put the windows down after leaving my mechanic's garage then went to raise the passenger one from the driver's side and window no worky!...so now I'm on the hunt for a new pair of driver's side window switches and a trip to the scrapyard looks likely, as Audi don't stock them anymore
plus my car has started the random '4 BEEPS' alarm battery low warning...oh, deep joy, It seems the nearer to the end, the more demanding my S3 is becoming, if that's possible. I'll need to sort that out before the sale as we all know what a lovely job that one is!Finally got round to fitting the 'AUX IN' to the RNS-E and as I was going to put it in one of the blanks either side of the ESP switch, I thought I'd add a USB charging dock to match so picked up one from ebay. ..
https://www.ebay.co.uk/itm/40261001...spyEewMSftNYLmAm0%3D|ampid:PL_CLK|clp:2334524
The gloss black surround has rounded corners on the inside edge and the USB dock had two right angle corners and two rounded, so that meant it was best to the right of the ESP button. I rounded off the left side corners of the 'AUX IN' and that was a simple job of plugging it into the RNS-E (the RNS-E then had to be coded for 'AUX IN') then sliding the dock into the fascia.
With the USB, I bought a 12v to 3v converter...
DC/DC Converter Regulator 12V Stepdown to 5V 3A 15W Car Power Supply Module UK | eBay
Max power consumption: 15W. Output current: 3A (MAX). Converter Size: 6.50 2.70 1.40cm.
www.ebay.co.uk
I took a power and earth from the back of the RNS-E, I stripped an earth wire and spliced the converter into that and I had a spare block connector 'pin' so took power from B10 (CD power out)
This means that the dock is only powered when the ignition is switched on. Then when you remove the ignition key, the power to the USB drops out after a few seconds. Put back together, with the fascia on and the problem is a gap either side of the ESP switch...
I thought I'd match up the chrome trim I used to fill the gap above the RNS-E. I cut up some tile trim again and hot glued a piece to the side of the 'AUX IN' and USB to look like this...
It's an 'open and shut case'
Excuse the grubby fingerprints...happy with that one, another plus when it comes to sale time...right off to search for parts, again.
- Joined
- Nov 9, 2015
- Messages
- 1,060
- Reaction score
- 577
- Points
- 113
A trip to the scrapyard today and a case of what could've been,,,managed to pick up a replacement window switch and the A3 1.9TDI it came from had an auto dimming mirror fitted but unfortunately it had 'blown', also had a scuttle panel without any cracks in the grills but couldn't get that off as I didn't have any pullers. It also had a center armrest, but it had a broken lid and was a bit tatty, so I left that as well...still, at least I can get the passenger window up and down from my side now.
My replacement alarm siren has arrived...start that job this week then get another new aircon compressor and fit that before the service.
My replacement alarm siren has arrived...start that job this week then get another new aircon compressor and fit that before the service.
- Joined
- Nov 9, 2015
- Messages
- 1,060
- Reaction score
- 577
- Points
- 113
A visit to my exhaust man today as the middle clamp had bust and it's in for the MOT next Monday. Whilst it was up in the air I slapped some Hammerite underbody seal on the underside...


Looks much better now and a bit more protection from the elements, not forgetting a nice shiny clamp for the new owner to enjoy...fingers crossed for Monday, a straightforward pass would be nice. I've also fitted a new a/c pump in preparation (and hope) for gassing when it gets serviced.
Looks much better now and a bit more protection from the elements, not forgetting a nice shiny clamp for the new owner to enjoy...fingers crossed for Monday, a straightforward pass would be nice. I've also fitted a new a/c pump in preparation (and hope) for gassing when it gets serviced.
- Joined
- Nov 9, 2015
- Messages
- 1,060
- Reaction score
- 577
- Points
- 113
I just brushed off the underside, as it was dry, then painted it on...quite surprised how well it stuck to the body...it took me about an hour ( while my mate had to source a big clamp )
Got it from Halfords...
 www.halfords.com
Got it from Halfords...
Rust Removal & Treatment | Halfords UK
Protect and preserve your car’s finish with car rust removal and car rust treatment products from Halfords. Shop and buy rust removal products online.
www.halfords.com
- Joined
- Nov 9, 2015
- Messages
- 1,060
- Reaction score
- 577
- Points
- 113
Sorted out my alarm siren with a lucky replacement from ebay and I cut my old one open to see if it was salvageable...

The batteries had leaked over the circuit board and corroded the contacts...it's toast.
Anyone who has to do this, I used this guide...

 www.audi-sport.net
It's pretty straightforward and took me about 1 1/2 hours. I'd already looked into replacing the batteries before I found out it was no good. I found a TT thread about it...
www.audi-sport.net
It's pretty straightforward and took me about 1 1/2 hours. I'd already looked into replacing the batteries before I found out it was no good. I found a TT thread about it...
 www.ttforum.co.uk
Even found some batteries...
www.ttforum.co.uk
Even found some batteries...
 May be of use to someone in the future.
In other news, my S3 flew through it's MOT with no advisories and the aircon has been re-gassed, so all in all, it's probably in the best nick since I purchased it...and soon I'm going to sell it...what a plonker only this year it has had a new windscreen, alternator and a/c pump...still a few more little jobs to do, I didn't get chance to get the wheels off at my mates ramp the other day so I'll get them off, good clean inside and underseal the bits I of the car I couldn't get to and touch up the calipers.
Then enjoy it for a couple of weeks.
The batteries had leaked over the circuit board and corroded the contacts...it's toast.
Anyone who has to do this, I used this guide...
Westle and S3baby's late night mechanics. (Replacing Alarm Batteries)
Right just got all the boot trim off to tackle this bitch and I'm now after some guidance! Can anyone confirm that the alarm and the batteries are actually part of the central locking pump??? I've plugged in the laptop and triggered the alarm and it seems to be sounding from the central...
How to - MK1 Alarm Siren fix
2PCS x New Rechargeable 3/V150H 3.6V 160mAh Ni-MH Fruit Machine Backup Battery | eBay
Many original batteries may of been in a Blue Case, it was Nicad and known as 3V100R. This Ni-MH battery is a uprated version of these older batteries. This battery is also suitable for replac ing 110/120mAh batteries and others.
www.ebay.co.uk
In other news, my S3 flew through it's MOT with no advisories and the aircon has been re-gassed, so all in all, it's probably in the best nick since I purchased it...and soon I'm going to sell it...what a plonker
only this year it has had a new windscreen, alternator and a/c pump...still a few more little jobs to do, I didn't get chance to get the wheels off at my mates ramp the other day so I'll get them off, good clean inside and underseal the bits I of the car I couldn't get to and touch up the calipers.Then enjoy it for a couple of weeks.
- Joined
- Nov 9, 2015
- Messages
- 1,060
- Reaction score
- 577
- Points
- 113
This week so far has been mostly cleaning and undersealing...so lucky to have a garage to work on my car. Had the wheels off and slapped a coat of underseal on all the parts I could get to with a brush and gave the arch guards a clean and plastic treatment. Also cleaned the back of the wheels and sadly had to polish the backbox as I lovely shiny chrome exhausts...


Now it needs a wash
Now it needs a wash
This is something I’ll get round to doing at some point too mate. Good effort as always
Sent from my iPhone using Tapatalk
Sent from my iPhone using Tapatalk
- Joined
- Nov 9, 2015
- Messages
- 1,060
- Reaction score
- 577
- Points
- 113
Decided to add auto lights using an ebay Golf MK4 switch...

This one didn't need programming, as well as the auto function, it has a 20 second timer from when you remove the key when it's dark and a 20 second timer when you unlock the car in the dark.
Sorry guys, I didn't take any pictures of fitting it but to make it fit I had to cut the Audi switch surround in two parts and filed out a small piece of the under dash panel for the switch to fit.
It's not my best work but I'm reasonably happy with the result...


Auto Head Light Sensor w/ Switch Suit For VW Polo Golf 4 Jetta MK4 Amarok Passat | eBay
For VW Polo Golf Jetta MK4 Bora Amarok Passat Auto Headlight Sensor+Switch UK. Volkswagen's full range of models: Polo, Bora, Beetle, Golf MK4, Jetta, Passat, Jetta, Tiguan Touran. Wind Deflectors. When the ambient brightness is low, the indicator/low beam will automatically illuminate.
www.ebay.co.uk
This one didn't need programming, as well as the auto function, it has a 20 second timer from when you remove the key when it's dark and a 20 second timer when you unlock the car in the dark.
Sorry guys, I didn't take any pictures of fitting it but to make it fit I had to cut the Audi switch surround in two parts and filed out a small piece of the under dash panel for the switch to fit.
It's not my best work but I'm reasonably happy with the result...
- Joined
- Nov 9, 2015
- Messages
- 1,060
- Reaction score
- 577
- Points
- 113
Forgot to mention guys...when it came to sticking down the light sensor on the dash, I used a hairdryer to warn up the cable to make it a bit more supple as it was quite hard to get the sensor to stick down and not keep popping up!...I also laid a heavy spanner on the sensor for a while to keep some downward pressure.
The auto headlights is a good option. I did it a while ago like the way you fitted the switch but I didn't like the way it looked so I changed it a bit.
