

How To - Facelift Chome Climate Control Module Switches
- Thread starter Ash187
- Start date
You are using an out of date browser. It may not display this or other websites correctly.
You should upgrade or use an alternative browser.
You should upgrade or use an alternative browser.
Kevin A3 Quattro
2008 A3 3.2 S Line Quattro
Hey fellas need some help... I upgraded my 2008 A3 S-Line (manufactured in October of 2007) to the facelift controls last fall. I went to use the AC last weekend and found that the air did not seem to get cool. When I hit the auto button air does flow into the cabin and my defroster does seem to work pretty well as this past winter was brutally cold and in a few minutes my windshield would be clear (read those two things in another thread will help narrow down if your A3 has the updated blower). I am trying to figure out if I need to recharge my AC like someone mentioned here: http://www.audi-sport.net/xf/thread...-your-ac-needs-re-charging-re-gassing.137540/ or if I need to swap back in the old climate control unit? Any help would be appreciated. O and I did buy the A3 last year and it had 33k miles on the odo, I am up to 42k now and I know that the AC has not been recharged since purchased 7 years ago. Thanks in advance!
Hassan427726
Registered User
- Joined
- Oct 5, 2016
- Messages
- 3
- Reaction score
- 0
- Points
- 1
hey guys, im facelifting my interior, ive managed to get hold of a facelift climate control unit with heated seat option, now when connected up everything works spot on except the heated seats dont seem to be getting fully warm when on 6, they feel slightly warm like they are on 2 but nowhere near where they should. Anyone ever done this and had the same issue?
- Joined
- Mar 12, 2009
- Messages
- 7,567
- Reaction score
- 817
- Points
- 113
- Location
- London and surrounding areas
Thats how the facelift modules are... the heating temp setting is much lower than the prefacelift modules. plenty of threads here on it.
Thats how the facelift modules are... the heating temp setting is much lower than the prefacelift modules. plenty of threads here on it.
Is there no fix for this then as it's something I'm thinking of doing aswell and I've got heated seats.
I'm wanting to do the heater panel the headight switch and the instrument cluster but only want to do it if I can do them all so it doesn't look odd.
- Joined
- Mar 12, 2009
- Messages
- 7,567
- Reaction score
- 817
- Points
- 113
- Location
- London and surrounding areas
Well it doesn't look odd so you won't have to worry there.Is there no fix for this then as it's something I'm thinking of doing aswell and I've got heated seats.
I'm wanting to do the heater panel the headight switch and the instrument cluster but only want to do it if I can do them all so it doesn't look odd.
But there isn't a 'fix' because there isn't a fault. Nothing is wrong with the facelift panel... It's a lower temp setting as the prefacelift ones were set too high and Audi had reports of people complaining that it was getting too hot hence the change

Ok thanks, I'll probably leave it or change the switches over then like I've seen in an old thread of yours as I sometimes have my seats on full heat.
When I said it would look odd I meant if I put a new cluster and headlight switch in but left the old heater panel in.
When I said it would look odd I meant if I put a new cluster and headlight switch in but left the old heater panel in.
Guys just to make sure:
I have a 2006 Audi A3 single din without heated seats.
I bought a 2010 A3 double din unit for the double din conversion: this means the new AC control will not work with my 06 A3?
Do you guys know if 06 A3 did have a double din that would work? And part number if anyone can find?
Thank you guys!
Paulo.
Edit: I am in the US if that makes any difference on the new AC working or not
Hi Guys, - Hoping to draw on the collective strength of your expert knowledge. I have a 2009 5 door Audi A3 sportback (TDIe engine) we recently purchased. I will be upgrading several components. My question that is relevant to this thread, can I swap out the basic heater controls to the climate control panel with LCD... I have read several forums which didn't help some say the whole dash needs dismantling others say after 2007 (08 onwards) it can be a straight unit swap with coding... Any feedback appreciated - if anyone knows of the part codes 8P.... thats also appreciated for the ebay searching. There is a second motive for doing this, I will be looking to replace the cloth seats with full leather heated, so I will look for the panels with heated seats button (a second question - will I have to run a new wiring loom to the front seats or will the existing loom support the upgrade? should I have the panel and the seats ...)
Thanks
Aaron
Hi there,
How did you get on with this as I want to do the same!?

Hi there,
How did you get on with this as I want to do the same!?
Complete dash has to be removed to be able to fit the new parts & all wiring looms, plus degas, coolant drop & refill, plus sensors in each airvent, it's not a quick job.
Complete dash has to be removed to be able to fit the new parts & all wiring looms, plus degas, coolant drop & refill, plus sensors in each airvent, it's not a quick job.
Wow, that sounds technical!!!
Did you end up changing it?
Can't I just change the dials?

- Joined
- May 16, 2017
- Messages
- 78
- Reaction score
- 26
- Points
- 18
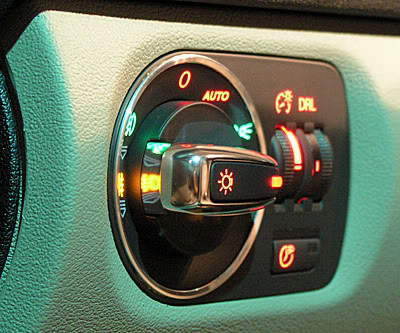
Ash, thank you so much for this topic. I'm doing a single to double DIN conversion and wanted to see about doing a face-lift change to the switches and climate control unit. My A3 was produced in April of 2007, but I had the A/C system completely replaced just recently, with new fan module, flap controller, and A/C control switch (engine bay). I'm hoping that maybe the face-lift unit may work for me. If the AC LED ends up working in reverse, not a big deal. I might be tempted to just change the color of the LED so that yellow means "off". If the unit simply doesn't work right, then I'll follow the instructions here on swapping the knobs, which look so much better than the pre-2009 knobs. It's encouraging to see that they actually light up too. I've already got the Euro headlight switch module.
Not sure what’s going on, but the comrades are claiming FL works on PFL. WAT?!
https://www.drive2.ru/l/505697834280943993/
You’ll need to use Google translate though.
https://www.drive2.ru/l/505697834280943993/
You’ll need to use Google translate though.
Hi Ash,
I did replacement old climatronic unit with newer version and like you said, all works fine except when AC is on air is not blowing to the cabin. I am wondering is there any way to solve that problem? I'll be very gratefull if I got solution.
I am new member here")
I did replacement old climatronic unit with newer version and like you said, all works fine except when AC is on air is not blowing to the cabin. I am wondering is there any way to solve that problem? I'll be very gratefull if I got solution.
I am new member here
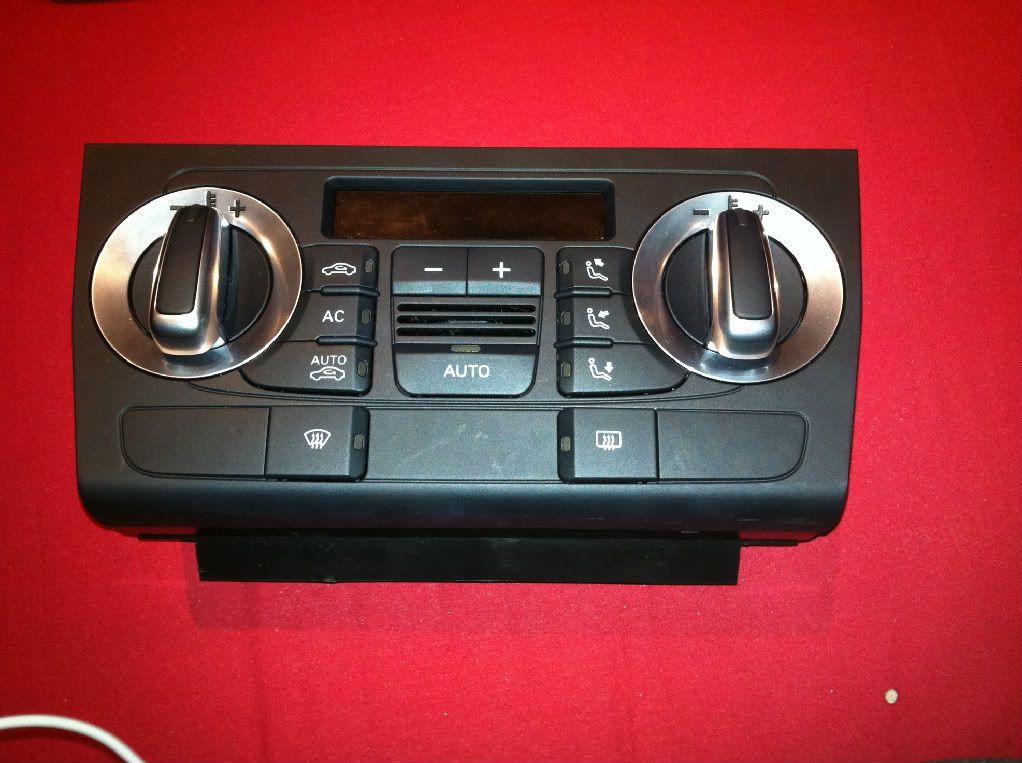
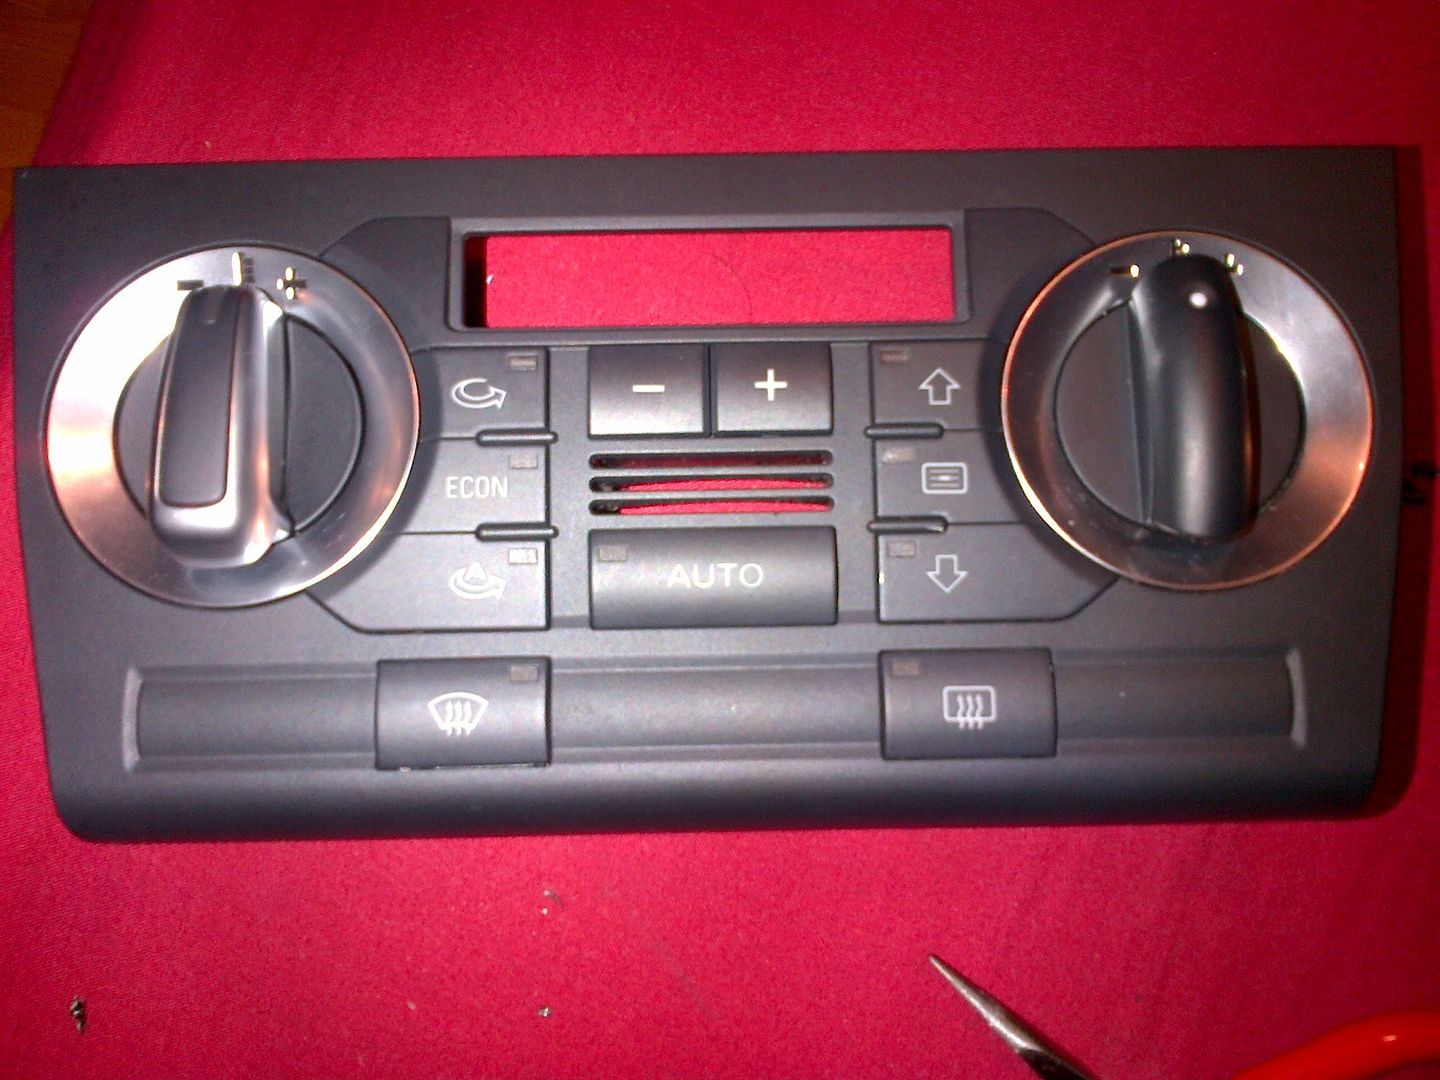
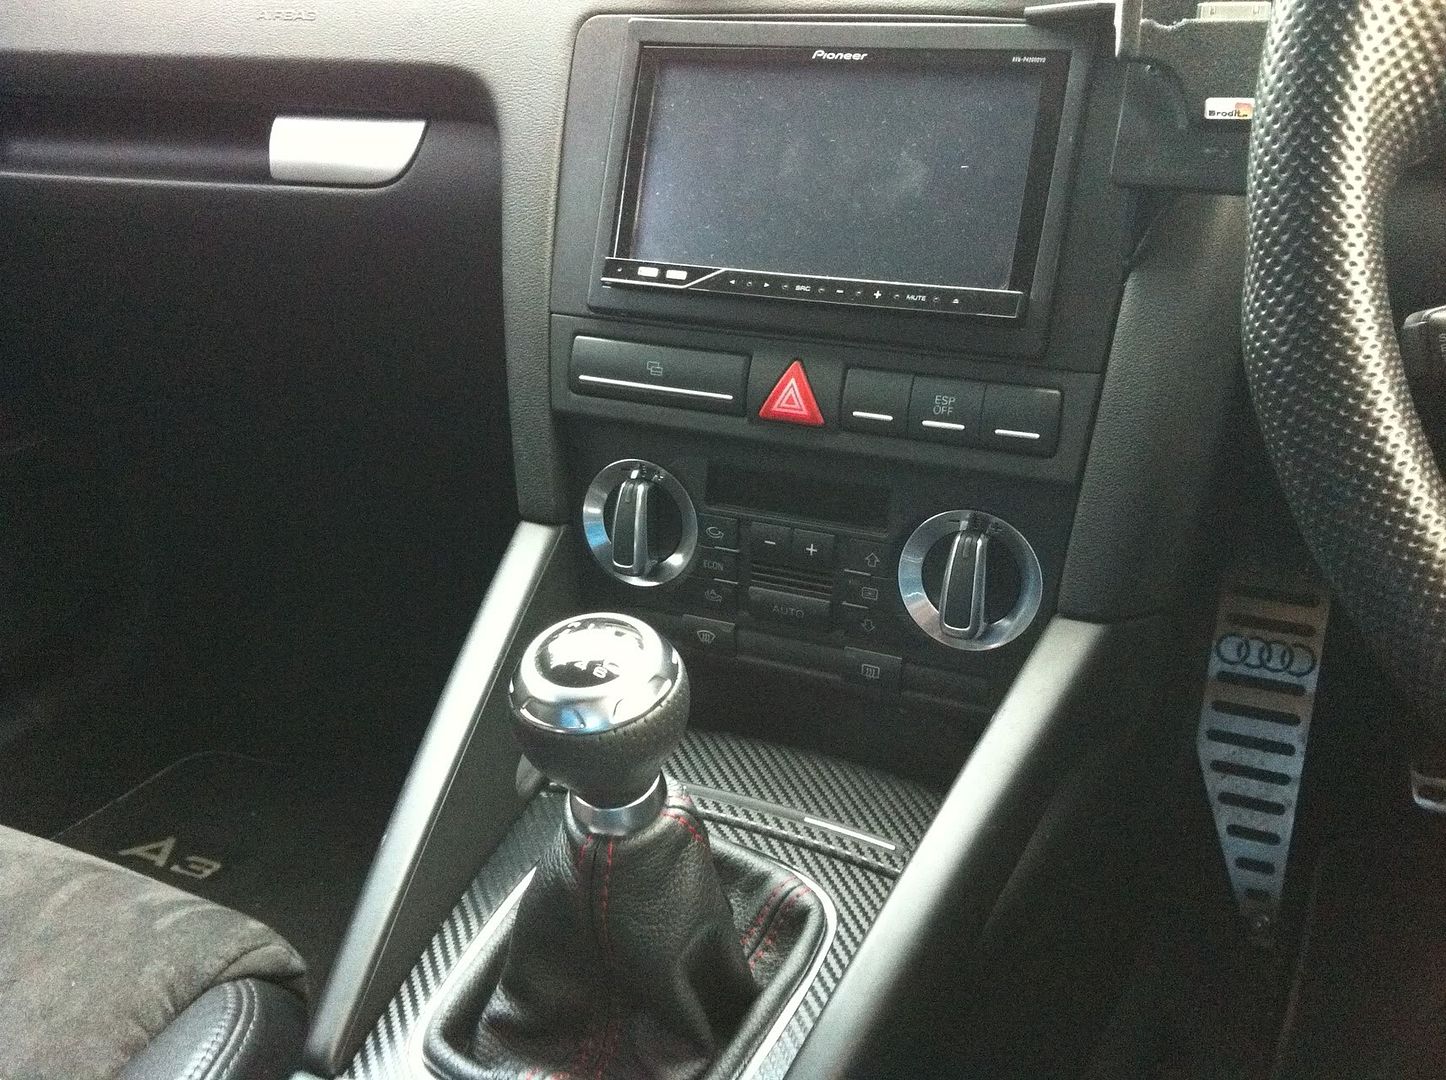
I have finally upgraded my climate control by adding the chrome switches from the facelift models to it.
This 'How To' will show how it is done, i would say its a difficulty rating of 2 out of 5 (not difficult, just need to take your time and be patient)
For anyone that is wondering why this mod was needed and why i didnt just swap over the unit directly to the car.... well i tried to test it out and i found that the new unit does power on and pump out air but when the A/C is turned on no air is directed into the cabin due to the air circulation flaps being changed, so its pretty useless in my pre-facelift A3.
So here is what to do...
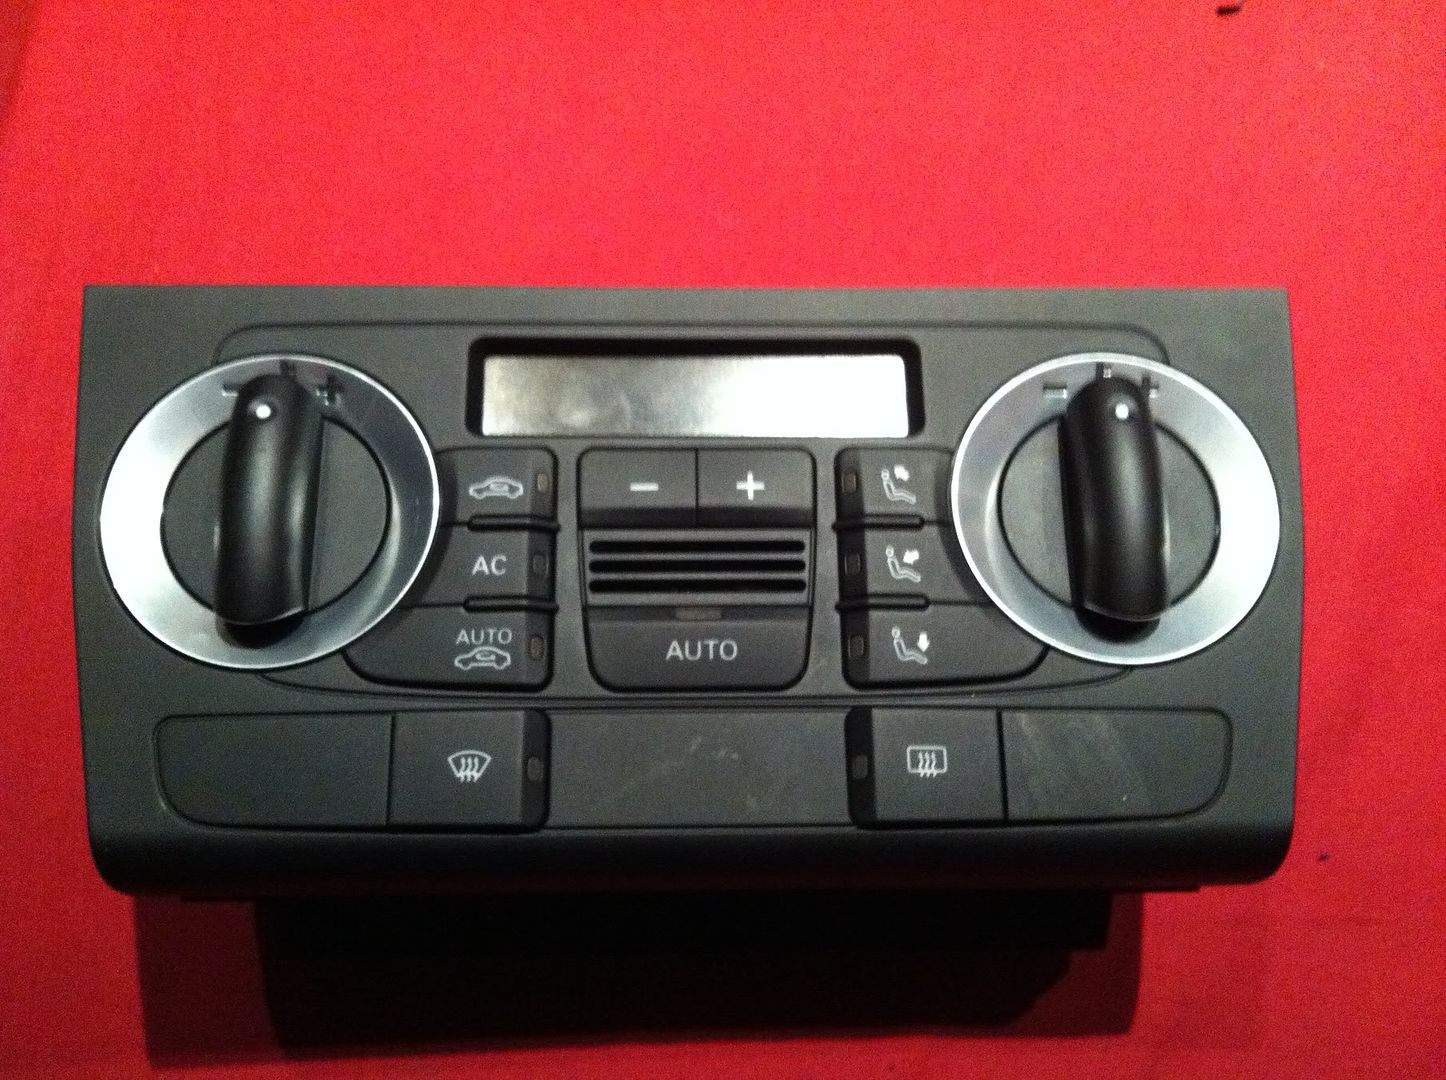
Firstly get yourself a facelift climate control unit... these can be pricey, i picked one up for £60 on the bay.
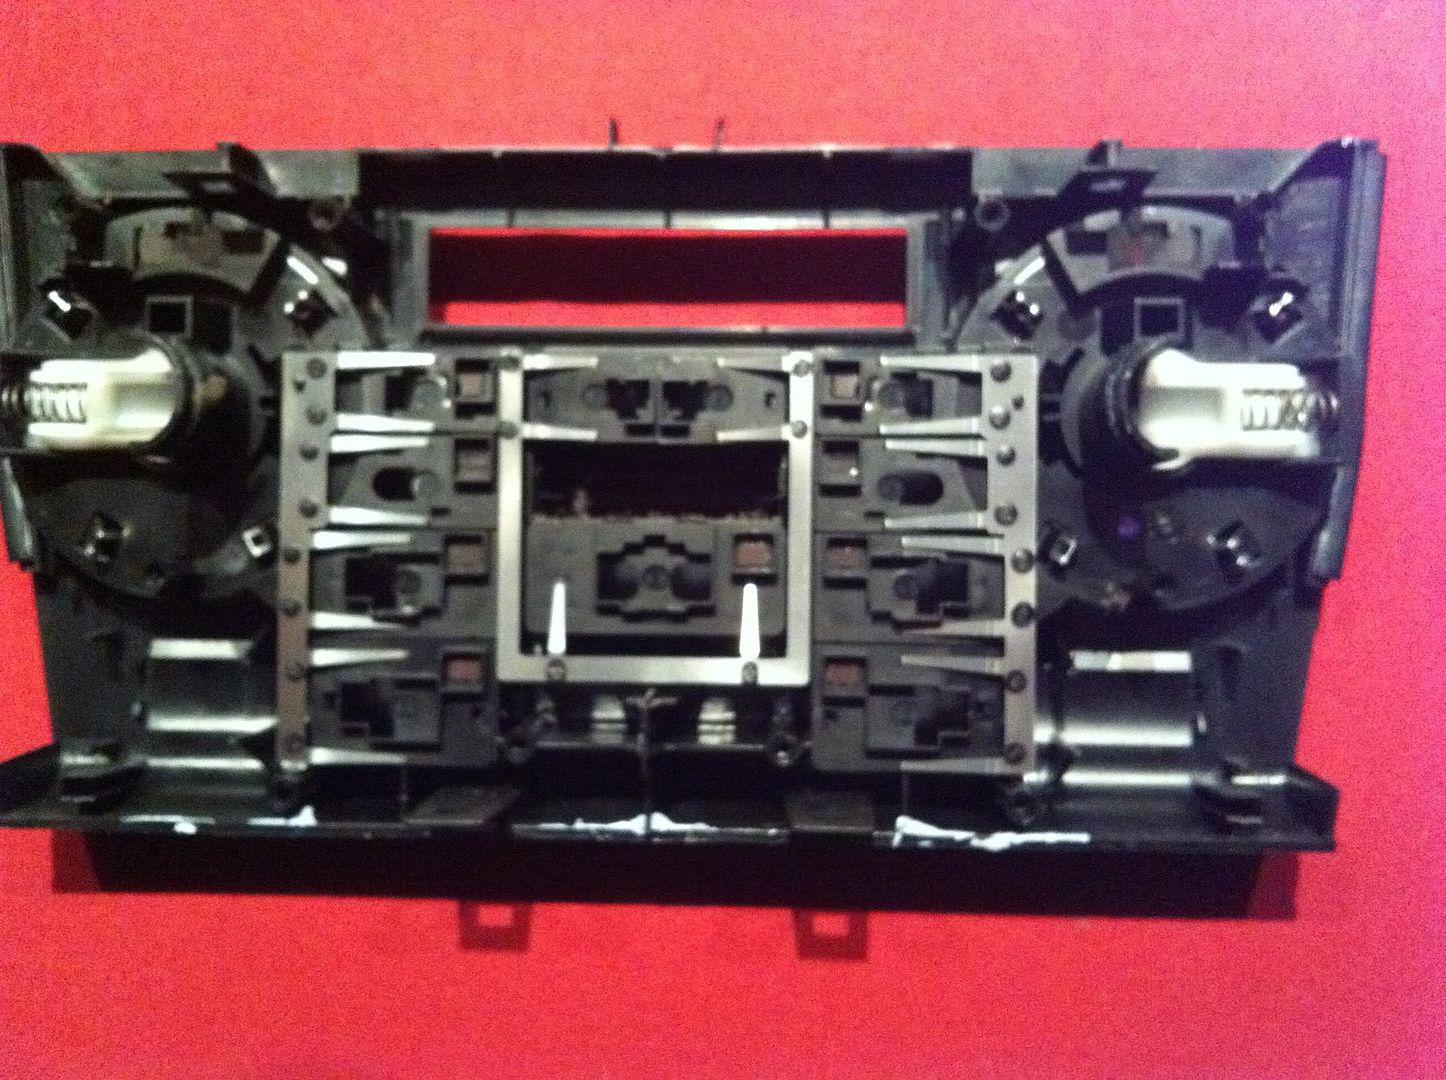
Then take out your existing climate control unit from the car. I have a double din unit so i just simply removed the rubber button strip above the climate unit and then just pulled the climate unit out by pushing it down off its top clips and then unplugging the cables behind it.
Now you need to get both units apart. This part is really easy! you just need to have a T9 screwdriver and then get to work removing the screws in the back of the units.
The old unit disassembly:
unscrew 8 screw from the back of the unit (that little see-through plastic part is my custom ambient light under the unit):

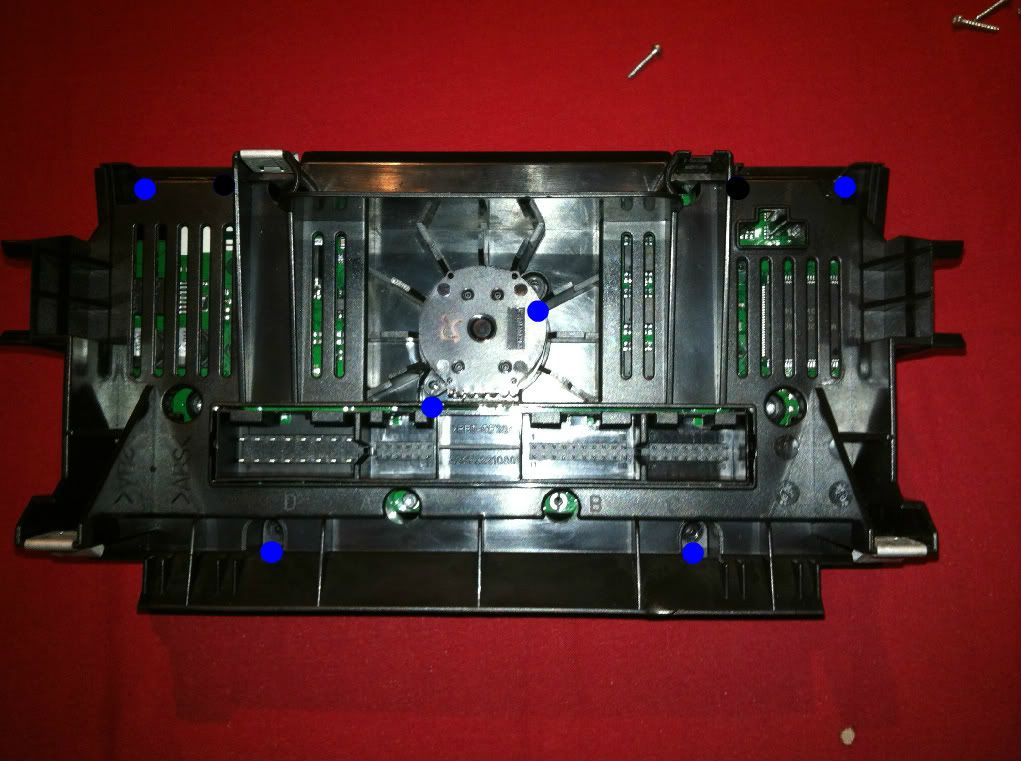
next carefully lift the 2 tabs at the top and take the back plastic off...

then unscrew 6 more screws from the back of the electrics board:

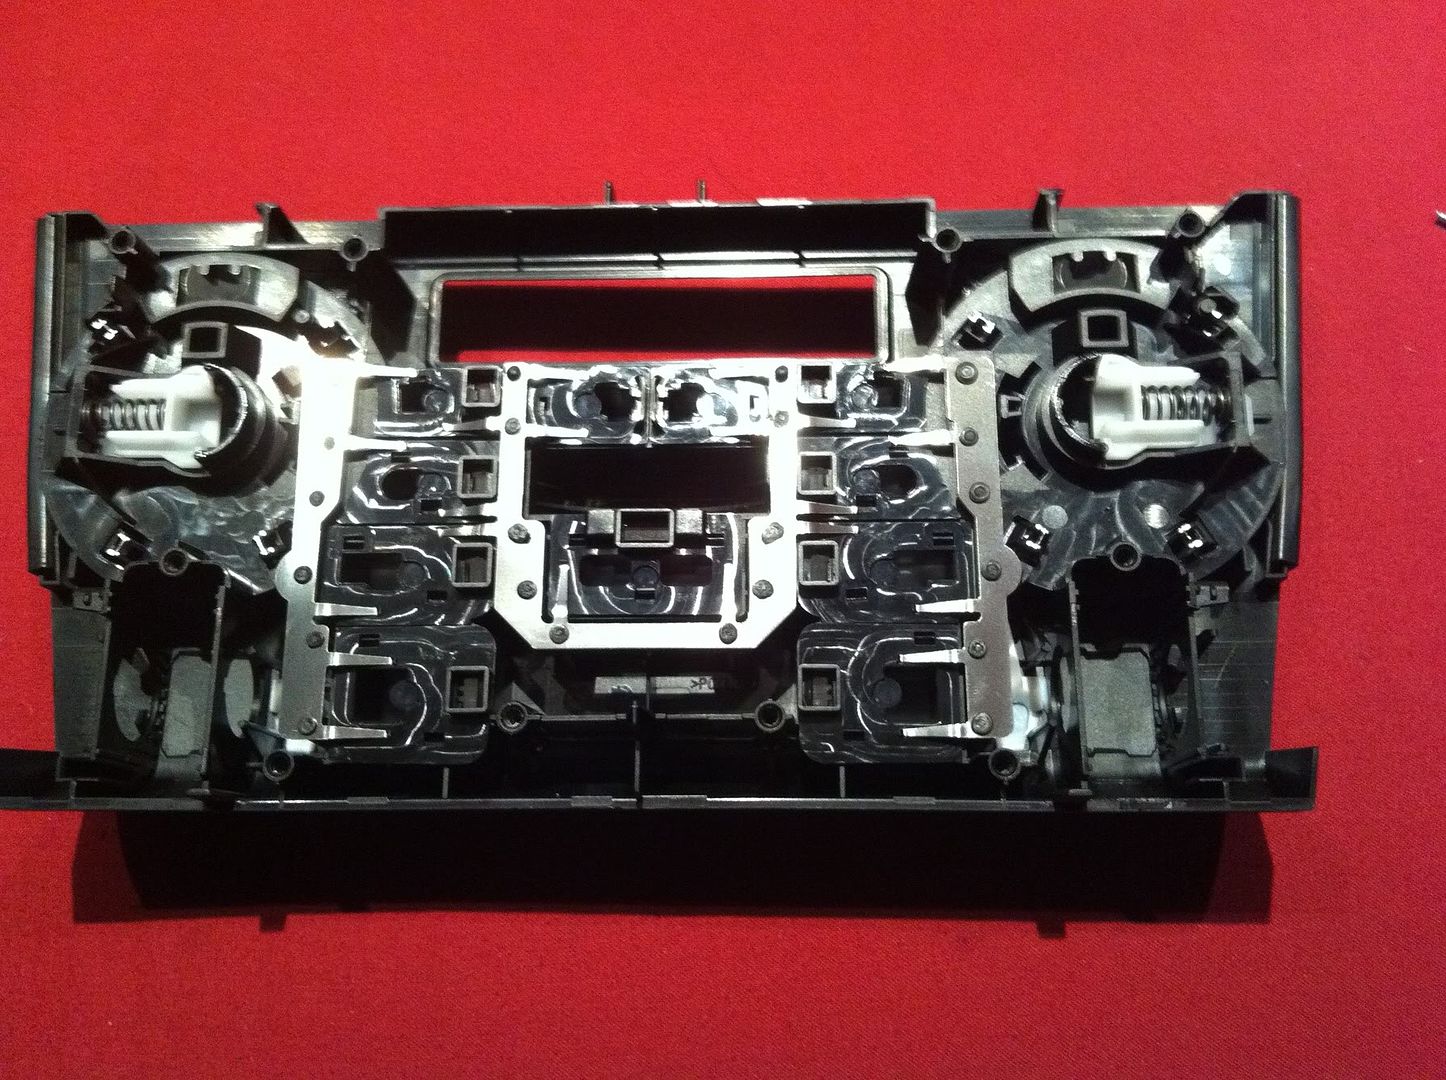
now this panel can be taken off to reveal the front panel
The facelift unit disassembly:
Unscrew 6 T9 screws from the back of the unit:
remove the plastic cover and remove another 6 screws from the back of the board:
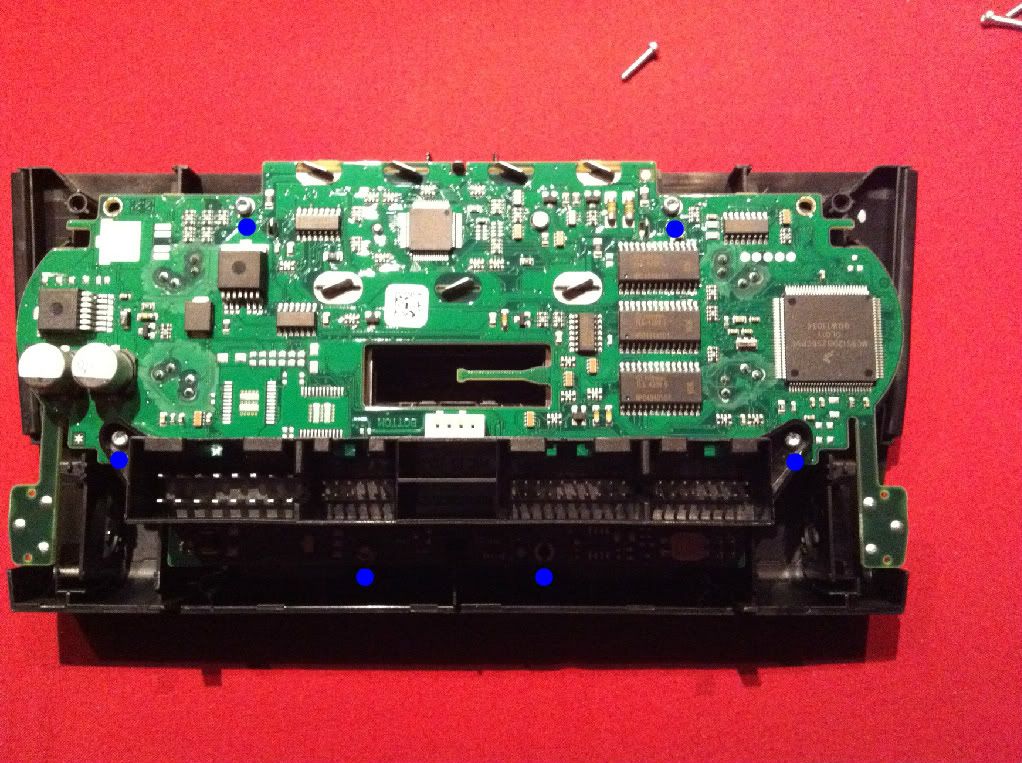
now you have the front panel of the facelift unit...
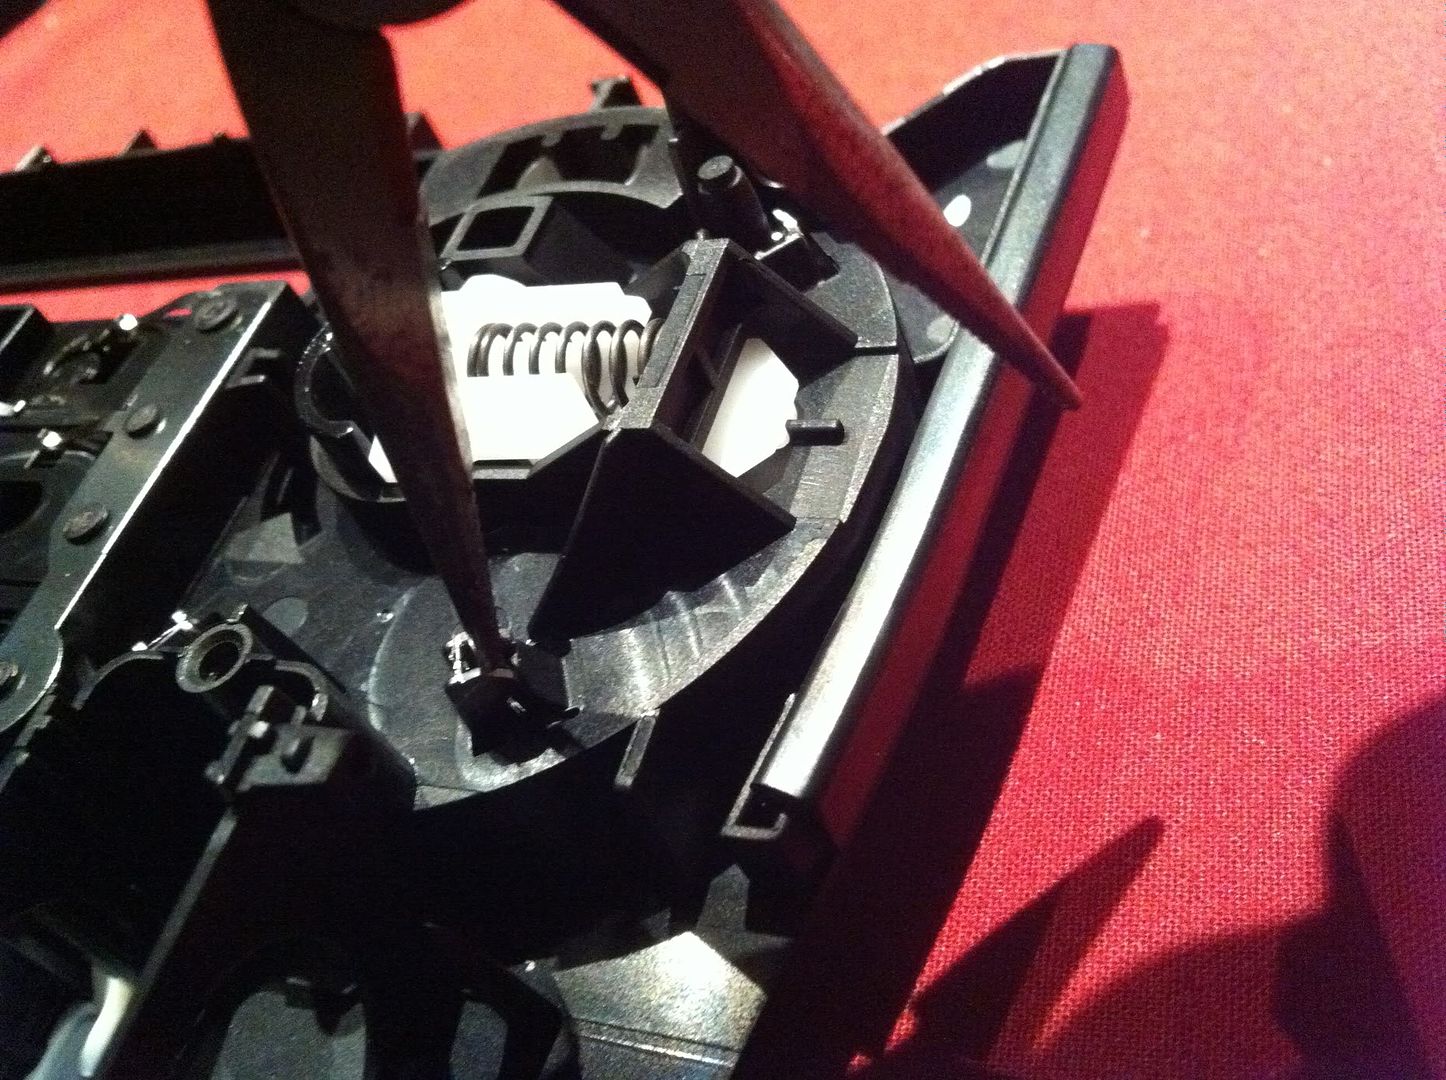
now we need to remove the switches from the panel. this is done by carefully moving the the black tabs out of the way and the switch should pop out of the front of the unit:
do the same to the other side and to the old climate unit, you should now have this:

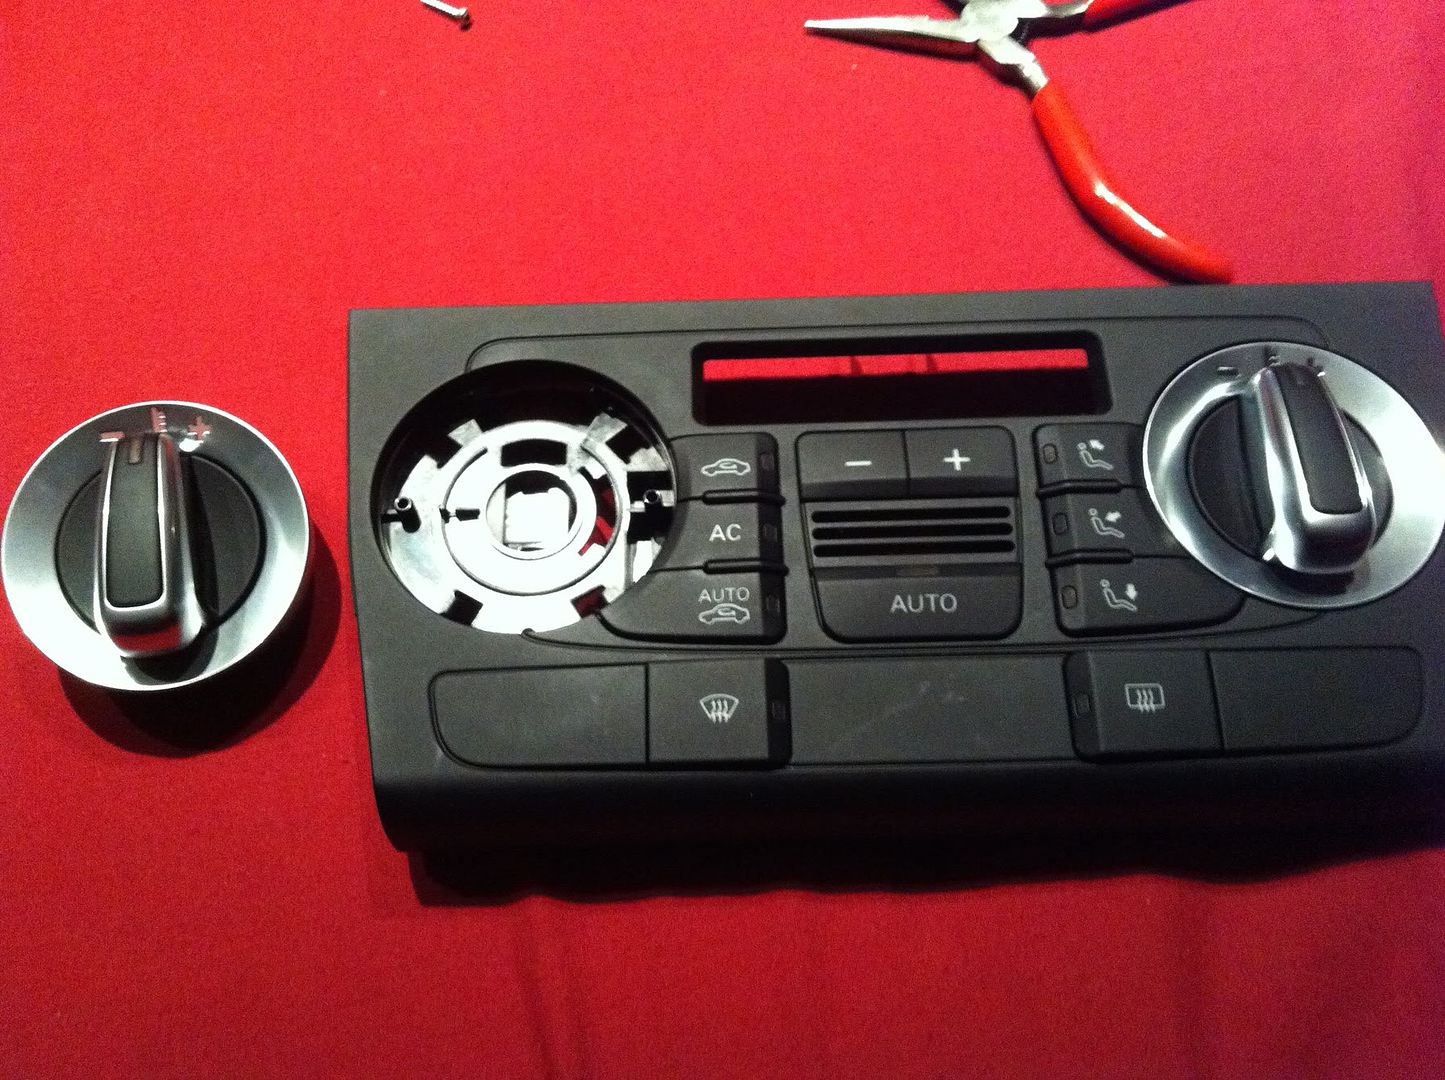
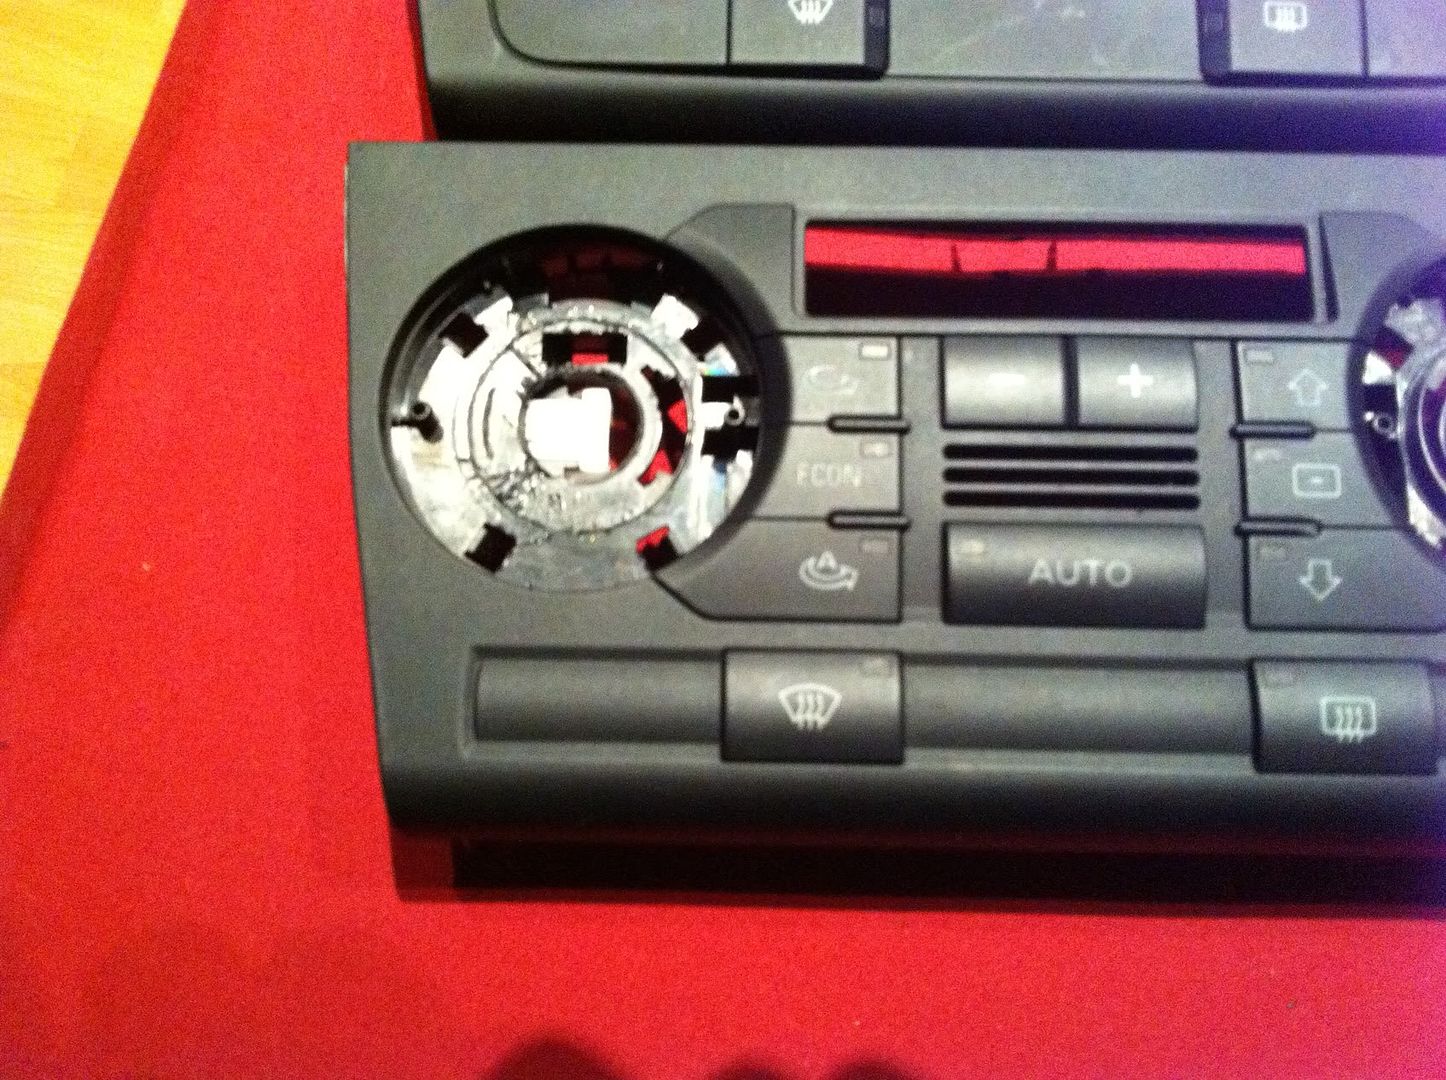
now we need to get rid of the raised plastics on the old climate unit as the new chrome switch will not sit unless these are removed. You can dremel these out but as it was late when i did mine (1.30am) and i didnt want to make too much noise i just used a small set of pliers and got to work cutting them off (thanks Amar for this idea!)
before:

After:
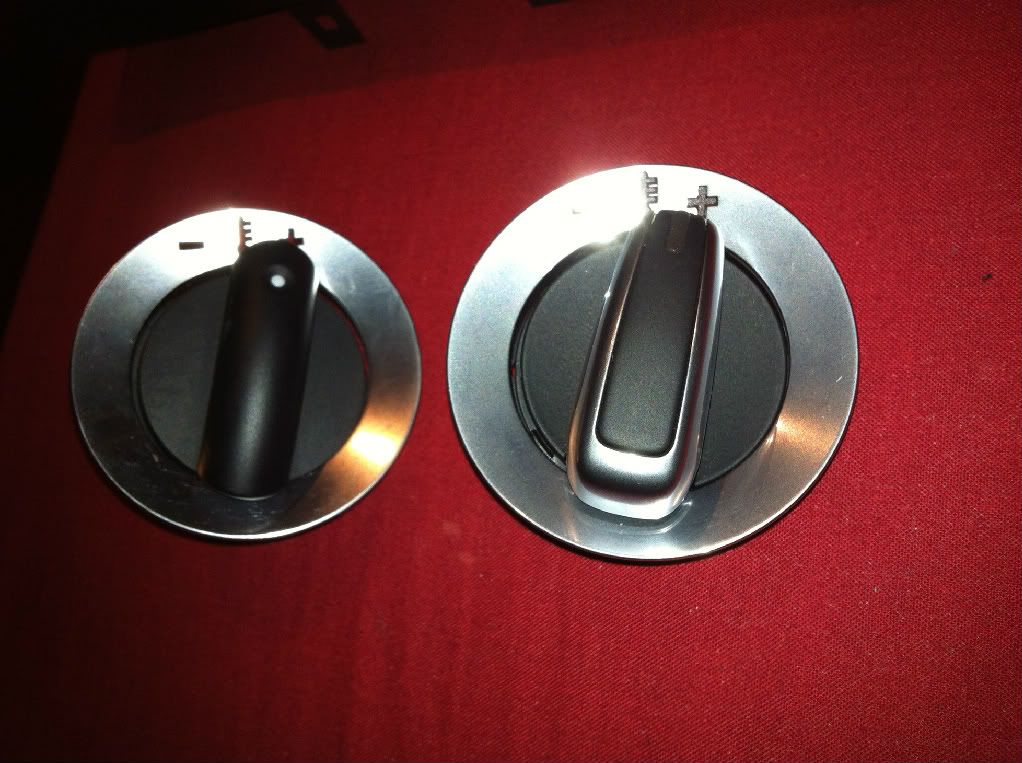
now the chrome rings from the new unit will not fit the old climate unit as the legs are slightly shorter and so need to be swapped over...
Old rings on the left, new rings on the right:

To do this the chrome one needs to have the small tabs carefully pushed inwards to release it (be very careful as these are really weak and can easily break)
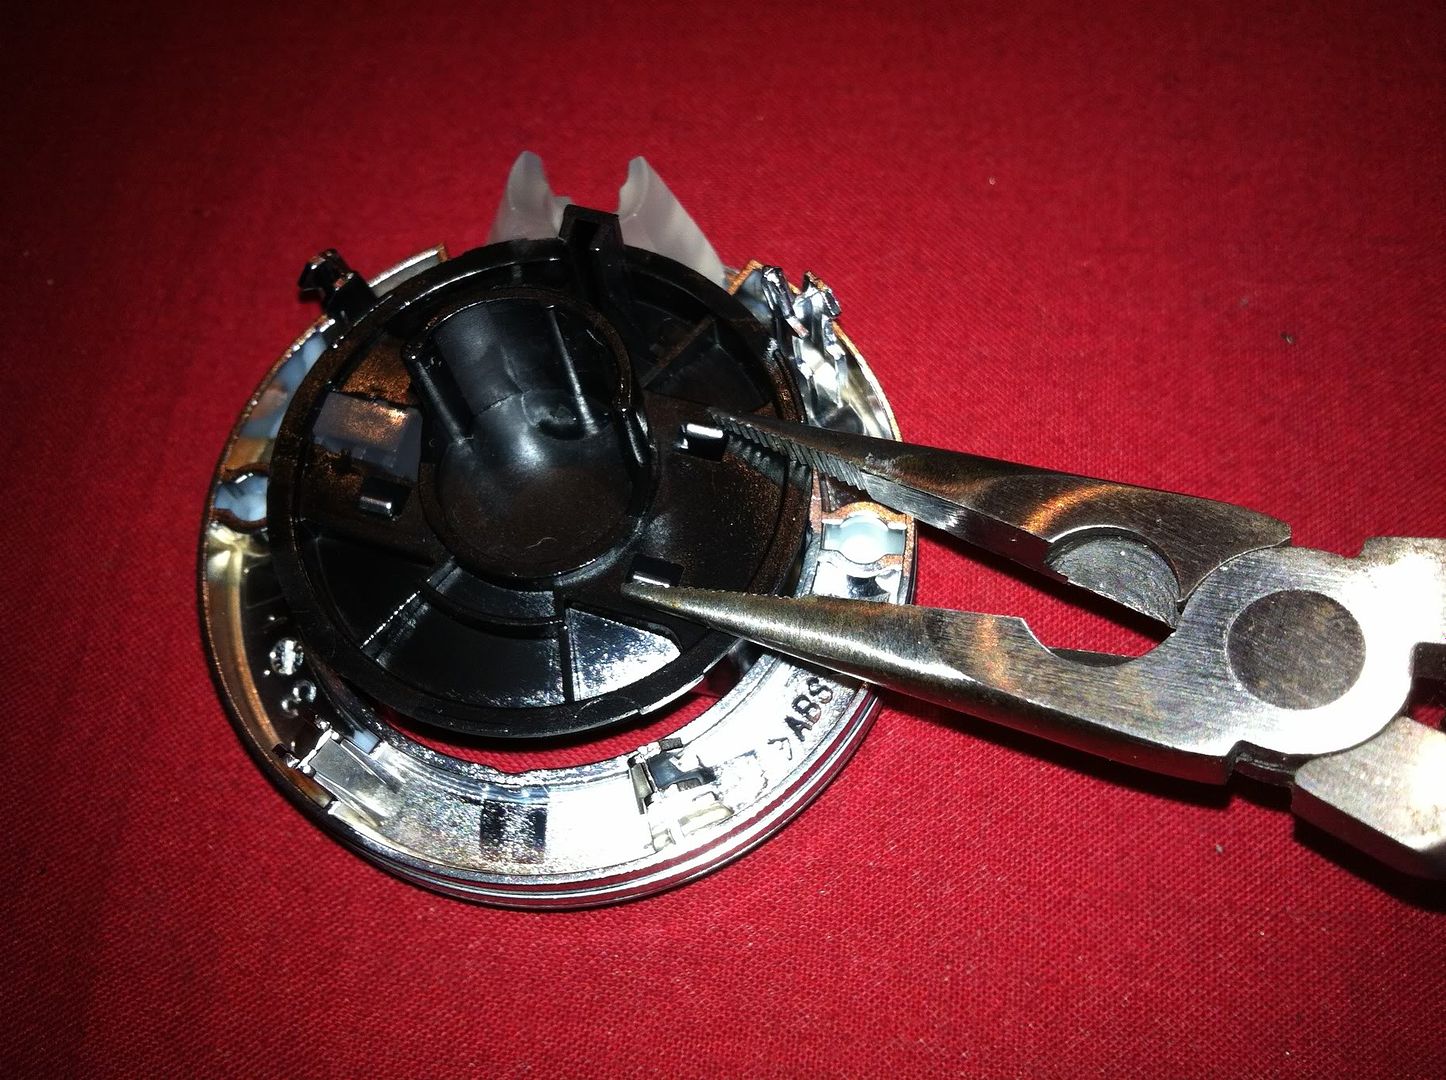
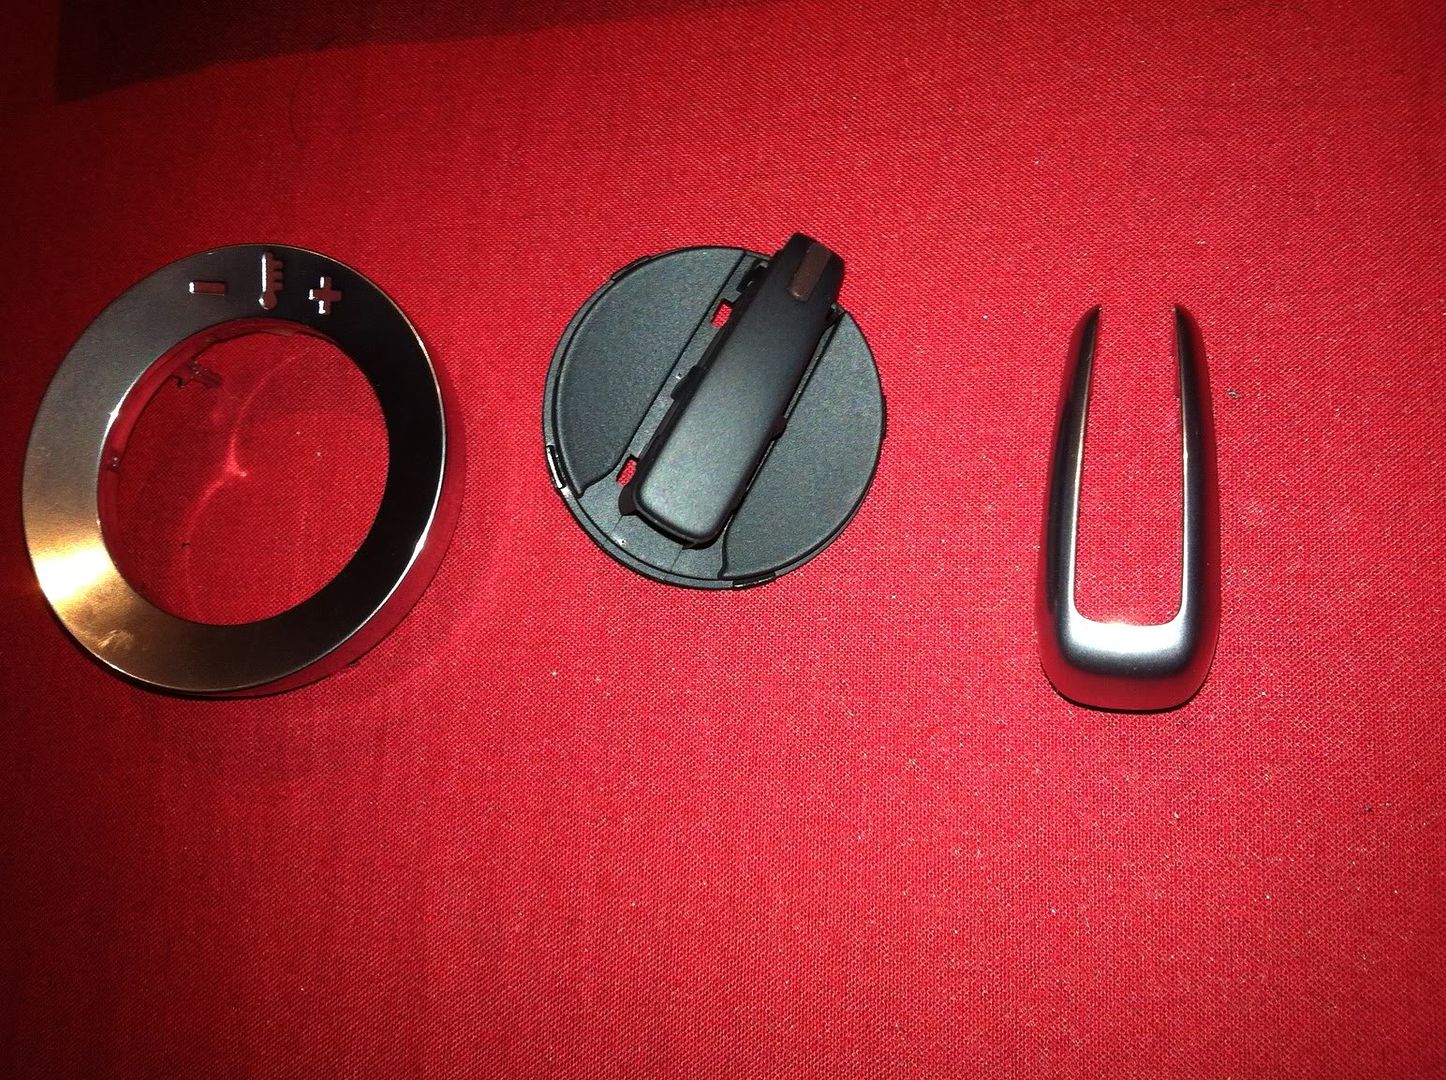
the old switches are easy as the front part of the plastic just pull off...
now swap over the chrome rings and reattach the switches, then attach the new chrome switches to the old climate control face. Watch out for the spring and carefully push the chrome rings back into place
Then just put the board and the rear plastics back together with the screws and you are done!
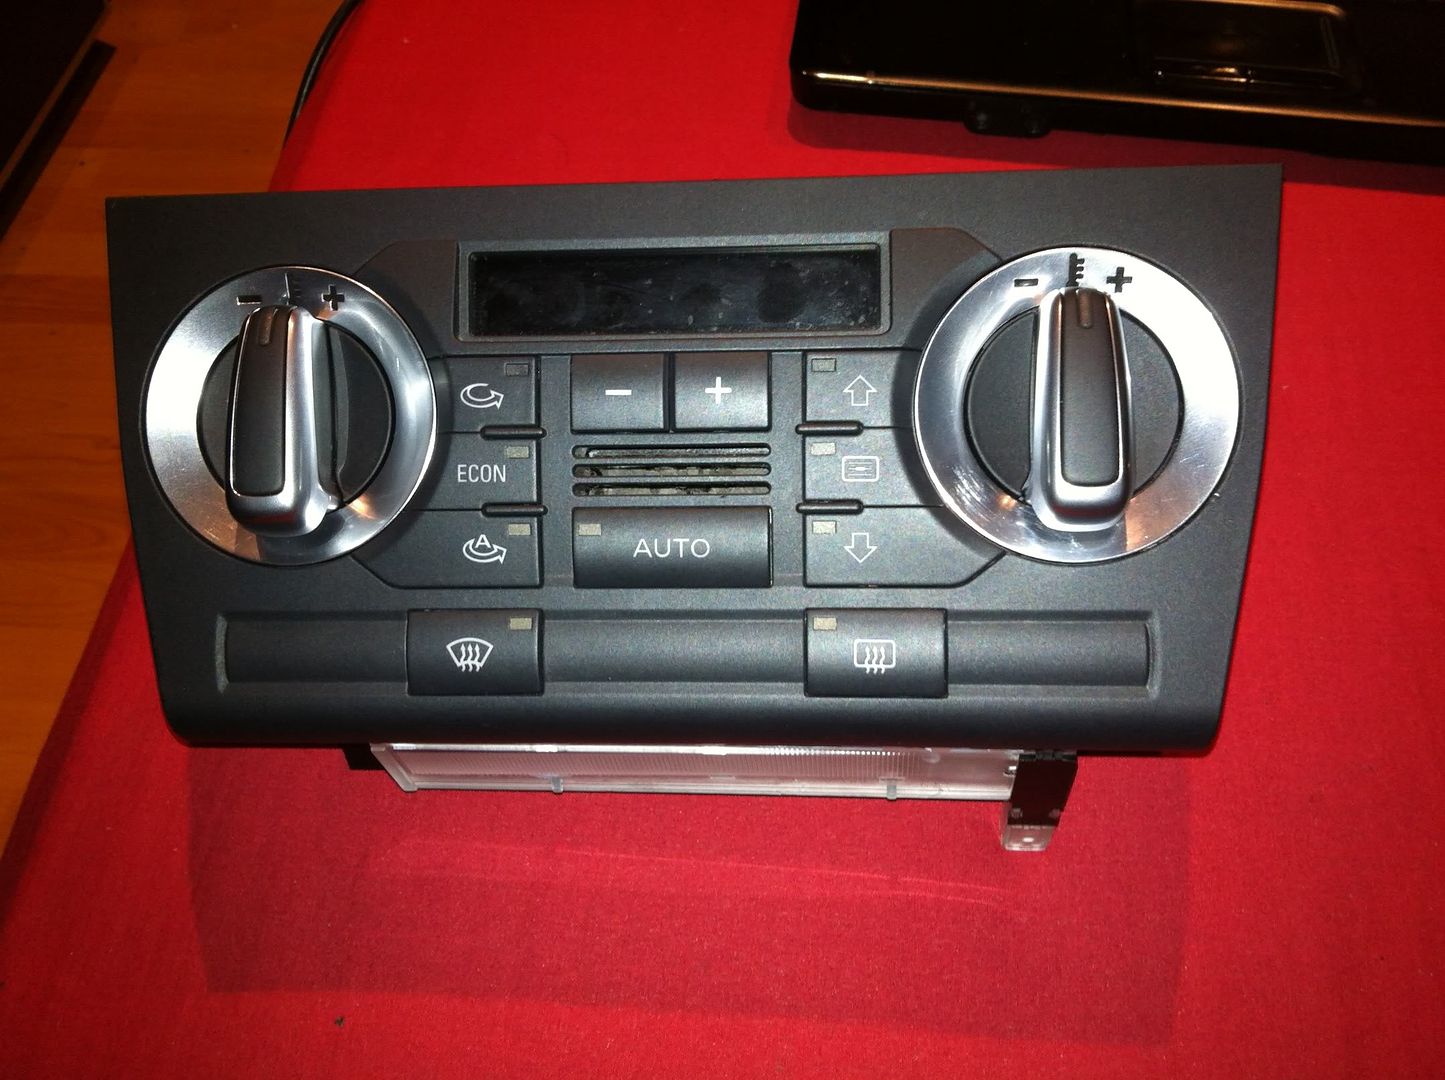
plug it back into the car and admire your new shiny chrome blinging look
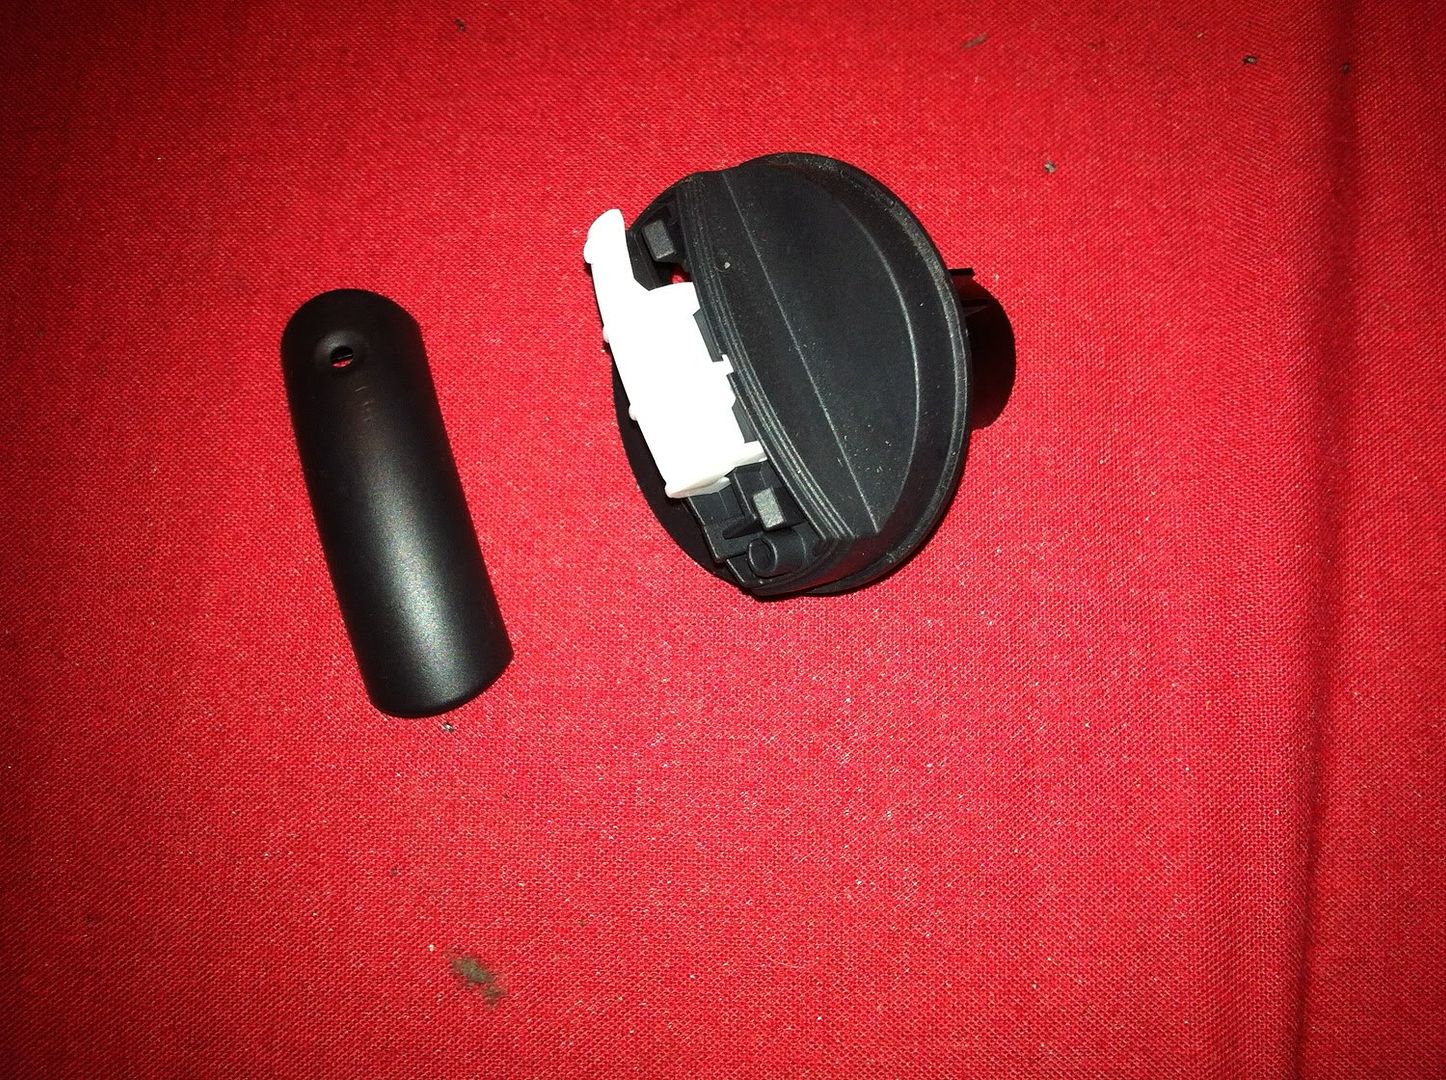
Now since I had the facelift panel and the old switches i decided to make use of it so after a little 'modding' on the old switch i ending up with this:

The facelift unit still works perfectly fine now just with the older looking switches on it. Since no modification was actually done to the facelift panel the old switches can come back off and replaced with another chrome switch if anyone wants to do that, or it can be used as it is with the older switches in place. So I am going to sell on the facelift unit as someone out there may need to replace their original facelift unit due to other sorts of damage to the unit or electrical faults with their existing climate unit.
Hope this helps you guys out in the future
DISCLAIMER: I will not be help responsible for any faulty climate control units after attempting this mod. If you do F*** up your unit then thats your own fault
Hi Ash,
I did replacement old climatronic unit with newer version and like you said, all works fine except when AC is on air is not blowing to the cabin. I am wondering is there any way to solve that problem? I'll be very gratefull if I got solution.
I am new member here
- Joined
- May 16, 2017
- Messages
- 78
- Reaction score
- 26
- Points
- 18
Actually. this isn't correct. It's not that the legs are longer... they're "fatter" on the face lift controls. You can see when placed side-by-side. At least on my unit, the lengths were nearly identical (maybe a 0.5mm longer) but noticeably wider. So I took a chance and decided to give it a go with a Dremel. I cut down the width a bit. Sure enough, they fit now! The thing I like about the new face lift switch bezel is that it's a little less reflective. Audi used a metallic silver coating & it looks better to my eye. Plus, the face lift climate control unit I got was in pristine condition, whereas my donor unit was a little rough on the switch bezels. I had to get another unit because I'm also going from single to double-din, as I mentioned last year, and the CCU is slightly more narrow since it sits lower. Yeah, I hit a snag and put this whole thing on the back burner until now.Ash187 said:now the chrome rings from the new unit will not fit the old climate unit as the legs are slightly shorter and so need to be swapped over...
Old rings on the left, new rings on the right:
Last edited:
- Joined
- May 16, 2017
- Messages
- 78
- Reaction score
- 26
- Points
- 18
I read that over and yeah, sounds pretty remarkable. Maybe there's something different with the models that were released in Russia. I'd gotten the face lift climate controls and was tempted to just try them out as-is, so I hooked up the unit... and while fan motor would blow and temperature change worked, there was no cold air. That pesky flap must've remained closed. So I can confirm that it didn't work successfully as it had for that Russian guy.Not sure what’s going on, but the comrades are claiming FL works on PFL. WAT?!
https://www.drive2.ru/l/505697834280943993/
You’ll need to use Google translate though.
I read that over and yeah, sounds pretty remarkable. Maybe there's something different with the models that were released in Russia. I'd gotten the face lift climate controls and was tempted to just try them out as-is, so I hooked up the unit... and while fan motor would blow and temperature change worked, there was no cold air. That pesky flap must've remained closed. So I can confirm that it didn't work successfully as it had for that Russian guy.
My understanding is that some 2006 models had the newer flap mechanism under the hood and hence they’d work with the new facelift unit. Here’s the irony, you can use the pre facelift unit with newer cars but not the other way round.
Very annoying!
- Joined
- May 16, 2017
- Messages
- 78
- Reaction score
- 26
- Points
- 18
Maybe the A3 production was in a "transition" from one climate control design to another that started in 2006, but they had a boat load of inventory of the other design... so they just installed those in some 2006 and 2007 models, then ran out of the older CCU units by 2008. It would be interesting to know why they bothered to make this change that wouldn't be noticed by the consumer.My understanding is that some 2006 models had the newer flap mechanism under the hood and hence they’d work with the new facelift unit. Here’s the irony, you can use the pre facelift unit with newer cars but not the other way round.
Very annoying!
- Joined
- May 16, 2017
- Messages
- 78
- Reaction score
- 26
- Points
- 18
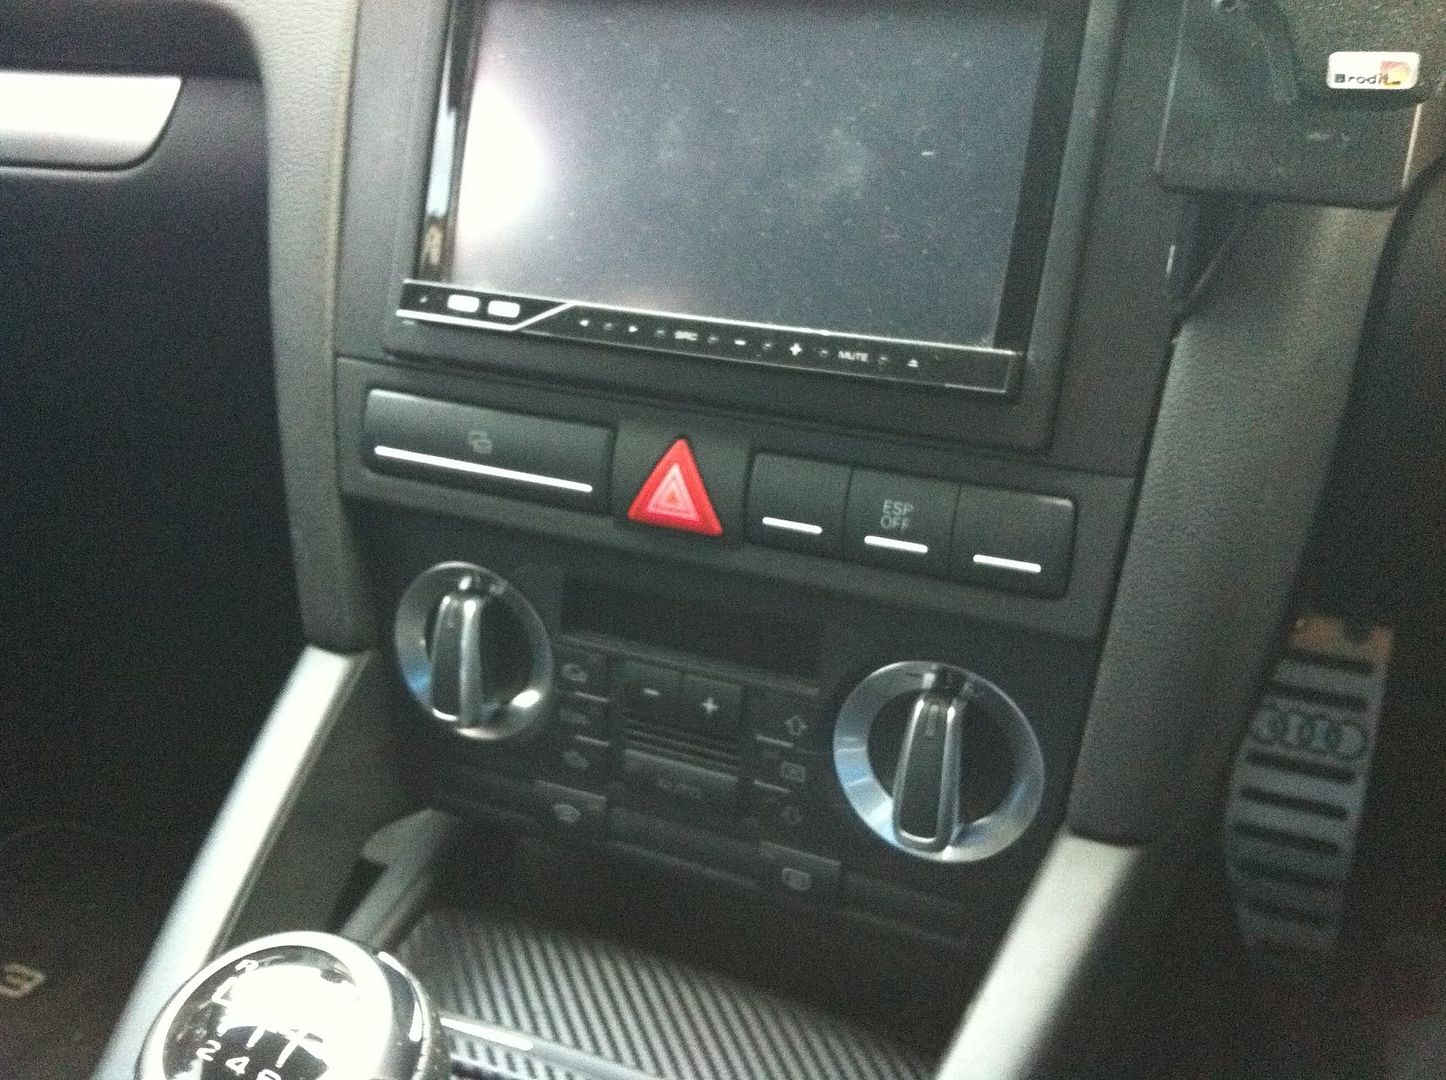
Here's the result of my mod:

Thanks to Ash187 for his write-up. He was spot-on about the screws, tabs, and mods. I have the heated seats, which meant a slight difference as JRock247 noted HERE. Those facelift control knob silver accent tabs are indeed fragile. I busted one of them, but a little glue took care of it.
The hardest part of all this was dealing with the raised plastic rings that have to be cut down flush. I didn't take any photos, but kind of wish I had. My technique in trimming them down was to use a thin cutting wheel implement and slice into the rings at various places. Then once there were enough cut slots, I started cutting on an angle to clear out the "stubs". When enough material was removed, I used a grinding stone attachment (about 1cm in diameter) to sand down to the surface. This is a messy, tricky job. Some tips:
- Apply painter's masking tape to the face plate around the circular control cut-outs. This helps guard against any slips. I did slip a couple of times and mostly the tape protected the surface.
- Do this in a sink, so you keep all the plastic fragments mostly contained.
- Wear eye protection!
- If you're bothered enough, use a filter mask to avoid breathing in plastic dust.
- Be sure the circular opening in the center is perfectly smooth. In one case, I didn't realize there were a few plastic burrs still there, and while the control knob inserted and rotated, it was binding enough to interfere with the spring. I mistakenly thought it was due to the smoothness of the surface, but it was those burrs. I used a screwdriver and scraped along the circumference of the openings to slice off any left over plastic until the screwdriver dragged smoothly.
- Before reassembling everything, take out the mini fan module that's situated in the back panel. Mine had a nice thick coating of dust on it. Once removed, I could use a moist cotton swab (kind used for ear cleaning) and was able to completely get rid of the dust. Also make sure to clear off the sensor. That's the thin "prong" in the center, that sits behind the small vent. Mine had some fibers and dust stuck to it.
- I'm glad I bothered to shave down the legs on the facelift bezels, as I find they look nicer than the older ones. However, be mindful that the original bezels will not fit in the facelift CCU sockets. So you can't reassemble it as Ash187 did and then sell it. I may see about just selling the parts separately, as I don't need them.
- Joined
- May 16, 2017
- Messages
- 78
- Reaction score
- 26
- Points
- 18
- Joined
- May 16, 2017
- Messages
- 78
- Reaction score
- 26
- Points
- 18
My understanding is that some 2006 models had the newer flap mechanism under the hood and hence they’d work with the new facelift unit. Here’s the irony, you can use the pre facelift unit with newer cars but not the other way round.
Very annoying!
That's because the newer units didn't have the circuitry for the 2 motors on pre mid 07 cars, that on facelift became 1 motor with a plastic cam system.
- Joined
- May 16, 2017
- Messages
- 78
- Reaction score
- 26
- Points
- 18
Was there ever any clarity on why this was done? I'm presuming a cost cutting measure... but curious about efficacy, given the changes to production required to accommodate it. Or was there some reliability issue that needed to be addressed?That's because the newer units didn't have the circuitry for the 2 motors on pre mid 07 cars, that on facelift became 1 motor with a plastic cam system.
/Bringing this thread to life again.
I'm currently on the head unit facelift project for my prefacelift 2007 A3 and seriously trying to figure out how I will have the facelift CC working. Obviously, I know the issue about the changes in air circulation system, preventing prefacelift models' A/C from working properly. @Ash187 you provided a very useful guide for the switches swap, although I'm really keen on trying out @KOZI 's guide, meaning match facelift fascia to prefacelift unit. Dont mind about A/C button working invers. I'm pretty sure its tough but if it was done and proven working, I think its worth to try (by a real handyman electrician ofc) Has anyone tried that or have some more info (maybe some photos) on this procedure? Dont really know what to do about this Polish AudiA3 forum
I'm currently on the head unit facelift project for my prefacelift 2007 A3 and seriously trying to figure out how I will have the facelift CC working. Obviously, I know the issue about the changes in air circulation system, preventing prefacelift models' A/C from working properly. @Ash187 you provided a very useful guide for the switches swap, although I'm really keen on trying out @KOZI 's guide, meaning match facelift fascia to prefacelift unit. Dont mind about A/C button working invers. I'm pretty sure its tough but if it was done and proven working, I think its worth to try (by a real handyman electrician ofc) Has anyone tried that or have some more info (maybe some photos) on this procedure? Dont really know what to do about this Polish AudiA3 forum
Sorry Ash but i can not agree with you on this one.
Like Daniel's mention you need a handyman electrician (plenty of those in Poland) to do it. You wouldn't be able to do it yourself. I will try to explain it as clear as i can.
Description is based on what has already been done by our colleagues from Polish AudiA3 forum. It's not my DIY. It was done and it was proven working fine.
Ok so form the top.
To do a front panel swap we will need
a) front facelift panel
b) facelift panel display
c) motherboard from old prefacelift climate control unit.
d) rear wall from old prefacelift climate control unit.
There is few problems we encounter while doing the front panel swap
No.1 Different size display
No.2 There is a small resistor that is blocking/touching a new facelift panel.
No.3 Some buttons are getting stuck / don't fit in properly with new front panel.
No.4 different distribution of certain LEDs.
Solutions.
No.1 Display.
Display is build from three elements.
- White plastic block
- Small piece of glass that goes on top of that white plastic block
- Small Metal cage that holds those two elements in place.
Due to the fact that the displays have different thickness's these have to be swapped. Old display is thicker then the new one so it makes that space between the motherboard and new facelift panel too big. That's why some of the buttons wouldn't work properly.
Replacing:
The display is attached to the motherboard via a metal plaque. Prefacelift motherboard has a slightly different cuts/holes and so in order to put the new display you need to gently widen the holes on the MB. It also helps when you reduce plaque length gently, so they fit easier into the slots on MB.
Now the white plastic block has two tabs that goes into the motherboard. One of those two is too thick. You can widen the hole in the MB or cut the tab on plastic block.
No.2 Resistor
One of the resistors on the board is too close to the temperature control knob and it touch the front panel. It's pretty much blocking the front panel from proper fit onto motherboard so You have to cut-out gently plastic that's on top of that resistor so the new panel fits in properly.
No.3 Blocking buttons.
If you compare two motherboards you will notice that there is different arragment of LED's on both panels.
There are two types of led's. Ones are to backlight the buttons, the other ones are to indicate when the button is pressed.
Leds that are responsible for indication of pressed button have those special light canals at the back of the facelift panel where they go in. Different LEDs arrangment means that they won't fit into those 'light canals' and that is why the buttons are not working/ getting stuck/ blocked.
In order to solve this problem you have to cut off some of the walls of these 'light canals'.
no.4 Different LED on AUTO button.
Problem with AUTO button is that the old panel had the LED on the left, but the new one have it in the middle of AUTO button.
The solution for that is to unsolder the old led and resolder LEDs on the appropriate place. (sorry don't know the proper tchnical word for that, anyway you have to use a solder)
There is also a problem with window heating buttons (front/back) those have to resolder as well.
Now there is an issue that was unresolved by the guy that did this DIY ( he had an idea to go around it tho )
Personly i don't find it a huge problem.
AC button is working invers. Which mean that the LED lights up as the AC is disabled. Goes out
when you turn the AC ON.
Newer facelift unit is working oposit but i don't care.
Hope that explain everything.
It took me an hour to translate it.
You'r welcome.
Tbh the surface mount LEDs are very intricate & for all that work & then with an AC button that isn't right, I'd sooner just fit the correct heater adaptions & use a facelift climate in natural state.
But then again I'm an OEM purist most days lol.
But then again I'm an OEM purist most days lol.
EvilSmurph
Registered User
Sorry for asking stupid question, why did you just swap control unit instead of going thorough all that disassembling ?
?Sorry for asking stupid question, why did you just swap control unit instead of going thorough all that disassembling
Because pre-07 models' A/C systems don't work properly with facelift cc's. The facelift cc unit may seem to fit perfectly but works with 1 motor+1 cam system instead of the pre-fl one that works with 2 motors. So, the A/C is just useless. You can't either fix it by programming it. You can check it in various thread including this one. That's why I'm trying to do this, hoping my electrician is handy enough
- Joined
- May 16, 2017
- Messages
- 78
- Reaction score
- 26
- Points
- 18
The overall appearance of both the facelift and pre-facelift climate control units is very close. There's only a minor change with how the AUTO and ECON function buttons are positioned and some very subtle raised panel contours that are well hidden from a distance. To me, doesn't make sense to go through all that effort to force a facelift unit to work in a pre-facelift car. If the driving intention to do this is the knobs, then go through the modification as documented in this topic. I did it. It was a bit of a pain, but you do it once and that's it, forever. Of course, much more prudent to go with a used unit, rather than brand new. The reliability is very high, so little concern as long as you get it from a reputable source. Cosmetic condition helps with selection.

So you think it isn't worth it? Switching knobs is a bit PITA as you said too, so why not having the whole fl plate? I'm more concerned about actually getting the best result from it, rather than the time it requires. Really don't want anything messed up in the process, causing malfunctioning. But as I said before, it's the risk I gotta take, hoping my electrician is handy enough! Personally I think it's worth it, since I'm getting the full fl center console, including the middle chrome trim with new hazard button etc...The overall appearance of both the facelift and pre-facelift climate control units is very close. There's only a minor change with how the AUTO and ECON function buttons are positioned and some very subtle raised panel contours that are well hidden from a distance. To me, doesn't make sense to go through all that effort to force a facelift unit to work in a pre-facelift car. If the driving intention to do this is the knobs, then go through the modification as documented in this topic. I did it. It was a bit of a pain, but you do it once and that's it, forever. Of course, much more prudent to go with a used unit, rather than brand new. The reliability is very high, so little concern as long as you get it from a reputable source. Cosmetic condition helps with selection.
/Doublepost but..well, it's been a long time
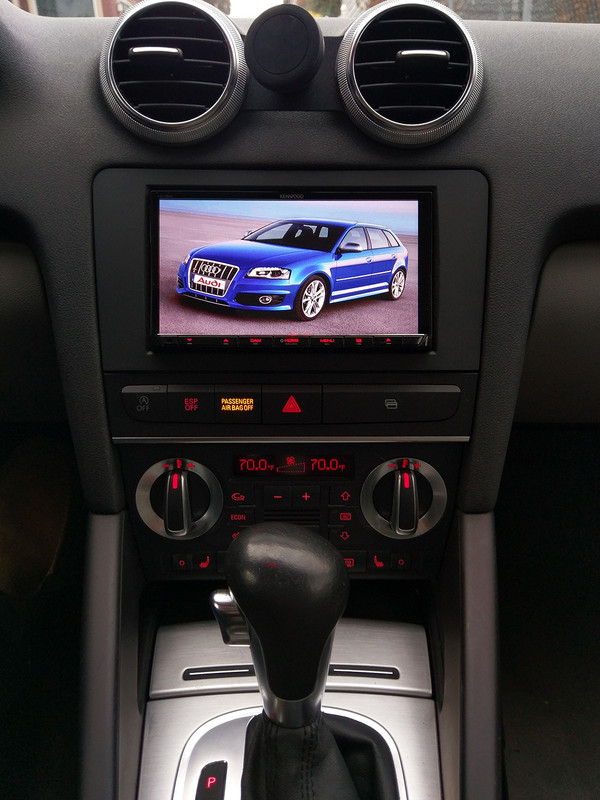
After buying the fl cc unit and giving a try at my 06' production A3, I realised after a few days that it doesn't work indeed as I read quite lotta times on ASN. Funny thing is sometimes when u press AC button air does come into the cabin and sometimes it doesn't (even tho when it does its not actually by the compressor) Anyways, my initial plan didn't change and I went to my 'handyman electrician' (quote my last post) who 'could swap the two fascias' and the result was..that eventually he couldn't! He couldn't even swap the knobs! So, I took over the situation and followed @Ash187 guide step by step. That's the result!

Thank you for this awesome guide. I had some extra work to do tho, as I had to trim the unit both sides (it was originally for 1 din cage). Took me quite a while since I lacked a dremel tool and I used sandpaper instead (lolz) The result is still pretty neat. A have a question tho: as @AbsoluteA3 stated, facelift rings don't click with prefl switches on fl unit. Is there any solution for this?
Thanks for your time!

After buying the fl cc unit and giving a try at my 06' production A3, I realised after a few days that it doesn't work indeed as I read quite lotta times on ASN. Funny thing is sometimes when u press AC button air does come into the cabin and sometimes it doesn't (even tho when it does its not actually by the compressor) Anyways, my initial plan didn't change and I went to my 'handyman electrician' (quote my last post) who 'could swap the two fascias' and the result was..that eventually he couldn't! He couldn't even swap the knobs! So, I took over the situation and followed @Ash187 guide step by step. That's the result!
Thank you for this awesome guide. I had some extra work to do tho, as I had to trim the unit both sides (it was originally for 1 din cage). Took me quite a while since I lacked a dremel tool and I used sandpaper instead (lolz) The result is still pretty neat. A have a question tho: as @AbsoluteA3 stated, facelift rings don't click with prefl switches on fl unit. Is there any solution for this?
Thanks for your time!
- Joined
- May 16, 2017
- Messages
- 78
- Reaction score
- 26
- Points
- 18
Congrats on doing your mod. Yeah, some shops won't even try this, because it's too "non-standard." After looking over @Ash187's instructions a few times, I decided it was doable. Not using a Dremel... that's tough! And I'll bet the problem you're having about the lack of click is because of this. The Dremel does a really good job of trimming. You either have some burrs left behind, or uneven surfaces (knob wasn't returning back automatically, and no 'click'):/Doublepost but..well, it's been a long time
After buying the fl cc unit and giving a try at my 06' production A3, I realised after a few days that it doesn't work indeed as I read quite lotta times on ASN. Funny thing is sometimes when u press AC button air does come into the cabin and sometimes it doesn't (even tho when it does its not actually by the compressor) Anyways, my initial plan didn't change and I went to my 'handyman electrician' (quote my last post) who 'could swap the two fascias' and the result was..that eventually he couldn't! He couldn't even swap the knobs! So, I took over the situation and followed @Ash187 guide step by step. That's the result!
View attachment 204269
Thank you for this awesome guide. I had some extra work to do tho, as I had to trim the unit both sides (it was originally for 1 din cage). Took me quite a while since I lacked a dremel tool and I used sandpaper instead (lolz) The result is still pretty neat. A have a question tho: as @AbsoluteA3 stated, facelift rings don't click with prefl switches on fl unit. Is there any solution for this?
Thanks for your time!
View attachment 204270
Absolutett said:5. Be sure the circular opening in the center is perfectly smooth. In one case, I didn't realize there were a few plastic burrs still there, and while the control knob inserted and rotated, it was binding enough to interfere with the spring. I mistakenly thought it was due to the smoothness of the surface, but it was those burrs. I used a screwdriver and scraped along the circumference of the openings to slice off any left over plastic until the screwdriver dragged smoothly.
Thanks @AbsoluteA3 !! These burrs can be very annoying indeed, so I worked them out a little bit more with my precious sandpaper and the knobs are working perfectly now!
PLUS I finally combined the fl unit and the prefl knobs with 100% functionality! I tried to figure out what the problem was, why the knobs couldn't move. So I ended up cutting/trimming certain spots and the result is amazing!
I used a plier for cutting and a piece of sandstorm for trimming. Ofcourse a dremel tool is the best choice but budget version works just fine! (even tho you gonna need more time)
First step is to cut this little surface and make it even with the circles.

Then we need to get rid of these little guys.

Finally, we need to cut the lower surface, as well as the higher one for the motherboard to fit it. The goal here is to even the edges as shown in the picture.

Little bit of testing, putting the knobs on and off and moving them left & right between every change we make. Just to make sure the mod is legit before we start putting the pieces back together and...voila!

As you saw see in the pictures, the cuts weren't perfect but it's the best I could do with the budget tools I got. The important thing is to make the knobs work perfectly and that's what I did. Appearance didn't matter at all, since the changes I made were all covered inside the unit. I tested the knobs many times between every change I made so I was sure they worked perfectly . Now it's a totally functional unit! It may have the prefl knobs on it but it does the job just fine and it can be sold at a decent price since its value hasn't fallen that much compared to the the original one! Hope this mini-guide helps a lot of people who try the initial mod of @Ash187 and wanna make the most of it!!
PLUS I finally combined the fl unit and the prefl knobs with 100% functionality! I tried to figure out what the problem was, why the knobs couldn't move. So I ended up cutting/trimming certain spots and the result is amazing!
I used a plier for cutting and a piece of sandstorm for trimming. Ofcourse a dremel tool is the best choice but budget version works just fine! (even tho you gonna need more time)
First step is to cut this little surface and make it even with the circles.
Then we need to get rid of these little guys.
Finally, we need to cut the lower surface, as well as the higher one for the motherboard to fit it. The goal here is to even the edges as shown in the picture.
Little bit of testing, putting the knobs on and off and moving them left & right between every change we make. Just to make sure the mod is legit before we start putting the pieces back together and...voila!
As you saw see in the pictures, the cuts weren't perfect but it's the best I could do with the budget tools I got. The important thing is to make the knobs work perfectly and that's what I did. Appearance didn't matter at all, since the changes I made were all covered inside the unit. I tested the knobs many times between every change I made so I was sure they worked perfectly . Now it's a totally functional unit! It may have the prefl knobs on it but it does the job just fine and it can be sold at a decent price since its value hasn't fallen that much compared to the the original one! Hope this mini-guide helps a lot of people who try the initial mod of @Ash187 and wanna make the most of it!!
- Joined
- Mar 12, 2009
- Messages
- 7,567
- Reaction score
- 817
- Points
- 113
- Location
- London and surrounding areas
In my initial mod I did the same... used facelift knobs on the prefacelift unit and the prefacelift knobs back on the facelift unit so that it’s not a complete waste.
- Joined
- May 16, 2017
- Messages
- 78
- Reaction score
- 26
- Points
- 18
Good to hear it was indeed those pesky burrs that were keeping you from smooth knob function.Thanks @AbsoluteA3 !! These burrs can be very annoying indeed, so I worked them out a little bit more with my precious sandpaper and the knobs are working perfectly now!
PLUS I finally combined the fl unit and the prefl knobs with 100% functionality! I tried to figure out what the problem was, why the knobs couldn't move. So I ended up cutting/trimming certain spots and the result is amazing!
I used a plier for cutting and a piece of sandstorm for trimming. Ofcourse a dremel tool is the best choice but budget version works just fine! (even tho you gonna need more time)
First step is to cut this little surface and make it even with the circles.
Then we need to get rid of these little guys.
Finally, we need to cut the lower surface, as well as the higher one for the motherboard to fit it. The goal here is to even the edges as shown in the picture.
Little bit of testing, putting the knobs on and off and moving them left & right between every change we make. Just to make sure the mod is legit before we start putting the pieces back together and...voila!
As you saw see in the pictures, the cuts weren't perfect but it's the best I could do with the budget tools I got. The important thing is to make the knobs work perfectly and that's what I did. Appearance didn't matter at all, since the changes I made were all covered inside the unit. I tested the knobs many times between every change I made so I was sure they worked perfectly . Now it's a totally functional unit! It may have the prefl knobs on it but it does the job just fine and it can be sold at a decent price since its value hasn't fallen that much compared to the the original one! Hope this mini-guide helps a lot of people who try the initial mod of @Ash187 and wanna make the most of it!!
 I've been using my modded CC unit for 8 months now, no issues. Great you were able to refit those pre-FL knobs... although, not something you could really sell--a replacement would be sought after with original knobs. Used CC units are going fairly cheaply these days, too. So I didn't bother on mine. Originally I had thought about trying to get the fascia replaced with the FL version, but... the work involved would've been too much. I actually don't mind the original design--at least the design is muted enough to go with the FL control switch bank that sits above the chrome accent.
I am so enjoying the new head-unit & glad I finally did the single-DIN to double-DIN. I waited a bit too long... over a decade of ownership with single DIN. What a world of difference! I don't commute to work so my car does sit a lot... but when I drive it, first thing after engine start is "head unit on." Whatever my next car is going to be, I am NOT skimping on options. At least with how well my setup is now working, it'll be easier to keep running the A3 until Audi/VW has a compelling electric car available (probably in another 2 to 3 years). I've really enjoyed this A3. I will miss it when the time comes to part ways...
Jace_Mindu
New Member
Does anyone know if the triangular hazard double donsole is compatible with the later, square button version? I prefer the latter but the cage looks slightly different at the bottom from ebay pics.
Thanks
Thanks
I apologize for bumping this old thread again. But did anyone manage to successfully swap circuit board from the old pre-facelifted climate control unit into the new one? Would that soluton work with the old AC system, retrofiting facelift unit with pre-fl old motherboard inside?
The change is 1 motor & a cam as opposed to 2 motors on old, it's not possible to do without changing the main flap intake unit to suit which needs dash out.
Also the auxiliary heater changes to a different setup, but it can be done yes.
Also the auxiliary heater changes to a different setup, but it can be done yes.
Similar threads
- Replies
- 2
- Views
- 8K