

It's another locking system with an internal bar with the pin slots that is unlocked when you remove it from the exterior housing, much similar to the connectors used on the BCM, if I recall correctly. I've spent a much longer time trying to discover how to reach the door disconnector in the A pilar since the diagrams I had weren't clear and I couldn't find any access from the footweel to the pilar interior area (I even removed the front wheel housing liner while trying to find it!), until I eventually discovered that there is a small square hole covered by the hood release lever mount. After releasing the clip at the exterior side at the bottom of the connector, remove the hood release lever mount and you will be able to remove a piece of foam and pull the connector by its harness. Putting it back is a little harder because the hole is too small for a hand to pass and you'll have to put the connector in place by holding it from the harness, but you can do it with a little patience.Is there some unlocking mechanism with the disconnector too before you can insert the pin? Do you have an idea how it went? Just started with this retrofit.
Now also need to locate the disonnector first
Passenger Auto Dim Mirror.
- Thread starter dandav1985
- Start date
You are using an out of date browser. It may not display this or other websites correctly.
You should upgrade or use an alternative browser.
You should upgrade or use an alternative browser.
Easy. Check the 20 pin connector (not the 16 pin connector that goes to the mirror) connected to the door module. If positions 8 and 17 have a green and a blue wire, then your car already has the wires from the disconnector to the module.So the wire from the interior mirror goes to the door disconnector right? So that should be point A on the picture. In the door connector there would be another side to pin that will further lead to the door module right? But what is the best way to guide the wire to the door module? Since the wire will be “inside” the door that i cant see . Or am i misunderstanding something?
maybe you can draw some circles on the picture to show which route you went.
I dont really know how to remove the cover on this yet, but it seems there is a blue and green wire running along to the end of the on opposite side. That had to be 17 and 8 I guess?
my car has stock heated mirrors. It that why there already are cables there? Weird..!
my car has stock heated mirrors. It that why there already are cables there? Weird..!
Attachments
It's another locking system with an internal bar with the pin slots that is unlocked when you remove it from the exterior housing, much similar to the connectors used on the BCM, if I recall correctly. I've spent a much longer time trying to discover how to reach the door disconnector in the A pilar since the diagrams I had weren't clear and I couldn't find any access from the footweel to the pilar interior area (I even removed the front wheel housing liner while trying to find it!), until I eventually discovered that there is a small square hole covered by the hood release lever mount. After releasing the clip at the exterior side at the bottom of the connector, remove the hood release lever mount and you will be able to remove a piece of foam and pull the connector by its harness. Putting it back is a little harder because the hole is too small for a hand to pass and you'll have to put the connector in place by holding it from the harness, but you can do it with a little patience.
But what I still don't understand is. how is it suppose to look like. So i just pull the wire from through the A trim to the footwell. now I need to find an opening to the outside of the car in order to insert the pin into the door disconnector right?
Maybe I will understand whenever I unplugged the disconnector. Because now I get the idea that after inserting the pins, there will be always two fragile wires visible ''hanging'' under the housing of the connecter everytime I open the door.
Look for small tabs at the corners so you can release them and slide the cover. That connector is much easier to open. If the blue and green wires are present, then you have the connection from the module to the disconnector ready.I dont really know how to remove the cover on this yet, but it seems there is a blue and green wire running along to the end of the on opposite side. That had to be 17 and 8 I guess?
my car has stock heated mirrors. It that why there already are cables there? Weird..!
Things will get much clearer as you work on the wirings, believe me. Before removing or unplugging the disconnector, I think the best idea is to check if the wiring from the interior mirror is already present. If it is, no additiona wiring is needed. Opening the interior mirror trim at the windscreen and checking if there is a blue and a green wire in the connecot is much easier than accessing the door disconnector in the A pilar just to check if wires are present.But what I still don't understand is. how is it suppose to look like. So i just pull the wire from through the A trim to the footwell. now I need to find an opening to the outside of the car in order to insert the pin into the door disconnector right?
Maybe I will understand whenever I unplugged the disconnector. Because now I get the idea that after inserting the pins, there will be always two fragile wires visible ''hanging'' under the housing of the connecter everytime I open the door.
If the interior screen harness doesn't have the wires, you'll have to add them. The wiring uses two "000 979 034 E" female terminals in the interior mirror connector and two "000 979 035 E" male terminals in the door disconnector. Wiring is easy to fit in the roof lining, but you will have to remove the upper A pilar trim to pass the cable down to the hood release lever area.

Thanks for the information.
I did indeed insert two pins in the 8 pin connector from the interior light. Also routed the wires through the A piller to the footwell.
Now I'm just at the part of inserting the two pins to the disconnector.
So i need to remove the bonnet lever mounting bracket to see a certain hole/the interior side of the disconnector right?
After that I have to remove the disconnector on the outside.
Then I'll only need to know how to insert the pins/remove the housing of the connector. But you told me it is pretty much the same as those on the BCM? (like the BCM plug in which you have to insert the LED cup holder live wire/footwell lights?)
Exactly. It looks like the BCM connector, but it's simpler. I think it has a single block of terminals instead of the two-part block used with the BCM. If you still didn't find how to disconnect the door at the disconnector, there is a moving part that looks like a cap that has to be moved upwards in order to unlock the male and female connectors before you separate them.So i need to remove the bonnet lever mounting bracket to see a certain hole/the interior side of the disconnector right?
After that I have to remove the disconnector on the outside.
Then I'll only need to know how to insert the pins/remove the housing of the connector. But you told me it is pretty much the same as those on the BCM? (like the BCM plug in which you have to insert the LED cup holder live wire/footwell lights?)
I've found a set of pictures I took from my car when I was retrofitting the exterior dimming mirrors. Maybe you'll find them useful.
These are from the hood release lever mount. After disconnecting the bowden cable and removing the screw, you have to lift the tab marked with the arrow on the picture.


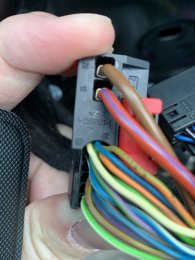
The connector before and after the casing removed


These are from the hood release lever mount. After disconnecting the bowden cable and removing the screw, you have to lift the tab marked with the arrow on the picture.
The connector before and after the casing removed
Attachments

I've found a set of pictures I took from my car when I was retrofitting the exterior dimming mirrors. Maybe you'll find them useful.
These are from the hood release lever mount. After disconnecting the bowden cable and removing the screw, you have to lift the tab marked with the arrow on the picture.
View attachment 199904
View attachment 199905
The connector before and after the casing removed
View attachment 199906
View attachment 199907
Thank you for the pictures mate!
")
I do have a question.
When you compare the ''back'' of plug of the first two pictures with the last one (the one with disconnector that's just been detached): the last one has a thick plastic cover with rubber ribbed loom while the first two pictures shows a soft tape loom?
The one with the ribbed tube is the connector comes from the door and holds the female terminals. The one with tape is the connector installed inside the A pillar and contains the male pins. Is that your question?When you compare the ''back'' of plug of the first two pictures with the last one (the one with disconnector that's just been detached): the last one has a thick plastic cover with rubber ribbed loom while the first two pictures shows a soft tape loom?
The one with the ribbed tube is the connector comes from the door and holds the female terminals. The one with tape is the connector installed inside the A pillar and contains the male pins. Is that your question?
yes! now i understand!
and to get the terminal with male pins, you 100% need to remove the lever-mount-bracket if I'm correct. Though isn't it possible to remove the bracket without loosen the bowden cable?

Yes, the space behind the lever mount where the loom passes through to enter the hole in the pilar is too small for the connector to be pulled through, and even if there was more space it would be impossible to move the loom because there is a piece of foam filling the space in the hole (probably for dust, noise, moisture isolation), so you really have to remove the mount. I think it's possible to remove it without dettaching the bowden cable but removing and reinstalling the mount is much easier with the cable dettached.and to get the terminal with male pins, you 100% need to remove the lever-mount-bracket if I'm correct. Though isn't it possible to remove the bracket without loosen the bowden cable?
Yes, the space behind the lever mount where the loom passes through to enter the hole in the pilar is too small for the connector to be pulled through, and even if there was more space it would be impossible to move the loom because there is a piece of foam filling the space in the hole (probably for dust, noise, moisture isolation), so you really have to remove the mount. I think it's possible to remove it without dettaching the bowden cable but removing and reinstalling the mount is much easier with the cable dettached.
Allright I will try that tomorrow!