Hi  ,
,
As I could find no information in the internet on how to wire a rear dash cam to my Audi A4 Allroad with powered boot, I thought I'd do a "how to" for anyone else doing a search.
1 - Remove the o/s black plastic boot hinge trim that gives access to the boot wiring loom. There are two clips on the left side, unclip them and it will pull away to the right:


2 - Remove the rear centre headliner to expose the powered boot motors. It unclips by pulling it towards the boot:

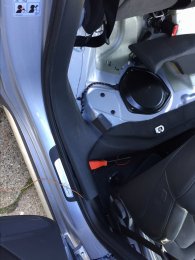
4. Remove rear side panel upper bolt:

then the boot cover slider trim bolt:

5 - This panel will now pull down to expose the wiring loom plastic trim:

6 - There's a plastic push fit dowel holding the plastic trim in place. Remove this fully by pushing down with some pliers to expose it, then gripping it from the bottom to remove. The trim will now be free to move. Cut all three cable ties as you need access to the wiring loom:


7 - To help prevent your dash cam wires from fraying with the movement of the boot hinge mechanism, undo the wiring loom fabric tape, insert your dash cam hard wire kit wiring into the main loom (remembering which way they should go to the vehicle fuses). I also cut a small hole in the black and white sheath and fed the wires through there to ensure they would never be exposed to movement with the boot opening and shutting all the time:

8 - Ensure you have enough wire to reach the vehicle fuses behind the o/s storage pocket (although it will later become apparent why this isn't really necessary, as all the fuses are permanent live !!). Tape all the wiring back up and use three new cable ties to put the wiring loom back into the plastic trim, then put the trim back in place and replace the plastic dowel. At this stage I opened and closed the boot multiple times to ensure that there was no danger of the wiring catching moving or catching on anything:


9 - I then fed the wiring down behind the o/s rear inner trim and it came out where the vehicle fuses are. Unfortunately, I found out all these fuses are permanent lives, so no good for a hard wire kit. I ended up running a seperate wire from the fuses in the o/s dash panel:

10 - You can now replace the side and rear headline panel trim and bolts, as you're done in there. Just ensure there's no way the hard wire kit wiring can foul against the boot hinge when it's opening and closing.
11 - Now it's time to run the wiring through the tailgate plastic trim panel. To remove the panel there are 4 bolts holding it on. Two where the removable lights access panels are, and two underneath the warning triangle:


12 - You are going to have soooo much fun trying to remove the tailgate panel - NOT !! If you've never done this before, it's really hard work and you think you're going to break stuff, just be careful but use some force to remove the clips that hold it on. There are 4 spaced out where the boot latch is, and another four (Ithink ?) where the window is. I used a trim tool and a ******' big screwdriver:


I packed out the panel with some gloves so I could get my dainty little hands in:

And removed the tailgate side trim with a screwdriver:

13 - Then it was just a case of running the hard wire kit wiring down the side of the tailgate trim panel, then up through where the panel meets the rear windscreen:


14 - Then it's just a case of putting the tailgate trim panel back in place, ensuring you are not trapping the dash cam wiring like I did initially. Then put the boot hinge plastic trim back on.
As I mentioned earlier, I found out too late that the fuses in the o/s rear quarter panel are all permanent lives which are no good for a hard wire kit....you need a switched live. I thought about two options (you may be able to think of others ?).........using the rear 12 volt accessory wire as a switched live, or run a wire from the switched live fuses in the o/s dash panel to your dash cam wiring at the rear which I will do further on in the thread.
Good luck if you decide to do it yourself. It was really hard work as I had absolutely nothing to go off. If I had to do it again, it would be much easier
,As I could find no information in the internet on how to wire a rear dash cam to my Audi A4 Allroad with powered boot, I thought I'd do a "how to" for anyone else doing a search.
1 - Remove the o/s black plastic boot hinge trim that gives access to the boot wiring loom. There are two clips on the left side, unclip them and it will pull away to the right:
2 - Remove the rear centre headliner to expose the powered boot motors. It unclips by pulling it towards the boot:
4. Remove rear side panel upper bolt:
then the boot cover slider trim bolt:
5 - This panel will now pull down to expose the wiring loom plastic trim:
6 - There's a plastic push fit dowel holding the plastic trim in place. Remove this fully by pushing down with some pliers to expose it, then gripping it from the bottom to remove. The trim will now be free to move. Cut all three cable ties as you need access to the wiring loom:
7 - To help prevent your dash cam wires from fraying with the movement of the boot hinge mechanism, undo the wiring loom fabric tape, insert your dash cam hard wire kit wiring into the main loom (remembering which way they should go to the vehicle fuses). I also cut a small hole in the black and white sheath and fed the wires through there to ensure they would never be exposed to movement with the boot opening and shutting all the time:
8 - Ensure you have enough wire to reach the vehicle fuses behind the o/s storage pocket (although it will later become apparent why this isn't really necessary, as all the fuses are permanent live !!). Tape all the wiring back up and use three new cable ties to put the wiring loom back into the plastic trim, then put the trim back in place and replace the plastic dowel. At this stage I opened and closed the boot multiple times to ensure that there was no danger of the wiring catching moving or catching on anything:
9 - I then fed the wiring down behind the o/s rear inner trim and it came out where the vehicle fuses are. Unfortunately, I found out all these fuses are permanent lives, so no good for a hard wire kit. I ended up running a seperate wire from the fuses in the o/s dash panel:
10 - You can now replace the side and rear headline panel trim and bolts, as you're done in there. Just ensure there's no way the hard wire kit wiring can foul against the boot hinge when it's opening and closing.
11 - Now it's time to run the wiring through the tailgate plastic trim panel. To remove the panel there are 4 bolts holding it on. Two where the removable lights access panels are, and two underneath the warning triangle:
12 - You are going to have soooo much fun trying to remove the tailgate panel - NOT !! If you've never done this before, it's really hard work and you think you're going to break stuff, just be careful but use some force to remove the clips that hold it on. There are 4 spaced out where the boot latch is, and another four (Ithink ?) where the window is. I used a trim tool and a ******' big screwdriver:
I packed out the panel with some gloves so I could get my dainty little hands in:
And removed the tailgate side trim with a screwdriver:
13 - Then it was just a case of running the hard wire kit wiring down the side of the tailgate trim panel, then up through where the panel meets the rear windscreen:
14 - Then it's just a case of putting the tailgate trim panel back in place, ensuring you are not trapping the dash cam wiring like I did initially. Then put the boot hinge plastic trim back on.
As I mentioned earlier, I found out too late that the fuses in the o/s rear quarter panel are all permanent lives which are no good for a hard wire kit....you need a switched live. I thought about two options (you may be able to think of others ?).........using the rear 12 volt accessory wire as a switched live, or run a wire from the switched live fuses in the o/s dash panel to your dash cam wiring at the rear which I will do further on in the thread.
Good luck if you decide to do it yourself. It was really hard work as I had absolutely nothing to go off. If I had to do it again, it would be much easier