A3 8V Removing J519 T46b in Attempt to install Footwell and Cupholder Lights

After I got the puddle lights working I tried to get the footwell lights working as welland even though I'm sure I've done it correctly my MMI seems to have lost the background lighting option completely?
Anyone have any idea what I've messed up?
 
is there a trick to getting this to work on the MMI 2? i had the menu for the footwells working fine on my old MMI but after retrofitting an MMI 2 the interior menu isnt there, just the exterior. My coding is as shown in this thread.
 
Just want to say a huge thank you to @Rob2k68 for supplying me with the perfect oem factory style front and back footwells and warning lights and puddle lights for all 4 doors I would highly recommend him for anyone planning this retrofit.rob also helped me a lot leading Upto my retrofit.
I fit all footwells and door lights and went and saw @DJAlix to get my vcds done, however after Alex coded we realised 3 doors was not working,(my earth connections was not good enough) we stripped all door cards and Alex re wired everything for me without question or fuss.and lo and behold the lights were all on, He’s such a kind guy definetley recommend @DJAlix to everyone in London areas.thanks a lot guys @Rob2k68 and @DJAlix
 
  • Like
Reactions: Rob2k68 and DJAlix
Just want to say a huge thank you to @Rob2k68 for supplying me with the perfect oem factory style front and back footwells and warning lights and puddle lights for all 4 doors I would highly recommend him for anyone planning this retrofit.rob also helped me a lot leading Upto my retrofit.
I fit all footwells and door lights and went and saw @DJAlix to get my vcds done, however after Alex coded we realised 3 doors was not working,(my earth connections was not good enough) we stripped all door cards and Alex re wired everything for me without question or fuss.and lo and behold the lights were all on, He’s such a kind guy definetley recommend @DJAlix to everyone in London areas.thanks a lot guys @Rob2k68 and @DJAlix
Thanks for the kind words. Was no way I was going to let you leave without everything working!
 
  • Like
Reactions: Rob2k68
Thanks for the kind words. Was no way I was going to let you leave without everything working!
Thanks a lot fella really appreciate it. See you soon for the folding mirrors retrofit.
 
@DJAlix would you mind giving the person for the lights we was speaking about earlier please.
 
Did someone manage to get the cup holder working when connected like the OEM method? (J519 46)
 
Did someone manage to get the cup holder working when connected like the OEM method? (J519 46)
I've never found a way to make the cupholder work with light intensity controlled through the MMI. I was using it connected to the J519, pin 2 of the 46 pin (B) connector, but programmed the BCM to adjust that output with the light switch dimmer, so the cupholder was adjusted along with the dashboard/console illumination (getting the same results as if it was connected to the cigarette lighter wires which is the way most retrofitters do), expecting to get the info on how to control it through the MMI some day. Eventually I've needed the pin 2 for other lighting purposes, so I gave up and moved the cupholder light wiring to the cigarette lighter connection.
 
  • Like
Reactions: rcnacura
I've never found a way to make the cupholder work with light intensity controlled through the MMI. I was using it connected to the J519, pin 2 of the 46 pin (B) connector, but programmed the BCM to adjust that output with the light switch dimmer, so the cupholder was adjusted along with the dashboard/console illumination (getting the same results as if it was connected to the cigarette lighter wires which is the way most retrofitters do), expecting to get the info on how to control it through the MMI some day. Eventually I've needed the pin 2 for other lighting purposes, so I gave up and moved the cupholder light wiring to the cigarette lighter connection.
I've tried the same and maybe this is a SWOP thing? Could not get foot or door lighting to work using the Mmi. Changed for modules without any luck as well.

Sent from my Pixel 3 XL using Tapatalk
 
I've tried the same and maybe this is a SWOP thing? Could not get foot or door lighting to work using the Mmi. Changed for modules without any luck as well.
My footwell lights worked perfectly with the MMI Ambient Lights menu, so I supposed that everything else would work too, but it didn't. I couldn't control my door handle lights with MMI, so I kept it connected to pin 3 on the door module so the brightness is controlled with the light switch dimmer. Setting "cockpitbelechctung" and "lautsprecher" on the BCM settings as "Installed" make the options "Front" and "Door" appear on the MMI screen, but they don't seem to control any of the "lichtfunktion" options that can be assigned to the outputs. I don't know if there is any kind of software license issue involved because people who sell retrofit lighting kits never mention it. Probably it's something related to the BCM software version.
 
I've tried the same and maybe this is a SWOP thing? Could not get foot or door lighting to work using the Mmi. Changed for modules without any luck as well.

Sent from my Pixel 3 XL using Tapatalk

i had footwell menu working in my MMI until i changed to MMI2 high. After that they still come on but i no longer have the ambient menu matter what options i've changed in 5F etc.
 
I've tried the same and maybe this is a SWOP thing? Could not get foot or door lighting to work using the Mmi. Changed for modules without any luck as well.

Sent from my Pixel 3 XL using Tapatalk

I was able to get the footwell lighting to work with the MMI. In addition to the adaptations you need to do in 09 and 5F, there’s also some long coding changes in 09.


Sent from my iPhone using Tapatalk
 
  • Like
Reactions: rcnacura
i had footwell menu working in my MMI until i changed to MMI2 high. After that they still come on but i no longer have the ambient menu matter what options i've changed in 5F etc.

I have factory cupholder ambient and MMI menu, after MMI2 upgrade, the cupholder ambient comes on when I unlock the car and stays on, and won't adjust brightness on the MMI menu, footwell still working fine tho... The only thing I can't solve after MMI and all FL upgrades...
 
  • Like
Reactions: rcnacura
Does someone know which pin is needed to insert the cupholder 12+ into t46b? Is it the same as for the T32 connector (the one in the door panel i.e door lights, puddle lights)
 
Does someone know which pin is needed to insert the cupholder 12+ into t46b? Is it the same as for the T32 connector (the one in the door panel i.e door lights, puddle lights)


000979026E


Sent from my iPhone using Tapatalk
 
Hi it's depend on your headlights, see photo
 

Attachments

  • cup holder light.jpg
    cup holder light.jpg
    160.2 KB · Views: 1,164
So i also managed to pull the connecter out by removing the a trim and approach it from the side.

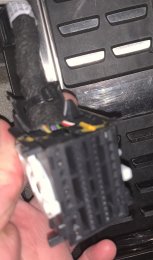
I pulled the one in the middle since that should be the A2. Now, i just counted the holes on the connector and it seems there are just 30 of them? I thought it should be 46? Could some also edit the picture and point pin 2 on it? (Just to make sure)

and also, how should i remove the pin cover of the connector to insert the wire? Anyone who can place arrows on the picture where to pry with a screwdriver?
 

Attachments

  • 97AC93DA-631E-4DF3-88BF-3F6F250ED171.jpeg
    97AC93DA-631E-4DF3-88BF-3F6F250ED171.jpeg
    781.4 KB · Views: 761
  • 627B9F1D-E75F-485C-9BB3-9CBB67C5941F.jpeg
    627B9F1D-E75F-485C-9BB3-9CBB67C5941F.jpeg
    1.5 MB · Views: 669
I don’t remember exactly where pin 2 is but it’s written on the connector.

409ad1065dca33a6ff3e287a3fdb0d69.jpg


Sent from my iPhone using Tapatalk
 
I don’t remember exactly where pin 2 is but it’s written on the connector.

409ad1065dca33a6ff3e287a3fdb0d69.jpg


Sent from my iPhone using Tapatalk


Thanks a lot for replying! So i just need to pry on the side with a flat screwdriver to uncover the plug I guess
 
Thanks a lot for replying! So i just need to pry on the side with a flat screwdriver to uncover the plug I guess
You have to cut the zip tie that holds the wiring loom, so you can slide the two bars that hold the pins out of the connector frame.
CAM02034
 
You have to cut the zip tie that holds the wiring loom, so you can slide the two bars that hold the pins out of the connector frame.View attachment 197596

so it is just sliding only? No need to use a flat screwdriver to push against a hatch or something before it can slide out?
Is that step really needed like mechanical wise? Since the bars should slide out of the plug in the same direction, the zip tie that wraps around the loon at a certain distance wouldnt block the movement right ? Or...?
You have to pry on two small tabs on each side of the connector in order to release the bars. You really have to cut the zip tie so you can have some slack in order to move the wires and the bars.
 
The bars have a pin, circled in yellow on the picture. There's a tab at the connector housing that locks on the pin. That's where you have to pry to release the bars.
R CAM02034
 
I managed to got it working via the oem connection and able to change the intensity of light separately from the footwell lights now. Thank you for providing information!
 
  • Like
Reactions: Rcord
Hi it's depend on your headlights, see photo

Hello world!
I'm about to attempt my first retrofit on my A3.
Sorry if the question is dumb, I've been trying to do my homework but I think I'm at the point I need to ask.

So, the first question would be: the infamous T46B is that big block of plugs, correct?

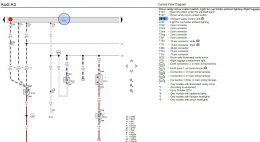
Second, can somebody explain me how to read this wiring diagram? Is this a representation of the plug (T46b)?
I don't quite understand what is J519. Is is the name of the pin?

And then, lastly, both, the cup holder and the footwell leds are both connected to pin #2?

thanks.
 
Hi
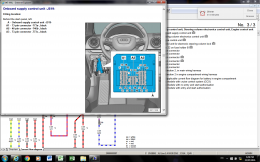
first photo is onboard supply control uint, middle one is T46B
J519 is the name of the unit, same as J525 amplifier
second photo I hope you will understand
cup holder and the footwell are separate, cap holder is depending on the headlight type
 

Attachments

  • IMG_0925.PNG
    IMG_0925.PNG
    483.7 KB · Views: 1,043
  • footwell1.jpg
    footwell1.jpg
    192.8 KB · Views: 823
  • cup holder light.jpg
    cup holder light.jpg
    160.2 KB · Views: 708
  • Like
Reactions: cbaldan
Hi
first photo is onboard supply control uint, middle one is T46B
J519 is the name of the unit, same as J525 amplifier
second photo I hope you will understand
cup holder and the footwell are separate, cap holder is depending on the headlight type

ogi230

thanks a lot for the info and the diagrams, it took me a while but I think I finally understood those diagrams.

To be sure I’m not messing up my ride, can you please confirm my conclusion?
In OEM installation, the footwell lights are connected to T73c, with positive on pin 72 and ground on pin 63.
Right??

Is there a table that tells which pin to use for the cup holder given the type of headlights the car has?

Once again, thanks for all the help guys.

cbaldan already provided the diagram but in short, for Cup holder LED:

If you have xenon (oem ofcourse) headlights, you should use pin2 on T46B.
If you have halogen headlights , then you should use pin 3 of T73C.
There is also a pin 62 of T73C in case you have ''additional lights'' but I'm not sure what that exactly means
 
Thanks CK87

I hadn’t picked all the details on how to read those diagrams before, they were extremely confusing to me from the start.
With the help of both of you I can now read those diagrams fully.

Anyway, I’ll probably be doing the footwell and cup holder this weekend, but I’m concerned with the coding. I did follow the coding in this thread to enable the ambient light settings in the MMI, I even reset the MMI, checked all the configuration at least two more times, but I still can’t get any new menus in the MMI.
Is there any chance it will only enable the menu once it actually detected the load in the pins??

It sounds a little far fetched even to myself, but I can’t understand why the MMI won’t show it. My last resort will be the infamous cigarettes lighter/12V connector hack
 
Never mind guys.

I was rechecking the coding I did and it was incomplete; module 09 was coded but somehow I forgot to code module 5F.
Now my MMI has a new menu called Interior Lights.
I’m just doing the coding for now, once I get it all done I’ll post the updates.
 
  • Like
Reactions: rcnacura
Never mind guys.

I was rechecking the coding I did and it was incomplete; module 09 was coded but somehow I forgot to code module 5F.
Now my MMI has a new menu called Interior Lights.
I’m just doing the coding for now, once I get it all done I’ll post the updates.

Yes, I was already about to remind you of going through the coding again , just to make sure you did everything. But I'm glad you found out.
Good luck!
 
  • Like
Reactions: cbaldan
And ofcourse, I meant ogi230 that provided the diagrams in my previous post (instead of cbaldan)
 
Will post this within the VCDS main thread, but this is what I have so far by way of Interior Light Coding:

*I am currently unable to test any of this myself
**Footwell lights MUST be LED. If normal bulbs are in use then Leuchte channels need changing
***Rear Door coding needs the use of the current VCDS v16beta. If still using v15.X and you are not wanting to install the current Beta you will need to add modules BB and BC to the CAN Gateway Installation List.

Interior Lighting MMI Menu
  • 5F - Information Electr
  • Adaptations
  • (15)-Vehicle function list BAP-interieur_light_0x08 = Activated (should be set as factory default)
  • (6)-Vehicle menu operation-menu_display_ambient_illumination = activated
  • (7)-Vehicle menu operation-menu_display_ambient_illumination_clamp_15_off = not activated
  • (8)-Vehicle menu operation-menu_display_ambient_illumination_over_threshold_high = activated
  • (9)-Vehicle menu operation-menu_display_ambient_illumination_standstill = not activated
  • (10)-Vehicle menu operation-menu_display_ambient_illumination_after_disclaimer = not activated
  • Reset MMI
Footwell Lights
  • 09 Cent Elect
  • Long Coding
  • Byte 5
  • Bit 7 = Active (Footwell Lights Installed)
  • 09 Cent Elect
  • Adaptations
  • (6)-Ambient lighting-Innenlichtinszenierung = Installed (ambient lighting - interior lighting)
  • (1)-Ambient lighting-Defaultwert Ambienteprofil Fussraum = 100% (default value setting profile footwell)
  • (3)-Ambient lighting-Defaultwert Ambienteprofil Vorn = 100% (default value setting profile front)
  • (1)-Leuchte30FR LC72-Lasttyp 30 = 46 - LED Kleinleistung
  • (2)-Leuchte30FR LC72-Lampendefektbitposition 30 = 0
  • (3)-Leuchte30FR LC72-Fehlerort mittleres Byte DTC-DFCC 30 = 2
  • (4)-Leuchte30FR LC72-Lichtfunktion A 30 = Footwell Light
  • (6)-Leuchte30FR LC72-Dimmwert AB 30 = 100
  • (7)-Leuchte30FR LC72-Lichtansteuerung HD AB 30 = Always

Thanks, you were right. I also needed to enable footwell and door separately in the mmi to get the independent settings via the car menu above, via:

Interior light; light configuration-Fussraumbeleuchtung = installed
Interior light; light configuration-Cockpitbeleuchtung = installed

(...)
Adam

Thanks to both of these guys I got all settings available in the MMI.
DJAlix gave me the Interior lighting menu in the MMI, with All zones and Front, but Footwell was never there. I went over the setting multiple times, I reset the MMI a bunch of times, but it just didn't show up.
But when I read this thread once again, Mr adamal gave me the piece of the puzzle that was missing:
In my MMI setting, Interior light; light configuration-Fussraumbeleuchtung was not installed!!!
It was just a matter of changing that to installed and boom! It showed up in the menu.
I can't recall if I had to reset the MMI or not, I spent over 2 hours in the car tonight.

But I didn't do the installation of the lights yet, I was just trying to get MMI to work correct before diving into it.
 

Attachments

  • 2020.03.11 - MMI - Interior lighting menu.jpg
    2020.03.11 - MMI - Interior lighting menu.jpg
    200.2 KB · Views: 687
Performed the retrofit this weekend. Any idea why the footwell lights come ON when the headlights are on? I have a 2017 S3.

Is that normal operation or did I code something wrong?
 
Performed the retrofit this weekend. Any idea why the footwell lights come ON when the headlights are on? I have a 2017 S3.

Is that normal operation or did I code something wrong?
WOOHOO! I figured it out!!! Found the below on the OBDEleven forum.

09, Adaptations
Interior light, light configuration: Ambientemenue mit globalem aus: active

Interior light, light configuration: Ambientemenue mit alle Zonen: active

241383AA 36E6 44C9 B26B 14917B17A819
C98E3CF8 273A 48F0 98F0 840AEE2512C1
4714824D 7D1D 43ED A5A9 26CDBB00FCDE


Now the footwells can be separately turned off while headlights are on. They still come on when doors open, so I’m thrilled!