

LMLT Build Thread + Pictures
- Thread starter *P3nfold*
- Start date
You are using an out of date browser. It may not display this or other websites correctly.
You should upgrade or use an alternative browser.
You should upgrade or use an alternative browser.
*P3nfold*
Registered User
Great work..
I take it these are not fitted as standard?
I was wondering what it for so it was explained to me, I've never seen one before.
- Joined
- Dec 2, 2008
- Messages
- 17,400
- Reaction score
- 1,104
- Points
- 113
Blimey, you don't hang about! I read this thread about a month ago and just popped in to see the engine has been rebuilt. Good efforts.
- Joined
- Mar 28, 2010
- Messages
- 10,073
- Reaction score
- 2,697
- Points
- 113
- Location
- Liverpool/Southport. N west
Don't forget the heatshielding dude... that orange hose from the turbo to the charge pipe will melt very quickly....
<tuffty/>
ERRRRHHHHM forge COUGH one COUGH for sale ERRRHEMMMMMHey, tuffty extremely good point, heat management is key. Need to also put on the BAM throttle body, air conditioning pump on the front, aux belt and turbo support bracket.
:sign_plug:
- Joined
- May 13, 2011
- Messages
- 904
- Reaction score
- 35
- Points
- 28
*P3nfold*
Registered User
Blimey, you don't hang about! I read this thread about a month ago and just popped in to see the engine has been rebuilt. Good efforts.
Cheers Westy to be fair buddy it was Ben who did the work, I just sourced the parts etc.... I am getting excited to see the results of the turbo etc....
ERRRRHHHHM forge COUGH one COUGH for sale ERRRHEMMMMM
:sign_plug:
Terrible fella, PM me sure there is a deal to be done lol.
looking good bud, nice pics")
Cheers hopefully this will all be done in the next four weeks, is getting close to MOT time.
*P3nfold*
Registered User
Update from yesterday, I fitted the pressed plates, I do think they finish off the Alice quite nice


Paradox1
Registered User
*P3nfold*
Registered User
Most def, looks really good!
I think your LCR front splitter is a little short though...
Thanks. Well spotted the LCR splitter is about an inch too short, when I was fitting it I tired to trim here and there to make it look stock and got a bit excited with the dremel, it look really bodged, so i chopped it to make it equal lol.
*P3nfold*
Registered User
More progress this week, I had the new front wishbone bushes fitted, so only the rear standard tie arm to do. The thats the suspension mods done.
I got to see the rebuilt engine at Bens gaff on Monday, looks good from a on the engine standard perspective lol, just need to get the s3 through its MOT and then its time to crack on with the engine installation.
I got to see the rebuilt engine at Bens gaff on Monday, looks good from a on the engine standard perspective lol, just need to get the s3 through its MOT and then its time to crack on with the engine installation.
*P3nfold*
Registered User
S3 passed its MOT which is great news, so now its play time!
Intercooler is going on this Saturday and then the follow weekend is engine change time with Ben @ Parsonsperformance.
After that is mapping time. I am hoping for good figures, well at least over 320bhp and circa 300 ft lb of fun fun fun.
Intercooler is going on this Saturday and then the follow weekend is engine change time with Ben @ Parsonsperformance.
After that is mapping time. I am hoping for good figures, well at least over 320bhp and circa 300 ft lb of fun fun fun.
Intercooler is going on this Saturday and then the follow weekend is engine change time with Ben @ Parsonsperformance.
After that is mapping time. I am hoping for good figures, well at least over 320bhp and circa 300 ft lb of fun fun fun.
What Intercooler are you opting for?
I notice you put "Parsons Special FMIC + 2.5inch Pipework" - is this basically the wellycooler?
Keeping an eye on this thread,-and I'm pretty sure I've had a nosey round your engine whilst I've been up at Parsons whilst it was up on the stand
*P3nfold*
Registered User
What Intercooler are you opting for?
I notice you put "Parsons Special FMIC + 2.5inch Pipework" - is this basically the wellycooler?
Keeping an eye on this thread,-and I'm pretty sure I've had a nosey round your engine whilst I've been up at Parsons whilst it was up on the stand
To be honest I am not 100% sure what Ben is up to with it, he gave me a list of pipework to buy and off I went.
I think you most likely had seen Alex's beast/toy.
Should have some more interesting stuff soon to post..
To be honest I am not 100% sure what Ben is up to with it, he gave me a list of pipework to buy and off I went.
I think you most likely had seen Alex's beast/toy.
Should have some more interesting stuff soon to post..
Haha- sounds like how I go about modifying my car. Will you be keeping your fogs then with the FMIC?
I always end up double checking with Ben that I'm buying the right parts considering he's the one that will be fitting them as well
Hmmmm well it may have been his- but your manifold and set up does look very familiar.
Plus I am up at Parsons to often for my own good either with my car or my friends Leon. Which reminds me - I need to get booked in again for some bits and pieces! lol
*P3nfold*
Registered User
Well progress is going well. New engine is in with Dans Hybrid + K04. Cheers to Ben and Chris.


Next piece of work is the decat, fmic, injectors, base map and rear tie arm bushes.

Next piece of work is the decat, fmic, injectors, base map and rear tie arm bushes.

Stuart35205
Registered User
*P3nfold*
Registered User
Nice car mate & great build thread I can't believe how far you've got , shame about the golf.
Cheers buddy, do miss the golf, fantastic car. S3 is turning out to be a nice challenge. Hoping for good figures and more importantly awesome delivery of power.
Car looks good mate, was amusing how long you were looking at the relentless manifold before you cottoned on!
Now you've seen how well haldex works in my car, you can push a bit more in yours..
Here's one not long after it was started up:

Now you've seen how well haldex works in my car, you can push a bit more in yours..
Here's one not long after it was started up:
*P3nfold*
Registered User
Cheers Chris, once I sort of the rear suspension issue and get the alignment done. I shall drive maybe 5 mph faster round corners lol.
Looking forward to the FMIC getting fitted this week, injectors in and base map.
I got a funny noise coming from the drivers side, I popped round Ben's yesterday afternoon to take a look and the cam belt cover was not seating quite right and it needed a push but I still have the issue though. Could be pulley or aux belt related?
Last edited:
*P3nfold*
Registered User
Took a look this AM, removed the aux belt and it looks very worn, so as recommended I will turn it inside out and will get another to replace it as its my daily from TPS. Its a pig of job when you are trying to put it back on, on your drive.
- Joined
- Sep 14, 2008
- Messages
- 24,836
- Reaction score
- 6,078
- Points
- 113
- Location
- Wibbleton
- Website
- www.tuffty.co.uk
Has the aux belt tensioner been removed at any point during the recent work?
<tuffty/>
Yes, it's the tensioner off the amk that came out of it as the bam one was snapped from the crash. Whys that mate?
- Joined
- Sep 14, 2008
- Messages
- 24,836
- Reaction score
- 6,078
- Points
- 113
- Location
- Wibbleton
- Website
- www.tuffty.co.uk
Yes, it's the tensioner off the amk that came out of it as the bam one was snapped from the crash. Whys that mate?
on the S3 there is a bracket for securing the hard coolant pipe that feeds the expansion tank (IIRC)... I have seen (and done myself once) this fitted the wrong side of the tensioner which will cause it to pitch over towards the engine... this cause a whirring noise and damages the aux belt... easily done but it sits on the outside of the tensioner rather than sandwiched between the tensioner and the alternator bracket...
<tuffty/>
*P3nfold*
Registered User
Hi Guys, all fixed now. Tuffty, I had a look for the hardpipe, no obstructions there.
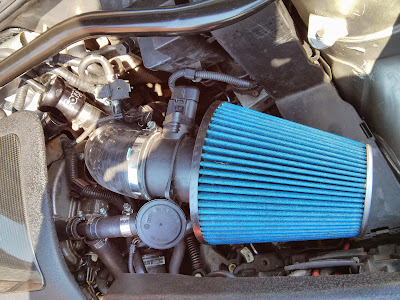
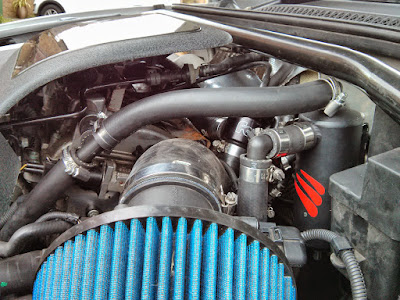
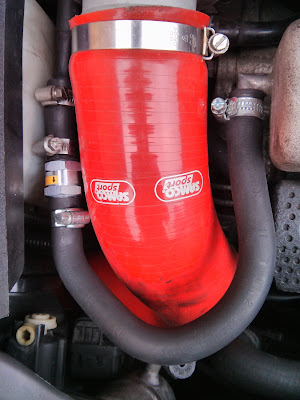
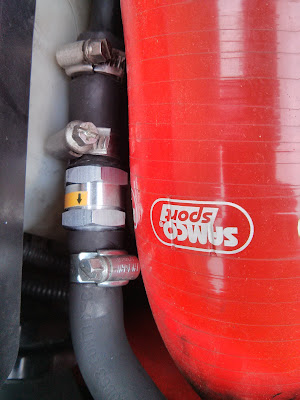
So next piece of work is the change over of the old red Badger 5 v1 for the the v2 and too replace the red samco upper boost hoses with creationmotorsport ones in black, then its FMIC time.
Looking for a black engine bay. Considering in the future getting the charge pipe and inlet powder coated.
So next piece of work is the change over of the old red Badger 5 v1 for the the v2 and too replace the red samco upper boost hoses with creationmotorsport ones in black, then its FMIC time.
Looking for a black engine bay. Considering in the future getting the charge pipe and inlet powder coated.
on the S3 there is a bracket for securing the hard coolant pipe that feeds the expansion tank (IIRC)... I have seen (and done myself once) this fitted the wrong side of the tensioner which will cause it to pitch over towards the engine... this cause a whirring noise and damages the aux belt... easily done but it sits on the outside of the tensioner rather than sandwiched between the tensioner and the alternator bracket...
<tuffty/>
Ah I see. Just looked through pics I took during the build and it's definitely on the outside of the tensioner.
Hi Guys, all fixed now. Tuffty, I had a look for the hardpipe, no obstructions there.
So next piece of work is the change over of the old red Badger 5 v1 for the the v2 and too replace the red samco upper boost hoses with creationmotorsport ones in black, then its FMIC time.
Looking for a black engine bay. Considering in the future getting the charge pipe and inlet powder coated.
Martin, you say all fixed but don't say what it was. Were you being a spaz?
Martin, you say all fixed but don't say what it was. Were you being a spaz?
Distinct possibility
*P3nfold*
Registered User
Martin, you say all fixed but don't say what it was. Were you being a spaz?
Spaz you cheeky sh*t lol, on this occasion I was right, it was the aux belt
Distinct possibility
Nice feeling the love!!
Last edited:
*P3nfold*
Registered User
More progress which is great!
So the New Intercooler Hoses arrived a few weeks back so at last the red ones can go.

Last part of puzzle, the toyosport aka "Wellycooler" arrived today, I cannot believe the ****** weight of it, its HUGE lol.

Last week was a pretty bad week for me, I had a bright idea which turned into an absolute nightmare, remove the old v1 and replace with the v2.
Not the brightest Idea as you can see but I found the grub screw, metal fragments, and at least I did not start the engine, it could be have been a lot worst.

Would really like to thank Dan and Ben for there advise and also an additional thanks to Ben for fitting the billet wheel back on

So eventually after 3 days I finally got the Badger 5 v2 TIP fitted
But the bottom seems really tight and almost squashed. I need to give it a wiggle to get it totally right. For some reason mine feels quite soft at the bottom at the bend.
Being stubborn and careful consideration I was going to ditch the catch can and keep the PCV and vent to air but I really wanted the catch can back on and here it is with PCV delete and vented to air under the car. It still ****** stinks
Westys thread for catch can installation really helped as I was struggling to get the location just right and I am pleased with the outcome, I think it looks OEM.
So the New Intercooler Hoses arrived a few weeks back so at last the red ones can go.
Last part of puzzle, the toyosport aka "Wellycooler" arrived today, I cannot believe the ****** weight of it, its HUGE lol.
Last week was a pretty bad week for me, I had a bright idea which turned into an absolute nightmare, remove the old v1 and replace with the v2.
Not the brightest Idea as you can see but I found the grub screw, metal fragments, and at least I did not start the engine, it could be have been a lot worst.
Would really like to thank Dan and Ben for there advise and also an additional thanks to Ben for fitting the billet wheel back on
So eventually after 3 days I finally got the Badger 5 v2 TIP fitted
But the bottom seems really tight and almost squashed. I need to give it a wiggle to get it totally right. For some reason mine feels quite soft at the bottom at the bend.
Being stubborn and careful consideration I was going to ditch the catch can and keep the PCV and vent to air but I really wanted the catch can back on and here it is with PCV delete and vented to air under the car. It still ****** stinks
Westys thread for catch can installation really helped as I was struggling to get the location just right and I am pleased with the outcome, I think it looks OEM.
Ouch....very lucky you didn't turn the car over...not a nice picture that on the turbo
So a catch can is not really necessary at all then; and you can just vent to air if need be from the PCV?
So a catch can is not really necessary at all then; and you can just vent to air if need be from the PCV?
*P3nfold*
Registered User
Ouch....very lucky you didn't turn the car over...not a nice picture that on the turbo
So a catch can is not really necessary at all then; and you can just vent to air if need be from the PCV?
Hey buddy, yeah true, I just went into panic mode and called good friends for advise. Lucky for me really I hope I've done 150 miles since with no issues touch wood!!
I would not say its not necessary it depends on your point of view. I would say for me I did not like the idea of nothing catching the vapour.
You can vent to air from the PCV from what I have read and people I have spoken too but its your shout.
Haha....I've had to have a panic call as well to some people who are in the know...or I tend to post up on the VAG talk page or have a search on here!
Good to hear there are no issues then...so going from a V1 to a V2....have you found/heard of any difference at all?
I am still undecided what to do to be honest....I just want to get rid of as many crappy OEM black brittle pipes under the bonnet as I can! Ben yanked my SAI out and did the N249 by pass for me on the Friday just gone... so that's a start
*P3nfold*
Registered User
Haha....I've had to have a panic call as well to some people who are in the know...or I tend to post up on the VAG talk page or have a search on here!
Good to hear there are no issues then...so going from a V1 to a V2....have you found/heard of any difference at all?
I am still undecided what to do to be honest....I just want to get rid of as many crappy OEM black brittle pipes under the bonnet as I can! Ben yanked my SAI out and did the N249 by pass for me on the Friday just gone... so that's a start
If I was to be totally honest I like the flexibility of the v1 compared to the v2 but 76mm vs 80mm size matters lol. I guess the dyno run and mapping will prove its worth.
Little and often on the build is my approach at the moment. Need to sell and buy parts to move forward quickly, I really wanted to have completed the build by now but its just one of those things, sods law and been busy.
When I bought the car the N249 had been done, does removing the SAI make a difference?
Haha yep I suppose size does matter...I just can't justify the cost personally just yet as I've personally got more important things to tackle than get a 4mm larger TIP lol
Im over 4 years of ownership and not finished/completed my car to a spec I am truly happy with tbh! Lol and the spare bedroom has very part I've replaced + god knows what else bunged in there! Haha
Where wil you be taking her for a remap and RR out of interest?
Well removing the SAI it removes one more thing that could go wrong really and makes the engine bay more neater without plastic hoses. Plus that SAI unit is ****** heavy - so saves weight also, plus it makes changing the oil filter in the future alot easier....so winner winner chicken dinner in my eyes Just need to get the small pump out and blank it on the engine with my forge blanking plate.
lol Im over 4 years of ownership and not finished/completed my car to a spec I am truly happy with tbh! Lol and the spare bedroom has very part I've replaced + god knows what else bunged in there! Haha
Where wil you be taking her for a remap and RR out of interest?
Well removing the SAI it removes one more thing that could go wrong really and makes the engine bay more neater without plastic hoses. Plus that SAI unit is ****** heavy - so saves weight also, plus it makes changing the oil filter in the future alot easier....so winner winner chicken dinner in my eyes
Just need to get the small pump out and blank it on the engine with my forge blanking plate.*P3nfold*
Registered User
Haha yep I suppose size does matter...I just can't justify the cost personally just yet as I've personally got more important things to tackle than get a 4mm larger TIP
Im over 4 years of ownership and not finished/completed my car to a spec I am truly happy with tbh! Lol and the spare bedroom has very part I've replaced + god knows what else bunged in there! Haha
Where wil you be taking her for a remap and RR out of interest?
Well removing the SAI it removes one more thing that could go wrong really and makes the engine bay more neater without plastic hoses. Plus that SAI unit is ****** heavy - so saves weight also, plus it makes changing the oil filter in the future alot easier....so winner winner chicken dinner in my eyes
Fair enough buddy. RR and Map will be somewhere, not sure yet, waiting on Ben. Won't be Bill or Nick for the CC as far as I am aware. The car will have a 5 stage map with TIV, als, nls etc...
Just wondering does the SAI need to coded out of the map/ecu?
When you are next at Ben's let me know I will go down?

Haha- yeah we all end up waiting on Ben at some point- but I suppose good things come to those that wait
5 Stage map!? Wehh heyyy!....so you will be getting a switch to change between everything? - I thought Nicki/Bill would be ideal for that tbh, especially with the TiV mapping.
Won't be back to Ben's till maybe the end of the month - however I am in the process of setting up a meet in Brighton for Saturday 29th June...I'll set up a thread later today Martin so keep you eyes open in the SE section fella :icon_thumright:
*P3nfold*
Registered User
Just quickly fitted the one way valve as per Westy thread. Looks better than the old version I had, dont fancy having the same issue. lol
- Joined
- Sep 14, 2008
- Messages
- 24,836
- Reaction score
- 6,078
- Points
- 113
- Location
- Wibbleton
- Website
- www.tuffty.co.uk
Just quickly fitted the one way valve as per Westy thread. Looks better than the old version I had, dont fancy having the same issue. lol
You do realise that there is a check valve at the servo and this one is not needed? its wrapped in heatshield behind the bulkhead heatshield

<tuffty/>