What have you done today?

on the facelift ashtray there is onlyone 3 pin plug, i tapped directly into the led wires of the ashtray i think, and i also need to figure out how to get the clocks to illuminate on ignition, the VDO clocks in the AGN does it but the Jaeger clocks in the Agu only lights up with the light switch, and i cant change anything in vcds
Strange as vcds does give you the option to turn them on or off on the Agn have you tried using the basecode.exe

Sent from Syknet Global Defence Network
 
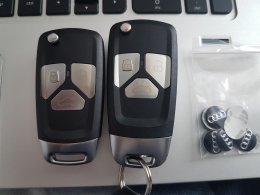
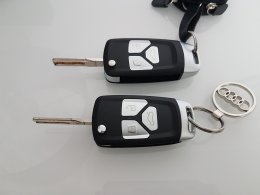
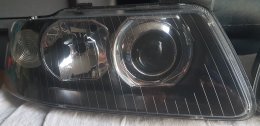
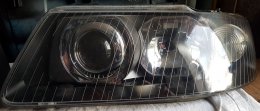
Keys2Programmed a couple of keys Keys1 Headlight rebuild nearly done just need to seal them up.RightLeft
 
  • Like
Reactions: ToughlilT and hydro s3
spent a little at weekend, forged rods, engine stand etc etc.

IMG 20210315 120222
IMG 20210315 120228


something to work on whilst the sign game is quiet.
 
  • Like
Reactions: Tj 0785, S3AMJ and MPH
Being the sort of guy that needs to keep his hands busy (insert any number of fnarr related tomfoolery here) lockdown and the whole covid thing in general has been a royal pain as I have not really been able to do much with the car and tbh haven't really driven either the A2 or the S3 much over the past year...

I think the batteries have spent more time on charge than I have spent driving them...

So to scratch the 'must tinker' itch I turned yet again to my PC redoing all the pipework on the cooling loop and moving stuff around a bit to clean the build up a bit and hopefully help with cooling...

This was its most recent iteration (I have changed it a couple of time now already)... was never 100% happy with the layout aesthetically and also from an engineering perspective
PXL 20201205 144216245

Intake fans at the bottom never sat too well with me even though logically it made sense... so... drained the coolant and stripped ready for the next update
PXL 20210319 171630723

Swapped the one rad from the side mount to the bottom of the case, intake fans now at the side and have a lot more area to pull air from... the rejig allowed me to keep most of the pipework over on one side keeping it cleaner and more purposefully industrial looking...
PXL 20210320 205940042

I also added two oled gauges for flow rate and water temp... meaning I can see at a glance if the water temps are running away (typically happens in the summer) rather than have other software running in the background while gaming

Very happy with the result... looks more balanced and cleaner whilst overall temps seem to be a little more consistent
PXL 20210321 120031591

PXL 20210321 120038984

PXL 20210321 120521942


...happy days...

...I really need to get back to tinkering with cars soon though... :)

<tuffty/>
 
  • Like
Reactions: Farmor00, hydro s3, S3AMJ and 1 other person
Being the sort of guy that needs to keep his hands busy (insert any number of fnarr related tomfoolery here) lockdown and the whole covid thing in general has been a royal pain as I have not really been able to do much with the car and tbh haven't really driven either the A2 or the S3 much over the past year...

I think the batteries have spent more time on charge than I have spent driving them...

So to scratch the 'must tinker' itch I turned yet again to my PC redoing all the pipework on the cooling loop and moving stuff around a bit to clean the build up a bit and hopefully help with cooling...

This was its most recent iteration (I have changed it a couple of time now already)... was never 100% happy with the layout aesthetically and also from an engineering perspective
View attachment 233665
Intake fans at the bottom never sat too well with me even though logically it made sense... so... drained the coolant and stripped ready for the next update
View attachment 233666
Swapped the one rad from the side mount to the bottom of the case, intake fans now at the side and have a lot more area to pull air from... the rejig allowed me to keep most of the pipework over on one side keeping it cleaner and more purposefully industrial looking...
View attachment 233667
I also added two oled gauges for flow rate and water temp... meaning I can see at a glance if the water temps are running away (typically happens in the summer) rather than have other software running in the background while gaming

Very happy with the result... looks more balanced and cleaner whilst overall temps seem to be a little more consistent
View attachment 233668
View attachment 233669
View attachment 233670

...happy days...

...I really need to get back to tinkering with cars soon though... :)
Excellent work I must say I'm extremely impressed

Sent from Syknet Global Defence Network
 
  • Like
Reactions: <tuffty/>
Being the sort of guy that needs to keep his hands busy (insert any number of fnarr related tomfoolery here) lockdown and the whole covid thing in general has been a royal pain as I have not really been able to do much with the car and tbh haven't really driven either the A2 or the S3 much over the past year...

I think the batteries have spent more time on charge than I have spent driving them...

So to scratch the 'must tinker' itch I turned yet again to my PC redoing all the pipework on the cooling loop and moving stuff around a bit to clean the build up a bit and hopefully help with cooling...

This was its most recent iteration (I have changed it a couple of time now already)... was never 100% happy with the layout aesthetically and also from an engineering perspective
View attachment 233665
Intake fans at the bottom never sat too well with me even though logically it made sense... so... drained the coolant and stripped ready for the next update
View attachment 233666
Swapped the one rad from the side mount to the bottom of the case, intake fans now at the side and have a lot more area to pull air from... the rejig allowed me to keep most of the pipework over on one side keeping it cleaner and more purposefully industrial looking...
View attachment 233667
I also added two oled gauges for flow rate and water temp... meaning I can see at a glance if the water temps are running away (typically happens in the summer) rather than have other software running in the background while gaming

Very happy with the result... looks more balanced and cleaner whilst overall temps seem to be a little more consistent
View attachment 233668
View attachment 233669
View attachment 233670

...happy days...

...I really need to get back to tinkering with cars soon though... :)

Looks well distributed now mate, very clean indeed.


Sent from my iPhone using Tapatalk
 
  • Like
Reactions: <tuffty/>
scored another 8V flat bottom steering for the ridiculously low price of R1500 ie. 76 Pounds on my local Gumtree site

Has some nasty damage to the leather at the top but really cant complain considering the price, Now i need to source an airbag again, hopefully it wont take more than a year this time round. Still in 2 minds about having it recovered or not.

This one is destined for the Agu, im starting to have parity between my 2 interiors.


Fbsw n02


Leather damage
 
  • Like
Reactions: craigt1985 and MPH
scored another 8V flat bottom steering for the ridiculously low price of R1500 ie. 76 Pounds on my local Gumtree site

Has some nasty damage to the leather at the top but really cant complain considering the price, Now i need to source an airbag again, hopefully it wont take more than a year this time round. Still in 2 minds about having it recovered or not.

This one is destined for the Agu, im starting to have parity between my 2 interiors.


View attachment 236577

View attachment 236578
The leather does not look that bad to me me try some recolour leather balm after a good clean good luck with the airbag hunt good price btw.

Sent from Syknet Global Defence Network
ddff0602ea74bd5ecbc24d355c13d9ec.jpg
 
  • Like
Reactions: Dohcwp
Today I mostly washed the car and repinned the replacement Haldex controller


PXL 20210507 123401338


PXL 20210507 164324105

PXL 20210507 170901902

PXL 20210507 172628210


<tuffty/>
 
  • Like
Reactions: MPH and s3mad_dude
sourced another wheel (a round one) essentially just to get the lin 1.3 buttons it has less features than the line 2.0 buttons on the FBSW but, sourcing a lin 1.3 steering controller is much easier than sourcing a 2.0 one so that is the main reason why i had to buy the second wheel. now i just need to get time to swap the buttons over and source an airbag

Roundwheel
 
  • Like
Reactions: MPH
Put some stainless steel tank straps and bolts on at the same price as OEM ones originals were corroded due to 23+ in age.
20210517 142612
S l1600 2
S l1600 1
S l1600 3
20210611 171026
20210612 095802
 
Last edited:
  • Like
Reactions: S3AMJ, Frizzley and s3mad_dude
Changed Engine and gearbox mounts What a difference....No more shake rattle n roll

Sent from my SM-G975F using Tapatalk
e989404266e8e6d3220ae2e3134f58e4.jpg
 
Last edited:
  • Like
Reactions: Ian W and s3mad_dude
Fitted new crank sensor, had help getting it out, not much room for sausage fingers, car started right away. Delighted
 
  • Like
Reactions: MPH
Excellent work! I put one in 3 years ago and another one recently what brand did you use out of curiosity?

Sent from my SM-G975F using Tapatalk
I'm pretty sure its a haas one, v cheap from ecp. Was a ****** to pull out
 
  • Like
Reactions: MPH
replaced the G68 speed sensor on the AGU and since some genius decided it was a good idea to have the sensor location directly below the transmission mount i, decided to replace the left engine mount aswell with a new febi one, since i had to remove almost everything on the left just to get to the sensor. Will repalce the right side mount when i do the cambelt service

IMG 20210626 082753
 
  • Like
Reactions: highlanderian
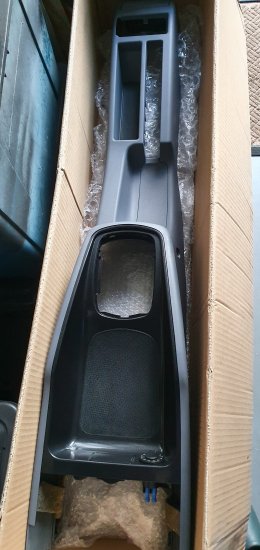
Finished refurbing the original 1997 slate grey centre console in slate grey original rubberised Audi finish and volcano mica 20210706 20432620210706 204300black metallic added a handy twin-port USB fast charger/voltmeter with on/off switch.
 
  • Like
Reactions: notafordfocus, hydro s3, highlanderian and 1 other person
My rear passenger courtesy light was sometimes dim, whilst the main light up front was always bright when the doors were opened. If I turned the front light on manually with the switch, then the rear would also be fully bright. It seemed to just be on door opening.

I prised out the rear courtesy light unit using a plastic trim tool, and whilst the front door was opened I wiggled the connector plug. It was very sensitive and immediately the light bulbs went fully bright.

I cleaned the copper strip that joins the two bulbs together as it was pretty manky. Reassembled and no difference. The only other thing would be the mini circuit board that controlled the lights. That actually made more sense as the dim light was only on door open anyway.

I removed the PCB (which in hindsight was a bit dumb) as there was a resistor and two red LEDs soldered through both sides. Removing the PCB obviously broke the solder joints. So, rather than just reflowing all the solder joints I had to actually resolder them instead.

Anyway, long story short, I did that and reassembled and now the light is perfectly bright on door open.

PCB prior to re-soldering:
1-CBD2-BFF-FBA7-4-ACF-8397-65-C9-DA25062-E.jpg


The other side of the courtesy light rocker switch with resistor and LEDs which connect to the PCB:
7-B9-A691-F-2-EA7-4356-B63-C-516456-E8-BA6-E.jpg


I also removed the centre console storage compartment and put a small lick of black satin paint on the top edge of the flap as some of it had started to flake off. This photo was taken whilst waiting for the first coat to dry. I painted on two coats overall with a very fine artist’s brush:
54-D65-EC8-FCA7-4396-8-B44-54-E1771158-C0.jpg


Very pleased with the end results. Two niggly jobs crossed off my list.
 
  • Like
Reactions: Farmor00, highlanderian and MPH
I removed the PCB (which in hindsight was a bit dumb) as there was a resistor and two red LEDs soldered through both sides. Removing the PCB obviously broke the solder joints. So, rather than just reflowing all the solder joints I had to actually resolder them instead.

Anyway, long story short, I did that and reassembled and now the light is perfectly bright on door open.

PCB prior to re-soldering:
1-CBD2-BFF-FBA7-4-ACF-8397-65-C9-DA25062-E.jpg


The other side of the courtesy light rocker switch with resistor and LEDs which connect to the PCB:
7-B9-A691-F-2-EA7-4356-B63-C-516456-E8-BA6-E.jpg
Hi,

I also have issues with the rear courtesy light. Do you think reflowing would have been enough had you not removed the PCB? Is there access to reflow without removing the PCB?

Thanks.
 
Continuing with the interior! I gave the door pull handles a bit of a spruce up I must say I'm rather pleased with the outcome!
Before
During
After
Panel
 
  • Like
Reactions: s3mad_dude, S3AMJ and highlanderian
[
Hi,

I also have issues with the rear courtesy light. Do you think reflowing would have been enough had you not removed the PCB? Is there access to reflow without removing the PCB?

Thanks.

Well, yeah I mean it’s worth a try. It quite fiddly redoing all the solder points but I suppose you could try a reflow, and if it doesn’t work, then re-do all of the soldering by removing the PCB. Just be careful as the LEDs and resistor will fall out the other side. Don’t lose them!
 
Thought I'd uploaded this already.
From a few nights ago
 

Attachments

  • 20210708_233209.jpg
    20210708_233209.jpg
    1.4 MB · Views: 121
  • 20210708_233150.jpg
    20210708_233150.jpg
    1.5 MB · Views: 128

Similar threads

Replies
33
Views
2K
Replies
10
Views
3K
Replies
61
Views
6K
Replies
21
Views
2K