Prawn and BigAls A3 Track Car

540lb front springs on badgerwagen, 400lb rears. and on slicks these would be too soft..

how do these compare to your spring rates?
 
336lb fronts on mine (stock 6kg as supplied with V3's), softer on the rear but no data :laugh: Kw just say they're 'progressive'

Considering how 'wrong' they are (and I'm not for a minute suggesting they are not totally unsuitable!), it's absolutely remarkable how well it currently corners, and how it wears it's tyres perfectly evenly across the whole surface with even temps.

I can only imagine with more camber, and a stiffer spring rate, it would be able to make even greater use of the slicks and up cornering speeds further again, which would be nice!
 
I don't know what your front and rear motion ratios are on the A3, but i'm running 500lbs fronts 800lbs rears... with the TT's motion ratio (0.97 front 0.63 rear) this gives a wheel rate of roughly 500lbs front and back. The stiffest off the shelf options i could see were about 350lbs so this is quite a decent improvement over even the upgrades!

Apparently this is soft, I've seen someone else mention running 800/1300!

Are you going to have the dampers re-valved to suit when the time comes?
 
Something like that PT :racer: half the parts are from B&Q or Travis Perkins anyway :laugh:


In the true spirit of 1st world problems I decided to make this a bit slower last week!

Full power is too addictive, and the progressive map so efficient that there wasn’t a huge difference when selecting map 3 on the button.

I took some logs to see where things were currently, and also took note of EGT temps before / after all runs.

We’d seen very low EGT’s on the dyno at Bills, peaking at just 739 all day, but on the road I was seeing higher numbers, into the mid 800’s, with a slightly bizzare spike when letting off and allowing the car to coast on over run.

Here’s how it looked after the first pull without any changes:


Runs were all done on the same stretch of road, in 4th gear, from 2k to the limiter. Start EGT’s were 550 each time.

After the first run logging, EGT’s peaked at 786 including the small spike on overrun.

To avoid getting completely used to all the power all of the time, I decided to back the boost off a fraction in the midrange, and also to richen it up a fraction to add a small amount of fuel cooling.

After a few runs, I’d smoothed the boost out a be a little more progressive, and bought the AFR down about 0.5:1 across the whole range:


If you look at the timing value, I also added a cheeky extra degree of timing in, by reducing the MAP compensation top value by 1 degree, you can see this where the timing runs flat, rather than stepping down as boost increases.

Peak EGT including the over run spike was down to 737, for an identical 550 start point on the same stretch of road

I know playing with timing is brave, but having reduced the boost, and added extra fuel, I was confident that just a tiny amount wouldn’t hurt. I intend to get a Knock Link G4 soon through Bill to allow me to really keep an eye on that side of things. Bill runs one of these in the Ibiza and it appears to be very good: http://www.linkecu.com/G4KNL He is also becoming a dealer for Link soon, which is handy :D

To drive, it feels hardly any different. It’s still just as urgent as it felt before, yet it must BE fractionally slower, as the map 3 button FEELS like it has more of an effect.

I’m still loving the ECU, and loving the ability to constantly tweak things. I’m over the moon with the map from Bill also, and I don’t think there was NEED to change anything, but it’s in my nature, and I figured if I can pull the car back maybe 10bhp in the midrange and 5bhp at the top end to cool things a little further, then it’s worth while. I’ve still got the dyno’d map from Bill at the full fat 370 that I can load on any time, so for short sharp bursts like Curborough I’ll probably load it back on :racer:

I also found that the post throttle spikes were my fault too :laugh:

In my wisdom whilst messing around before Christmas, I’d tweaked the over run timing values to be -5 along the top line to make it pop and crackle more on over run :laugh: the massively retarded timing on overrun seemed to be causing an egt spike. I discovered this when letting off one time, and hovering my foot on the throttle pedal, where I’d be in load cell 2 rather than 1 on 0% throttle. The spike didn’t seem to occur, so I changed the over run values to match the second line of the ign table, all around 30 degrees, and the spike seems to have dropped considerably! Haha.


Every day is a school day :)
 
Your brave. I would break it ha ha. Sounds like your really getting to grips with the Emerald!
I would love to take a trip down to a track day when I know your running just to watch and see the car in the metal. Be a good run out for my car too
 
Your brave. I would break it ha ha. Sounds like your really getting to grips with the Emerald!
I would love to take a trip down to a track day when I know your running just to watch and see the car in the metal. Be a good run out for my car too

We'll be at Donington on March 12 with Circuit days if you find yourself free mate, you're welcome to pop down and say hello!

Alternatively..........

It's probably a bit of a trek for you, but if you wanted a ride in the car, I will be giving passenger rides for charity again at both Actions days at Castle Combe this year, the Spring Action day on April 2nd, and also the Summer Forge Action day on September 10th!


That offer is open to anyone who fancies making the trip to Castle Combe too, in either April or September :racer:

I believe it's £20 towards Mission Motorsport - http://www.missionmotorsport.org/ (an absolutely awesome bunch of people) for a passenger ride of 3-4 flying laps in one of several cars we will have available.

Last year we had 5 different cars giving rides, from a 4wd mk2 Golf, to a Castle Combe saloons Punto race car, to Davie No Legs driving a works prepared MX5 endurance car with 2 prosthetic legs, and doing a better job than most people with a full compliment of original limbs!

A very enjoyable day out, for a very worthy cause.

Would be great to see a few of you there. I think I took 4-5 ASN guys out last year and they all seemed happy :)
 
  • Like
Reactions: Lavis89 and fanta
How have I never heard of this mk2 TT ball joint idea!?!?

Thanks for mentioning it! A quick Google reveals this on the TT forum:

TT%2BMk2%2BBall%2BJoint%2BMods%2BLR.jpg


Apparently they give an additional 0.7 degrees of negative camber, Pretty much exactly what I'm looking for to get me towards the 3 degrees I'd like!

Will order a set tomorrow seeing as GSF are doing 35% off this weekend :racer:

Apologies if I'm being obvious and this has already been done/mentioned... But have you thought about using a burr to elongate the slots in the arms? . . I was thinking about this when I fitted my TT arms the only day, there's a fair big of meat there, should allow you to pull the hub out another few mm or so!
 
  • Like
Reactions: Prawn
Pretty much all the build details for the car are in the previous 195 pages. It's a great read.
 
  • Like
Reactions: fanta, Prawn and Erikn89nl
Sorry to go off topic but I really want to know where and how you made your splitter, skirts, wing, etc?!

Cheers Sam :)

I've replies to your PM.

it was all made on my driveway / garage using bits from the builders merchants largely! Plus a bit of assistance from a few friends in handy places :)
 
  • Like
Reactions: fanta
The pics quoted below are for Fanta, and absolutely not because I wanted an excuse to repost a load of random old pics :laugh:

I’ve thought for a while, that with the splitter and the old rear wing, the side of the car was looking a bit bare. There was a really obvious visual difference at the sides, and it just looked a little strange to me:

When I added the new wing, I thought this suddenly became even more obvious:

So, I needed something to balance it out. Visually more than anything.
The curvy sides of the A3 Sills aren’t ideal from an aero point of view, because due to low pressure created under the car by the splitter, air running down the sides is encouraged to curl round the sills and under the car again, which isn’t what you want.
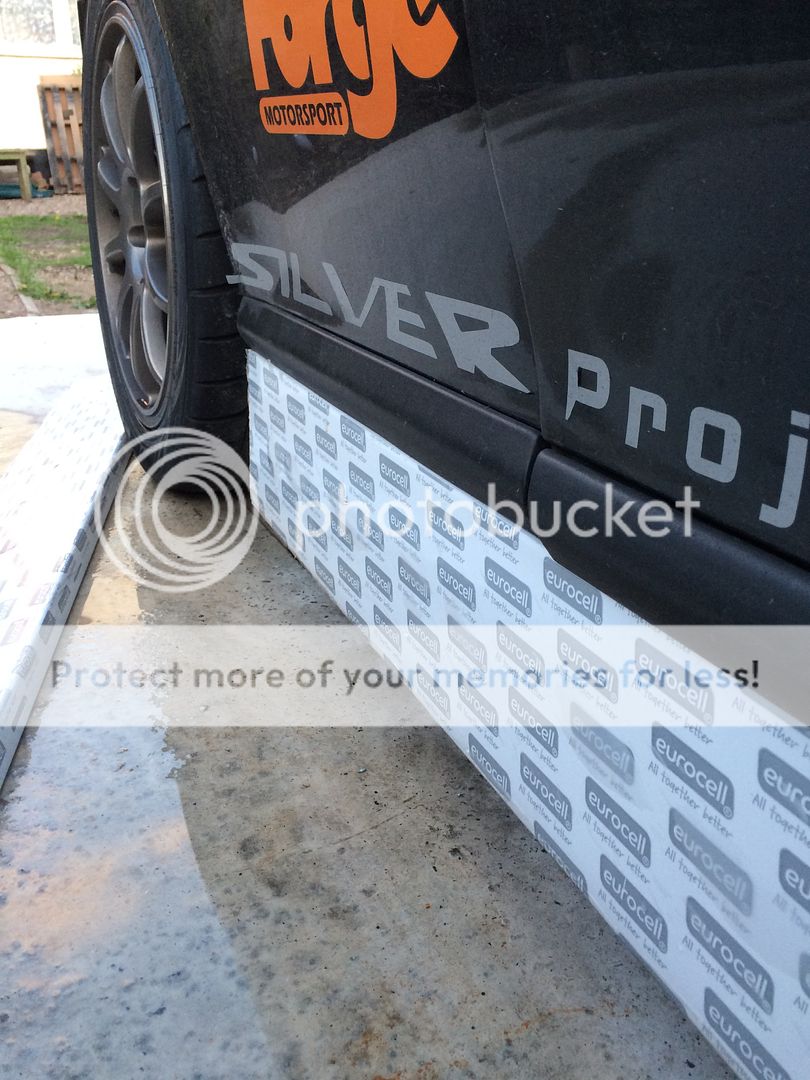
By adding some form of side below the sill, you can discourage air from getting back in under the car. How effective these are depends entirely on the depth of course, but anything is better than nothing here, and what I’ve done forms part of a larger plan that’ll hopefully become clear in the next few months also.
So – as we all know, I try to do EVERYTHING on a budget, meaning I’ll use materials from unusual sources, and make as much as possible myself.
I recently helped AndyP out with some work on his house, during which we fitted all new fascia boards and soffit boards front and rear. He just so happened to have a 5m length of Fascia board spare, which got me thinking…….

Hmmmmmmmmmmmmmmmmmmmmmmmmmmmm, I wonder?
A 30 second mock up with some cardboard was all I needed – this confirmed that there was at least possible SOME merit in the idea!

Maybe I’m onto something! :laugh:
 
  • Like
Reactions: fanta
Saturday arrived, and RobinJI came over to say hello, it was quite nice for a change having some help whilst working on the car, and some input to the creation too. Robin as we know is pretty clued up on all thing aero, which is pretty handy at times :)
I was keen to make sure that where the skirts joined the sills, there was no obvious join is unslightly seam line visible.
It worked out pretty well, that I was able to remove the side trims and grind them back 1-2mm on the back face, to create a slot underneath to tuck the skirt behind.
At the door opening, I was worried it'd still be very obvious with the door open.
We decided to experiment on a spare offcut, and thinned the top edge right down to about 1mm thick:

This slotted in really well and seemed to work nicely, even looking like a proper fit at the transition from door to quarter panel:


Having already taken a few measurements, we knew that the 150mm deep fascia board was going to be too deep. I thought I’d take the chance to chamfer the whole top edge at full height for a test fit though.
I trimmed the top edge right down, and test fitted it:

This worked well :)

Deep skirts would be more effective in terms of air flow, although they run the risk of potentially looking like a silly ‘hovercraft’ style drift kit, which I was keen to avoid.
With the theory proved, we did some measuring relative to various points on the floorpan, and decided to cut 30mm off the boards to give me a sensible depth skirt for this V1.
These were cut down, and the taper restored to the top edge, then test fitted:

To secure them, as per my sketch a few weeks ago, we made up some ali brackets to mount to the sills:

Which sit something like this:

Last up was a small cut out at the front of each skirt.

Reasons for this were 2 fold: partly to allow jacking access to the chassis rail, and partly to make some attempt at allowing wheel arch pressure to escape behind the wheel. At this point the skirt actually sits higher than the sill line, so hopefully it won’t be trapping too much hot air from the front arches in.
At this point, it rained like hell, and it was getting late, so we gave up for the day. Tori ****** dinner, and we chatted rubbish about cars late into the night over a few beers :)

Morning came (as it has an irritating habit of doing!), and we were due to meet Jardo, Lewis, Mowgli, and Ash at Loomies for breakfast.

Feeling overly enthusiastic, I got up at 7am, and decided I HAD to have the skirts and wing fitted for our breakfast meet.

Thinking back, I remembered my good friend Duct tape, and set about wrapping the steel wing brackets, and both side skirts entirely in black duct tape to make it look (slightly) presentable.

The pikey wrapped parts were dropped on, and off we went in the torrential rain!


Breakfast meet was great. 6 of us, chatting and talking cars for a few hours over a fry up and a few coffees.

I had a brief drive of Jardos mk2, which was very interesting indeed in the wet, then we parted ways around 11am just as the rain was clearing and the sun was coming out.

Robin and I took a skirt each, and set about wet sanding them down ready for paint. We added a radius on every cut edge to make them look a little more ‘proper’ also.

2 coats of plastic primer first:


Followed by 3 coats of good old satin black!


Job Jobbed.

Next up was the end plates. I wasn’t keen on how the stock ones on the wing looked, and wanted to find a low cost alternative that was easy to work with and easy to form.

I got onto ebay, as you do, and ordered up 2x A4 sheets of 3mm perspex in gloss black:


In hindsight I should probably have gone with 5mm thick stuff, as these are slightly flexy, but that’s not a huge issue and easily changed for about £6.

We drew all sorts of shapes on them, and held them in as many ways as possible, and it was very hard to work out what would be best.

I added a 30mm radius to each corner of the A4 sheet, and they instantly looked better, but still not quite right.

Looking at various pics, and my old wing, I’d tapered the end plates on those, so we gave it a try on these new ones too:


It's really hard to get a feel for how they looked when sat on the drive, so the only real way to tell, was to take it out somewhere more open and get some better pics.

I'll add those when I've had some lunch! my lunch break is almost over now! :laugh:
 
  • Like
Reactions: fanta
All in good time :racer: you'll be pleased to know that plans are in place for that already :)

So, with everything seemingly finished, I topped up the meth tank for the first time in ages, and headed out for a little blast!

I wanted to get a few pics of it out in the open to look at the aero from a proper distance. I found a quite little spot, and took a few snaps:


What is strange, is that no matter what height or angle I take the pic from, any shots from the rear looking forward, make the wing look REALLY high up. You can see from the other pics that it isn't, but the camera somehow doesn't catch the proportions quite right.


The highest point of the whole wing is actually less than 10mm above the highest point of the roof, yet in pics it looks like loads more :laugh:


Having seen it in the wild I'm much happier with the end plates size and shape now. I think they work pretty well.
I may still buy some 5mm sheet to make some more slightly stiffer ones, but for now at least, I'm happy :)
One last one just for Dad, as posted previously. There's obviously a running joke that half the car comes from the builders merchants, so I couldn't resist a shot outside my local TP:
 
  • Like
Reactions: fanta
Hi Dude,

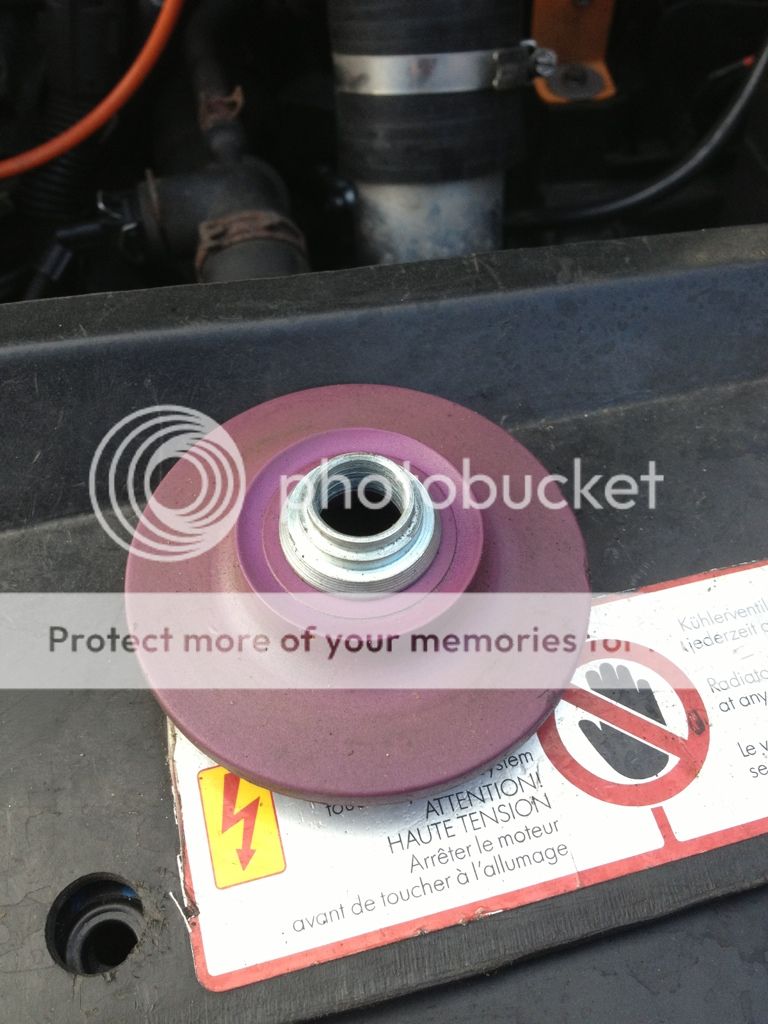
I know you're currently searching for more camber, but how have you found the Silverproject top mounts have held up to track abuse? Have you had to replace/repair much? Possible groupbuy going on!
 
Hi Nick,

I installed mine in November 2012.

In Feb/ March 13 I hit an ALMIGHTY pot hole (****** moon crater) on the m25 in roadworks, and shattered a bearing on the left side top mount.

I messaged Robert of Silver Project on the Sunday afternoon, and by Wednesday morning I had a brand new lower plate and bearing, and an additional spare bearing posted over from Poland.

3 years on they're still great and nothing else has broken, despite some fairly severe tyre destroying kerb abuse on my part :laugh: on a fairly regular basis :racer:

For what they cost, I couldn't recommend them enough, and the service I've had from the guys at Silver Project has been fantastic.

I'm able to get -2.4 degrees with lots of added caster, or about -2.6 I'd caster is left stock at the top.

I'm really hoping that when combined with the mk2 TT ball joins that we will have a genuine bolt on solution for over 3 degrees of camber, which would be awesome!

If you're feeling kind, mention me if you're contacting Silver Project :laugh:
 
  • Like
Reactions: ProjecTTrack
Hi Nick,

I installed mine in November 2012.

In Feb/ March 13 I hit an ALMIGHTY pot hole (****** moon crater) on the m25 in roadworks, and shattered a bearing on the left side top mount.

I messaged Robert of Silver Project on the Sunday afternoon, and by Wednesday morning I had a brand new lower plate and bearing, and an additional spare bearing posted over from Poland.

3 years on they're still great and nothing else has broken, despite some fairly severe tyre destroying kerb abuse on my part :laugh: on a fairly regular basis :racer:

For what they cost, I couldn't recommend them enough, and the service I've had from the guys at Silver Project has been fantastic.

I'm able to get -2.4 degrees with lots of added caster, or about -2.6 I'd caster is left stock at the top.

I'm really hoping that when combined with the mk2 TT ball joins that we will have a genuine bolt on solution for over 3 degrees of camber, which would be awesome!

If you're feeling kind, mention me if you're contacting Silver Project :laugh:
That's awesome thanks! Hopefully they'll do me good then, did you utilise the same fixings that came with the kit? I've seen others have modified to use longer bolts and then a nut on the underside rather then just the threaded plate.
 
stock bolts and fixings used here the whole time Nick.

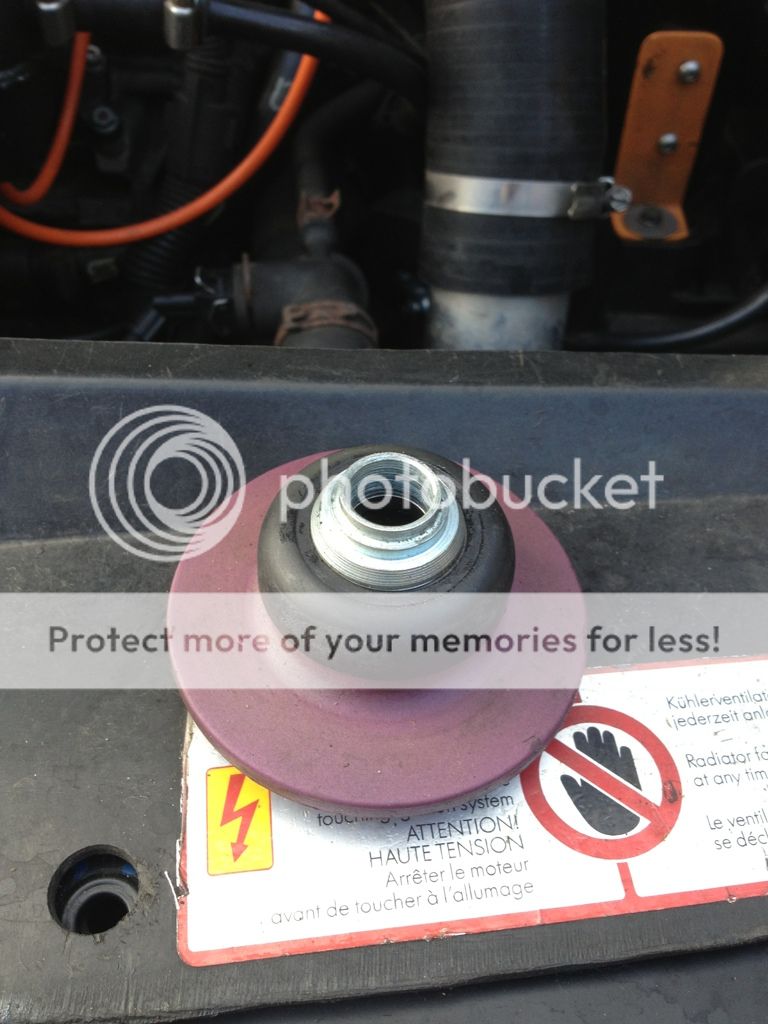
I do chose to run an OE top mount between the SP mount and the spring seat though, as this takes rotational duties away from the spherical bearing and prolongs it's life. It's also potentially sacrificial in that hopefully the stock ball bearing will break before popping a spherical bearing in the event of another moon crater!
 
Ball joints arrived from GSF.

Sadly the two joints look totally different:


No huge issue there.

However, one of the packets was missing the 3 bolts:


Grrrrrrrrrrr!

Again, hardly the end of the world, but annoying all the same. I don't have time during the week to get to thunderbolts for replacement bolts, and shouldn't have to either!

Hoping to get the ball joints fitted and top mounts altered this weekend.
 
haha.

I've e-mailled them asking for a replacement by the weekend. At worst case I can just go and get some bolts, but I'd prefer not to, and don't know what grade they need to be either, aside from '****** strong!'
 
Gsf not impressing currently.
Emailed them pictures. Explained that one had the bolts as expected, and one packet was opened with bolts missing.

Got a response back saying they never come with bolts and I was welcome to a refund on all of it.

Not helpful at all.
 
One more polite email and it's all sorted.

Bolts on their way. Problem resolved easily enough.

New wishbone bolts ordered also, these have done 18 months use and are bound to start causing issues sooner or later with a busy calendar this year.

I'm going to whip the wishbones off so I can make a decent symmetrical job of enlarging the camber slots and also getting the drilling spot on on the ball joints :)
 
That's a bit ***** ain't it!! Why wouldn't they send a matching set!?!

Atleast you've got the bolt issue resolved, hopefully this will get you the camber you want!

SP topmounts have been ordered today, do you have a pic of how you installed them along with the OEM top mounts? Interested to know how it all goes together!
 
Cars looking good mate. If you keep the top mounts let me know, I have a set of uprated bearings I bought from silverline that are meant to reduce the maintenance and issues the early top mounts had.
 
  • Like
Reactions: Prawn
  • Like
Reactions: ProjecTTrack
Aghh that's brilliant. I don't know why I thought it was the existing top mount bush that you used, it was the bearing... This makes a lot more sense!!
 
  • Like
Reactions: Prawn
No progress over the weekend, I decided to do the right thing and spent all weekend with Victoria instead :)

I have been inspired by @MIGGZ though, after seeing his little exhaust clip with the WOTbox.

Here's my attempt :laugh:


Turn it up, and sorry for the shoddy camera work, blame @Rich196 for that!
 
  • Like
Reactions: nightroamer, StaceyS3 and superkarl
oh,. whats next flamer kit?


NO!

I thought I'd get a telling off for that :laugh:

No Launch / flat shirt / huge ignition ****** enabled at all, that's just the hard cut limiter at 7k on map 3 with the soft cut set 50rpm before. hard cut is much higher on maps 1 and 2 and soft cut in earlier to avoid hitting hardcut at all.

Not advised for regular / frequent use at all. Damage likely if abused!
 
Hahahahahahahahahahhahahqhq thanks for the mention, that is insane so much love for that sounds Hahahah
 
  • Like
Reactions: Prawn
No pictures, and no progress of late. been FAR too busy.

Had a really crap day yesterday.

Took the car out for a 20 mile blast in the evening - all was then right with the world again. I fecking love this thing.

Tori cooking sausage chips n beans for dinner also helped :laugh:

Hopefully sorting out the front end stuff this weekend. new mk2 TT ball joints, new poly bushes in the 30mm front wishbone bushes, new wishbone bolts, and modified top mounts. we will see how that goes.

Does anyone have access to etka?

I could do with a part number for the ball joint nut and bolt:
$_1.JPG


It's M10 x 1.25, which I've been unable to source locally in a 10.9 grade, so I'd like to pick some up at TPS if possible, but they don't want to play ball and need a part number.

Any help much appreciated!
 
Nick I do, All i need is a reg / chassis number of the car you want the bits off and I will sort it for you mate
 
  • Like
Reactions: sparrow and Prawn

Similar threads

Replies
26
Views
8K
Replies
6
Views
4K
Replies
10
Views
4K
Replies
166
Views
20K
Replies
40
Views
4K