A3 saloon retrofit folding mirrors

zooankski

Registered User
Joined
Mar 20, 2015
Messages
93
Reaction score
29
Points
18
IMG 0263
I am possibly going to attempt a folding mirror retrofit ( if i do then i will obviously take loads of photos! ).
I need to work out if my door control modules 5Q0959592D will accept the mirrors or not?
If not then can anyone with folding mirrors on the saloon and who has VCDS give me their module numbers? Looks like a fairly big job with door cards off, and i guess the window glass also has to come out for access!!!ATTACH=full]74640[/ATTACH]
 
Last edited by a moderator:
I have factory folding mirrors using:
  • 42: Door Elect, Driver - Part No SW: 5Q0 959 593 A HW: 5Q0 959 593
  • 52: Door Elect, Pass. - Part No SW: 5Q0 959 592 A HW: 5Q0 959 592
 
  • Like
Reactions: Toonsoldier91
I'm hoping to do them same, in contact with nhn (apart from message not getting to him via here)

What sort of price this going to cost?
 
Price for parts - not inc modules would be £360 ish(total bill was £405 but i got some new window trims and i think they were £20 each ). You can see why i hope my modules will work! they are another £150 each unless i can be sure what to get off of the bay.
Looks like numbers are the same to DJAlix apart from last letter?? How do i see HW and SW number on VCDS? I only get what you can see in the photo in post 1.
 
The information I posted up is a cut and paste from an Auto Scan.

I just looked at some of the scans which other people have sent me and a car I know 100% does not have folding mirrors has the same modules as me from the factory. I know some module revisions can cause issues with VCDS codings and adaptations but with a retrofit like this, which is a normal factory available option, I cannot see there being an issue.
 
Found options to enable folding mirror in modules 42 and 52 but guessing it must be somewhere else too?
 
...... and i guess the window glass also has to come out for access!!!

With the door glass lowered you should have ample access to the 3 door mirror fixings ......

evr9GSIh
 
  • Like
Reactions: zooankski
With the door glass lowered you should have ample access to the 3 door mirror fixings ......

evr9GSIh

Perfect :) , I might even get away with not removing the door card from the handle - thanks for the pic!
 
  • Like
Reactions: Rob2k68
I believe the mirror will need coding within the door modules and then within the BCM (09) in order for the MMI option to pop out. Will need to double check tho.
 
  • Like
Reactions: zooankski
I am sure there used to be a guide to removing the mirror caps on an 8V on the forum, damned if i can find it now :(
Parts arriving Monday :), shame i won't have my car back until Tuesday night as wheels being powder coated.
 
Mirror caps can be quite tricky. To do it properly and ensure that you don't damage anything remove the glass and the front plastic bezel so the bit you see that surrounds the glass. Also helps to remove the glass stabilising springs. There's a pic in the carbon accessories thread although don't think search function is working at the mo.

I'll post some better pics from work tomorrow morning ;o)
 
  • Like
Reactions: zooankski
I have guides for mirror cap removal also, in fact I think I posted some photos on here of when I removed mine to wrap them. Will dig some stuff out but try searching my post history in the meantime.
 
Found my photos.
  1. Adjust mirror glass so that it's facing towards the car and you can get your fingers behind the outside edge.
  2. The glass is held in place by some large spring clips on each side. With this in mind gently pull on the outside edge in order to release this side. DO NOT let the glass flex as the mirror will break. Try to apply even pressure. A busted mirror (heated) glass is approx £44.
  3. Once unclipped adjust the mirror so that the inside edge is "out" as far as it will go. Get your fingers behind it and repeat the pulling process.
  4. Photo One - Once the glass is out you will see the screws highlighted. You will need to remove all of them.
  5. Photo Two - You can then slide out the adjuster.
  6. Photo Two - Once the adjuster is out you will be able to unclip the surround and pull it towards you.
  7. Photo Three - Once unclipped look inside and towards the top you will see the two clips which hold the cap in place. Keeping the cap in position lift the clips and then slide the cap away from you while keeping it level to the ground.
  8. Job done.
Will post the ElsaWin docs once I get a a few mins.
 

Attachments

  • Photo One.jpg
    Photo One.jpg
    1 MB · Views: 2,159
  • Photo Two.JPG
    Photo Two.JPG
    356.4 KB · Views: 1,985
  • Photo three.jpg
    Photo three.jpg
    894.1 KB · Views: 1,761
  • Like
Reactions: pamarakos, zooankski and Rob2k68
Excellent mate. Will torx bits in an adapter fit or would you need specific torx screwdrivers to remove the screws?
 
  • Like
Reactions: Rob2k68
This is what i have ordered so far. The mirror assembly comes with everything in yellow.


Screen Shot 2015 12 10 at 195134 Screen Shot 2015 12 10 at 195330

Part numbers came from a 2014 A3 Saloon with folding mirrors. The only part we struggled with was the new surround for the switch as the dealer part diagrams are not clear.
This is what we have ordered for now and hopefully it is right! -

Screen Shot 2015 12 10 at 195815
 
Excellent mate. Will torx bits in an adapter fit or would you need specific torx screwdrivers to remove the screws?

A couple of the screws are fairly deeply recessed if I remember right so you'll be better off with a screwdriver or wrench tool (similar to allen key) again from memory but fairly sure it's a T5 torx.
 
Is all stand sizes and used a driver with long changeable bits instead of the stubby ones. It's not hard, just need to take your time.

Cannot comment on the needed parts (surround) as I have not got around to installing ETKA or whatever the name of the digital parts catalog is called.
 
Parts turned up today. Now just to get some time to have a look! Mirrors appear to be only missing the caps and everything else looks spot on.
My main concern now is releasing the door clips without breaking any! I have purchased a trim removal set and hopefully that will do the job.

IMG 0374


IMG 0376 IMG 0377
 
  • Like
Reactions: mike170
Nice! Just go slow and easy with trim parts. One thing I have learnt over the years is that you need to take your time and step away if getting ****** of or confused. Just remember to apply firm and even pressure. Some parts do need more pulling than you might think. Another good trick is once you have inserted a tool, slide it around slowly in order to locate a clip, then prize from there. The clips will be located in the strongest locations, if you see what I mean...
 
  • Like
Reactions: zooankski
Definitely going to take my time :) - when i bl**dy get some that is! :)
 
  • Like
Reactions: DJAlix
How much is this costing you? if you don,t mind me asking..
Looking at your avatar.... Are you based in Broughton Cheshire by any chance??
 
I am an unrestricted licensed B1,B2,C aircraft engineer working for EasyJet in Luton mate although i travel from home in Cambridge when i am on shift :) . Cost for bits was about £350, So assuming i can do it then that is not too bad considering people have been paying twice that for installations.
I have most of the info now and i may take a little look later today once i collect my car as it has been having it's wheels powder coated. I can't wait to not see those diamond cut wheels ever again! :)
I am going to try and put together a guide as i go but it does not look too hard, just a bit fiddly.
 
  • Like
Reactions: Schizophonic and pburv
Cheers for that mate..
Thought you worked for Airbus in Broughton..
Good luck with the retrofit.....
 
  • Like
Reactions: zooankski
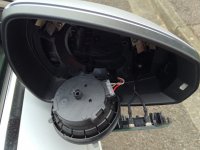
Well, got the drivers side mirror fitted today and it was not too bad a job although i was a bit nervous taking apart a 6 month old car!. Hardest parts were routing the mirror cable behind the window guide and replacing the mirror switch trim panel.
It is indeed possible to undo the mirror without removing the glass, however the glass needs to come out to route the cable behind the window guide with one arm up through the base speaker hole!
The interior door arm rest/handle that houses the switches needs to come off to be replaced and Audi decided in their wisdom to use the plastic projections that go through to the rear of the panel as a type or rivet in a few areas and have melted the ends to secure them. I have highlighted them using blue arrows in the pictures.. The very forward end of the handle is also melted over although it also has 2 securing screws so no idea why? I simply heated an old coach screw up and remelted the new plastic projection over as i put it back together.
Once i used a drill bit to remove the rivet head i was able to remove the trim and swap out the switch fascia with no problems.
Refitting is simply a matter of replacing the drilled heads with short self tappers.
I have coded 42 drivers door for drivers folding mirror and it works fine from the switch. Been trying to work out how to make it fold on locking but the option is not there in 09. Having discussed it with DJAlix, it could require both mirrors coding first so that's tomorrows job!
Massive thanks to DJAlix for all his help so far!
Rivets to drill out Self Tappers Fitted IMG 0398 IMG 0399
 
Last edited:
  • Like
Reactions: dp_motley, Rob2k68, mike170 and 2 others
Happy to help fella, although I wish you could have waited until Friday / Saturday as I would have loved to have popped over and helped with this :( Great project!
 
Trouble is mate, i now have to work Saturday, not to mention Christmas day night too now as well Grrrrrrrrrrr. It would have been a good crack too i imagine! :)
Just hope this coding gets sorted.
 
Passenger door mirror fitted this morning and door module coded. Central electronics adapted to display mirror fold on MMI and it works a treat- well chuffed!
I hope to get some sort of guide done at some point but if anyone needs info for now then drop me a message and i will send you a link to the photos and trim removal guides etc.
Massive thanks to DJAlix for all his help!
 
  • Like
Reactions: mike170, Rob2k68 and DJAlix
Good work - well done !!!
 
  • Like
Reactions: zooankski