Our New 1.8TQS Avant

So todays efforts!

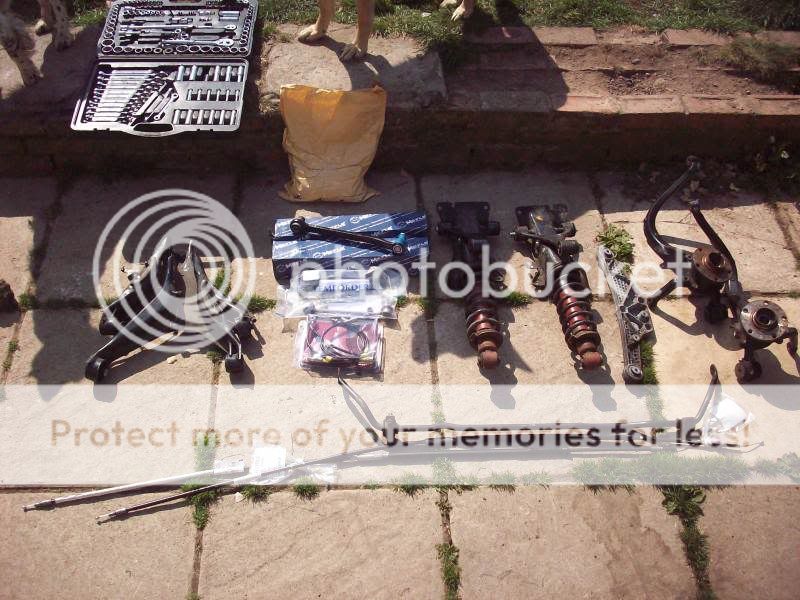
Laid out all the parts that were going on and got the subframe out to fit the bushes:

100_8101.jpg

100_8094.jpg

100_8095.jpg


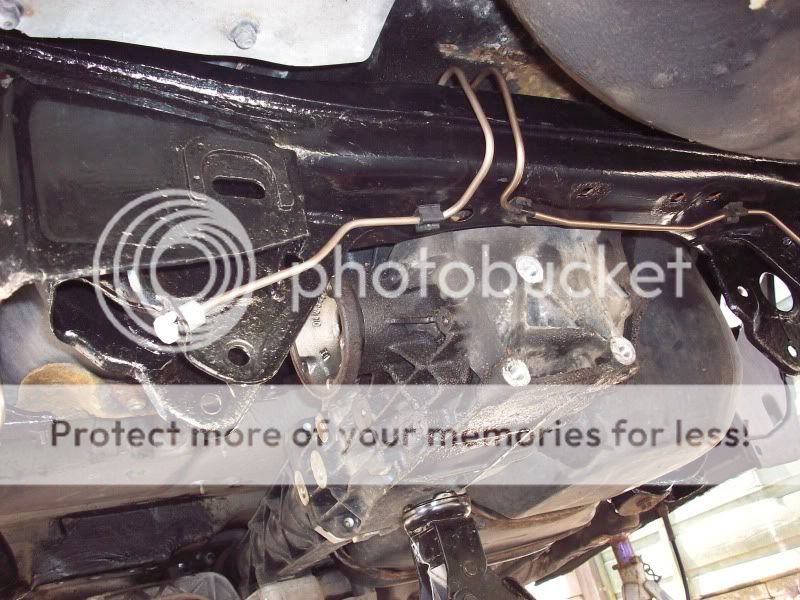
Attached the brake lines to the subframe:

100_8105.jpg


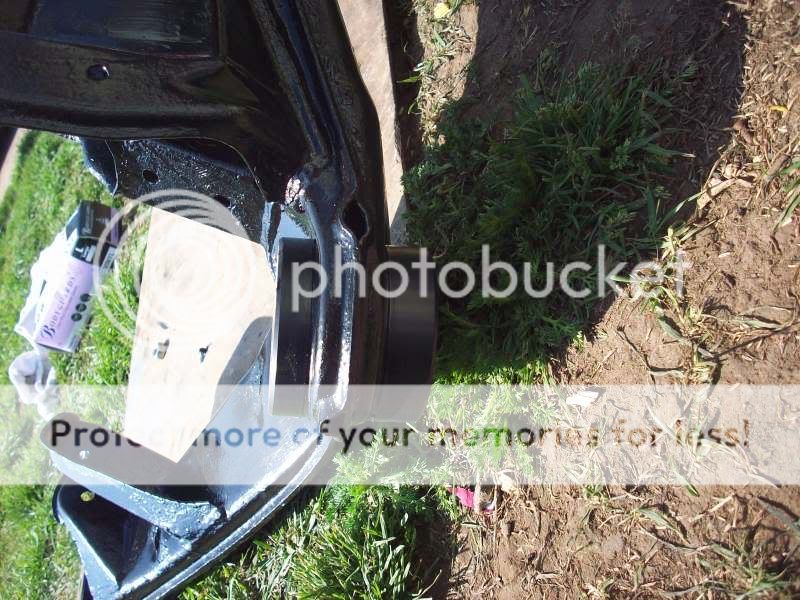
Changed the side seal on the diff while it was all apart:

100_8108.jpg

100_8109.jpg

100_8111.jpg

100_8112.jpg


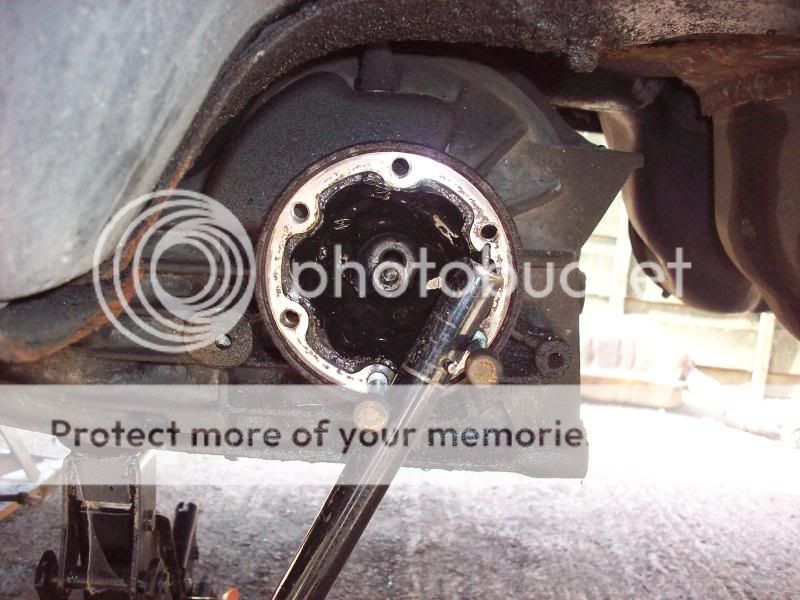
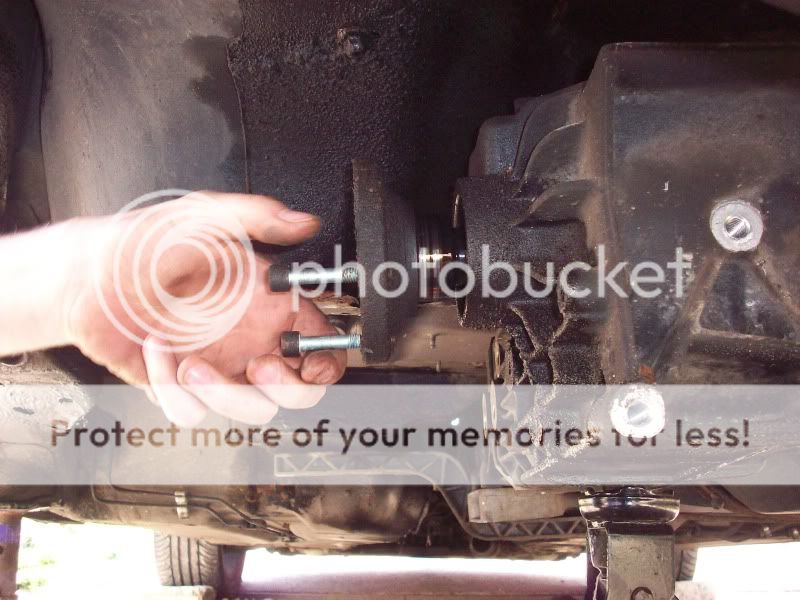
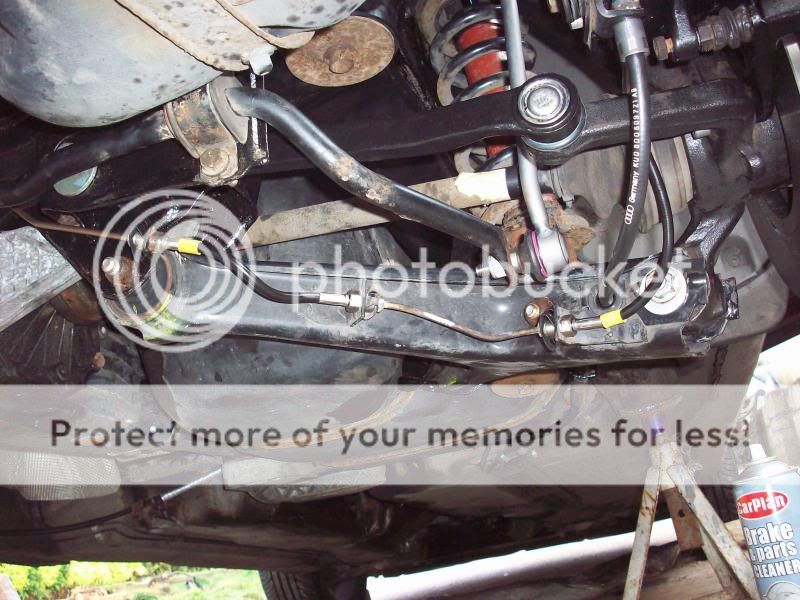
Bolted in the new subframe and started rebuilding the suspension:

100_8113.jpg


100_8115.jpg


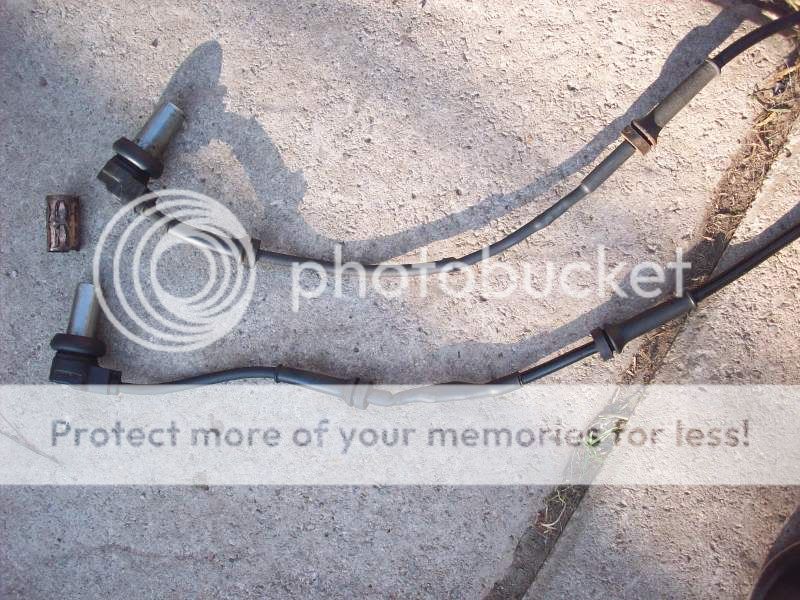
Modified some "push in" front ABS sensors to fit the rear:

100_8119.jpg


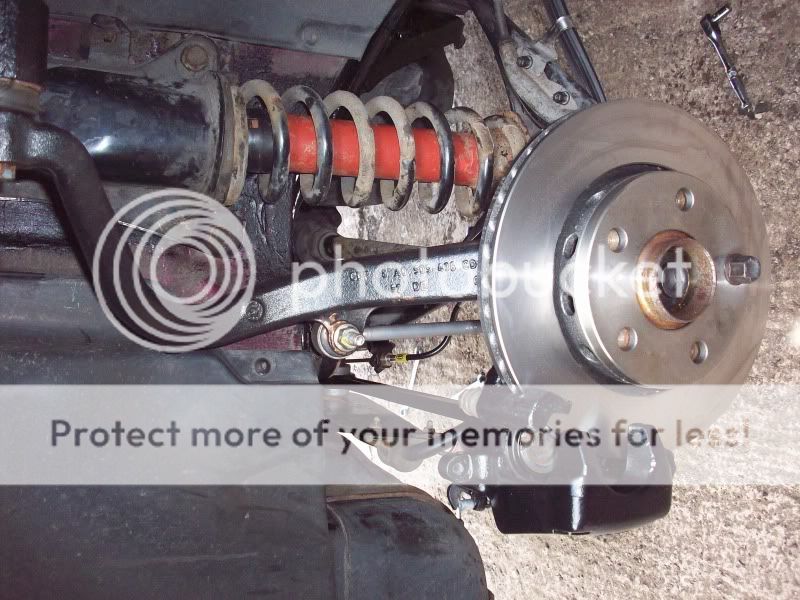
Fitted new flexis and brakes:

100_8123.jpg

100_8129.jpg


Then after all the great progress hit a snag, and a big one.

TQS Ronal Boleros dont clear the FL S4 rear calipers :mad:

Chucked in the towel for the evening. Trip to halfords tomorrow for some spacers!
 
good progress guys! shame about the Boleros clearance, Mark had the same issue with the S4 Calipers on the front as you know mate nice day for it anyway! :photo:
 
Yeh, but these rear calipers are much more sensible than S4 fronts. It didnt even occur to me that there was even a possibility of it being an issue. Its just the boleros are quite narrow, and due to the dish and the curved spokes they really encroach on the caliper area.

It only just touches, and a 3mm spacer will be enough to make it clear.
 
Yeh, but these rear calipers are much more sensible than S4 fronts. It didnt even occur to me that there was even a possibility of it being an issue.
yea i agree Kev. so all set after the spacers on?

Chucked in the towel for the evening. Trip to halfords tomorrow for some spacers!
Lucky they are open on Easter Sunday
 
Yeh, need to fit the handbrake cables to the internal mechanism and adjust them up, and perhaps do some more bleeding depending if its taken or not as the pedal felt spongy even with the engine off!

Slot the exhaust on and its ready for a test drive.
 
I have a set of spare rear wishbones to fit new bushes to once i get round to buying them all. Just one of many things i want to do.
 
Soo, yestarday seemed to drag on forever, but we got it "finished" and got home.

Started with an early morning trip to halfords, and i collected some wheel spacers. When i got back to marks we assembled the wheel, spacer, brake disk and hub on the floor and discovered that the amount of engagement on the wheel bolts wasnt really enough to be safe. The packet suggested that 6 threads of engagement was required for an M14x1.5 bolt, and the hub itself is only 6 threads wide. Unfortunately the stock bolts are only just thick enough to engage those 6 threads, so fitting the spacer had us down to 3-4 threads engaged.

Clearly the optimal solution would be hubcentric spacers and extended bolts, but we didnt have any, nor any chance of aquiring some on Easter sunday, so we took the decision to refit the original brakes. With those back on and bled up, exhaust back on and the handbrake cables installed and adjusted it was getting on for 1o'clock, and time for the barbecue that the other halves had insisted we were finished for! Quick drive round the block suggested that everything was fine, so we called it done and parked up just in time for food.

The drive home showed all our work had been worthwhile, as even with the rear geometry completely randomly set, the car felt much more solid, less bouncy/wandery, with a much crisper turn in.

There is a distinct whine from the diff at certain load/speed/steering positions, presumably because its now much more solidly mounted, unfortunately the dull thud that was present before and that i had assumed was down to knackered bushes is now a crisp metallic clunk, which presents itself when ever you engage the clutch or snap the throttle, so i need to try and work out whats causing that.

Think i'll spend some time washing the car today, and see where i can get the geometry done locally, although that might have to wait until later in the week.

Will also have to think about what i want to do with the rear brakes.
 
I figured it would be useful to make a note of how much all this cost, and any notes or useful info on each part so people wanting to do the same can get an idea before they start.

Clearly you can do it in stages, or perhaps have already done some of it, but you can pick and choose as required.

Alloy Rear Subframe Mounts from KDR Engineering, £80. Well made, fitted perfectly and i smeared them in sikaflex type adhesive to ensure no creaking or squeaking.

Lower Wishbone Bushings, OEM parts from AllGerman, £70 for the 6.

Upper Wishbone Bushings, OEM parts from AllGerman, £60 for the 6.

Bearings and Upright Bushings, OEM parts from AllGerman, £90.

Tie Rods, Meyle Arms from AllGerman, £77.55. Mine werent worn, but it affects the geometry and i figured i'd rather change them now, than have them fail the next MOT and need the alignment done again once rectified.

Metal Droplinks, Lemforder parts from AllGerman, £60. The OEM links are plastic, and typically people use the RS2 metal ones on the B5 to improve it, i found that lemforder seems to list the metal links against the B5 anyway.

Rear Diff Carrier Bushings, The front mount i've just filled the stock mount with sikaflex. The rear mounts have been replaced with 80 shore mounts from 034 motorsport. These are circa $25, but i picked them up on ebay for £9!

Rear brake Flexis, Black Covered braided lines from HEL, £105. Good quality and fit better than the goodrich ones. I found that with the goodrich hoses, the short hose between the subframe and wishbone are 10mm longer than the stock ones, and this makes them fit awkwardly. The HEL pipes were spot on.

I ordered replacement bolts, diff seals, handbrake cables and brake hard lines from Audi, which came to a ludicrous £250. The handbrake cables alone were £95!

So all in i spent around £800!!! (And that doesnt include buying the spare parts to fit everything to)

This was ofcourse spread over about 6 months of collecting parts.

You could probably reuse all the bolts, but theres the risk of siezed bolts etc (the only one of mine that was an issue was one of the camber bolts) and the handbrake cables shouldnt be a huge issue to reuse, which should save a good £250 off that total without too much effort, with only the small risk that your stuck off the road for a few days waiting on a bolt to arrive if you do damage one.
 
You say 6 bushes for the lower wishbones,is that including the 2 that are in the upright? Just that there is only 4 in the wishbones themselves. All the bushes i have been removing from my spare set looked not bad so im hoping i will notice an improvement with new ones.
 
Changed the rear diff today, thinking that was causing the clunking.

Unfortunately its more or less the same, perhaps a little better than it was.

Both diffs appear to have a lot of play in the input flange when attached to the car, but minimal play once on the floor. No idea whats going on, but i think the next step is to ignore the play and get some softer rear diff mounts to dampen the noise a bit!
 
Yeh, but these rear calipers are much more sensible than S4 fronts. It didnt even occur to me that there was even a possibility of it being an issue. Its just the boleros are quite narrow, and due to the dish and the curved spokes they really encroach on the caliper area.

It only just touches, and a 3mm spacer will be enough to make it clear.

The Boleros on TQS are ET35 on an 8" rim right?
Hmm my BBS's are the same, I hope they clear.

Changed the rear diff today, thinking that was causing the clunking.

Unfortunately its more or less the same, perhaps a little better than it was.

Both diffs appear to have a lot of play in the input flange when attached to the car, but minimal play once on the floor. No idea whats going on, but i think the next step is to ignore the play and get some softer rear diff mounts to dampen the noise a bit!

I have the same problem and have had for a long time.
I believe mounts are the wrong way to approach the problem head-on.
I saw your thread on AZ and sucks that no one has shed some light on it.
Check the centre diff for play, JHM advised me to do this long ago. They also did mention 01A ctrs seemed to be much weaker than 01Es which is why they don't do core exchanges on those for their 4:1 diff serice.
 
Last edited:
Dont mean to be a pain but could you list the part no's of all the bushes i need for just the wishbones if you have the info to hand from ordering yours? 12 bushes in total? I dont know where to get part numbers from other than going to audi. Will just get them from allgerman as you did.
 
gmx: TQS Boleros are ET45 and 7" wide, you'll be fine with your 8" rims.

The point is that with the transmission in neutral, and the handbrake on, the propshaft turns quite a bit. I put a video of the play up on the AZ thread, i'll post it here shortly, along with a comparison with my other car. None of that movement can be coming from the centre diff, as the rear wheels/diff should be locked and shouldnt allow any movement, and with the tranny in neutral the centre diff is free to turn.

There may well be play in the centre as well ofcourse, but i dont think thats the problem here. I should point out i didnt fit the mega stiff bushes/mounts to cure the thud specifically, i fitted them because any movement in the drivetrain affects the cars handling and power delivery. I had hoped ofcourse that the thud that was present beforehand was simply the result of tired mountings, and that fixing them would fix the thud. As it happens it made it worse, by removing all the slop that was acting as a damper for the slack in the drivetrain that was actaully causing it.

Unfortunately what i've found with these cars is that people like bolting on bling parts, but very very few people actually get the car back to how it should be when it left the factory before adding go faster bits. As a result asking for help/info about such matters seems to just draw a blank everywhere, because unless said part has physically disintegrated/broken/snapped/whatever, it just gets ignored by 99% of owners.

Ian: PM me your email address, and i'll forward you the part numbers i baught from all german.
 
Thx for specs on the rims. I could've I was shocked that my Boleros were the same dimensions as the BBS'. I'll have to unwrap and recheck them.

Unfortunately what i've found with these cars is that people like bolting on bling parts, but very very few people actually get the car back to how it should be when it left the factory before adding go faster bits. As a result asking for help/info about such matters seems to just draw a blank everywhere, because unless said part has physically disintegrated/broken/snapped/whatever, it just gets ignored by 99% of owners.

Couldn't agree more.
People aren't going after proper solution. They are just bandaiding the problem with these aftermarket components.
What confuses me even more is that for all others, their problem seems to disappear. I don't know if it's an extreme case of placebo or plain stupidity or even that they've never experienced the problem but only had similar symptoms as ours.

I had a look at your video posted on AZ, and it's just beyond me.
So the replacement diff hasn't even slightly changed the movement or extend of thud? Was that from one of your other cars and did you have experience with it beforehand?

Are there any marks on the prop that suggest it is aligned and true?
What about the shaft centre support bearing? I can't fathom how this may be related to the thud but is it heavily worn?

I haven't got round to try this, but how about the opposite of 'braking' the rear wheels and get them up in the air to see how much turn there is when the fronts are stationary on the ground (choke or brick behind them). Car in gear too.
 
Last edited:
It seemed to change it very slightly, it now seems a little less harsh. But its still hugely clanky and pretty annoying.

The diff i baught as a used spare from a member on here along with a pile of other rear suspension parts. But i've compared the play on the avant with the play on the diff fitted to the saloon i'm fixing up, and they're more or less identical. I've never driven the saloon on the road yet though, so it could well be just as bad. Its also on similar mileage (115k). I took a video of the saloons diff, and the new avant diff the other day, i'll upload these now and link them in a minute..

Measuring what you've suggested wont be particularly enlightening i dont think. With the rear wheels free to turn and the front wheels locked and in gear, you'd be measuring the play in everything forward of the prop flange, ie centre diff, front diff, transmission, clutch etc.

I think the next step has to be to swap the rear diff carrier out for one thats softer (perhaps new OEM bushes), as until i work out what exactly is causing this play i want to take some of the load off the gears etc. Having them take a shock load like that on every shift cannot be good for them, and i dont want this to cause other parts of the drivetrain to wear out.

I think i will try to replicate the play on the ground on the diff i removed by locking the diff flanges together (simulating the handbrake being on as in the car) If i get the same play, i might pull it apart and see if i can see anything obviously knackered/worn inside, and maybe throw some new bearings at it and see if i can get rid of any of the play. I had assumed that because the diff had no play on the ground it must be something else, but thinking about it, when on the ground there is no load, and its entirely possible that it IS still the diff, and that the play would appear once i loaded it up (ie by stopping it turning the output flanges)

The propshaft centre bearing isnt brand new, and i can move it around a bit if i push it, but the rubber is all intact and it looks to be doing its job from what i can see.
 
Over the last 6 months theres been a slow building up of parts that need done to the Avant.

Currently on the to do list we've got something like this:

Replace the roof rails with black ones
Fit new springs and replacement front shocks as well as top arms
Fit new front outer CV boots
Fit new engine and gearbox mounts
Fit replacement turbo (i think the one in there has a dodgy wastegate)
Fit a new clutch

I finally set about actually ticking some of the items off, as the list was getting a bit ridiculous.

Last week i swapped the roof rails with a guy from AudiSRS, so i'll post some pics of them in a bit.

Yestarday i decided to crack on with the front suspension. I'd baught an eibach prokit and some lower mileage front shocks from an RS4 a few months back, so i decided to install those along with the CV boots and fit the top arms. I'd already done the bottom four arms back in november.

Set about stripping the car and it all came apart with relative ease, the pinch bolt had been out recently so slipped right out without issue.

Suspension removed and driveshaft extracted:
P1040735-2000.jpg

P1040736-2000.jpg


Comparison of Original shock and spring and new shock and eibach spring:
P1040737-2000.jpg


New shock and spring assembled:
P1040738-2000.jpg


Unfortunately the top mount was showing signs of degredation, but i dont have replacements, so they'll have to go back in as is.

The driveshaft was an ABSOLUTE pig. I popped the CV off with relative ease using the vice and a cold chisel. Some crap had got into the joint, so i decided to fully dismantle it and clean the components then reassemble. I stupidly didnt take any photos of this, but i will take some of the other side. Fitted the boot to the shaft then made a complete **** of trying to refit the CV. Ended up damaging the splines and had to sit for about an hour with a file before it would go back together!

They're also plastic boots, and require a "special" tool to tighten the bands. The tool however is hopeless and seems to have deformed and stretched. I just hope it holds out to allow me to do the other side!

Shaft refitted:
P1040739-2000.jpg


Assembly Complete:
P1040740-2000.jpg


Wheel back on:
P1040742-2000.jpg


I'm now waiting for the drizzle to stop so i can go attack the other side!
 
Nice work, bet it was chilly outside at this time of the year. When you getting it resprayed?

Just kidding, that must be a pretty rare colour. Whats it called?
 
So today the plan was to repeat yesterdays work on the other side. As always nothing goes to plan!

Stripped it all down again with no issues, however i discovered the CV boot on this side had already given up and everything was covered in ming. Got the shaft out and took it into the garage to sort it.

P1040748-2000.jpg


Removing the CV:
P1040749-2000.jpg

P1040750-2000.jpg

P1040751-2000.jpg


Cleaning the CV Internals:
P1040752-2000.jpg

P1040753-2000.jpg

P1040754-2000.jpg


Reassembling:
P1040755-2000.jpg

P1040756-2000.jpg


Shaft reassembled:
P1040757-2000.jpg


I managed to break my brand new CV Joint Band pliers, so i couldnt properly crimp the bands:
P1040767-2000.jpg


I got them tight enough to continue, but i'll need to crimp them properly before i use the car. I then noticed there was a fair amount of play in the inner CV. I noticed the broken rear shaft i had seemed to have an identical Inner CV, so i removed that and stripped it in the same way, cleaned and reassembled.

P1040758-2000.jpg

P1040759-2000.jpg


Complete shaft:
P1040760-2000.jpg


Shaft back in and new shock/spring installed:
P1040762-2000.jpg

P1040763-2000.jpg


As it is now:
P1040764-2000.jpg


Will try and get a replacement CV Band tool tomorrow and get them tightened. Then it can go back together!
 
So you got just this new rubber bit on CV joint?
I didn't know you can change that...
Where do you get something like that?
 
The replacement boot came from All German Parts, they were £15-20 quid each and come with a new bolt and grease etc.

They are the newer thermoplastic type ones rather than rubber too, hence needing the special tool to fit them.
 
The tub just had diesel (expensive white stuff at that!) in it. CV Grease is horrible stuff, used about half a roll of blue roll to clean the various bits.

Yeh gonna see if i can get a set of those tomorrow morning!
 
The tub just had diesel (expensive white stuff at that!) in it. CV Grease is horrible stuff, used about half a roll of blue roll to clean the various bits.

Yeh gonna see if i can get a set of those tomorrow morning!

You cleaned them in just diesel and clothes?
Nice.

Mine seems to be locking/sticking when turning right. So need to look at it and if diesel is any good as a cleaner, I'll use that.
 
Petrol or petrol/diesel mix would probably work better, as its a bit more solventy, but ye it worked fine.

If its sticking are you sure the boot isnt split?

What typically happens is the boot goes, all the grease escapes and is replaced with road grime, which then contaminates the joint and cuases it to jam. I suspect you may well find the CV is fubar when you take it apart in that case!

Worth a try though for the sake of a few hours and a tub of CV grease.

Its got all new CV boots and fresh grease.

I'll strip it down when the weather warms up and soak them.
See what happens.
 
That tool you bought looks like it's very weak ! I used steel fixers pliers and a ratchet strap on it, make a loop then use a extension to turn the loop till it takes up the slack and it will tighten itself. I hate them plastic boots, they are so hard that it makes the cv joint almost impossible to fit back in the hub !
 
Got some nice new steel pliers with built in holes for the torque wrench/breaker bar today.

Will have a go later and post an update then!


Scott, you'll really need to dismantle the joint like i have, rather than just soaking it.
 
So its done.

Those new pliers did the job but they're nowhere near as nice to use as the other tool.

Because the other tool had a screw,once nipped up they stay where they are by themselves, you can then use one hand to hold it steady and the other hand to tighten the screw and do up the crimp.

With the pliers obviously you have to hold them streight and true the whole time and actaully squeeze to apply pressure, rather than just ratcheting up a screw.

All of this made more difficult because it was wedged under the car, rather than out in the open!

Its dark so i didnt take any photos. Will snap some tomorrow.

Took it out for a drive though, and it feels ****** awful. I can only imagine (hope!) that the alignment is away to hell, afterall i've now replaced all the front arms, front uprights, and lowered the car since i had the tracking done originally!

Need to find somewhere local that can set the car up properly. I used a place before, but it was mega expensive, and i wasnt that impressed with their work after discovering a chewed up camber washer on the rear!

I'll need to swap the rear springs in before i do that though!
 
So to round this off some photos!

This is how its looked for the past year or so. Silver rails and stupid front ride height the most noticeable issues:

100_4147.JPG

100_4098.JPG


and how it looks now (i apologise for the ****** awful photos, no idea how they've come out so bad!):

P1040769.JPG

P1040770.JPG


Once i've done the rear springs, and given it a proper wash, i'll get some decent photos taken.
 
Looks better with the black bars and a bit lower.
Got any plans for the rims?

What colour is it again?
It looks like Hibiscus red but with a greater hint of pink.
 
Last edited:
I swapped the rails with a bloke on SRS.

He wasnt sure if he liked them though, so he might be up for a swap with someone else :p

Color is called Berry Pearl.

I quite like the Boleros (i have hoarded 5 sets of them now :p) so they'll probably be staying. I want to get the summer set properly refurbed though. The cars currently wearing its winters, but if you look at the "before" photos you'll notice the rears are a totally different color to the fronts. I had the rear pair refurbed, and was going to get the fronts done to match, but i didnt like the color, they're too blue.

So i need to find somewhere that can do me a decent job of refurbing the summer set before they go back on (shortly!!)
 
Color is called Pink Berry Pearl.
That would explain its pinkness :)

I quite like the Boleros (i have hoarded 5 sets of them now :p) so they'll probably be staying. I want to get the summer set properly refurbed though. The cars currently wearing its winters, but if you look at the "before" photos you'll notice the rears are a totally different color to the fronts. I had the rear pair refurbed, and was going to get the fronts done to match, but i didnt like the color, they're too blue.

So i need to find somewhere that can do me a decent job of refurbing the summer set before they go back on (shortly!!)
Is that not something a man of your skills can do?
 
I HATE painting things. I get impatient and want it finished an hour ago.

The result being either a) i dont spend enough time on prep or b) i apply the paint too fast and it reacts and goes to ****, or c) a & b together, followed by rage, followed by failed attempts to rectify it, followed by more rage, followed by the wheels getting fitted as they are looking a right state.

See the photos of my orange winters for proof of this process :p

I also wanted the wheels powdercoated rather than painted for longevity. Aerosol spray paint is crap and chips off when you brush past it with a feather duster. Cept the place i went to clearly uses the ****test powdercoat in existance, as i've already chipped both the orange set on shed and the blue on avant ones in a couple of places :mad:

And its not pink :p