Audi A3/S3 LED Project
At last here is the how to guide for installing LEDs for the interior and exterior bulbs in an Audi A3/S3.
You will need:-
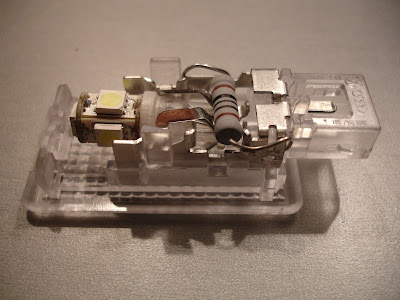
5 x 2W 150 Ohm resistors -
www.maplins.co.uk product code: D150R (150 Ohm is the maximum resistance you can use, this has been tested and proved. Any higher and the computer will not be fooled into thinking there is a bulb there)
1 x Soldering iron
Solder
4 x BA9S T4W Flank LED bulb (eBay) Map reading lights
2 x 42mm LED festoon bulb (eBay) Front ceiling lights
2 x 36mm LED festoon bulb (eBay) Number plate lights - Use metal LED's NOT plastic. See important note at bottom of page!
5 (for 3 door) or 7 (for 5 door) x 168 194 refractor wedge LED bulbs (eBay) Puddle lights, foot well and boot
IMPORTANT NOTE: I discovered when ordering bulbs off eBay that they are not all the same colour white. The difference is only very slight but if your ceiling festoon and map reading bulbs are ever so slightly different colour white, would it bother you? It bothered me! The only way I got round this was trial and error. I ordered several different types of festoon bulbs off eBay to match my map reading bulbs, after only 2 tries I found a match! This is the only place in the car where you will see the difference in colour as the bulbs are next to each other. Everywhere else will not matter!
IMPORTANT NOTE: It seems that the DIS may work with a tolerance. I can use 150 Ohm resistors in the number plate set-up but it seems others are having problems. If 1 resistor does not work then install a second resistor in the other fitment. This way you can double the current and fool the DIS.
Why are LEDs a trouble to install?
The installation part is not so difficult, in the most part it is just a matter of taking the filament bulb out and putting the new LED bulb in. The difficult part is getting the car to think there is a bulb there and to supply it power. Audis being Audis monitor every bulb in the car, if the car detects there is no power or very little power being used in a lighting circuit it will cut the power from it, hence switching the bulb off. LEDs use much less power than filament bulbs. This is why we put a resistor in the circuit to fool the car into thinking there is a bulb there and to send it power.
Interior Bulbs
Festoon and map reading, front and rear
Remove the clear plastic guard by levering it off with a screw driver, it will unclip. Now you can see the first two festoon bulbs. Now lever off the dark plastic guard, you should see the two map reading bulbs. There are two screws near the top of the panel, remove them and use a screw driver to lever off this unit. Unclip the electrical wires so the unit is free from the car. Place this unit to one side.
Now go into the back of the car, find the map reading unit and gently lever it off with a screw driver. Disconnect the electrical wire and place the unit to one side.
You should now have the front lighting unit and the rear lighting unit in front of you.
Remove all the old filament bulbs from the units. You should have six bulbs. Now look at the rear light unit, you will need to solder a resistor like shown below. This resistor is used to stop the lights being on very dim when they are meant to be off. Insert the 2 x flank LED bulbs in the rear unit and the 2 x 42mm festoon LED in the front unit. Now, in the front unit there is a little bit of difficulty getting the map reading bulbs to face down, this is due to the way they are designed. To get them to face down you need to push them in with a little force, making the metal spring part of the bulb holder bend back a little and then turn the bulb to be secured behind the plastic guard. Looking at the unit you will see what I mean. This is the interior ceiling LEDs complete! Reattach the units and test! If the festoons do not light up try turning them around, LEDs are omni directional and can only pass current one way.
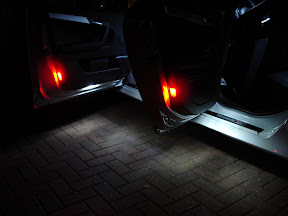
Foot well
Use a small screw driver to pry the clear foot well light off. You will see the wedge type bulb in the casing. Unclip the power supply and remove the unit, do this to both the drivers foot well and passengers foot well. Remove the cream plastic guard, you do not need this. Attach a resistor as shown below. Only attach 1 resistor to either unit. Insert the 2 x wedge LED bulbs, 1 into each unit and reattach and test. Again, the same rule applies, if they dont light up turn the LEDs around.
Boot
Do the same as the foot well and attach a resistor. I believe the boot bulb is used in the puddle light circuit, this is why we are putting a resistor here. Reattach and test.
Exterior Bulbs
Puddle Lights
The puddle lights used the same style holder as the foot well but you cant completely remove them. When you pry the clear plastic off you will see a cream coloured guard over the bulb, remove this with some pliers, be sure it doesnt snap off into the door card or you will get a rattle! To change the bulb use a screwdriver to gently remove the bulb, be careful not to touch the positive and negative sides of the bulb holder with the screwdriver as you will blow a fuse. Once the filament bulb is out replace it with the wedge LED. Do this on both sides. If you have a 5 door the rear doors are more difficult. I couldnt replace the bulbs in the rear doors as they were guarded by black plastic. I asked my dealer to replace the bulbs for me when I went in for an oil change, they had no problem in doing it.
IMPORTANT NOTE: When installing the puddle lights be sure to secure the bulb in place with some duck tape. This is necessary as the LED bulb is quite loose in the holder and can fall out into the door card. The duck tape will insure this wont happen. Getting a bulb out of a door card is a very annoying job!
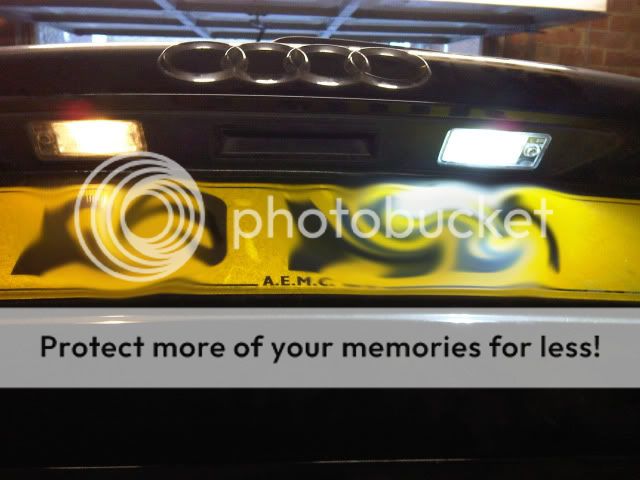
Number Plate Lights
Remove the light units by using a small Philips screwdriver. Remove the old filament bulbs and attach a resistor to each fitment as show below, be sure the resistor is secured in place and has a gap from the bulb as it will get quite hot. Insert the 2 x 36mm festoon LEDs into the light units, 1 in each, reattach and test, again, if one does not light, turn the LED around.

IMPORTANT NOTE: The number plate LED mod has not been without a few problems. When the resistor is wired in this setup it is passing current a lot of the time. Due to this it can get hot! When i was testing with the 100 Ohm and 120 Ohm resistors it managed to melt the LED bulb and stop it from working. I am now trying with a 150 Ohm resistor, this will only be outputting 0.96 watts of heat. I am still testing to make sure this does not melt the bulb, I am confident it will be sufficient this time! We use 2 resistors in this set-up as only 1 can trigger a bulb warning fault on the DIS. Having 2 resistors in the set-up ensures that there is enough current being drawn to fool the DIS into thinking there is something there!
IMPORTANT NOTE: I have just purchased more 36mm festoon LED's off eBay. They are made of metal, not plastic. I believe they can handle the heat a lot better than the original LED's i used. I advise purchasing these LED's over the plastic ones. This is what they look like:

There! You are done! Now sit back and wait for it to get dark and marvel at your gorgeous lighting setup!
The end set-up:


")