Votex Spoiler Fitting

paul20v

Audi fanatic
Joined
May 24, 2009
Messages
1,112
Reaction score
3
Points
38
Location
S.Wales
Hi
sorry if this has been covered i did have a search but cant find anything ,
what i was wondering is how the Votex front spoiler is attached to the bumper and is it hard to get right
im asking before i take the plunge as im still torn between the s-line spoiler and the votex one
thanks
Paul
 
S-Line is supposed to have a special top bumper (deeper, with attachments for the skirt)... but that can be worked around, I think there's a guide on a4mods.com
 
Hi
sorry if this has been covered i did have a search but cant find anything ,
what i was wondering is how the Votex front spoiler is attached to the bumper and is it hard to get right
im asking before i take the plunge as im still torn between the s-line spoiler and the votex one
thanks
Paul

I am fairly sure the Votex bumper is bonded over the top of your existing bumper. You tend to get a step where it mates up to the upper part of the bumper. If fitted correctly they can look good.
 
Yep Votex goes straight over the top. Hence why I took mine off - dont like the fitment!
 
Thanks for the info thats answered my question,
i like the look of both i would like to see the votex in the flesh thou
before i make a desicion.
 
Yep Votex goes straight over the top. Hence why I took mine off - dont like the fitment!

And with that in mind, aint it about time we where seeing some pictures of the blue? :eyebrows:
 
Oh yes Indeed Marc! - Im 3 weeks behind due to my Sprayer going on his hols. He's back this weekend so hopefully all will be completed by next weekend or weekend after!
 
Hi
sorry if this has been covered i did have a search but cant find anything ,
what i was wondering is how the Votex front spoiler is attached to the bumper and is it hard to get right
im asking before i take the plunge as im still torn between the s-line spoiler and the votex one
thanks
Paul

hey there paul,

i've been searching for answers to your question for myself for some time now. i was lucky enuf to find and buy a votex front lower bumper here in south africa. but my issue was that i wasnt getting fitment 100% flush.

i undertook to fit the part myself and heres what i can tell you...

• before fitment, make sure the ppl that spray the part paints right over all the edges and a little on the inside the bumper. these leading edges of the part will show at your seams where the body meets the bumper.

now the fitment...
• you'll need a dremmel tool (cutting, grinding bits)
• power drill with small metal drill bits and weather proof screws
• i did it alone tho but a helping hand will be great

i can go thru the fitment with you if u want me to at a later stage.
but here are some shots with my votex bumper fitted.

1 •••>
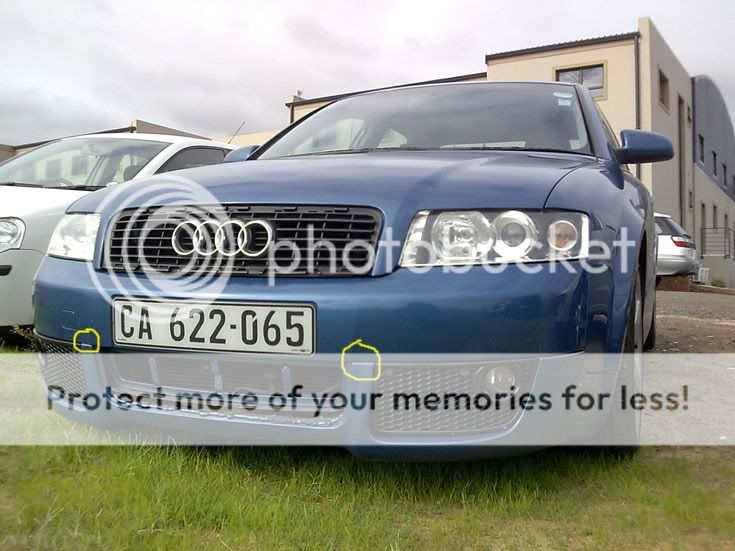
The shot below indicates the points where i drilled through the upper bumper and the alluminum bumper bar (the metal bar behing the upper bumper) to join the lower votex part with the upper bumper.

Votex1.jpg


2 •••>
I also bolted the 2 vertical parts (side bits next to the centre grill) onto the upper bumper for more hold.

VotexFront1.jpg


NOTE: before drilling, make sure you press the votex part firmly against the upper bumper for a flush fit in the front first. this is where you will need to grind away from the votex part to make it flush before drilling and bolting.
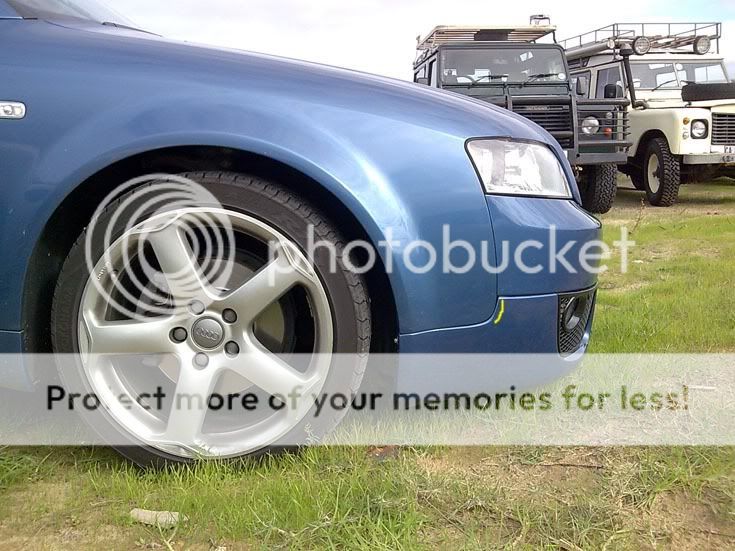

3 •••>
here you can see that the side fitment needs more grinding to fit better. the votex plastic is riding slightly over the side panel of the car, so that areas needs to be worked down a tad to follow the curve and for a better fit.

VotexSide1.jpg


4 •••>
the votex part must be fixed to the car at this point as well. but the stock lower bumper has a plastic bar on the inside that holds a bolt that joins it with the car. the votex part doesnt! so you'll have to use a long bolt and washer and let that run right throught into the votex part and join it with the car. this is a quick fix method but i will redo it later when i have time

VotexSide2.jpg


5 •••>
what needs to be done to fix the above shot is to remove the bumper again and fix a plastic bar in the position indicated on the shot below. the bar can be fixed to the inside with epoxy or some resin. this bar will support a bolt that will now join the votex part with the car. you then wond see a bolt from the outside of the votex part, as u see in mine.

VotexSide3.jpg


6 •••>
the grilles can me made to fit btter and more flush with the front by grinding away the plastic honeycomb mesh on the inside of each grille.

VotexSide4.jpg


NOTE: the images illustrated are a bit dated, in that I have redone some aspects about my votex bumper fitment. it is indeed sitting much more flush now but i still need to fabricate my centre grilles properly and the side fixture bars.

i hope this has helped anyone in getting around the votex diy fitment for a A4 (B6). good luck! :hi:

oh and to answer ur question: no its not a major mission to get it right and yes the votex part can fit snug and flush but some fabrication and a little bit of work will ensure that! if u a relatively good DIY'er then its all good.
 
Last edited:
:sign_welcome: Sam.

That fit looks pretty good to me, better than most of the factory fit I have seen in all honesty!
 
:sign_welcome: Sam.

That fit looks pretty good to me, better than most of the factory fit I have seen in all honesty!

i must say thank u Qjames, but upon closer inspection of my first attempt, one would have seen that a bit more work was needed. and also i now know how to get it just right.

i have seen many pics of such votex fitments and i cant believe that some folks would settle on such an awesome looking part to NOT fit flush and snug. DONT believe anyone when they tell you that its supposed to sit slightly raised and off on the seams.
 
i have seen many pics of such votex fitments and i cant believe that some folks would settle on such an awesome looking part to NOT fit flush and snug. DONT believe anyone when they tell you that its supposed to sit slightly raised and off on the seams.
Mate thanks
thats a fantastic insight into the bumper,
is there any way you can photo the fixings at the wing edges i dont quite get what you did with the bolts and resin
many thanks
Fantastic right up much appreciated and just the right colour car to see it on too :beerchug:

Paul
 
James beat me to it - Those alloys are nice, got a Gallardo feel to the edges!
 
Oh yes Indeed Marc! - Im 3 weeks behind due to my Sprayer going on his hols. He's back this weekend so hopefully all will be completed by next weekend or weekend after!

Good stuff, think we're all dying to see it. I think you need to post a video, with it starting out covered by a big sheet and have a
prper unveiling, lol.
 
What wheels are these? Are they OEM Audi ones?

they are actually wheels i got from VW Golf5 R32 here is SA. They called the 18" "Karthoum" and was a special edition rim from VW. Thing is that it has a bit of VAG OEM feel so i grabbed it when it was offered. (you can google "karthoum wheel" and get more info for other countries)

apologies for the late replies guys but the USA and SA time zones tend to do that.
 
Mate thanks
thats a fantastic insight into the bumper,
is there any way you can photo the fixings at the wing edges i dont quite get what you did with the bolts and resin
many thanks
Fantastic right up much appreciated and just the right colour car to see it on too :beerchug:

Paul

i hear you Paul. i will get to it at the end of this month when i get some more peanuts to buy the materials. i'll try my best to redo the whole tutorial from scratch cos the bumpers need to be removed again.

the sad thing is that if i had found a tutorial on this particular job i would have only had to do it all once! :aggressive:

but i want it perfect so i'll redo it and this time i actually know what the hell i'm doing and make a tutorial out of it. :salute:

ps: be careful when trying to remove ur hooter horns located in the upper bumper cos those fukn bolts just break and snap off, never to be used again. i broke one of these bolts that holds one of my horns and had to do a mcguyver trick to make the sucker stay in place.
Thanks that would be great
many thanks
Paul:thumbsup:
 

Similar threads

Replies
2
Views
724
Replies
4
Views
1K
Replies
12
Views
1K
Replies
0
Views
829
Replies
2
Views
420