

superkarls overhaul
- Thread starter superkarl
- Start date
You are using an out of date browser. It may not display this or other websites correctly.
You should upgrade or use an alternative browser.
You should upgrade or use an alternative browser.
- Joined
- Dec 2, 2008
- Messages
- 17,400
- Reaction score
- 1,104
- Points
- 113
- Joined
- Mar 28, 2010
- Messages
- 10,073
- Reaction score
- 2,697
- Points
- 113
- Location
- Liverpool/Southport. N west
right you've had your payback now with everyone joining in!Is this mapped yet or is it still gay?
just to give an update, here he is as he stands now:

and its current spec:
Suspension / BrakingAp coilovers
LCR top mounts
Fully poly bushed
R32 rear anti roll bar
Stainless adjustable tie bars
brembo pads
Engine / DrivetrainBadger5 V2 TIP
Jetex FR-08001
Stainless heatshield
3" air feed
NGK iridium plugs
oil catch can
N249 bypass
Forge short shifter
3 inch downpipe and decat
custom FMIC (wellycooler)
Milltek non res slash cut
Wheels & TyresB5 RS4 rep wheels
TPI wheel spacers. 15+20mm
Falken FK452
InteriorLED lighting
S3 mats
Other Mods and GadgetsChrome mirrors
Window tints
LCR splitter
black grill
now i WAS going to get it mapped, however that would involve me getting a clutch and a new DV aswell.
but, due to change in some of my circumstances mods have ceased for now.
then, my plan i think will be to buy a new engine and rebuild that and swap the lot over.
in the end i would like:
AGU large port engine and higher comp pistons
built with rods
head refurbed with new guides, maybe do some porting and polishing
clutch
cambelt
pumps
DV
followed by a map to see a nice, reliable, and smile inducing car.
but for now, it remains gay

future
Scuderia Vittoria Edition 001
- Joined
- Nov 11, 2009
- Messages
- 10,099
- Reaction score
- 739
- Points
- 38
- Location
- west yorks
- Website
- www.stainless-engineering.co.uk
in the end i would like:
AGU large port engine and higher comp pistons
built with rods
head refurbed with new guides, maybe do some porting and polishing
clutch
cambelt
pumps
DV
followed by a map to see a nice, reliable, and smile inducing car.
And not to forget the fcn trailing arm bushes!!
but for now, it remains gay
Nice....
")
Just like yours
Just no need that for that this is there stace! Haha.
- Joined
- Mar 28, 2010
- Messages
- 10,073
- Reaction score
- 2,697
- Points
- 113
- Location
- Liverpool/Southport. N west
dont worry dani, staceys isnt fast for long when it melts through its boost pipe every 2 miles. Prawns doesnt even have a *** engine, and freds floods itself with wmi.Just no need that for that this is there stace! Haha.
dont worry dani, staceys isnt fast for long when it melts through its boost pipe every 2 miles. Prawns doesnt even have a *** engine, and freds floods itself with wmi.
And reesy's car is "double denim blue"
- Joined
- Mar 28, 2010
- Messages
- 10,073
- Reaction score
- 2,697
- Points
- 113
- Location
- Liverpool/Southport. N west

Dan-Jnr
Registered User
- Joined
- Mar 28, 2010
- Messages
- 10,073
- Reaction score
- 2,697
- Points
- 113
- Location
- Liverpool/Southport. N west
been a busy week getting the car respectable for adi, despite this being the cars last outing before being garaged and rebuilt.
as you may know i've had trouble with rear toe in and its eaten 4 sets of tyres over the last 18months or so, and because im a ****** i put off putting the trailing arm bushes in, so i did that on the drive the other day:


not a hard job, just have to be careful. i snapped a brake line the first time i tried it, hence putting it off.
the effects of too much toe in:
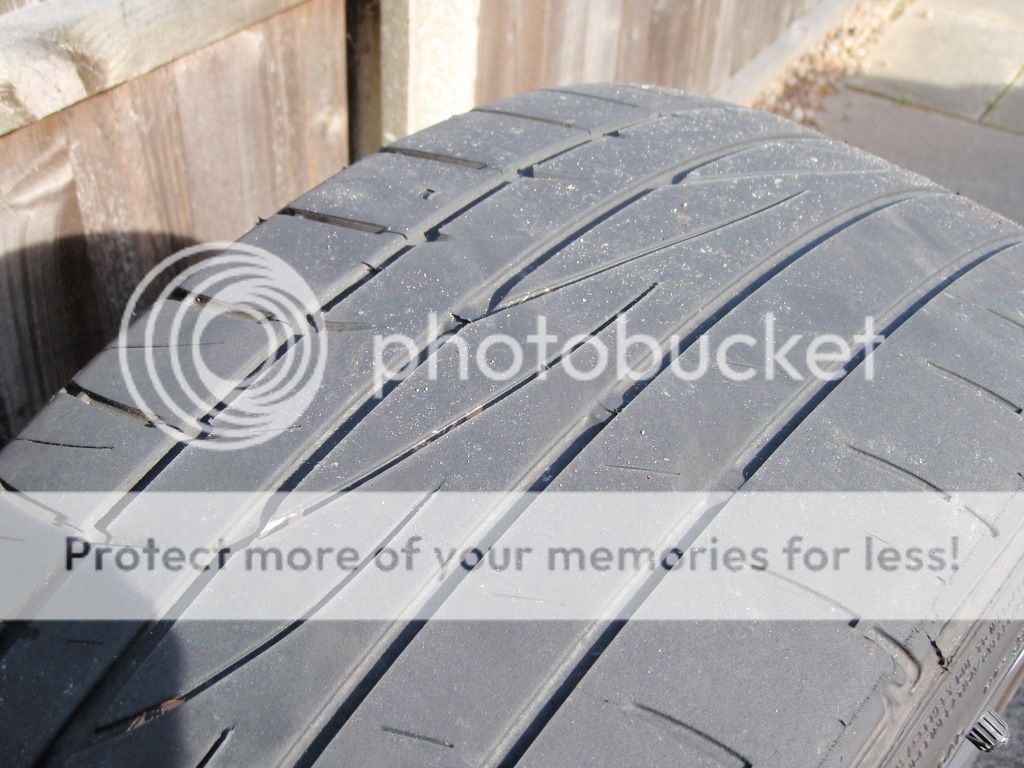

outer tyre wear.
whilst i changed these bushes i took out the adjusters on the rear coils, lowered it a good 8mm, which tb h it needed.


today my AEB head arrived.
needs a skim tho:


slight dents in all 4 corners, has a little lip on it.

will give the head a quick clean, totally strip it. and clean thoroughly.
i have a BAM head in the garage aswell, which will be my practice head for porting and polishing, just thought id try it, why not eh. il be asking andrew for some tips.
then if im ok at it, il smooth the AEB head out, give it a little tickle here and there, just for the hell of it.
il rebuild the head with new valve stem seals, just for insurance.
also gave the car a wash the other day. its been raining tho so theres already a bit of grime

had new rear tyres fitted yesterday.
and alignment checked this morning, toe in is improved, but still present. My mate told me it shouldnt cause too much trouoble as it is now. time will tell.
after lowering the rear, i raised the front too. did have a little bit of positive rake but now its dead level.
ride heights from floor to arches are:
F: 622mm 622mm
R: 635mm 635mm
so nice and even. yes i am that ocd, had a tape measure out and everything.
cant wait for the track
as you may know i've had trouble with rear toe in and its eaten 4 sets of tyres over the last 18months or so, and because im a ****** i put off putting the trailing arm bushes in, so i did that on the drive the other day:
not a hard job, just have to be careful. i snapped a brake line the first time i tried it, hence putting it off.
the effects of too much toe in:
outer tyre wear.
whilst i changed these bushes i took out the adjusters on the rear coils, lowered it a good 8mm, which tb h it needed.
today my AEB head arrived.
needs a skim tho:
slight dents in all 4 corners, has a little lip on it.
will give the head a quick clean, totally strip it. and clean thoroughly.
i have a BAM head in the garage aswell, which will be my practice head for porting and polishing, just thought id try it, why not eh. il be asking andrew for some tips.
then if im ok at it, il smooth the AEB head out, give it a little tickle here and there, just for the hell of it.
il rebuild the head with new valve stem seals, just for insurance.
also gave the car a wash the other day. its been raining tho so theres already a bit of grime
had new rear tyres fitted yesterday.
and alignment checked this morning, toe in is improved, but still present. My mate told me it shouldnt cause too much trouoble as it is now. time will tell.
after lowering the rear, i raised the front too. did have a little bit of positive rake but now its dead level.
ride heights from floor to arches are:
F: 622mm 622mm
R: 635mm 635mm
so nice and even. yes i am that ocd, had a tape measure out and everything.
cant wait for the track
- Joined
- Dec 2, 2008
- Messages
- 17,400
- Reaction score
- 1,104
- Points
- 113

- Joined
- Sep 4, 2003
- Messages
- 29,115
- Reaction score
- 3,862
- Points
- 113
- Location
- Solihull, Midlands
- Website
- www.audi-sport.net
- Joined
- Jun 19, 2009
- Messages
- 3,883
- Reaction score
- 619
- Points
- 113
- Location
- Leeds
- Website
- www.aldevelopments.com
today my AEB head arrived.
needs a skim tho:
slight dents in all 4 corners, has a little lip on it.
will give the head a quick clean, totally strip it. and clean thoroughly.
i have a BAM head in the garage aswell, which will be my practice head for porting and polishing, just thought id try it, why not eh. il be asking andrew for some tips.
then if im ok at it, il smooth the AEB head out, give it a little tickle here and there, just for the hell of it.
il rebuild the head with new valve stem seals, just for insurance.
Don't forget my guide
http://www.audi-sport.net/vb/a3-s3-...er-head-work-ie-porting-polish-gasflowed.html
If you need help then just pm me but as with any head work its hard trying to tell you were the work is need unless your stud next to me so i can show you on a head
- Joined
- Mar 28, 2010
- Messages
- 10,073
- Reaction score
- 2,697
- Points
- 113
- Location
- Liverpool/Southport. N west
cheers andrew, i have that guide saved.Don't forget my guide
http://www.audi-sport.net/vb/a3-s3-...er-head-work-ie-porting-polish-gasflowed.html
If you need help then just pm me but as with any head work its hard trying to tell you were the work is need unless your stud next to me so i can show you on a head
i think as long as i know the DO NOTS il be ok. but i wont be getting too into it, especially on the aeb head il be using. maybe il try and go crazy on the BAM head and can send you the odd pic.
its just ever since i saw the work you've done i was like wow. i appreciate the hours that go into little details like this, so thought id try it myself.

- Joined
- Mar 28, 2010
- Messages
- 10,073
- Reaction score
- 2,697
- Points
- 113
- Location
- Liverpool/Southport. N west
- Joined
- Sep 14, 2008
- Messages
- 24,836
- Reaction score
- 6,078
- Points
- 113
- Location
- Wibbleton
- Website
- www.tuffty.co.uk
been a busy week getting the car respectable for adi, despite this being the cars last outing before being garaged and rebuilt.
as you may know i've had trouble with rear toe in and its eaten 4 sets of tyres over the last 18months or so, and because im a ****** i put off putting the trailing arm bushes in, so i did that on the drive the other day:
not a hard job, just have to be careful. i snapped a brake line the first time i tried it, hence putting it off.
I need to change these on mine I think... did you undo the the whole mounting bracket to gain access to the bush bolt? only ever done rear beam bushes which are of course a little different to our lovely quattro's
<tuffty/>
- Joined
- Mar 28, 2010
- Messages
- 10,073
- Reaction score
- 2,697
- Points
- 113
- Location
- Liverpool/Southport. N west
yes.
mounting bracket is 4 bolts. then its secured through the bush with 1 bolt.
once i got the mounting bracket off the bush i mounted it back up to the car to get it out the way, it has the brake line mount on it so i thought best get it out the way to save making the same mistake twice and snapping a line.
plus as you can see, the bush is really accessible.
and to add, anyone thinking of doing these bushes, or even not doing these bushes, DO THEM. vastly improves the feel of the car. I compare it to fitting the R32 arb, its that good.
- Joined
- Nov 11, 2009
- Messages
- 10,099
- Reaction score
- 739
- Points
- 38
- Location
- west yorks
- Website
- www.stainless-engineering.co.uk
^^ Agreed ^^
Makes the car feel connected and controlled, well worth doing with the age of these now..
Makes the car feel connected and controlled, well worth doing with the age of these now..
- Joined
- Dec 2, 2008
- Messages
- 17,400
- Reaction score
- 1,104
- Points
- 113
^^ Agreed ^^
Makes the car feel connected and controlled, well worth doing with the age of these now..
It's something else for my list. I want to see the on track improvement of the rear arb on my car in 3 weeks time then I might return after doing these bushes.
And those trailing arm bushes, how did you press them out? Just thought id let you know, because of you, I bought myself a downpipe and sports cat! Was gonna fit it myself but I have no space anywhere to do it!! But if I end up doing it myself, how did you connect the decat pipe to the cat back? Need to update my own thread tbh but i'll wait till I get some pics and work done
- Joined
- Mar 28, 2010
- Messages
- 10,073
- Reaction score
- 2,697
- Points
- 113
- Location
- Liverpool/Southport. N west
i drilled the trailing arm bushes a couple of times right at the edge and they literally just pushed out with little force.
the bushes are weird, they arent encased in alloy like say the wishbone ones, they're plastic, so real easy to remove and refit.
as for the DP decat, you'l need a decent 2.5 inch clamp to join the 2.
Millteks come with them, might wana buy one of those aswell :thumbsup:
the bushes are weird, they arent encased in alloy like say the wishbone ones, they're plastic, so real easy to remove and refit.
as for the DP decat, you'l need a decent 2.5 inch clamp to join the 2.
Millteks come with them, might wana buy one of those aswell :thumbsup:
Sam_
Down under
Think I'll add these to the list of rear bushes to do then. Looks pretty easy based on what you've said. Would it also be a good time to do the rear lines to braided?
- Joined
- Mar 28, 2010
- Messages
- 10,073
- Reaction score
- 2,697
- Points
- 113
- Location
- Liverpool/Southport. N west
- Joined
- Dec 8, 2006
- Messages
- 12,100
- Reaction score
- 4,340
- Points
- 113
- Location
- Eastleigh
- Website
- twitter.com
- Joined
- Mar 28, 2010
- Messages
- 10,073
- Reaction score
- 2,697
- Points
- 113
- Location
- Liverpool/Southport. N west
do you really or are you just taking the **** because its a 'slow3'?I like this thread
Tbh I don't like it coz **** all happens.
Update tho, clutch started slipping with all my power on friday night, bought a brand new LUK clutch kit on sunday for £71. Winning
- Joined
- Dec 8, 2006
- Messages
- 12,100
- Reaction score
- 4,340
- Points
- 113
- Location
- Eastleigh
- Website
- twitter.com
do you really or are you just taking the **** because its a 'slow3'?
No, genuinely!
I like how well you document everything with pics at every single stage, makes for interesting reading, and with all your suspension posts I get to see stuff I don't play with so often, like the IRS on the S3
- Joined
- Dec 8, 2006
- Messages
- 12,100
- Reaction score
- 4,340
- Points
- 113
- Location
- Eastleigh
- Website
- twitter.com
Also, as much as I take the ****, your approach of making it a complete car, with handling, braking, and cooling mods and the like before a remap, is a FAR better approach than just going for POWAH, then retrospectively upgrading the rest to catch up with the power.
You'll end up with a better car at the end of it
You'll end up with a better car at the end of it
- Joined
- Mar 28, 2010
- Messages
- 10,073
- Reaction score
- 2,697
- Points
- 113
- Location
- Liverpool/Southport. N west
- Joined
- Mar 28, 2010
- Messages
- 10,073
- Reaction score
- 2,697
- Points
- 113
- Location
- Liverpool/Southport. N west
One hundred and fifty three thousand two hundred and three miles.
Thats how lomg my car lasted before blowing piston rings.
At least thats what we think thus far.
Ahhh well, apocolypse tomoro anyway. See ya
Thats how lomg my car lasted before blowing piston rings.
At least thats what we think thus far.
Ahhh well, apocolypse tomoro anyway. See ya