Stacey's Belated Yo Yo Build Thread

Does look like a good idea and they do some very high performing turbos.

Did strongly consider they're 6235 (Garrett gt35 core with 62 comp wheel) as am a bit limited with tial flanged hot side. Did also have my heart set on the 7+7 blade format which seem to be doing now.

Made your mind up which one for the mk1?

Still think eventually you'll go bigger but at what point you'll loose out on track performance for the sake of a willy waving figure will be the main concern!
Well I think I'm set on the 6466 just to be a bit different from the 6262 that the majority seem to go with! Evo boys have shown some good results and I know it's a different platform but curious minds want to know
 
Sounds like an excellent job mate. Always a real bonus when there are new skills and techniques to learn.
I've had a bit of a set back so need another couple of operations but will get there. Did pass my class 2 Hgv license yesterday so may pick up a bit of work here and there when my back can handle it lol.

Thanks mate :)

Congrats on the license Leigh, gutted for you about your Ops as last I heard thought you was pretty much there! All the best mate and hope things pick up and turn round for you.
 
  • Like
Reactions: g60leigh
Still think eventually you'll go bigger but at what point you'll loose out on track performance for the sake of a willy waving figure will be the main concern!
Well I think I'm set on the 6466 just to be a bit different from the 6262 that the majority seem to go with! Evo boys have shown some good results and I know it's a different platform but curious minds want to know

Yeah I can't see myself putting anything much bigger on this as start to loose any kind of mid range fun.

6466 will be a mental turbo on your car and and flow more bhp equivalent than what your car weighs you nutter 1hp/1kg lol

Mine will see a VR 6 pot dropped in there if i really start hunting for more or get to bored at a later date, can use that 2.8 hydro locked bottom end and r32 head you've got in the container ;)
 
Got a few hours on the car this afternoon.

Managed to get the WMI line run in through the passenger side chassis leg. I filled a hole and used a rubber bung to protect it.

I've left a little extra at the tank end and managed to feed it through from the pump side


Tied it to the rear brake lines down the side of the fuel tank


Comes out under the passenger side chassis leg ready to go to the solenoid


Mounted the master cut off ready for the power cable run, pretty sure it's the same place as prawny


I then set about hacking the dash up so can start working out positioning of the heater and other objects.

I had to cut quite a bit more away than I first originally thought but was quite pleased with the fit


The holes on the side mounts I hacked up and tacked on lined up nicely :)


Hoping to get on there again at some point over the weekend
 
Got a little excited this weekend but still waiting for this oil pump to arrive from Germany!

65d0cb77d4c4fb2f98dd57f0088b89df.jpg


Any joy getting out there this weekend?

See the dash looks a nice fit round the cage and shouldn't be long before the screen goes back in! But for now at least it gives you something else to start doing!
WMI line look a good idea and will be nicely put out of harms way!
 
  • Like
Reactions: superkarl and StaceyS3
Got a little excited this weekend but still waiting for this oil pump to arrive from Germany!

65d0cb77d4c4fb2f98dd57f0088b89df.jpg


Any joy getting out there this weekend?

See the dash looks a nice fit round the cage and shouldn't be long before the screen goes back in! But for now at least it gives you something else to start doing!
WMI line look a good idea and will be nicely put out of harms way!

Cheers mate there's countless things for me to still do, just don't where to start half the time lol

Looking good with yours! Nice and shiney

Will have to pop down the yard soon and see how the mk1 is coming along :)

Got out there for a bit today and update will be up shortly ;)
 
  • Like
Reactions: g60leigh
Got a few more hours out on the car today :)

I had a little play with the dash and the ducting for the screen vent. The assembly is designed to direct airflow round to the little round vents in the top of the dash for the side windows which I've now cut the integral ducting in the dash.
To try and limit the air escaping out of the sides I cut the duct down so sits inside the recess now and will hopefully direct most of the airflow up and out to the screen where I want it.


I will be looking at some way of securing it a bit better in the future.

I then set on blanking off the no longer needed openings in the bulkhead that was for the OEM heater matrix and aircon heat exchanger.


Usual CAD template used


Only quickly rough cut them out and riveted them on with fire retardant silicon to aid a seal. The billet an10 to 1/2' hose tail adaptors are a well made bit of kit and look the part


I now head back on to the wiring including the battery power feed and mounting the fuse box

The fuse box power cable was a tad on the short side so opened it up and prised open the connector as isn't a run of the mill connector and would need to reuse it


Squeezed a longer cable core in there and crimped it back down with aid of the vice, screwdriver and hammer


I fitted it in the passenger footwell where should be out of the way but still accessible


I reused the cable I had previously used for my battery relocation, it's 50mm* tri-rated iirc. Used a stuffing gland to get it into the sealed box


I'm waiting for some p-clips to secure it in place, but should be something like this with the loom cable tied to it.


Come up the front turret diagonal then through the redundant airbag mount and through another stuffing gland


Will be terminated at the master cut off with the feed to the fuse box and the supply to the starter motor once I put that in


Have started putting the loom back in now and just got to sort through all this mess then definitely will be on the road to reassembly

 
  • Like
Reactions: <tuffty/>
Got a little excited this weekend but still waiting for this oil pump to arrive from Germany!

65d0cb77d4c4fb2f98dd57f0088b89df.jpg


Any joy getting out there this weekend?

See the dash looks a nice fit round the cage and shouldn't be long before the screen goes back in! But for now at least it gives you something else to start doing!
WMI line look a good idea and will be nicely put out of harms way!
That's going in a mk1?!?

Are you ******* mental????
 
  • Like
Reactions: Goubo1
That's going in a mk1?!?

Are you ******* mental????

Yeah he's crazy!

Spec is pretty simular to mine apart from standard stroke and 7.25' twin plate clutch to help make it a nice revvy engine.

Turbo wise iirc is running in and sorting teething issues out on a GT35 but pretty sure it will be going PTE 6466 once up and singing!

Car should be comfortably under a 1000kgs when done.....I need to do some more to the S3 to keep up with it once he finds traction lol
 
  • Like
Reactions: Goubo1
Got the day on the car yesterday and am afraid to say that although I got some bits done it was no where near as productive as I would have liked

I set out at having another look at the fueling system and to start plumbing it in to work out what fittings will be needed.

The route I had hoped to run was pretty simular to the OEM lines but this bracket next the OEM filter and the breather line was in the way.


The beige breather line that was there runs up to this valve that stops and kind of air/fuel passage if not level incase of a roll over etc.


So before I set about shortening the line I wanted to confirm the valve worked correctly but removing it as per ELSAWIN and trying to breathe though it at various angles. It worked fine so I proceeded by citing the line back to behind the rear wheel

Now this was clear and had cut off the line holding bracket in the first pic I set about trying to feed the hose through with no luck!

There appeared to be more brackets or something else obstructing it. I dropped the tank down by and inch or so by releasing all the bolts and braces and resting it on the prop. This allowed me to get my hand in and confirm my fears over another welded on bracket. Doh!

At this point I decided that to check pipes were in properly when I pull the tank back up and for future access, I cut an access hole which will seal an aluminium plate down on top later.


Once cut open was clear what was stopping me!


After attacking it with the Dremel and pulling the tank back up into position it looked like this


I then threaded the hoses through and pulled them in. Front to back it now looks like this with OEM colour coding to keep the forum moderator happy.


That was haulted due to waiting on some bits including hose fittings, second filter, filter holder and hose clamps. Once they arrive can crack on and get the tank end and right through to the engine bay completed.

During the process of working a few things out in my head I realised I had completely forgotten about the cable from the alternator to the fuse box.

The old one was in a bad way and now I've relocated the alternator it will be to short.


It had another on the ring crimps with a captive nut so set about swapping that.


I couldn't deal with the yellow so run some black insulation tape down it. I pulled it in through the bulkhead with the rest of the loom and terminated it at the fuse box


This left me with a little bit of time before Chloe and the kids were due to be home so started to tidy the loom up and tape it all together. Suppringly this went quite quickly and have got most of it tucked in where it should be.


That's all for now. Just waiting on a few bits to arrive and got a few other things that are in the making and should hopefully come through in the near future :)
 
  • Like
Reactions: <tuffty/> and g60leigh
That's going in a mk1?!?

Are you ******* mental????


Well traction is for losers!....hold on think I might have got that the wrong hey ho it'll look good wheel spinning and the lads parked up at mcds will be well jel
 
Anyone know of many examples of people relocating the shift tower? I removed mine the other day and will be relocating it on top of the tunnel in some manor with the cables going through the bulkhead.


Previously the cables were trying to play twister with the wastegate exhaust where it drops into the tunnel to merge with the downpipe.


I will have to wait until the engines in to work out exactly where can go through the bulkhead but current idea is probably to raise it a little above the tunnel on the inside of the car which will bring it up to a bit more of a comfortable position nearer the wheel.

Been meaning to add a bit more detail on the team I've joined and will be running with them at Santa pod next year :)

I've been good friends with Simon for some time, he's won at Santa pod USC in the A class for iirc 4 out of the 6 years he's taken part, the other 2 he didn't he had gearbox failures :racer:

His best time iirc was 12.4 quarter mile which for a 2.0 N/A car with no power adders like nitrous etc and have to be a road legal car including TYRES I think is quite impressive!

We will both be competing this coming year with some very fresh builds in regards to drag racing and hoping to iron out issues and shake the cars down pretty quickly to start setting some respectable times!

Please have a quick gander at our page and like and share it :)

https://www.facebook.com/Pro-Race-Engineering-1033319353367871/
 
  • Like
Reactions: g60leigh
Had the day on the car yesterday.

Feel I made some good progress and hoping shouldn't have to crack the welder out any more now. It does seem that whenever any fabricating is involved it seems to take a lot of time for what looks like to not be much gain

I started by continuing with putting the loom in its desired resting points, to which found this no longer had one of the mounting points


I welded a bit of flat bar with a bolt tacked through it to mount the other side


I then moved onto the fuse box which its usual home now has a lump of tube in its place, done a similar thing by welding a bit of flat bar in place to mount it


The passenger side was a similar story with no mount existing for the lateral sensor. I just cut the bracket down and drilled and tapped a hole in the dash bar


Whilst I had the welder out I saw it as the best opportunity to sort out remounting the shifter on top of the tunnel followed by the heater


I cut the lip and mounting bolts off the top of the tunnel and then once had drilled holes in the correct location tacked some bolts of from the underside of the tunnel so are captive


Will make the holes through the bulkhead for the cables once engine is in

After much umming and ahhing I made my mind up on how to mount the heater. I was governed a lot by the lack of materials as would have loved to rivet some ally bar in place to hold it.


Welding was far from pretty here as was laying upside down, struggled to grind the paint off and seemed to be reacting with some seam sealer that seeped through once was heating up.

None the less it looked horrible but it's attached and not going no where ;)


I've put one pipe on direct and will route the other to a tap somewhere to regulate the flow and hopefully control the heat and shut it off in summer


This is where it's at now with only the centre console to finish to complete the dash, the centre console will have a few switch for heater and a few other various things. The main feature of the dash will be a centre mounted Windows tablet to display live data from the ECU like this.


Got to love technology, no more need for gauges :)
 
  • Like
Reactions: tom2001s3, CHEZ, basil brush and 1 other person
Very busy this week and coming weekend at work so no real time to progress much on the car :(

I managed to sneak out for a couple of hours as really want to get my turbo oil drain and downpipe sorted before the Christmas holidays as am worried it will hold me up as should be able time permitting start looking at dropping the engine in.

All of the turbo lines and downpipe need tweaking due to the bigger comp cover meaning turbo has to be spun on the v-band to allow clearance.

First off started with the most crucial, the oil drain. The flanges for the drain even though supposed to be the same CHRA for GT30 and Gt35 turbo's have different hole spacings.

First of I tried just elongating the holes but wasn't happy with the result so cut the flange off to get the new one welded on, here's them both side by side


I filled the pipe to angle desired to get fitment and scribed the position as well as a more obvious pen mark


Should sit something like this once a friend has welded it


Next up was the coolant feed, this just required a little persuasion with a mallet and vice to bend and tweet it a little.

From turbo to block


For the lines this then leaves the oil feed which is flexible and the coolant return but this will be in AN6 line and will have to wait until I'm decided on a few other bits like header tank etc

The end result with turbo position allows me to just about remove the back right cam cover bolt and sits pretty tight to the wastegate


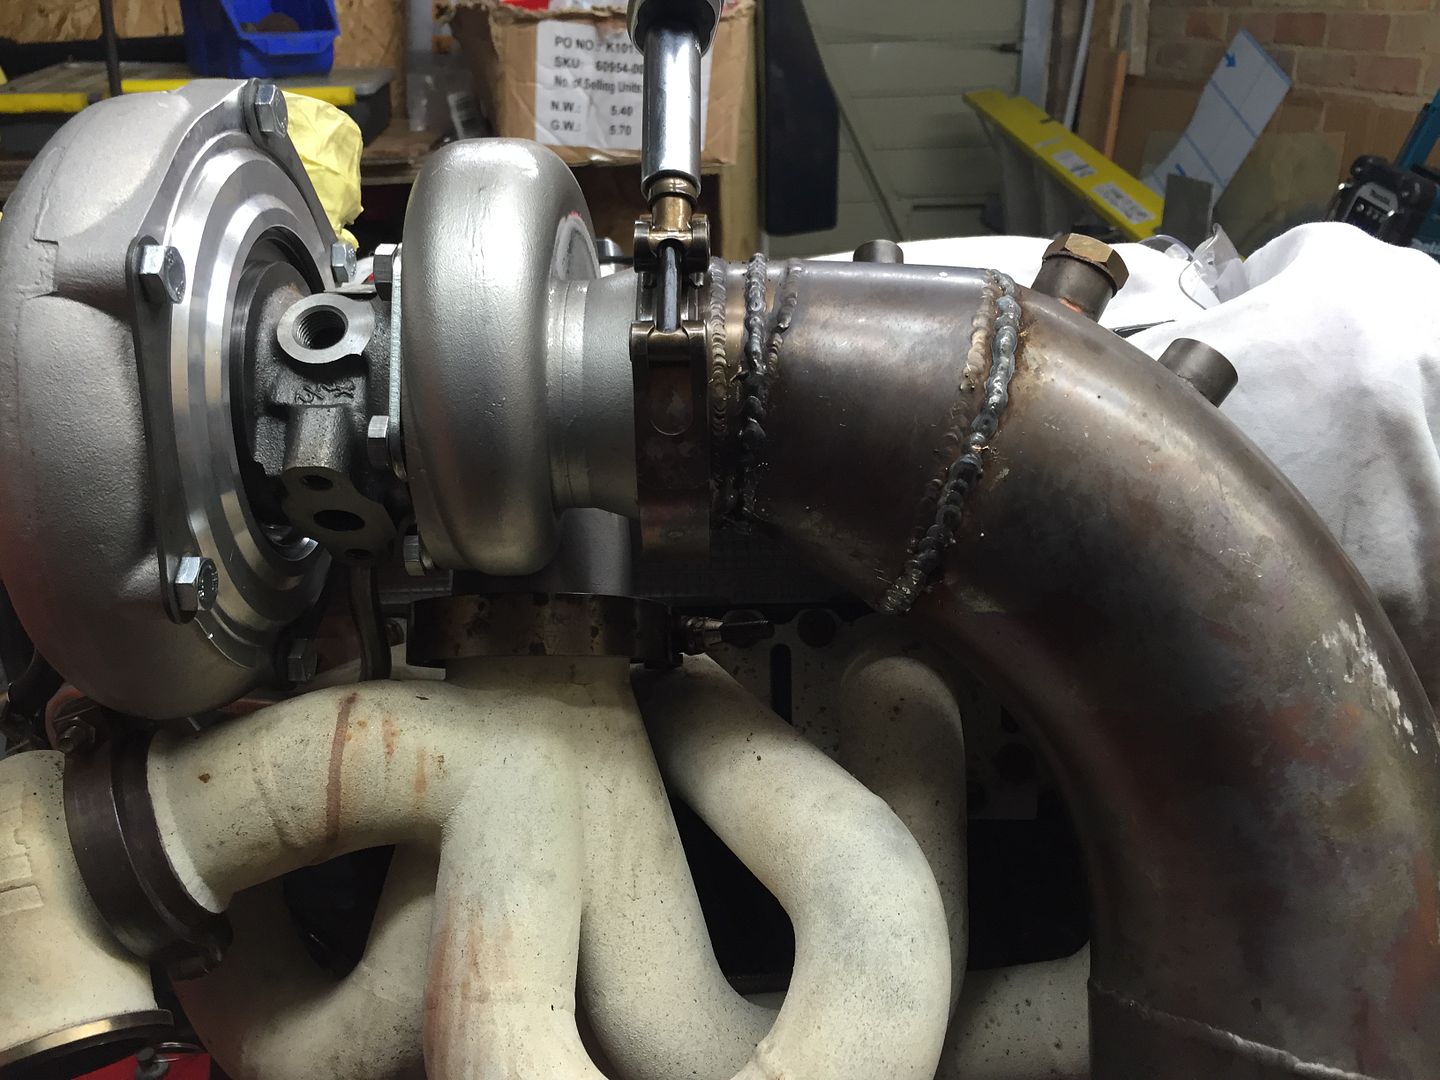
Last but not least I had the exhaust to sort, from spinning the turbine and changing over to the snail turbo turbine has without a doubt moved to a place it needed to be cut and shut

I couldn't get it anywhere near the temp bracing mounting holes until I cut this off


After a bit of fettling and cutting slithers off here and there it sat in like so


I had previously bought some stainless wire for the MIG to get me out of trouble if need be even though I've only got argoshield gas and not pure argon or helium.
I went to use this wire to which I quickly realised the tiny hole in the spool was about a third of the diameter of the spool holder...doh

I got a little creative and used a big M12 bolt with a combination of spring washers for preload and nuts to hold it to create my own holder lol


Now I'd got over that I put a couple of tacs on ready for a friend to weld it


Only thing was I got q bit carried away


All in all it felt criminal cutting up some beautifully crafted stuff and barstardising it but needs must and all that.

Also I've now decided I definitely need a TIG welder in my life! But I feel it's to late for my request to get to Santa this year so one may have to sneak it's way into the garage next year

Hope may get out in the garage a fair bit next week as only got one shift :)
 
my poor downpipe :)

Definitely need to get my hands on a TIG welder

Got a few exhaust plans in mind for the future for this and a full system for the derv that will require one.

Only thing is last time i held a TIG torch was 10 years ago in my late teens. (makes me feel old saying that lol)
 
Definitely need to get my hands on a TIG welder

Got a few exhaust plans in mind for the future for this and a full system for the derv that will require one.

Only thing is last time i held a TIG torch was 10 years ago in my late teens. (makes me feel old saying that lol)
you will love tig

you're still using the 1.25" runner TSR type manifold then....
Done a couple of HTA35 on this size manifold, and they did'bt give their best I dont think. The GT35 normal made more power.

We've had made an 1.5" version which is being made for us now for the 550+bhp builds
 
  • Like
Reactions: Gops and Broken Byzan
you will love tig

you're still using the 1.25" runner TSR type manifold then....
Done a couple of HTA35 on this size manifold, and they did'bt give their best I dont think. The GT35 normal made more power.

We've had made an 1.5" version which is being made for us now for the 550+bhp builds

Yeah can't wait to get my hands on a TIG again but ideally want to learn aluminium TIG welding but be honest for home hobby use its just not worth the cost for the plant.

Yeah going to use it for now as money is running out or more say run out! (just put the deposit down to purchase the further 75% of my house which is currently going through...****** everyone wants an admin fee etc)
Also just all out fed up of not enjoying the car, i do enjoy building it but that stage has continued for far to long.

Could always sponsor me ;) :racer:
 
you will love tig

you're still using the 1.25" runner TSR type manifold then....
Done a couple of HTA35 on this size manifold, and they did'bt give their best I dont think. The GT35 normal made more power.

We've had made an 1.5" version which is being made for us now for the 550+bhp builds

You done a 1.8t with the HTA3586 with the 79lb wheel? Can't find much about with one on VAG 4 pots as all info I can find is on Evo's
 
Give me a shout when you inevitably sell the 1.25" mani :laugh:

Your thinking of going big turbo hey? Thought i'd soon see you fitting a K04 064 hybrid next?

Its potentially been up for sale for around 6 months now as had half heartedly offered it up on a couple of facebook pages. Main thing that has probably held it back is that wanted to sell the mani and exhaust as a combo.

The house purchase has taken more money than planned but it will be most likely going no later than end of next season as will be winter project time again and will be getting another pay rise around then.

I have seen a car make north of 600 on the TSR mani which will be more than enough to keep me happy for a while, also am hopefully waiting to how some other things unfold in the near future.

Congrats on yours by the way, aftermarket ECU has freed up some more power which is good to see. Can't wait to start getting involved with the mapping on mine and learning more about it.
 
  • Like
Reactions: Prawn
I have seen a car make north of 600 on the TSR mani which will be more than enough to keep me happy for a while, also am hopefully waiting to how some other things unfold in the near future.

Congrats on yours by the way, aftermarket ECU has freed up some more power which is good to see. Can't wait to start getting involved with the mapping on mine and learning more about it.

other than the 2 which we've got past 600bhp, none of the HTA35 things have done as much... They have more potential on paper, but there's *something* which held them back...

We shall see.
 
Yeah the one I saw go past 600 on the TSR was using a 5858

I know Dannie made 680 on a HTA3582 but not seen much else besides that. Hoping they should perform as supposed to.

May not even be staying HTA yet...we'll see what the future holds ;)
 
Yeah the one I saw go past 600 on the TSR was using a 5858

I know Dannie made 680 on a HTA3582 but not seen much else besides that. Hoping they should perform as supposed to.

May not even be staying HTA yet...we'll see what the future holds ;)
lol, dont believe that one you saw on fb, that was a wind up..

dannie not on 1.25" mani tho was he?
 
lol, dont believe that one you saw on fb, that was a wind up..

dannie not on 1.25" mani tho was he?

Ahh thats not good as was on FB :(

Pretty sure Dannie last time i saw him said was on a Full race so yeah larger runners.

TBH i'd like to change before it goes back together but willhave to make best of what ive got for now and see what it can do until funds and time say otherwise. Am adament will enjoy driving this car in 2016
 
we will see what occurs on larger runners in the new year. One customer has had a manifold made with 2" tube runners on his hta35.. so a return visit will show if it helps the hta35 do the bizz.. It did'nt on 1.25" runners sadly
 
  • Like
Reactions: Goubo1, StaceyS3 and Gops
we will see what occurs on larger runners in the new year. One customer has had a manifold made with 2" tube runners on his hta35.. so a return visit will show if it helps the hta35 do the bizz.. It did'nt on 1.25" runners sadly

Defo have to put one on mine! You reckon it would make a considerable difference?
 
  • Like
Reactions: Goubo1
2" that's loads bigger.

Yeah want to change my manifold as have no doubt bigger will perform a lot better, but have to wait and see. Possibly a couple of spec changes coming up but will have to wait and see. Will know in the new year.
 
  • Like
Reactions: Goubo1
Bigger is better :D even if it makes the same power at less boost is a bonus! That DP is hugeee!
 
  • Like
Reactions: StaceyS3
will have to find out.. only one way to know ;)

Will be really good to see the gains on a car from just the manifold change. Don't doubt it'll free up a fair amount more.

One thing that came into my head last night in the comparison of Garrett and HTa 82 wheels is that iirc the hta 82 inducer is 2mm or so smaller than the Garrett so overall smaller comp wheel just same 82 exducer.

My 86 has the same 62mm inducer as Garrett 82 but larger exducer.

May have something to do with the different power levels even though the HTA is rated higher?

On another note what are you doing with your BB turbo builds now in relation to oil restrictor? My last one was drilled out as Owens said has an internal restrictor but the newer FP HTA unit I have seems more open and can't see an obvious restrictor in there?