

Neil_S
Registered User
Thought some people reading this may appreciate it, so I cross posted here.
You can take the pillar covers off by using a torx screw on the two screws below the little black plastic cover at the bottom of the pillar cover. Open both doors and pull the plastic cover gently at the bottom and pull outwards and then downwards.
When unscrewing, be careful of your rear door because it will be close to the torx screw. When unscrewed, remove the cover by pulling downwards. Alternatively you could just polish the part on the car and avoid this!
...
When me and Alex were doing the demonstration of the foam lance, pc and rotary to John and Geoff I asked Alex if I could borrow his Meguiars Plastx as the door pillars on my Audi were looking tatty and I wanted to see if I could bring back the shine.
I had always assumed these parts were plastic and always used to run some glass cleaner over them and that was it, but on closer inspection it turns out they are actually painted metal with clearcoat.
The surface of the pillar covers was dull and it looked oxidised to me as well as having swirl marks.


I took some PTG readings and found a thickness of around 95 microns on the outside face on the drivers side and around 160 microns on the passenger side. Both pillar covers having a thickness of around 33 microns on the rear.
I decided to start slowly and got an old microfiber cloth and some 'standard' Menzerna Intensive Polish (PO91L).

The hand polished removed the oxidisation and the shine was slowly being restored.

I decided to up the ante and got the PC out with 4 inch polishing pads and tried the PO91L to start. This achieved quite a nice finish, so I decided to get another polishing pad and get out my favourite polish, Menzerna PO106FF ceramiclear finishing polish. As this polish has a cut of 2.5 on the Menzerna scale I expected it would be able to correct the swirls and also finish nicely (having a gloss of 5 on the Menzerna scale). The finish was pretty good, only a little pitting present, with the majority of swirls being removed.


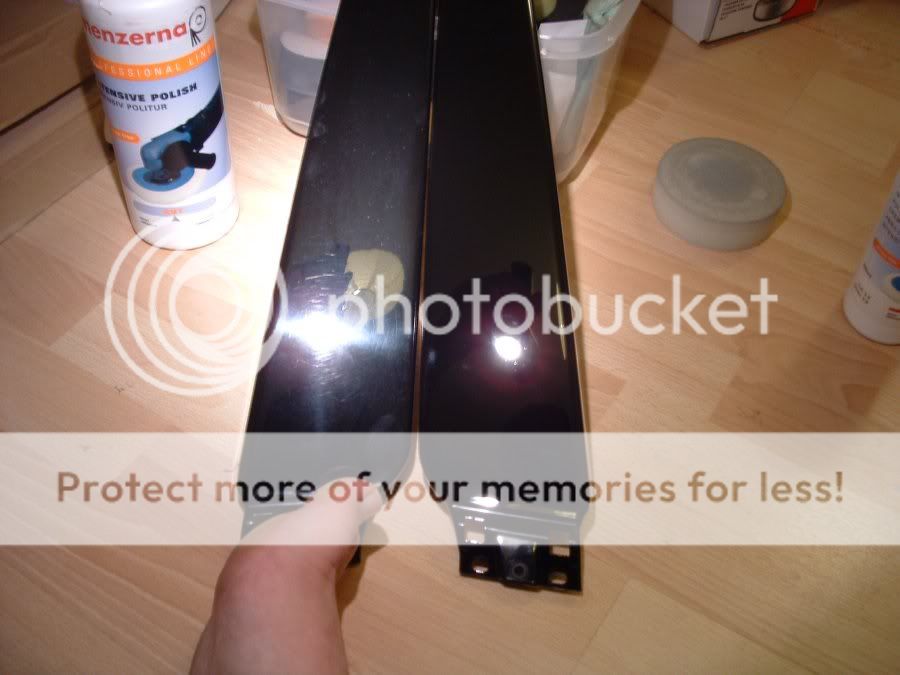
My assumptions were correct and I PC'd one of the pillars and stopped to compare. The finish on the polished pillar was pretty good, with only the odd deep mark remaining. (Sorry about the foot in the way! :lol")
I finished by using Zymol HD Cleanse and then applying Zymol Ital.

I will have to get some shots with them on the car, but unfortunately it is dark now!
One benefit of taking bits of the car and working in the house is that you can watch the Simpsons whilst applying the Zymol!

You can take the pillar covers off by using a torx screw on the two screws below the little black plastic cover at the bottom of the pillar cover. Open both doors and pull the plastic cover gently at the bottom and pull outwards and then downwards.
When unscrewing, be careful of your rear door because it will be close to the torx screw. When unscrewed, remove the cover by pulling downwards. Alternatively you could just polish the part on the car and avoid this!
...
When me and Alex were doing the demonstration of the foam lance, pc and rotary to John and Geoff I asked Alex if I could borrow his Meguiars Plastx as the door pillars on my Audi were looking tatty and I wanted to see if I could bring back the shine.
I had always assumed these parts were plastic and always used to run some glass cleaner over them and that was it, but on closer inspection it turns out they are actually painted metal with clearcoat.
The surface of the pillar covers was dull and it looked oxidised to me as well as having swirl marks.
I took some PTG readings and found a thickness of around 95 microns on the outside face on the drivers side and around 160 microns on the passenger side. Both pillar covers having a thickness of around 33 microns on the rear.
I decided to start slowly and got an old microfiber cloth and some 'standard' Menzerna Intensive Polish (PO91L).
The hand polished removed the oxidisation and the shine was slowly being restored.
I decided to up the ante and got the PC out with 4 inch polishing pads and tried the PO91L to start. This achieved quite a nice finish, so I decided to get another polishing pad and get out my favourite polish, Menzerna PO106FF ceramiclear finishing polish. As this polish has a cut of 2.5 on the Menzerna scale I expected it would be able to correct the swirls and also finish nicely (having a gloss of 5 on the Menzerna scale). The finish was pretty good, only a little pitting present, with the majority of swirls being removed.
My assumptions were correct and I PC'd one of the pillars and stopped to compare. The finish on the polished pillar was pretty good, with only the odd deep mark remaining. (Sorry about the foot in the way! :lol
I finished by using Zymol HD Cleanse and then applying Zymol Ital.
I will have to get some shots with them on the car, but unfortunately it is dark now!
One benefit of taking bits of the car and working in the house is that you can watch the Simpsons whilst applying the Zymol!
 I can imagine!