Led change in dial cluster

R34nel

Registered User
Joined
Feb 2, 2013
Messages
323
Reaction score
33
Points
28
Location
NULL
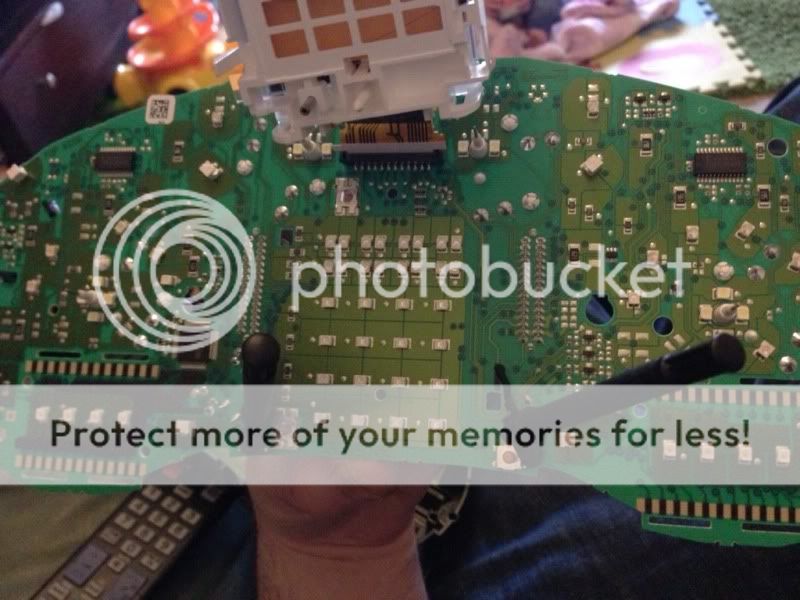
Hi guys, couldn't seem to find anything in a search about this, I want to change the smd's behind the three lcd displays in the instrument cluster, i want to create the facelift look with the white text, I've dismantled the unit to find some orange filter plastic in there, now I imagine that putting white leds in there will just shine through orange, so has anyone else done this?
I changed to white on my last car (non audi) but it was straightforward as there was a clear filter in there
I could take out the orange piece but I will probably get hotspots and I can't be ***** making a replacement filter

Help appreciated :)
 
Im doing this at the moment with a set of 8L clocks and B5 clocks.
Just waiting for the LEDs to turn up and do some parts shopping.

When I did this with my BMW, I used polystyrene cups and plates.
Cut them to shape, flatten and fit. Worked a treat.
 
polystyrene? I wouldn't have thought it would let much light through, or did you mean the white plastic disposable cups?
 
polystyrene? I wouldn't have thought it would let much light through, or did you mean the white plastic disposable cups?

I think that's what its called.
The white plastic cups younger at cafes.

The clear ones are no good,p. You need something in there they will bounce the light around to remove the hotspots.

I got some PC packing frosted plastic bags style bags from work to try.
I can post some up if you want.
 
thanks for the reply, if I'm going to change them I need to do it today as I don't want to take them apart again, ill see if I can find something decent around the house, if not I won't bother
 
I do this kind of thing as my sideline and have experience with Gen 7 Celica's and their LED lighting. To change the display to white you will indeed need to add white LEDs but also remove the orange filter as you suggest. You still need to use a white diffusion filter to get an even light, which I can provide for a nominal fee. It has similar visual qualities to tracing paper but is heat proof and wont degrade. There's examples of my work on my Facebook page if you're interested - http://facebook.com/skewernmb :)
 
I used to do this a fair bit also but on the vxr scene but the filter was white anyway in those cars, I've made a filter and changed the leds behind the mileage display only to see how it looks, I'm pretty happy with it but the filter I used was about double the thickness of the standard orange piece so takes a little of the brightness away, when I open up to do the rest I will need to use a slightly thinner material, but all in all should turn out good when I finish it off
 
2C1644FF-6E2E-4EF7-899A-9CA2BF62B53A-3017-000003FB8B62D719_zpscae57ce5.jpg


Opinions welcome
 
Doesn't look too bad, but a little yellow and dull as you mention, and likely to go more milky over time. I also have a very pale blue filter which gives a much crisper white light. Not a problem sending over some of the designed for purpose filter :)
 
Here is a photo with the engine running, the displays get brighter

8321C49F-1008-49E7-855A-B4B2C5A266E4-101-000000008272666E_zps0b657cb7.jpg


The yellowing you mention isn't there in the flesh, seems to be something the camera picks up, if you could sort me out some filter material that would be cool, I would need enough for all three displays though?
 
Just read a thread where Someone mentioned that putting a blue led behind the orange filter makes white, not sure if anyone had tried this but I may have to experiment!
 
Last edited:
Wouldn't it be easier to just swap out the old red one and code the new black and white one :uhm:
 
Wouldn't it be easier to just swap out the old red one and code the new black and white one :uhm:

lol of course not! it's not difficult to swap some leds and a piece of plastic, plus future buyers may be suspicious about mileage on a car that's had it's dials replaced
 
lol of course not! it's not difficult to swap some leds and a piece of plastic, plus future buyers may be suspicious about mileage on a car that's had it's dials replaced

Mileage can be corrected very easily for around £50 mate....
 
Here is a photo with the engine running, the displays get brighter

8321C49F-1008-49E7-855A-B4B2C5A266E4-101-000000008272666E_zps0b657cb7.jpg


The yellowing you mention isn't there in the flesh, seems to be something the camera picks up, if you could sort me out some filter material that would be cool, I would need enough for all three displays though?

Nalin & Kane - Beachball, followed by Delerium - Silence.... nice :thrashi:
 
You know your tunes, it's trance anthems 2008
 
Little update, used some proper filter plastic and here are the results, it's not how I intended as the background is blue however it looks great when driving, looks much more modern and cleaner than the red.
I can only imagine that the facelift must use a different type of LCD to keep the background so dark whilst text is lit bright white

E021852F-2F05-4C3B-BF47-EE1702023288-2273-000002224E3C7EA5_zps7d752224.jpg

7907A101-00C2-4AB4-8023-54F084EBFEF6-2273-0000022252F43A36_zps74652166.jpg


The top of the LCD (above the line) changes to red when is would go orange normally (ESP off, washer fluid low etc etc)
 
Last edited:
  • Like
Reactions: SCFC_Messiah
Little update, used some proper filter plastic and here are the results, it's not how I intended as the background is blue however it looks great when driving, looks much more modern and cleaner than the red.
I can only imagine that the facelift must use a different type of LCD to keep the background so dark whilst text is lit bright white

E021852F-2F05-4C3B-BF47-EE1702023288-2273-000002224E3C7EA5_zps7d752224.jpg

7907A101-00C2-4AB4-8023-54F084EBFEF6-2273-0000022252F43A36_zps74652166.jpg


The top of the LCD (above the line) changes to red when is would go orange normally (ESP off, washer fluid low etc etc)[/QUOT


Hi R34nel, Sorry to jump into your thread but after reading the above and seeing the results, I must have this done to my car, love the blue look.

Could you please direct me to the filters you purchased, do you have a guide or any tips/advice on completing the change? Any links would be great.

Thanks in advance
 
I could give you advice on doing this to your dials if you like, how are you with soldering? There are 40 plcc2 surface mount leds that I changed to get this look, most people who are confident with an iron would be okay, I work in electronics anyway so am well versed in this kind of thing also the dial cluster and LCD displays appear very fragile when removed. The parts aren't expensive but it can be a bit fiddly

I'm just giving you a heads up as I'd hate you to break your clocks!
 
Looks great. Now you have to change every single other red light/button to match ;)
 
I could give you advice on doing this to your dials if you like, how are you with soldering? There are 40 plcc2 surface mount leds that I changed to get this look, most people who are confident with an iron would be okay, I work in electronics anyway so am well versed in this kind of thing also the dial cluster and LCD displays appear very fragile when removed. The parts aren't expensive but it can be a bit fiddly

I'm just giving you a heads up as I'd hate you to break your clocks!

Thanks for the reply.

40! Didn't realise it would be that many. My soldering is OK, although I haven't done it for a while. I did Electrical Engineering back on college and I do some soldering were I work, so pretty confident.

I was trying to remove the cluster today, managed to get the cluster out no probs but I had difficulty removing the back cover of the cluster. I undid the 2 torx screws and un-clipped the clips but it seemed like the cluster would not pull apart......easily! Does it just pop off?

Where did your purchase the LED's?

Thanks again for your help.
 
yeah you need to remove the two Torx as you mention then undo them clips without the last one closing again, when there all open it will pull apart but it has two plugs holding two pcbs together which you will also be pulling apart so you may feel some resistance, although it shouldn't take decent force so remain gentle please! basically the blue plug on the rear of the cluster is on a pcb which is attached to the back cover you will be pulling this away from the rest of the dials, here's a pic of the pcb with the leds which are changed, there's 32 for the large centre display and 4 for each small display
751747BE-1178-4B27-A06A-6A93432C2302-2273-0000025993B62399_zps20cd989a.jpg
 
Also I use www.crazyleds.co.uk to buy the leds and the filter plastic, it's not the cheapest place but I find they have decent quality and brightness, I've bought some crap ones of eBay in the past, you could use rapid or farnell but it's not as user friendly if you don't know what your buying, you want plcc-2 leds
 
Also I use www.crazyleds.co.uk to buy the leds and the filter plastic, it's not the cheapest place but I find they have decent quality and brightness, I've bought some crap ones of eBay in the past, you could use rapid or farnell but it's not as user friendly if you don't know what your buying, you want plcc-2 leds

Is it the 3020 or 3528 plcc-2 LED's?
 
You want 3528 mate
You will need a second colour for the top bit of the large display also for when a message is displayed it changes colour
 
Just ordered the LED's and some plastic filter. Will give it a go this wknd and will post my results.

Fingers crossed!
 
incase you are unsure, the leds for the top of the large display are in pairs, one white and one red, the red is the usual lit one and when the top of the display changes orange the white one is lit (obv shines orange through the filter)

So you need to change the red one to your new colour (white?) and the white one to a second colour - I used red but you could use any colour, you could actually just swap the two leds over and would achieve the same effect but I prefer to use new as they can sometimes be damaged from the heat of the iron.

If you are unsure or get stuck just change the left one of the two to white and leave it at that, this way the screen will all be white/blue but it won't change colour when there's a warning or esp is pressed, also incase you didn't know you can light an led with a multimeter, you would need to use the diode/continuity setting

If you need any further help or what I've written doesn't make sense to you then just let me know :)
 
Update.

Had a go at this weekend on some old PCB's I had laying around.........fiddly little things aren't they!

Managed to get a few soldered OK and tested fine but still unsure if I am confident enough to try on my dials!? Although I managed to solder some and they tested OK, it was still difficult and found hard to keep myself steady without melting the LED.

As much as I would love to have this change, I may try and outsource the soldering 'somewhere, just encase I break something.

Thanks for the advice R34nel but this mod is a little 'too' scary for me to attempt.

Now just gotta find someone local to me who can solder them.
 
Plus the equipment I had was not ideal!

Needed a much smaller iron tip.
 
You want 3528 mate
You will need a second colour for the top bit of the large display also for when a message is displayed it changes colour

Thank's for the link.
Just ordered 50 to do a set of test clocks.
We'll see what happens.

Plus the equipment I had was not ideal!

Needed a much smaller iron tip.

That's my fear, I've removed a couple as a test and my iron did ok but we'll see what happens when I set about doing them all.
Thinner nib irons are cheap on ebay I think.
So worst case, order one of them.
 
plcc-2 leds are pretty big tbh, using a big tip wil make them easier to remove also.
ideally you would have an iron with a selection of tips (any half decent iron will have interchangeable tips) and they are a couple of quid a piece
 
My Iron does allow for interchangeable tips but the only tips I've got is a 1.8mm flat bladed type and 2mm round ball type, on the bay now looking for some smaller ones to try with.

I did find the larger tip easier for removing the LED's but not for installing, need a smaller tip for that.

Will update again this wknd.

ScottB5/R34nel, if you guys have any tips/tricks when soldering these to make things a bit easier, let me know. Thanks
 
I used to do this a fair bit also but on the vxr scene but the filter was white anyway in those cars, I've made a filter and changed the leds behind the mileage display only to see how it looks, I'm pretty happy with it but the filter I used was about double the thickness of the standard orange piece so takes a little of the brightness away, when I open up to do the rest I will need to use a slightly thinner material, but all in all should turn out good when I finish it off

yea for some reason its a very popular vxr mod, i remember my mates vxr!

555891 449603735063994 1929980388 n
 
My Iron does allow for interchangeable tips but the only tips I've got is a 1.8mm flat bladed type and 2mm round ball type, on the bay now looking for some smaller ones to try with.

I did find the larger tip easier for removing the LED's but not for installing, need a smaller tip for that.

Will update again this wknd.

ScottB5/R34nel, if you guys have any tips/tricks when soldering these to make things a bit easier, let me know. Thanks

I used a solder sucker to remove the bulk or solder.
 
Always have my solder sucker with me when soldering, very handy tool!

Just ordered some smaller iron tips for my iron, so will give them ago on wknd and hopefully that will make things easier.

Another issue I have when soldering these is keeping the LED in place for the 1st solder joint, it's OK when I have one edge soldered as the solder holds the LED in place for me to solder the other side. Any objections to 'sticking' the LED to the PCB first, with some sort of tack or tape?
 
I just use a pair of tweezers and an iron.
Also using solder braid on the pads to remove the solder allows you to keep the new led sitting flat although this isn't necessary it just keeps it looking neat.

Your not using a solder sucker to remove the leds are you?
 
I just use a pair of tweezers and an iron.
Also using solder braid on the pads to remove the solder allows you to keep the new led sitting flat although this isn't necessary it just keeps it looking neat.

Your not using a solder sucker to remove the leds are you?

Nahh, just to help remove any excess.
I've only removed two and it was easier with sucker lending a helping hand.