I have an e-tron and in the UK they only come with the standard spoiler. I wanted the s-line spoiler like the US gets as part of a sport pack. I searched ebay and could not finding one in my colour Cosmos Blue, I did find an RS3 spoiler from a 2017 sportback at a reasonable price, as there are very few exterior mods that will work on my car because of the e-tron specific bumper inserts and DLR lights and unique grill with charging port I thought it wouldn't be too much .


Painting
To be honest the hardest part of the whole process has been getting a decent paint job. The first shop I took it too did the most horrendous job terrible colour match lumpy paint job and loads of over spray !!! They also to 3 weeks to do it....
The next lot took 2 weeks but did an amazing job of sorting out the mess from the previous company.
Parts Needed
Tools

Instructions
I have a 2017 A3 8v FL e-tron sportback, things may vary with your car !
1. Start by flattening the rear seats and removing the parcel shelf, removing the warning triangle from its storage box, the covers for the lights and the cover for the emergency boot release.
2. Remove the 2 T25 screws in the warning triangle box.

3. Now carefully start to pull the lower trim piece away from the hatch. You need to use a bit of force and there will be all sorts of horrible noises ! I started by pulling on the left using the rear light hole to pull with . I then made my way around the trim with a plastic trim removal tool popping all the clips out . Once it is free place it on the folded down seats or on a blanket to stop it from getting scratched. Check that you have not left any trim clips on the boot lid, remove them with pliers and put them back on the trim so they don't get lost .
4.Using a trim removal tool remove the 2 plastic rivets on the top piece of boot trim.

5. As with the bottom piece of trim start on one side pull the top trim away from the boot lid again there will be all sorts of noises . Move around the trim unclipping it until it is free again there may be clips stuck in the boot lid remove these and put them back on the top trim.

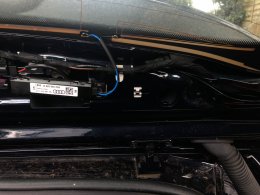
6. Disconnect the aerial cable (blue,green,and red) on left from the aerial amp. I could not figure out how this latched in but with a little force it just pulled out.


7. Dissconnect the cable for the high level brake light. This is a simple connector with a latch.
8. Unclip the white bung for the aerial cable and brake cable and push them into the spoiler slightly.

9. Use a 10mm socket and extension to undo the 4 nuts holding the spoiler on. be careful not to drop them into the boot hatch !
BE CAREFULL NOT TO SCRATCH THE SPOILER OR ROOF WHEN PRYING, OR TRAP THE SPOILER BETWEEN THE ROOF AND BOOT LID WHEN REMOVING OR REFITTING YOU MAY WANT TO PROTECT IT WITH A BLANKET.
10. Start to remove the spoiler by wedging a trim removal tool between the spoiler and the boot lid on one side of the spoiler. If you look up into the top corner of the boot lid you will see a white trim clip. This was the hardest thing to remove I used a pair of pliers to compress it together at the same time I pried the spoiler away from the boot lid. Once this clip had popped through it was easier to pop the blue trim clips with a bit of prying. Then you need to do the same with the white trim clip on the other side, this is the clip I broke as I forced it too hard thinking it would just pop out now i had all the other clips out. I recommend compressing it again with pliers.

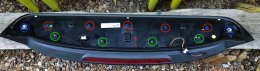
11. Carefully lift the spoiler away from the boot lid being careful not to get the cables caught. Also be careful you do not lose any of the foam washers that are on the captive bolts, locating pins and trim clips.
12. To fit the new spoiler. Feed the aerial and brake light cable through their holes and clip the grommet back into place . At this point connect the brake light cable and aerial cable and test they are working .


13. Line the spoiler up and push it down until the white and blue clips have seated properly. I gave each one a light tap to make sure it was clipped properly. Carefully open the boot lid for the first time making sure it does't foul on the roof.
14. The rest of the refitting is the reverse of removal.
Over all I found it to be an easy job. It took me about 1.5hrs with taking photos etc.
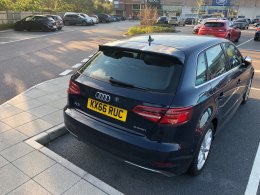
The spoiler looks great and completely changes the shape of the rear of the car .
BEFORE


AFTER


Boot Ref Photos


Painting
To be honest the hardest part of the whole process has been getting a decent paint job. The first shop I took it too did the most horrendous job terrible colour match lumpy paint job and loads of over spray !!! They also to 3 weeks to do it....
The next lot took 2 weeks but did an amazing job of sorting out the mess from the previous company.
Parts Needed
- Spoiler (I am not sure if they are 5 door/3door specific or even PFL/FL )
- you may also need replacement trim clips and fasteners ( I broke 1 and could of quite easily lost a couple more inside the boot lid )
Tools
- T25 Screwdriver
- 10mm socket and extension
- Good set of trim removal Tools
- pliers
Instructions
I have a 2017 A3 8v FL e-tron sportback, things may vary with your car !
1. Start by flattening the rear seats and removing the parcel shelf, removing the warning triangle from its storage box, the covers for the lights and the cover for the emergency boot release.
2. Remove the 2 T25 screws in the warning triangle box.
3. Now carefully start to pull the lower trim piece away from the hatch. You need to use a bit of force and there will be all sorts of horrible noises ! I started by pulling on the left using the rear light hole to pull with . I then made my way around the trim with a plastic trim removal tool popping all the clips out . Once it is free place it on the folded down seats or on a blanket to stop it from getting scratched. Check that you have not left any trim clips on the boot lid, remove them with pliers and put them back on the trim so they don't get lost .
4.Using a trim removal tool remove the 2 plastic rivets on the top piece of boot trim.
5. As with the bottom piece of trim start on one side pull the top trim away from the boot lid again there will be all sorts of noises . Move around the trim unclipping it until it is free again there may be clips stuck in the boot lid remove these and put them back on the top trim.
6. Disconnect the aerial cable (blue,green,and red) on left from the aerial amp. I could not figure out how this latched in but with a little force it just pulled out.
7. Dissconnect the cable for the high level brake light. This is a simple connector with a latch.
8. Unclip the white bung for the aerial cable and brake cable and push them into the spoiler slightly.
9. Use a 10mm socket and extension to undo the 4 nuts holding the spoiler on. be careful not to drop them into the boot hatch !
BE CAREFULL NOT TO SCRATCH THE SPOILER OR ROOF WHEN PRYING, OR TRAP THE SPOILER BETWEEN THE ROOF AND BOOT LID WHEN REMOVING OR REFITTING YOU MAY WANT TO PROTECT IT WITH A BLANKET.
10. Start to remove the spoiler by wedging a trim removal tool between the spoiler and the boot lid on one side of the spoiler. If you look up into the top corner of the boot lid you will see a white trim clip. This was the hardest thing to remove I used a pair of pliers to compress it together at the same time I pried the spoiler away from the boot lid. Once this clip had popped through it was easier to pop the blue trim clips with a bit of prying. Then you need to do the same with the white trim clip on the other side, this is the clip I broke as I forced it too hard thinking it would just pop out now i had all the other clips out. I recommend compressing it again with pliers.
11. Carefully lift the spoiler away from the boot lid being careful not to get the cables caught. Also be careful you do not lose any of the foam washers that are on the captive bolts, locating pins and trim clips.
12. To fit the new spoiler. Feed the aerial and brake light cable through their holes and clip the grommet back into place . At this point connect the brake light cable and aerial cable and test they are working .
13. Line the spoiler up and push it down until the white and blue clips have seated properly. I gave each one a light tap to make sure it was clipped properly. Carefully open the boot lid for the first time making sure it does't foul on the roof.
14. The rest of the refitting is the reverse of removal.
Over all I found it to be an easy job. It took me about 1.5hrs with taking photos etc.
The spoiler looks great and completely changes the shape of the rear of the car .
BEFORE
AFTER
Boot Ref Photos