Honeycomb fog grille mesh (RS6 look)

KrisKrk

A6 C6 4F 2010 LeMans Avant
Joined
Oct 11, 2016
Messages
2,946
Reaction score
2,609
Points
113
Location
London
Got inspired by one of the members who did this easy mod and decided to also have it done. Thanx niedzial 1983

I've chosen however, the harder way (as majority in my life) and decided to bring the mesh slightly to the front.

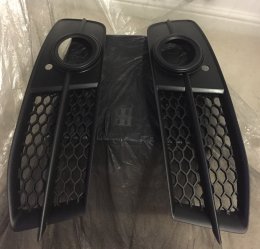
But from the beggining.
Couldn't get smaller piece of that mesh online and in here, had to order the whole 110x40cm piece.
IMG 6597

Cut out need piece
IMG 6598

Final shape adjustments
IMG 6599

and it look nice already
IMG 6601


Now the fun part started but didn't taken pictures yet but as the "battle" continues, I'll upload them later ...
 
Oh, btw
will have some mesh left overs in 2/3 of the size.
Whoever would like to tackle this mod, easy or hard way. Lol
 
good luck with that; have you done the main grill?
 
  • Like
Reactions: KrisKrk
Ooohhh Noooo! Wayyy too complicated and difficult to bend to all curves.

I will replace it with one of the RS replicas. Got one on my list also, as next step. Fog one's and main one will be matte black plasti dipped.

First got to finish the fogs and paint them, than main one as it requires bumper off
 
yes, I've just seen the main grill replacement procedure on youtube and it does look daunting, but will attempt it in the next few days as I've just ordered a full chrome grill!
 
Which grill have you ordered AJ? Think I'm going to change mine soon for a honycombe one. I hate the standard Facelift S-Line grill, it's grey and horrible!
 
I agree with you Mark on the standard s line grill, and my one was also missing the full number plate trim so was unsightly, and just bought this one as it was a cheaper option
chrome.gif
 
Good luck fitting, doesn't look too hard a job - and you'll be getting rid of the horrible standard grill :)

Before and after pics??
 
I personally prefer shorter plate holder.

Yeah, pic's please
 
Pulled all nighter and ...

after an hour of trimming with dremel and shaving the honeycomb to fit into the fog grille frame, this what I got out

IMG 0240


IMG 0241


Trimmed also the bar running across to house honeycombe

IMG 0242


IMG 0243


Now off for glueing and filling the gaps with melted plastic.
 
Mesh sitting well in the fog grilles frame.

Now filling gaps with glue and another cure time
IMG 6652


IMG 6653


After that, sanding down to more natural look and painting.

Tbc ...
 
  • Like
Reactions: AutoJack
Another night with grilles.

Sanded down to satisfied finish and first cote of PlastiDip
IMG 6659


trough to the last, 5th one
IMG 6659


Happy with it but I think Missus will be furious with the smell of the spray in the livingroom. Lol

Once fitted will post up some pictures.
Also, just had the delivery of the main grille.
That is drying up now after few coats of same PlasiDip and will be fitted on also shortly.
 

Attachments

  • IMG_6660.JPG
    IMG_6660.JPG
    646.4 KB · Views: 2,232
  • Like
Reactions: AutoJack and Peter Metcalf
just need to source the badges; 4 rings, and Quattro.
Have you tackled the grill replacement yet, AJ?
Managed to source the badges?

With my grill I got the plate holder, RS6 front and back badges, front logo/rings and quattro badge.
As my car isn't RS6 nor quattro, I would be willing to pass on the RS6 and quattro badges. Interested?
 
  • Like
Reactions: AutoJack
Not yet, but just got the badges last week, and thanks for the kind offer! :)

Have you tackled the grill replacement yet, AJ?
Managed to source the badges?

With my grill I got the plate holder, RS6 front and back badges, front logo/rings and quattro badge.
As my car isn't RS6 nor quattro, I would be willing to pass on the RS6 and quattro badges. Interested?
 
Here it is:
IMG 6677


"She" is embarrassingly dirty so first picture from the parking lot, at night.
Once clean will post another picture, hopefully with better light.

Main grille is already Plasti Dipped in matte black with silver Plasti Dip badge, waiting to be fitted shortly.
 
Main grille finally ready
IMG 6694


To be fitted soon
 
  • Like
Reactions: Ben85, Markjb and AutoJack
very nice; love the plate, where did you have it made?
 
  • Like
Reactions: KrisKrk
Thanx AJ,
It will look vicked on, I'm sure.
These are the Gel 3f plates from eBay.
Few guys there selling them @ £28-£30 for a pair.
Plain, no other marking, apart all necessary ones lto he road legal
 
  • Like
Reactions: AutoJack
great choice; just saw the 3D pressed plates, so going for a pair on mine!
 
  • Like
Reactions: KrisKrk
Finally, after last wash in 2016 last night, managed to take some pictures of the grilles in day light.
IMG 6702


IMG 6703


IMG 6704


Had to tweak the pictures slightly as these grilles were not showing properly. Nicely blacked out tho.

Small addition to the car also: audi-sport.net stickers in the drivers right corner windscreen and matching one at the back

IMG 6705


Tints, reflections and sun visor strip doesn't help on the pictures but in real life it is nice and delicate addition.
Whoever wants to see it, will notice it.

Big thanx to our Moderator Sandra for sorting those sticker for me.
 
Last edited:
I've attempted the main grille replacement last night but don't have the socket extension long enough to reach that nut at the back of the bumper.

Screwed back all together and frowned faced went home :crushed:
 
Hi, I also did the fog mesh upgrade a few weeks ago. Simple but makes such a difference to the car. I wasn't quite as detailed as you though, I just glued it to the top and bottom rails.

I just swapped out my grey sline grill. I did it without removing the bumper. Just removed the 3 bolts on top and pulled the grill and bumper back which allowed me to get my hands down behind the grill and I just felt for the 12 screw heads. It's not easy by any stretch but it's an option if u don't want to remove the bumper. U can tell where the screws will be by looking at ur new grill.
 
  • Like
Reactions: KrisKrk
Brilliant tip, Thanx mate.
Will give it a go one day.

I presume it will also depend on hand size.

Grille is held on normal Phillips screws, right?
 
Torx 20 I think mate. Yeah my hands got pretty shredded but if u have someone holding the bumper back or maybe wedge some wood in the gap then I think it would be fine.
10 are pretty easy (4 top, 4 bottom and 2 part way down from top) but the 2 I struggled with were the 2 directly behind the crash bar. Took me ages to get these out.
The tools I used were a small socket with the Torx bit and a tiny ratchet, pic attached.
 

Attachments

  • 41t01D91soL._SX300_.jpg
    41t01D91soL._SX300_.jpg
    11.4 KB · Views: 553
Finally, after weeks I've managed to get some time to fit the grille.
Armed with 12" long socket extension, got to the bumper back screws.

Had a bit of struggle with all the oem grille tabs hidden within the bumper grille frame but got it off. New one fitted just nicely and within seconds was properly installed.

Need to wash the car but here's how it look like:
IMG 7022
IMG 7023
IMG 7024

Nicely matches with fog grilles done earlier.

I'm sure after a good clean and in daylight it will look even better.

So far I'm chuffed with the result.
 
  • Like
Reactions: Markjb, Steveredman and Ben85
Looking very good, so looks like there is no easy way to replace the grill without removing the bumper then.

Sent from my SM-G928F using Tapatalk
 
No Prav, there is no way I would be able to squeeze my hand in between the grille and radiator like "rmctri" advised.
You have to take the bumper off.

There are two screws at the bottom of the grille and four at the top, behind chrome surround. Rest is all secured with tabs.
Mainly they are at the bottom half of the grille but two on the left and two on the right just above grille middle line, are pain in the back side.
I could not detach whole bumper off due to tight headlamp washers hose fitment and had to rest it on 6pack of mineral water. Driver's side came off easly but right hand side, where the washer bottle is , is connected tight and didn't want to damage anything.

There are small openings at the back of those tricky tabs to insert somethin and pry them up.

Replacemet grille had no tabs so replaced it and secured it with original and additional screws. Sits nicely and flush with the bumper.

Bumper to refit wasn't easy also but managed somehow.
 
  • Like
Reactions: _Prav_
My "lady" needed TLC lately.
Glad to present finished product of fog and main grille mod's:
IMG 7090

After wash and clay she's nice, clean and shiny
IMG 7085
IMG 7086

Each side of clay for each half of the car. Sore shoulders and frozen hands but was worth it
IMG 7089
IMG 7088

Love this look!
Now, rest of the chrome's have to go.

Despite all the cleaning and clay and polishing, it is pi....ing rain now and tomorrow all the glory will disappear:sob:

Till next time ...
 
  • Like
Reactions: Steveredman
Looking very nice now... You can give it a coat of sonax bad/ bouncers d&d mix and should keep it shiny for a few weeks.

Sent from my SM-G928F using Tapatalk
 
Looks good. What colour is the car? I see you've gone for teh complete black grill / surround and have chrome trim on teh sides.

Was thinking of doing that but worried it may look "weird". It looks great!

M
 

Similar threads