8V Dash Cam Hidden Install Project

DJAlix

VAG CAR CODING
Site Sponsor
VCDS Map User
VAG Can Professional
ODIS (Offboard Diagnostic System)
Joined
Aug 13, 2009
Messages
7,465
Reaction score
5,634
Points
113
Location
The Garage, Dukes Mews, London N10 2QP
Website
vagcarcoding.com
After messing around with a basic NextBase 101Go DashCam for a while, and after some dipstick neighbour started playing around with my wing mirrors over night, I thought I would invest in something better which included a parking mode and motion detection. I hate cables and things that look "bolted on" so went looking for a 2 Channel DashCam that I could hide away and found this KoonLung K1S:
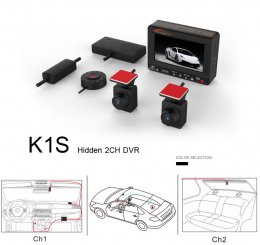
20150121190673517351

Reviews seemed ok for what I wanted so I grabbed one from eBay. The unit has speed camera warnings, GPS and lane assistance also :)

Camera units are very small, not bad for 1080p 30fps:
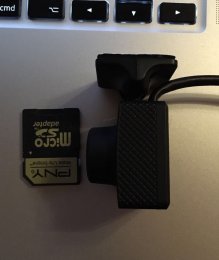
20160315132601

Now to the interesting and time consuming bits...

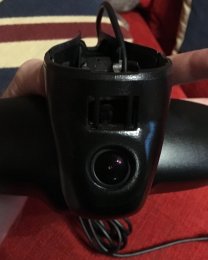
I drive a Saloon so there is no real place to hide the rear facing camera. I will just mount the camera under / to the bottom of the centre brake light trim. I always hated the fact that I could see bits of my previous NextBase Camera and it's cables sticking out over the rear view mirror. Having completed a Rain and Light Sensor retrofit when I first purchased the car (Auto Lights and Wipers) I knew that there was some empty space behind the mirror trim so I pulled the plastic off and drilled a hole, then stuck the camera in there. Unfortunately the angle of the trim when installed meant that if the camera was mounted flush it would be pointing downward too much and recorded more dashboard than road. Adjusting the hole to change the angle meant that the the camera unit sat too far back within the trim and installation would be blocked by the metal mounting bracket of the mirror. I tried to source the trim used in / for Audi High Beam Assist (larger trim with more space within) but the needed part is only available in conjunction with the HBA camera and rear view mirror, some £400, so set about modifying my exiting trim:

Hole cut in order to allow Camera to be mounted at correct angle:
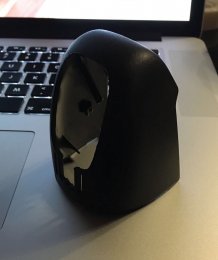
20160315132100
20160315132332

Test mount in order to see viewing angle:

IMG 0620

Viewing angle and wiring fitment tested so in theory all is good to go once modifications have been finished. I grabbed some of this stuff, 2 part epoxy putty which is very easy to sand and shape once dry:

IMG 0629

An hour later I had this and some messy hands:

20160318034427

Hand / Finger shaping and knife trimming after a further 30mins:

IMG 0637

Left it to dry over night and then shaped with sanding blocks / paper and then filler primed:

IMG 0704

Time for some HyperLex rubber paint (better version of PlastiDip):

IMG 0706

IMG 0710

The final result:

IMG 0730

IMG 0731

Am planning to complete my install tomorrow, weather permitting, so this is to be continued but I plan to mount the DVR unit within the glove box next to the MMI unit and then run the AV output to my AMI so I can view via the MMI Screen (VIM Activated). All is to be hardwired using using a NextBase Hardwire Kit. The external GPS unit will be mounted somewhere on the windscreen and the Remote Button will be mounted to the steering column.

More to come soon :)
 
  • Like
Reactions: glasgowdubber, Nick Sutton, daydotz and 12 others
Fair play, when I saw the first pic I thought "Oh dear" but you've done a good job...will be interested to see the updates and a example video ;)

Good luck :)
 
  • Like
Reactions: DJAlix
I've been considering the K1S as the tool of choice for my installation. I was going to mount the rear camera on the front though as I planned on installing it in the boot so it could directly attach to the 12V that resides in there. Then wire the event trigger button straight through to the center console.

David.
 
  • Like
Reactions: DJAlix
After messing around with a basic NextBase 101Go DashCam for a while, and after some dipstick neighbour started playing around with my wing mirrors over night, I thought I would invest in something better which included a parking mode and motion detection. I hate cables and things that look "bolted on" so went looking for a 2 Channel DashCam that I could hide away and found this KoonLung K1S:

View attachment 85700

Reviews seemed ok for what I wanted so I grabbed one from eBay. The unit has speed camera warnings, GPS and lane assistance also :)

Camera units are very small, not bad for 1080p 30fps:

View attachment 85701

Now to the interesting and time consuming bits...

I drive a Saloon so there is no real place to hide the rear facing camera. I will just mount the camera under / to the bottom of the centre brake light trim. I always hated the fact that I could see bits of my previous NextBase Camera and it's cables sticking out over the rear view mirror. Having completed a Rain and Light Sensor retrofit when I first purchased the car (Auto Lights and Wipers) I knew that there was some empty space behind the mirror trim so I pulled the plastic off and drilled a hole, then stuck the camera in there. Unfortunately the angle of the trim when installed meant that if the camera was mounted flush it would be pointing downward too much and recorded more dashboard than road. Adjusting the hole to change the angle meant that the the camera unit sat too far back within the trim and installation would be blocked by the metal mounting bracket of the mirror. I tried to source the trim used in / for Audi High Beam Assist (larger trim with more space within) but the needed part is only available in conjunction with the HBA camera and rear view mirror, some £400, so set about modifying my exiting trim:

Hole cut in order to allow Camera to be mounted at correct angle:

View attachment 85703
View attachment 85707

Test mount in order to see viewing angle:
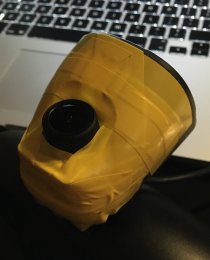
View attachment 85708

Viewing angle and wiring fitment tested so in theory all is good to go once modifications have been finished. I grabbed some of this stuff, 2 part epoxy putty which is very easy to sand and shape once dry:

View attachment 85709

An hour later I had this and some messy hands:

View attachment 85710

Hand / Finger shaping and knife trimming after a further 30mins:
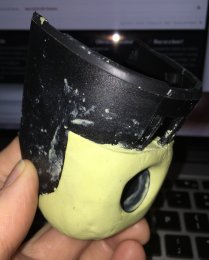
View attachment 85711

Left it to dry over night and then shaped with sanding blocks / paper and then filler primed:
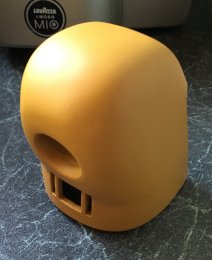
View attachment 85712

Time for some HyperLex rubber paint (better version of PlastiDip):
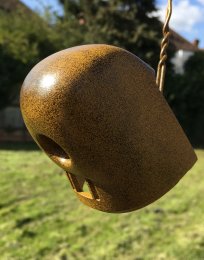
View attachment 85713

View attachment 85714

The final result:

View attachment 85715

View attachment 85716

Am planning to complete my install tomorrow, weather permitting, so this is to be continued but I plan to mount the DVR unit within the glove box next to the MMI unit and then run the AV output to my AMI so I can view via the MMI Screen (VIM Activated). All is to be hardwired using using a NextBase Hardwire Kit. The external GPS unit will be mounted somewhere on the windscreen and the Remote Button will be mounted to the steering column.

More to come soon :)
Credit to you mate..That's a good bit of modding you have done there...:friends:
 
  • Like
Reactions: DJAlix and Rob2k68
Looking good mate - very stealthy !!!
 
  • Like
Reactions: DJAlix and pburv
I've been considering the K1S as the tool of choice for my installation. I was going to mount the rear camera on the front though as I planned on installing it in the boot so it could directly attach to the 12V that resides in there. Then wire the event trigger button straight through to the center console.

David.
Only thing to be mindful of when installing this way is that the "front" camera records at a higher bit rate that the rear, so you will get slightly reduced quality by placing the rear in the front.
 
  • Like
Reactions: pburv
Forgot to mention... I will be throwing in an auto dimming mirror while completing this install. Will do a write up for that as well :)
 
  • Like
Reactions: AWP and pburv
Forgot to mention... I will be throwing in an auto dimming mirror while completing this install. Will do a write up for that as well :)
Did this on my car ..Sorry no pics..:frown new:
But it was very easy....Had a lot of helpful advise from @Ash187 top bloke...:friends:
 
  • Like
Reactions: DJAlix
Did this on my car ..Sorry no pics..:frown new:
But it was very easy....Had a lot of helpful advise from @Ash187 top bloke...:friends:
I have all the ElsaWin stuffs and some great information from a fellow forum member to follow :)
 
  • Like
Reactions: Rob2k68 and pburv
Ooh! I like surprises...:respekt:
 
  • Like
Reactions: Rob2k68
The two cameras are the same it's just the rear that records at a lower resolution within the control box. So I'd run the rear cam forwards through the car but plug it into the front cam slot on the controller.
 
The two cameras are the same it's just the rear that records at a lower resolution within the control box. So I'd run the rear cam forwards through the car but plug it into the front cam slot on the controller.
Actually, from reading further, you seem to be correct... 7mbps for the rear and 10 to 15mbps for the front by default in the latest firmware. Techmoan thought it was the camera's and not the main unit.
 
  • Like
Reactions: airbus319
For me the small area at the left side of the boot seemed the perfect location for the installation of the control unit with the gps antenna located on the rear near side quarter panel. It keeps it out of the way and once setup you should never need to access it.
 
Finally installed the front facing "hidden" camera today. I also completed an Auto Dimming rear view mirror retrofit at the same time, but will start a different thread for that :)

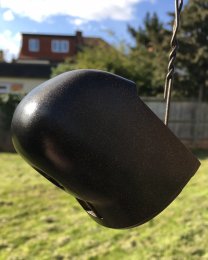
Side view:

IMG 0844

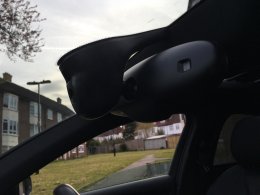
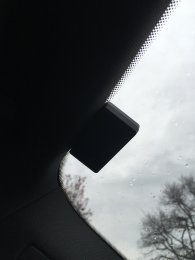
View from through the windscreen (not a great photo):

IMG 0846

The cable from the front camera was run through the mirror mount, up the mirror trim towards the reading lights and in to the head lining. From there I ran the cable round the top of the windscreen and then down the left side of the door trim. When level with the side of the dashboard I pulled the pillar trim back towards me a touch and fed the cable through the gap directly in to the area next to the glove / fuse box.

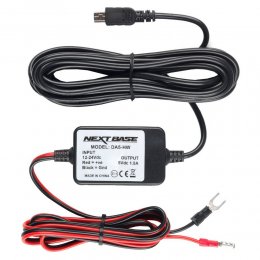
Am yet to install the DVR unit as I am making a custom mount for it but power will be supplied via piggy backing a NextBase Hard Wire Kit on to the cigarette lighter fuse, which has been set in the permeant live position:

155360a

The rear camera will be going in tomorrow but will be a standard "stick to the glass" install as the saloon does not really have anywhere to hide it.
 
  • Like
Reactions: Usman786, daydotz, illingworth22 and 4 others
Just a short update:

Not installed the rear facing camera yet as I am not sure on how / where to place it. Normally I would just stick it to the underside of the brake light but I have a Audi "fitted" sunshade installed. It's removable and with some fast testing the camera fits underneath, stretching the material, but only if mounted to the glass. To be continued...

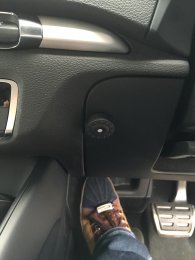
DVR control and file protect button installed. Cable was run from the glovebox and in to the hidden space behind the dash. It was then run along the underside of the passenger dash, tucked in to the trim gaps and over the center console / under the AirCon controls, down the other side and tucked in to more trim gaps to arrive in this position:

IMG 0855

GPS / Speaker module has been installed at the top of the windscreen on the passenger side:

IMG 0856

I wanted to mount this next to the rear view mirror trim but the cable is not long enough. Am going to investigate extending with a Micro USB cable.

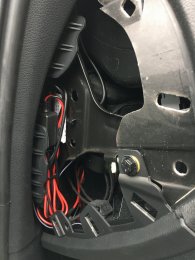
Fast tidy up of all the cables within the space behind the dash / next to the glove box. The NextBase voltage monitor / power unit is grounded to the top glovebox mounting bolt. I also earthed my dimming rear view mirror there also. Will do a final tidy up, fabric wrap and then secure all the cabling tomorrow:

IMG 0859

All cables run so far have been run through the fuse box and in to the glove box compartment via the finger hole in the access panel. I intend to make a hole in the left side of the access panel in order to tidy things up though:

IMG 0857

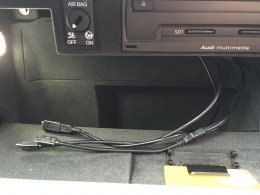
DVR unit will be mounted, screen facing outwards, to the left of the MMI unit. So... all thats left to install at the moment, bar the rear camera, is the cabling to the MMI/AMI:

IMG 0861

More to come :)
 
  • Like
Reactions: Rob2k68 and pburv
Just a short update:

Not installed the rear facing camera yet as I am not sure on how / where to place it. Normally I would just stick it to the underside of the brake light but I have a Audi "fitted" sunshade installed. It's removable and with some fast testing the camera fits underneath, stretching the material, but only if mounted to the glass. To be continued...

DVR control and file protect button installed. Cable was run from the glovebox and in to the hidden space behind the dash. It was then run along the underside of the passenger dash, tucked in to the trim gaps and over the center console / under the AirCon controls, down the other side and tucked in to more trim gaps to arrive in this position:

View attachment 86371

GPS / Speaker module has been installed at the top of the windscreen on the passenger side:

View attachment 86372

I wanted to mount this next to the rear view mirror trim but the cable is not long enough. Am going to investigate extending with a Micro USB cable.

Fast tidy up of all the cables within the space behind the dash / next to the glove box. The NextBase voltage monitor / power unit is grounded to the top glovebox mounting bolt. I also earthed my dimming rear view mirror there also. Will do a final tidy up, fabric wrap and then secure all the cabling tomorrow:

View attachment 86373

All cables run so far have been run through the fuse box and in to the glove box compartment via the finger hole in the access panel. I intend to make a hole in the left side of the access panel in order to tidy things up though:

View attachment 86374

DVR unit will be mounted, screen facing outwards, to the left of the MMI unit. So... all thats left to install at the moment, bar the rear camera, is the cabling to the MMI/AMI:

View attachment 86377

More to come :)
Are you still going to do a write up of the rear view mirror? I was just wondering if activating it on vcds does anything extra,this is the only thing I haven't been able to do with my mirror..It still works how it should though...
ps .Tidy write up on the camera install....:friends:
 
  • Like
Reactions: Rob2k68 and DJAlix
Are you still going to do a write up of the rear view mirror? I was just wondering if activating it on vcds does anything extra,this is the only thing I haven't been able to do with my mirror..It still works how it should though...
ps .Tidy write up on the camera install....:friends:
Am still planning to do a write up on the mirror, just trying to make some time and capture the needed photos. There is no VCDS coding as the mirror is a self contained unit, in fact it's only connections are power, earth, reverse gear sense and interior / cabin lights "on" sense.
 
  • Like
Reactions: Rob2k68 and pburv
Am still planning to do a write up on the mirror, just trying to make some time and capture the needed photos. There is no VCDS coding as the mirror is a self contained unit, in fact it's only connections are power, earth, reverse gear sense and interior / cabin lights "on" sense.
Cheers mate...:friends:
Looking forward to it nevertheless..:yes:
 
  • Like
Reactions: Rob2k68 and DJAlix
Still need to fully set up the DVR unit, too many options to play with, but thought to fire it up for the first time today while out and about. Am sure there are better quality packages out there but the video is good enough for me :) This clip was recorded with factory settings and sound muted:

https://www.dropbox.com/s/31hdyitr8oj1277/20160403-1453_CAM1_0069.MP4?dl=0

Contrary to some of the reports and reviews of the K1S, my unit has no issues with the recording of sound.

Did a temp install of the rear camera today in order to test for signal / interference problems with my MMI DAB radio... zero issues :)
 
  • Like
Reactions: Rob2k68
Nice one! Hope it wasn't that neighbour with the banged up Beamer...
 
  • Like
Reactions: Rob2k68
Nice one! Hope it wasn't that neighbour with the banged up Beamer...
Ha! They moved out thank god. It's some muppet who comes here to visit his girlfriend. Front camera is fully active now so will have him in a few days :)
 
  • Like
Reactions: Rob2k68 and Ignition1
Not much more to update at the moment as time has been very short :( I have found an issue which I am trying to work out... Maybe someone here might be able to assist...

Un-switched power was being taken from fuse position F40 - Cigarette Lighter / Electrical Sockets for testing. Thought I would leave the DVR running in the car like this for a while but when I returned to it the DVR was very hot. So I moved fuse F40 in to the switched power position and set the DVR unit to enable parking mode so that the following happens:
  • Engine Running = DVR in drive mode and recording.
  • Engine Off = DVR switches to battery power (unit has a removable GoPro battery) and enters parking mode with motion detection auto enabled.
  • Ignition in 1st position = DVR exits parking mode, enters drive mode and starts recording.
  • Start Engine = DVR exits drive mode and enters parking mode but then drops out of parking mode a second later and in to idle mode. Recording stops and has to be manually restarted.
Moved the fuse back to constant and am getting the same thing. Am guessing that there is a voltage drop on fuse position F40 during the engine crank which is causing this. So am wondering if anyone might know of a more stable fuse switched position? I just tested fuse position F12 - MMI, as I knew the MMI could be used without the key in the ignition and indeed during engine crank by design, with no voltage drop issues but this only supplies constant power.
 
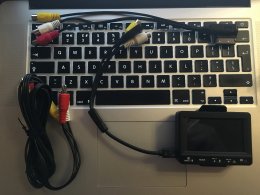
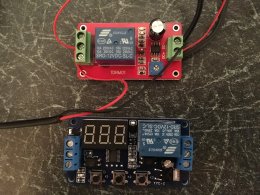
Rear Camera has been mounted and cabling run / hidden. Photos to follow but for the moment... testing delay relays in order to resolve the voltage drop when engine cranking :)

IMG 1065
 
  • Like
Reactions: glospete and Rob2k68
Rear Camera has been mounted and cabling run / hidden. Photos to follow but for the moment... testing delay relays in order to resolve the voltage drop when engine cranking :)...

I used the lower relay from your picture for my android system and was working really well. However one day I unplugged the battery and then it lost its settings to never turn back on. Are you having any issues with consistency from it?
 
I used the lower relay from your picture for my android system and was working really well. However one day I unplugged the battery and then it lost its settings to never turn back on. Are you having any issues with consistency from it?
No issues so far with the blue one, but then all I am doing is testing at the moment.

For those interested the relays will be used as follows if I deside not use the DVR battery pack:
  • Red = to delay power on
  • Blue = to delay power off
The supplied battery seems cheap, lasts a long time, but gets very hot with a constant 12v supply. Have ordered a new battery which has its own power management chip. If this new battery stays cool then I will only be using the Red relay in order to mitigate the voltage drop.

If the new battery gets hot as well then I will not use a battery at all. The Blue relay will then be used to control DVR shut down in order to avoid currpting the last video split file.

I looked at super capacitors etc but the needed setup would have been too big and too much of a faff to get working.
 
  • Like
Reactions: Rob2k68
Following with interest, it can't be that much more work to get the DVR to the centre console next to the cig lighter?

Also interested in how you link to the MMI screen and what the use of this would be?

Delivery tomorrow, then I can plan my install!
 
Following with interest, it can't be that much more work to get the DVR to the centre console next to the cig lighter?

Also interested in how you link to the MMI screen and what the use of this would be?

Delivery tomorrow, then I can plan my install!

Also interested in how to link the camera to the MMI, thinking of buying 2 kits (forward camera only in the cabby) and using the extra rear facing camera in my caravan (sorry) to use as a rear view mirror when towing with the SQ.
 
  • Like
Reactions: Max-Robbo
Camera arrived today, everything is a lot smaller than I thought!
Those cameras are tiny! All seems to be working well, and pleasantly surprised at the quality.

I don't anticipate huge problems in wiring the DVR to along side the cig lighter
 
  • Like
Reactions: DJAlix
Having some DAB issues since install, any pointers?

Got the DVR down by the cup holders no bother. Works great with speed cam alerts!
 
  • Like
Reactions: DJAlix
Having some DAB issues since install, any pointers?

Got the DVR down by the cup holders no bother. Works great with speed cam alerts!
Zero Dab issues for me while using both back and front cameras :) Got any photos of your DVR placement?

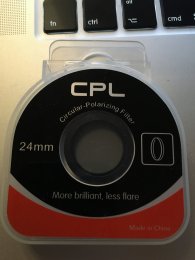
Am yet to 100% finish my install, hence why I have not updated this thread. Am in the process of fitting some CPL filters in order to reduce reflections etc.

Long story short the main reason for my installing the cameras was actually to catch someone who was messing with my car, and in order to better catch this guy and what he was doing I needed to point one of my camera's at my drivers folding mirror. I actually purchased a 3rd / spare camera and stuck it to the door card lol. Now I have caught the muppet and "sorted" the guy out I can finally finish my install. Oh, also grabbed a couple of OEM Go-Pro Hero ½ batteries as the supplied battery started to swell up. Zero heat with these new ones :)

Filters:
IMG 2050

Not the worst example of what the "muppet" was doing but funny as he was too drunk to bend the mirror all the way forwards like he normally does:

https://www.dropbox.com/s/n7xvw0ddsifzxth/Drunk Muppet.mp4?dl=0

Both mirrors are very noisy while unfolding due to this guys fascination with bending them backwards as far as they will go. Will be installing replacement ones soon :)
 
Very strange haha

Was he just doing this to only your car?
 
  • Like
Reactions: DJAlix
Very strange haha

Was he just doing this to only your car?
He was doing it to one other also, a VW Polo with non power mirrors, so not such an issue there I guess. Not got a reason as to why yet. Given the guy employment advice (unemployed for years and living with his old man), lent him money, always took the time to talk with him and all that stuff... this is how he repaid me. Alcohol is a hell of a thing I guess!
 
He was doing it to one other also, a VW Polo with non power mirrors, so not such an issue there I guess. Not got a reason as to why yet. Given the guy employment advice (unemployed for years and living with his old man), lent him money, always took the time to talk with him and all that stuff... this is how he repaid me. Alcohol is a hell of a thing I guess!
Ahh that's a shame!
 
  • Like
Reactions: DJAlix
This is mine that came with the Navi kit I got earlier, same concept :D 1080i, display/playback on MMI screen and MMI controlled. But no rear recording camera though, only backup cam (aftermarket), but maybe it can be coded to record video as well, will have to talk to the guy haha..

IMG 9695
IMG 9696
 
  • Like
Reactions: DJAlix
This is mine that came with the Navi kit I got earlier, same concept :D 1080i, display/playback on MMI screen and MMI controlled. But no rear recording camera though, only backup cam (aftermarket), but maybe it can be coded to record video as well, will have to talk to the guy haha..

View attachment 95139 View attachment 95140
Seen these as stand alone units on eBay. I probably would have purchased one if they were available before I purchased the K1s.
 
Yeah, but this one is a special tooling rather than universal tooling which the cam doesn't extended further than the shaded rain sensor area. The ones on eBay extends at least 1" out after the shaded area. Plus, those doesn't connect to the MMI for display nor control, you have to view it with phone app...

But either way, you did such a great job, could hardly tell it's there :D
 
  • Like
Reactions: DJAlix
Got model details or a link to that please @larbel? Looks nice!
 

Similar threads

Replies
2
Views
738
Replies
4
Views
1K
Replies
18
Views
2K