

Prawn and BigAls A3 Track Car
- Thread starter Prawn
- Start date
You are using an out of date browser. It may not display this or other websites correctly.
You should upgrade or use an alternative browser.
You should upgrade or use an alternative browser.
- Joined
- Dec 8, 2006
- Messages
- 12,100
- Reaction score
- 4,340
- Points
- 113
- Location
- Eastleigh
- Website
- twitter.com
I've now got a set of narrow slicks mounted on my OZs that I have absolutely no need for 
Ah well.
I guess worst case I have them incase the new wheels don't arrive before Thruxton in June!
Ah well.
I guess worst case I have them incase the new wheels don't arrive before Thruxton in June!

- Joined
- Dec 8, 2006
- Messages
- 12,100
- Reaction score
- 4,340
- Points
- 113
- Location
- Eastleigh
- Website
- twitter.com
****** big turbo builds!
Just when you think you've got EVERYTHING Covered, something else pops it's head up!
My Emerald came supplied with the standard K6 3 bar map sensor. This hasn't been an issue up to now, being seeing as 1 bar of that 3 is accounted for by the atmosphere, you're left with a working range of 2 bar of boost.
Not saying I want 2 bar necessarily, but it's the kind of region these turbo's often like to operate in, and to limit myself for the sake of a map sensor swap would be pretty silly!
Genuine VW 4 bar MAP sensor and plug ordered! Plus Im going to relocate it closer to the manifold too as it's been pointed out that my current sensor location in the scuttle at the end of a long vacuum line isn't exactly ideal.
These things are never finished are they!?
I remember when I was at Badger5 Bill would load a map, run it, and then jump out the car and simply say "more boosts". He'd wander into his office and appear minutes later and run the car again ha ha.
Then it would be "More timing" ha ah he had me in stitches.
Then it would be "More timing" ha ah he had me in stitches.
Quess what.??? We were booking in for a major shakedown at Bedford at the end of April, then wee Prawn checks his diary, and has a previous engagement. When in the name of hell will these stag days finish.??? Such a disruption over the last year. Spare days are for track. !!!
I need to get into this car to learn to drive, all over again. I don't want Thruxton to be my first experience in this animal. Not having driven Thruxton before. Oh ----.
I need to get into this car to learn to drive, all over again. I don't want Thruxton to be my first experience in this animal. Not having driven Thruxton before. Oh ----.
Al, Confiscate the car and learn to drive it, as a parent you have the right to frequently use the line
“I brought you into this world, I can just as easily take you out of it”

“I brought you into this world, I can just as easily take you out of it”
I am two hundred miles away, unfortunatley.
We like Bedford, such a good fast track with plenty of runoff. The organisation is among the best as well.
Though we have the 8j OZ's with the slimmer tyres we would of course rather run with the 10j wheels from T D and 265 tyres but at the moment there is a delivery problem because of porous castings. We ordered two sets in January and was told there was a ten week delay. That could translate into delivery at the end of April or even later. . We have all the tyres, but short on rims.
Nicholas has sourced some wide wheel arches so they will be going on soon. ???
Happy easter.
We like Bedford, such a good fast track with plenty of runoff. The organisation is among the best as well.
Though we have the 8j OZ's with the slimmer tyres we would of course rather run with the 10j wheels from T D and 265 tyres but at the moment there is a delivery problem because of porous castings. We ordered two sets in January and was told there was a ten week delay. That could translate into delivery at the end of April or even later.
. We have all the tyres, but short on rims. Nicholas has sourced some wide wheel arches so they will be going on soon. ???
Happy easter.
- Joined
- Dec 8, 2006
- Messages
- 12,100
- Reaction score
- 4,340
- Points
- 113
- Location
- Eastleigh
- Website
- twitter.com
In slowly psyching myself up to start this ICM delete!
2 weeks until mapping at Bills, and going there on the old coils is not an option.
The weather lately is REALLY not helping me either. I just cannot get a full pull through 4th without wheelspin or running out of road!
I'm really happy with how it's fuelling currently at 1.5 bar and it feels really good, I just want to get it a little further on before taking it to B5.
I'd like to get the coilpack conversion finished this weekend, which would then give me almost 2 weeks of evenings to get a bit more work done on the mapping if this rain ever stops!
Sunny day in Newcastle today and the first time Ive seen blue sky in what feels like weeks!
Good luck this weekend with the wiring, itll all be worth it in the end mate.
Good luck this weekend with the wiring, itll all be worth it in the end mate.
What harness did you get?
Its only
4 shared grounds
4 switched +v
And 4 triggers
Isn’t it?
Are you fitting a new male/female 4 pin connector in place of the ICM so you can disconnect it if need be.
When you said you were doing this I looked into it again and Bosch make a big thing of the ICM being on a heat sink that is grounded to the block. Mines been floating under a cone filter for 5 years like most have, but maybe it does result in less performance.
- Joined
- Dec 8, 2006
- Messages
- 12,100
- Reaction score
- 4,340
- Points
- 113
- Location
- Eastleigh
- Website
- twitter.com
What harness did you get?
Its only
4 shared grounds
4 switched +v
And 4 triggers
Isn’t it?
Are you fitting a new male/female 4 pin connector in place of the ICM so you can disconnect it if need be.
When you said you were doing this I looked into it again and Bosch make a big thing of the ICM being on a heat sink that is grounded to the block. Mines been floating under a cone filter for 5 years like most have, but maybe it does result in less performance.
I've got the repair loom from an AMK, and i'm stripping it out right back to where the loom exists the trunking under the standard air box. The old wiring is brittle and cracked so I'm removing as much as I possibly can.
Doing away with the ICM entirely and all it's wiring / plugs, so the 4 trigger feeds currently to the ICM become the 4 triggers for the new coils.
The chassis ground you mention is actually within the wiring on the 5 pin side, it's pin 3 on the ICM
In theory it's 4 triggers (from ICM), 1 shared 12v supply, and 2 shared grounds (much like the ICM has it's own ground, the coils need 2 grounds, 1 for the high load and one for the low load side of the coil)
Also containted within the repair loom are the VSS plug, which I may as well change, and an oil level plug I need to identify and cut out of the repair loom.
On the new loom the 12v supply to coils is shared onto one single wire. I'm not sure if this is the case on my AGU loom so much of it will be worked out when I've stripped it back.
It sounds daft, but I guess more than anything I'm anxious about stripping back the existing loom and identifying everything correctly.
I know someone who mistook black with a purple tracer and purple with a black tracer and wired cylinders 1 & 4 backwards then struggled to work out why he had a missfire!
Much time will be taken with a multi meter, and I've also got a label maker handy to label everything up before any cuts take place!

Eurgh electrics, rather you than me! Mechanical stuff makes sense in my mind, i can visualise it working... electrics on the other hand are just all black magic and wizardry!
- Joined
- Dec 8, 2006
- Messages
- 12,100
- Reaction score
- 4,340
- Points
- 113
- Location
- Eastleigh
- Website
- twitter.com
So, I've started!
Almost instantly I've found something out, which I've not seen anywhere mentioned online.
This is the image commonly thrown around when ICM deletes are discussed:
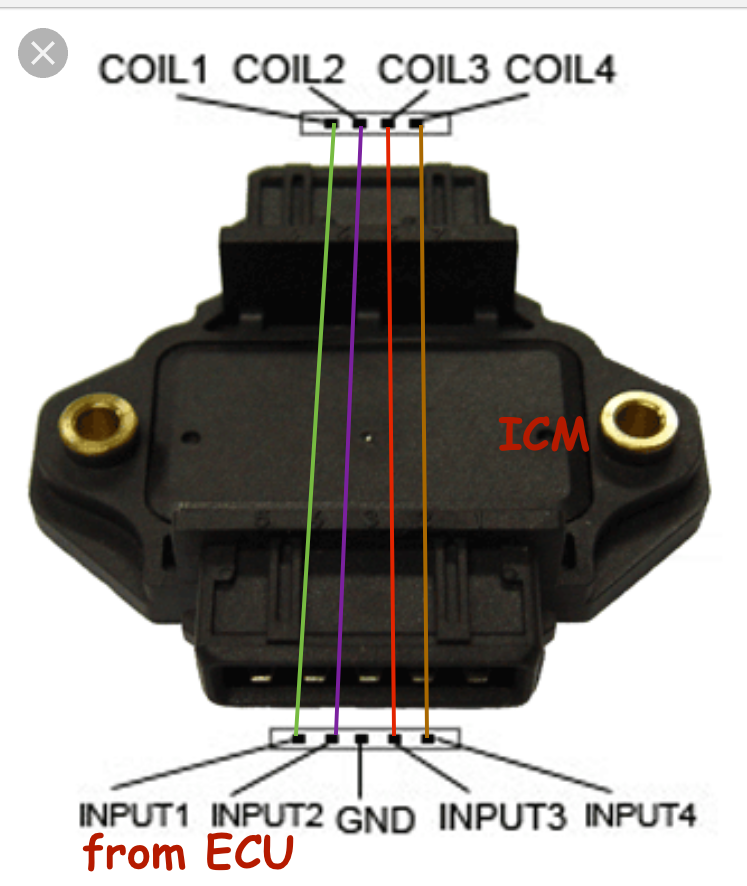
Whilst it's technically correct if you are just bridging across the ICM using a plug in delete, if using it to do a decent job and wire in a full replacement loom, it's very missleading!
When it says Coil 1-4 at the top, what it should actually say is Firing order.
The top row of pins, from pin 1 to 4, actually don't go to coils 1-4 in order at all.
Pin 1 to Cyl 1
Pin 2 to Cyl 3
Pin 3 to Cyl 4
Pin 4 to Cyl 2
So, 1 3 4 2, which just happens to be the firing order of a 1.8T.
So, if bridging across with a plug in you don't care where they go or in what order, but if splicing in a new loom it makes a huge difference.
It turns out the ECU doesn't fire in the engines firing order. It simply fires A B C D for example, then the hardware (wiring in this case) is wired in the correct order to determine the firing order. so ECU outputs 1 2 3 4, are actually wired to the coils 1 3 4 2 respectively.
God knows what would have happened if I'd just run the pins to the coils as per number order.
Given this 'interesting' discovering, I think I'm going to make all the other connections permanent, and just twist and tape these by hand for an initial first start just to be sure it starts up OK before I solder them all.
Have I mentioned before how much I HATE wiring?
I think I'm on top of it, but this stuff makes my brain hurt!

Almost instantly I've found something out, which I've not seen anywhere mentioned online.
This is the image commonly thrown around when ICM deletes are discussed:
Whilst it's technically correct if you are just bridging across the ICM using a plug in delete, if using it to do a decent job and wire in a full replacement loom, it's very missleading!
When it says Coil 1-4 at the top, what it should actually say is Firing order.
The top row of pins, from pin 1 to 4, actually don't go to coils 1-4 in order at all.
Pin 1 to Cyl 1
Pin 2 to Cyl 3
Pin 3 to Cyl 4
Pin 4 to Cyl 2
So, 1 3 4 2, which just happens to be the firing order of a 1.8T.
So, if bridging across with a plug in you don't care where they go or in what order, but if splicing in a new loom it makes a huge difference.
It turns out the ECU doesn't fire in the engines firing order. It simply fires A B C D for example, then the hardware (wiring in this case) is wired in the correct order to determine the firing order. so ECU outputs 1 2 3 4, are actually wired to the coils 1 3 4 2 respectively.
God knows what would have happened if I'd just run the pins to the coils as per number order.
Given this 'interesting' discovering, I think I'm going to make all the other connections permanent, and just twist and tape these by hand for an initial first start just to be sure it starts up OK before I solder them all.
Have I mentioned before how much I HATE wiring?
I think I'm on top of it, but this stuff makes my brain hurt!
- Joined
- Sep 14, 2008
- Messages
- 24,836
- Reaction score
- 6,078
- Points
- 113
- Location
- Wibbleton
- Website
- www.tuffty.co.uk
ECU side...
Pin 1 = Coil 2
Pin 2 = Coil 4
Pin 3 = Common
Pin 4 = Coil 3
Pin 5 = Coil 1
<tuffty/>
Pin 1 = Coil 2
Pin 2 = Coil 4
Pin 3 = Common
Pin 4 = Coil 3
Pin 5 = Coil 1
<tuffty/>
- Joined
- Dec 8, 2006
- Messages
- 12,100
- Reaction score
- 4,340
- Points
- 113
- Location
- Eastleigh
- Website
- twitter.com
I currently have no coil pack loom at all.
I think this is what they call the point of no return!
I think this is what they call the point of no return!
- Joined
- Oct 2, 2015
- Messages
- 3,565
- Reaction score
- 770
- Points
- 113
is now a good time to discover you are colour blind? I would not be able to do this as purple looks like black or blue depending on how dark it is and red green brown orange and grey are all similar colours.

- Joined
- Dec 8, 2006
- Messages
- 12,100
- Reaction score
- 4,340
- Points
- 113
- Location
- Eastleigh
- Website
- twitter.com
I tell you what Stuart, black with 2 purple tracers and Purple with 2 black tracers don't half look similar even when your not colour blind!
I've not gone on wire colours at all for this though, too open to failure if it's been chopped or changed every in the past without me knowing.
I've done it all using pin numbers and continuity testing between known points so I'm very certain of the function of every single wire.
Hopefully I'll find some time for it today and get a little more progress worthy of posting pics
even when your not colour blind!I've not gone on wire colours at all for this though, too open to failure if it's been chopped or changed every in the past without me knowing.
I've done it all using pin numbers and continuity testing between known points so I'm very certain of the function of every single wire.
Hopefully I'll find some time for it today and get a little more progress worthy of posting pics
nightroamer
Registered User
I think your being very thorough @Prawn you should have no problems. I love vehicle wiring and I meet so many people who are shall we say less fond of it. But it’s really straight forward and logical when you get into it.
The way your working through it sounds spot on, as you say colours change although I hope a car like yours should be ok on that front!
Keep up the hard work
Sent from my iPhone using Tapatalk Pro
The way your working through it sounds spot on, as you say colours change although I hope a car like yours should be ok on that front!
Keep up the hard work
Sent from my iPhone using Tapatalk Pro
- Joined
- Oct 2, 2015
- Messages
- 3,565
- Reaction score
- 770
- Points
- 113
I have always struggled with car electronics, in my Alfa I joined an extra power outlet to the existing one to put in the glove box and everytime I opened the ashtray the cars headlights dimmed.
- Joined
- Sep 18, 2012
- Messages
- 514
- Reaction score
- 323
- Points
- 63
I love vehicle wiring
Clearly you're either a madman, a sadist or a pervert

I can't say I'm fond of wiring, although on the odd occasion I've been able to properly get my head around things I must admit it's been rather therapeutic.

nightroamer
Registered User
Clearly you're either a madman, a sadist or a pervert
I can't say I'm fond of wiring, although on the odd occasion I've been able to properly get my head around things I must admit it's been rather therapeutic.
Or all three

Sent from my iPhone using Tapatalk Pro
I have always struggled with car electronics, in my Alfa I joined an extra power outlet to the existing one to put in the glove box and everytime I opened the ashtray the cars headlights dimmed.
 That would’ve annoyed the hell out of me
- Joined
- Oct 2, 2015
- Messages
- 3,565
- Reaction score
- 770
- Points
- 113
I was also trying to test my temperature sensor on my VW T25 in the boot by grounding it and the earth crown at the front of the car caught on fire.
I just dont understand how a car can have electricity going through the bodywork without electrifying everyone. so I understand red and black as + and - and assumed the body shell should be earth but not use that as black wire, as I was taught electricity has to go through + to negative which would electrify the body work. also I never understood that some car electrics could have negative 12 volts.... :| my coloured blindness should not effect understanding this type of thing.
a lighting circuit or ring main / socket spur at home I can manage although I am sure we have all wired up a lighting circuit so it is almost impossible to switch a light switch on where it is wired up wrong and eventually you manage to push it hard enough to blow the fuse.
I have always struggled with car electronics, in my Alfa I joined an extra power outlet to the existing one to put in the glove box and everytime I opened the ashtray the cars headlights dimmed.
I had an electrician like that. Every time I
I put the hall light on, the tele went off. Mind you it was ok because he was Registered.
Registered where I don't know. !!!
Obviously not this ****** planet. AND he had the cheek to ask for money. Something about having to pay a mortgage.
Last edited:
- Joined
- Dec 8, 2006
- Messages
- 12,100
- Reaction score
- 4,340
- Points
- 113
- Location
- Eastleigh
- Website
- twitter.com
hahahaha this is gold
Not just me that hates electrics then!
A few pics. I didn't get as much time as I'd hoped over the weekend.
An hour on Saturday morning had everything stripped, and all wires identified:

What I did, was hold the new loom up to the old at the coil plug end, then tape the new to the old to get a length measurement. I chose to make the new loom 50mm longer to give me some room to move if required.
By taping them together with the old loom pulled away from the car, I could lay the wires next to each other to be joined and cut them exactly the right length. Each joint it staggered by around 30mm so that I don't end up with a huge clump at the joint. I've also got some 3:1 glued heat shrink on recommendation of Alex who works at B5 which seems a lot stronger than normal heat shrink and also seals the joint with the glue.
I used the label maker stolen from work to label up each wire as I identified them:

I'm now at the stage where the bulk of the hard bit is done hopefully. Everything is stripped, everything is identified, and I just need to make the joints and then seal it all back up.
Sunday was a little busy so I didn't get my usual hour in the garage.
To make myself feel better I nipped out for 10 minutes though and got the coils swappped over so I could see what I was working towards!
One very old set of AGU coils:

Stripped out and cleaned up the cam cover:

Plastic push fit adapters popped in. These are great. They're a genuine VAG part, created I believe because they didn't want to revise the cam covers on the V6 engines when they changed to the later coils.

Plenty of companies make an alloy version and charge an absolute fortune for them, but I just can't see why it's required when this does the job so welll!
Finally coils pushed in:


Hopefully I'll find some time tonight to fire up the soldering iron and start making joints!
11 days until mapping!
this is gold Not just me that hates electrics then!
A few pics. I didn't get as much time as I'd hoped over the weekend.
An hour on Saturday morning had everything stripped, and all wires identified:
What I did, was hold the new loom up to the old at the coil plug end, then tape the new to the old to get a length measurement. I chose to make the new loom 50mm longer to give me some room to move if required.
By taping them together with the old loom pulled away from the car, I could lay the wires next to each other to be joined and cut them exactly the right length. Each joint it staggered by around 30mm so that I don't end up with a huge clump at the joint. I've also got some 3:1 glued heat shrink on recommendation of Alex who works at B5 which seems a lot stronger than normal heat shrink and also seals the joint with the glue.
I used the label maker stolen from work to label up each wire as I identified them:
I'm now at the stage where the bulk of the hard bit is done hopefully. Everything is stripped, everything is identified, and I just need to make the joints and then seal it all back up.
Sunday was a little busy so I didn't get my usual hour in the garage.
To make myself feel better I nipped out for 10 minutes though and got the coils swappped over so I could see what I was working towards!
One very old set of AGU coils:
Stripped out and cleaned up the cam cover:
Plastic push fit adapters popped in. These are great. They're a genuine VAG part, created I believe because they didn't want to revise the cam covers on the V6 engines when they changed to the later coils.
Plenty of companies make an alloy version and charge an absolute fortune for them, but I just can't see why it's required when this does the job so welll!
Finally coils pushed in:
Hopefully I'll find some time tonight to fire up the soldering iron and start making joints!
11 days until mapping!
- Joined
- Sep 18, 2012
- Messages
- 514
- Reaction score
- 323
- Points
- 63
IIRC the adapters were only about £2.30 each when I picked mine up - why some people pay silly money for ugly chunks of alu instead is beyond me.
Progress looks good mate, won't take long to join it all up from there
Progress looks good mate, won't take long to join it all up from there
- Joined
- Sep 14, 2008
- Messages
- 24,836
- Reaction score
- 6,078
- Points
- 113
- Location
- Wibbleton
- Website
- www.tuffty.co.uk
because shiny and the interwebs says its cool...why some people pay silly money for ugly chunks of alu instead is beyond me
<tuffty/>

I’m waiting for Nick to realise how shabby his 19 year old ignition harness was and then realise thevrest of the harness is the same state.
Out goes the AGU harness adapter and in goes a brand new harness

Out goes the AGU harness adapter and in goes a brand new harness

- Joined
- Dec 8, 2006
- Messages
- 12,100
- Reaction score
- 4,340
- Points
- 113
- Location
- Eastleigh
- Website
- twitter.com
I’m waiting for Nick to realise how shabby his 19 year old ignition harness was and then realise thevrest of the harness is the same state.
Out goes the AGU harness adapter and in goes a brand new harness
You know what, the irony is, that despite it's whopping ~240k miles, it leaked SO much oil in the first 200k that everything is very nicely preserved
I think there was more oil underneath that loom tape that the contents of the whole sump!
Exposed wires on the ends of the tails, like the injector wires and across the cam cover were fairly shabby, but inside the loom tape it's soaked in oil and all still really supple and no cracks at all
Just a fire hazzard waiting to happen. haha.I did think of cleaning it up, but didn't want to dry it out and it end up cracking now
it'll all get a thorough wipe down before it's rewrapped, but no chemical cleaning at all.Ahhh, the old continuous oil change and spray the engine bay with old oil preservation method.
I thought it was just mine
I thought it was just mine
Re wiring colours, we renovated a house a few years back and someone in the past had wired all the kitchen electrics with red wire only, lives neutrals and earths, very confusing. Someone told me at the time that he knew of a visually impaired electrician who used to do this kind of thing all the time, whether it was his work or not I never found out but we re-wired it, can't beat the traditional way
- Joined
- Dec 8, 2006
- Messages
- 12,100
- Reaction score
- 4,340
- Points
- 113
- Location
- Eastleigh
- Website
- twitter.com
Always good when it runs without too many mishaps after doing some work lolIt runs!
Good work sir!
Sent from my F5121 using Tapatalk

- Joined
- Dec 8, 2006
- Messages
- 12,100
- Reaction score
- 4,340
- Points
- 113
- Location
- Eastleigh
- Website
- twitter.com

Looks pretty. But the tfsi coil cover won't protect anything from heat.
Will sort out some form of shielding for it.
So far though, I'm very pleased. It started first turn of the key and sounded great. Just needs the coolant hoses and things refitting Nd boost pipes and we're ready for B5 in 10 days time
Will sort out some form of shielding for it.
This might help: http://www.audi-sport.net/xf/thread...m-laser-work-bling.249334/page-4#post-2598551
- Joined
- Dec 8, 2006
- Messages
- 12,100
- Reaction score
- 4,340
- Points
- 113
- Location
- Eastleigh
- Website
- twitter.com
I actually have something very similar to that already, but the TFSI coils sit higher, and the wire cover sits slightly higher also, so it won't actually fit.
I'm currently trying to device some sort of DIY bender /roller so I can 'tweak' it a little further to suit my needs!
Thankfully my OE style foil shield still fits nicely:

Ive also ordered a length of fire sleeve which I'll cut length ways and wrap around it too under the foil sleeve. I think that should be pretty well protected then!
I've also finally got round to swapping out the O rings in the push fit radiator connections:
Stock O-rings are 32x4mm, and the connectors have always felt 'wobbly' on the rad, and very occasionally I've seen hints of steam around the headlights. I know other people using the Direnza rads have had issues with the connections leaking when they've reused old O-rings too.
To try and combat this I've installed a 32.4.5 O-ring, which is visibly much thicker:

These took a fairly firm push to get on, but the connections feel much more solid, so hopefully that's the last of that issue!
I also replaced the lower fitting with the drain tap whilst I was down there as that too had started weeping recently!
Never ends with these cars!