

Evening all, thought a How-To might be helpful for some people..
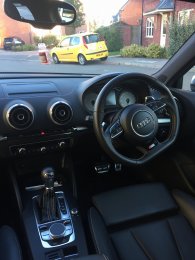
Following @zippster ’s recent thread about buying red air vents (and other items) from the RS3, I thought I’d have a go at red-ifying my standard vents (couldn’t stomach £250-300 for the OEM RS3 parts!)
A couple of pre-cursors:
- Yes i know there’s only three pictured, I trialled the first last night")
- DIY at your own risk, if you break something don’t blame me, just super-glue it back together!
- Apologies for the Bravissimo dust sheets, it’s all I (the Mrs..) had lying around…. Honest.
- Take your time, the plastic is quite thin in places.
- I have no affiliation to Homebase…!
- Thanks to @zippster for the inspiration, to @Rob2k68 for pointing me in the right direction for some vent removal guides, and to @pburv for encouragement (“Hurry Up!”)
Needed:
- 20-40 mins & drying time, depending on dexterity..
- Spray paint (whatever colour you want, just make sure it’s suitable for plastics), I used http://www.homebase.co.uk/en/homeba...l-spray-paint-cherry-red-gloss---150ml-232460 - the red has come out quite nice, £5 well spent
- Ideally two mini flat head screwdrivers (Christmas cracker ones for me...!)
- A couple of pieces of card to use as wedges
- Very small sanding file - I used a nail file
Here we go, my first How-To so cut me some slack!!
First, use your fingernails or a trim tool to prise the air vents out of the dash (the back end of an ice scraper helped me a bit). The surrounding material will bounce back so don’t be afraid to use some force.

On each of the vents, there’s a coloured dot to mark the top. I wrote L (Left), ML (middle left etc..), MR and R on the corresponding vents to put them back in the right place - optional as they’re all the same but hey.
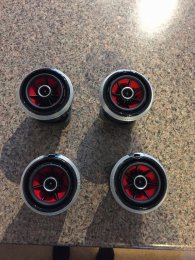
Turn the vent upside down and use a pair of needle nose pliers (or tiny fingers) to pinch the clips together to release the ‘ball’ from the outer casing

Pull the diffuser forward to bring the flaps together, and, from the back, locate the small T clips (there’s one behind each flap) holding the two halves of the ‘ball’ together.

Get behind this clip with a mini flat head screwdriver and push through so there is a clear gap. Do two of these and wedge something between the halves to stop it closing back together. Repeat for 3-4 clips and the rest should pull apart.

Remove the middle… Octopus(?!) looking thing, and pop out the plastic flaps.

Wash the flaps in washing-up liquid to remove the finger grease/dust and dry with kitchen roll.
Lay out all the flaps shiny (concave) side up on newspaper/ a Bravissimo catalogue.
Tip - Use blue-tac to hold the pieces down - the flow from the spray can may blow them around a bit, and they won’t stick to the newspaper after painting.
Apply 3 coats of the spray, starting with a light coat, and leaving for ~20 mins/until touch-dry between coats.

TIp - Once fully dry, GENTLY use a nail file to take some of the ‘stickiness’ off the small plastic notches that stick out in the centre channel. This will allow smoother operation of the diffusers. (Optional - not a lot of room)
I left the paint for about half an hour and went over it with a cold hair dryer, then clipped all the flaps back into the casings.
Tip - Gently wiggle each of the flaps back and forward a good few times once popped back in - this will loosen up the movement, taking the ‘stickiness’ off the legs, where they clip into the case.

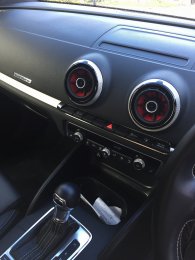
Put the ‘ball’ casing back together in reverse order, taking notice of the orientation of the three arms in the centre, in relation to where the frame will fit between the flaps - incorrect positioning will push the Octopus(?!) out of place and may snap one of its legs (I did this first time - superglue = job done).

Slide the ‘ball’ back into the outer casing, lining up the notch on the side of the ball with the groove in the casing. Operation may be stiff at first, but will loosen up with a few uses.

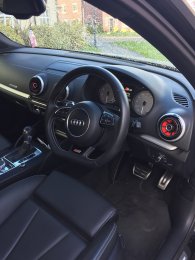
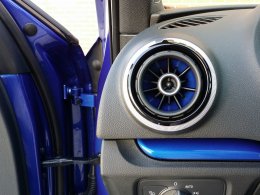
Put back in the car, take it for a drive, and notice the increased performance due to the added red bits.


This was very easy to do… I burn my toast and overcook my eggs EVERY SINGLE Saturday morning, and I managed!
Let me know how you get on… And as always, Picture or Didn’t Happen!
Cheers,
Max
Following @zippster ’s recent thread about buying red air vents (and other items) from the RS3, I thought I’d have a go at red-ifying my standard vents (couldn’t stomach £250-300 for the OEM RS3 parts!)
A couple of pre-cursors:
- Yes i know there’s only three pictured, I trialled the first last night
- DIY at your own risk, if you break something don’t blame me, just super-glue it back together!
- Apologies for the Bravissimo dust sheets, it’s all I (the Mrs..) had lying around…. Honest.
- Take your time, the plastic is quite thin in places.
- I have no affiliation to Homebase…!
- Thanks to @zippster for the inspiration, to @Rob2k68 for pointing me in the right direction for some vent removal guides, and to @pburv for encouragement (“Hurry Up!”)
Needed:
- 20-40 mins & drying time, depending on dexterity..
- Spray paint (whatever colour you want, just make sure it’s suitable for plastics), I used http://www.homebase.co.uk/en/homeba...l-spray-paint-cherry-red-gloss---150ml-232460 - the red has come out quite nice, £5 well spent
- Ideally two mini flat head screwdrivers (Christmas cracker ones for me...!)
- A couple of pieces of card to use as wedges
- Very small sanding file - I used a nail file
Here we go, my first How-To so cut me some slack!!
First, use your fingernails or a trim tool to prise the air vents out of the dash (the back end of an ice scraper helped me a bit). The surrounding material will bounce back so don’t be afraid to use some force.
On each of the vents, there’s a coloured dot to mark the top. I wrote L (Left), ML (middle left etc..), MR and R on the corresponding vents to put them back in the right place - optional as they’re all the same but hey.
Turn the vent upside down and use a pair of needle nose pliers (or tiny fingers) to pinch the clips together to release the ‘ball’ from the outer casing
Pull the diffuser forward to bring the flaps together, and, from the back, locate the small T clips (there’s one behind each flap) holding the two halves of the ‘ball’ together.
Get behind this clip with a mini flat head screwdriver and push through so there is a clear gap. Do two of these and wedge something between the halves to stop it closing back together. Repeat for 3-4 clips and the rest should pull apart.
Remove the middle… Octopus(?!) looking thing, and pop out the plastic flaps.
Wash the flaps in washing-up liquid to remove the finger grease/dust and dry with kitchen roll.
Lay out all the flaps shiny (concave) side up on newspaper/ a Bravissimo catalogue.
Tip - Use blue-tac to hold the pieces down - the flow from the spray can may blow them around a bit, and they won’t stick to the newspaper after painting.
Apply 3 coats of the spray, starting with a light coat, and leaving for ~20 mins/until touch-dry between coats.
TIp - Once fully dry, GENTLY use a nail file to take some of the ‘stickiness’ off the small plastic notches that stick out in the centre channel. This will allow smoother operation of the diffusers. (Optional - not a lot of room)
I left the paint for about half an hour and went over it with a cold hair dryer, then clipped all the flaps back into the casings.
Tip - Gently wiggle each of the flaps back and forward a good few times once popped back in - this will loosen up the movement, taking the ‘stickiness’ off the legs, where they clip into the case.
Put the ‘ball’ casing back together in reverse order, taking notice of the orientation of the three arms in the centre, in relation to where the frame will fit between the flaps - incorrect positioning will push the Octopus(?!) out of place and may snap one of its legs (I did this first time - superglue = job done).
Slide the ‘ball’ back into the outer casing, lining up the notch on the side of the ball with the groove in the casing. Operation may be stiff at first, but will loosen up with a few uses.
Put back in the car, take it for a drive, and notice the increased performance due to the added red bits.
This was very easy to do… I burn my toast and overcook my eggs EVERY SINGLE Saturday morning, and I managed!
Let me know how you get on… And as always, Picture or Didn’t Happen!
Cheers,
Max


 loool sorry mate, had to