My A6 3.0TDi Avant bit of a rebuild and repair thread.

just checking into this thread as its been a while. i have a few problems b5nut

- how do you do it? i mean, how do you find the time esp with a little one and i presume a day job that is not home based?
- where do you go for help? you are very generous in helping mortals in like me and enlighten others with your pearls of wisdom but who do you turn to in moments of need?
 
  • Like
Reactions: A6JP
Time is bad these days, like most people on the forum I do a 9-5 job but I do put aside time to work car. There are a number of other retrofits I'd like to on the car but these day's time is against me, but may start collecting a few bits over the winter months.

Everything you need to know about the A6 is either on google, elsawin/erwin or etka, other than CP removal by a mate at a local Audi dealer, I don't have any other sources of help.
 
Blimey, there can't be much left to do can there B5NUT? Pleased that you are doing more work though as it adds to this amazing thread :)
 
  • Like
Reactions: rich dj
Auto dimming mirror (got the mirror just need to sort the harness), full keyless, TPMS & memory seats. The seats may never happen as I would need to swap the entire seats for the electric version. Would also like rear seat entertainment.
 
I'm being given a tv tuner for my C6 not sure if it's any use to me for my mmi 2g high. Anyone advise how hard to install and what it can be fully used for ?
I may just sell or swap for a dab unit if anyone interested

Sent from my SM-G935F using Tapatalk
 
Could be an old analog unit, if so it's useless, other than to give AV input
 
  • Like
Reactions: dentsy
I am during assembly 3g, and I have a problem please help my.
Please contact us by phone 07580092880
 
Sorry, don't have time at the moment to assist with retrofits, may be able to help in the new year.
 
a lot of effort put into this car. Thanks for help with mmi 3g hdd retrofit to 06 plate C6. I've managed to get that working but it took some time. Please note that from mid 2016 Audi is not really happy to get the CP removed from FL units in preFL cars. Actually ODIS is not giving them the option to do it anymore unless they are using something else to get that sorted. Dunno anything about getting CP removed offline but I've read something on internet however I did it thru licensed database as I had all paperwork for units/parts. Went for 20pin FL gateway and already awaiting BEM + might change alternator. As mentioned/promised before, I can assist with 3g retrofits on PM if anyone needs some help. Trust me B5NUT has probably a lot of questions on his PM box:)

One question regarding 3g+ setup : If I have VAS and odis would I be able to flash xxxxx670 3g+ unit to C6 myself?
Merry x-mas mate!:)
 
  • Like
Reactions: S3Steve
So one of the Installs I did a while ago when I had my old 3G setup was the AMI install, I also used the same setup in my 3GP install as well, just needed a different configuration in the green menu.

I really don't like the idea of the AMI in the glove box on the C6 it was a rubbish idea especially if your using your iphone as the music source, so you have to reach over every time you get in and out of the car. I also been looking around for a pre-made cables which even on ebay they are going for £150 to £300 which is a complete joke for what it is.

So here is a write-up of making your own cable and installation which i'm going to put under the armrest.

So the parts required.

AMI extension cable (this is from a part from a VW) Part number on the connector is 7L6 035 727 changed to 7E2 971 199 (harness) the harness is expensive if you buy from VW I got one from Poland for 30euro
IMG_0241_zps967e9c8e.jpg


LVDS cable this is for a BMW.... cost was 19 euros delivered from ebay
IMG_0242_zps8cb66bf5.jpg


New section of cable you need at least 14 core + the screen
IMG_0243_zps7d6d2dbf.jpg


12 Pin connector to go into the back of the quadlock connector ignore the part number on the photo it is now 3B7 035 477 B
3b7035447b_zps7f3a918d.jpg


Quadlock pins you can buy 20 for £6
M-71_zpsa52c9c83.jpg


So to making the cable.

First is to remove the cover at the AMI socket end.
IMG_0244_zps4213f4ac.jpg


At this point desolder all the cables, and solder up the new cable, there are some differences between the VW & Audi setup on this cable I purchased which are shown in the picture below, all the points that were desoldered should be soldered back up with the new cable.
changes_zps48d03b81.jpg


Once the soldering is done at the AMI end you can connect the pins to the quadlock connector

You should also cut off the end of the LVDS cable and strip about an inch of the wiring back, so you can solder up the the 4 wires.

The pinout for both quadlock & LVDS is listed below
pin-out_zpsb1732896.jpg


After you have done all that you should end up with something like this.
IMG_0249_zps5ef9b9d9.jpg


I was doing some other work to the car at this point as I needed to replace the cup holder in the center console so had to take out all of the climate controls and MMI controls and surround, which you don't need to do if your just fitting the cable as you can run the cable going to the glovebox and run it behind the carpet trim.

First was to remove the side trims, there is one screw under the drivers & passenger foot well to remove.

WP_20140309_008_zps7012da9b.jpg

WP_20140309_013_zpsf4165127.jpg

Once the screw is removed you can remove the trim by getting your hand behind the trim and pulling away from the centre console, the passenger side is a little tight as there is not much room between the seat & console.


You can then start to remove the rear section of the console, you have to remove the air vent first either by pushing on the back of the vent or using a hook to pull the vent out. Don't hook onto the front vent you will on break them off the hook point is right at the back of the vent at the bottom.
WP_20140309_004_zps1ceabb13.jpg


Once the vent is removed you can access the screw holding the armrest in, if you have factory fit phone prep you will also need to disconnect the wiring harness
WP_20140309_006_zpseaa6eeed.jpg


Next was to remove all of the rubber mats under the armrest, and remove the screws holding the cup holder and rear console in place.
WP_20140309_007_zpsf290902c.jpg

WP_20140309_014_zpse59e49d3.jpg


The rear section is also held in by clips either side of the console at the back, you don't need to touch the screws
WP_20140309_017_zpse7f6efd4.jpg


Rear console removed.
WP_20140309_019_zpse725567a.jpg


Once you have the rear center console out it time to start hacking around with the dremel...

First to flatten out the area where you going to fit the AMI connector.
WP_20141019_001Medium_zpsf949b863.jpg


Next is to mark out the hole using the connector as a template.
WP_20141019_002Medium_zpsc8a8440e.jpg


Don't worry about it looking a bit untidy as there is a cover to go over
WP_20141019_003Medium_zps1a454caf.jpg


You then need to trim the AMI connector to allow it to clip in place, you trim down these edges to allow for the thickness of plastic.
WP_20141019_004Medium_zps8127dd15.jpg


AMI fitted
WP_20141019_005Medium_zps7ef4cb33.jpg


Depending on where you fit the AMI connector you will need to slightly trim the center console support. I trimmed my in the area marked in red but the screw and most of the plastic was still left
bit_of_a_trim_zps3e73d72f.jpg


Pic with the Rear console in place, remember you don't need remove the front center console or the climate controls
WP_20141019_008Medium_zps29030b44.jpg


Final stage of the installation is to connect the cable to the back for the Audi Multimedia module, to do this you need to drop the glove box. To remove the glove box first start by removing the end panel on the left hand side so you can see the fuse holders, you then remove the 2 screws underneath the glove box on the left & right hand side, then open the glove box and remove the 3 screws at the top of the glove box.

Once removed you can get get access to the quadlock connector.
WP_20140530_008_zps70477bda.jpg


At this point you can remove the glove box to make it easier to run the cable and connect into the quadlock
WP_20140529_001_zpse02211d5.jpg


The other connector goes in the yellow connector shown in the image below.
WP_20140507_20_50_24_Pro_zpsb9602f4e.jpg


Once fitted it then best to test the cable before you start putting the car back together.

First enable the hidden menu, you will need VCDS to do this.
[5F - Information Electr.]
[Adaptation - 10] -> Channel 6 -> Change 0 to 1
Save and Exit.

You should be able to access the hidden menu now by holding down the following buttons CAR - SETUP if you don't see the hidden menu then you may have to reboot the 5F module, you can do this by holding down the Setup, Joystick, and top right control button hold down for around 5 seconds then release.
WP_20141021_004Medium_zpsa164e501.jpg


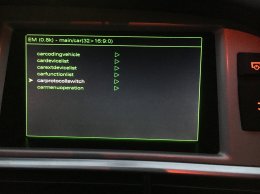
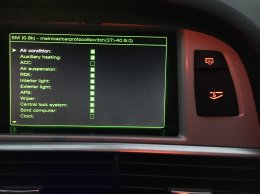
Once in the Hidden menu select Diagnose, Settings

Select AMI/AUX from there I selected option 5/8 as this will allow streaming of music via BT (once I get the AMI BT adapter)
Press the return key a couple of times to exit the menu and reboot the 5F module.

once the system has rebooted select he CD/TV or Media key, and the top right soft key (Source) you should now see AMI in the list (IT will be grayed out if you have not plugged in a cable and device)

Connect your cable to the AMI socket, I plugged in a USB cable & memory stick and you should see it come to life
WP_20141021_003Medium_zpsd373d5b1.jpg


WP_20141021_002Medium_zps324453ec.jpg


Installation is now complete you just have to put the car back together....
 
Last edited:
Beautiful. My Chinese AMI for 3G doesn't work however car see the AMI as is not greyed out and also supply power to pendrive(but not to phone).
Is this 3G or 3G+ setup ? Any difference on that ?:)
Another great write up btw :)


Sent from my iPhone using Tapatalk
 
Could the wiring to the phone cradle be adapted to do this?
With an iPhone, the cradle only supplies power and connection to the car's aerial, so the rest of the wiring must be redundant.

Also, is Bluetooth streaming only available with 3G+ or can it also be done with 3G?
 
Ok, thanks that looks interesting.
I don't have an AMI port on mine, how easy is that to add?
Is it just a cable, or is there more hardware required?
 
Send me a PM and I can email it to you.... I got it from vag-tech.
Hello. Sorry to trouble you and Google translator. Can you tell me - where can I download the update file 4L0910468A__0071. Masters of Abrites when removing component protection after the installation of 3G system on my A8 4E downgrade my gateway from 0071 to 0060. Thanks in advance.
 
Sorry I don't know where you can download this file, I know I don't have a copy. I replaced my gateway I did not upgrade the firmware.

Sorry not sure what you are asking for in your second sentence.
 
Thanks for answering. Update file sent to me yesterday here on the forum. This update does not change the gateway when upgrading the system.
 
Hi B5NUT. Great job here ;-). I just wanted to kindly ask for help in one problem.
I retrofitted MMI 2g->3G and have no climatronic controls displayed on screen.
I have V2 (black) version of clima gauges installed since my A6 is mid 2007 - I suppose so.
I have no errors on HVAC module but cannot manage to get controls displayed on 3G MMI screen.
I have currently 4E0035670F MMI 3G unit installed.

Is that question of protocol assignment or something else ?
 
Have you been into the green menu and checked the settings? For example below shows my Seat Heat set to [CAN Komfort] the climate should also be set the same.
IMG_0059_zpspfefuz3z.jpg
 
Last edited:
Hi, thank you for quick response.
I supposed this setting in green menu as I've seeen those on some photo in this thread.
The problem is - I can't find path /car/carbusassignment path in my green menu. Maybe it is because I have EM 0.8 version in top left corner.
Is it possible to set this channel through VCDS adaptation or anything?
 
It's in a different location on the 3G system, but I think you will find setting under /main/car
 
Nope. ;-(
 

Attachments

  • IMG_0589.JPG
    IMG_0589.JPG
    1.3 MB · Views: 454
  • IMG_0590.JPG
    IMG_0590.JPG
    1.3 MB · Views: 468
I switched settings according to your screen, reseted MMI and still no effect with climate controls on MMI display ;-(
 
That is not my car, it's just an example image!

Are you 100% your climate control is from a facelift car? It should have a production date of 2009 or later.
 
That's the point! I was pretty sure I have v2 controls since they're black and half 2007. So they're not ;-). Is it possible to flash them or have to find the new one?
 
Different chip installed . Easy to spot the difference apart from colour . You should have "Auto " switch and "AC". No setup button .


Sent from my iPhone using Tapatalk
b6955b84266997f4d521e0c10da12246.jpg
 
Last edited:
As above they should have the on/off switch. There is no way to flash the firmware that I know of, and I don't know if the hardware has changed!

Also if you fit the FL panel, then the heated seats won't get as hot as they used to! Seen a few people complain about that and never found a fix.
 
Seems like I will have to spend another 100£ for panel and 50 for CP ;-\
 
I have another question. I switched my instrument cluster to
4F0920932S according to future ACC retrofit.
What about little orange triangle marks around speedometer? Are they ACC only related or I can activate it with regular cruise control or speed limit controls?
 
As above they should have the on/off switch. There is no way to flash the firmware that I know of, and I don't know if the hardware has changed!

Also if you fit the FL panel, then the heated seats won't get as hot as they used to! Seen a few people complain about that and never found a fix.

Not a difference at all in my case. I've heard about this and had cp removed on both panels pre-fl and FL one so checked as I was curious and had both unplugged in my car. The other car I retrofitted 3G didn't change the AC panel and I don't really think is very uncomfortable as you can still operate through little LCDs on panel itself. Also saves money if you not willing to change the air vents for black ones (which I personally did)

Hardware - fl it's different in terms of AC panel-screen communication.

Bobie - the one you looking for is 4F2820043AA and yes- it's gonna be close to 100 quid. I paid 60 with postage from Lithuania on GB eBay however I was looking for it for a while. Most likely it's going to be cheaper and quicker to pick one up from scrap yard if you take it off yourself.

B5NUT- did you notice a difference in temperature the seats are producing since changed? I am very curious why is that.

Sent from my iPhone using Tapatalk
 
Last edited:
According to switching to new gateway/BEM:

From a wiring perspective, you will need to disconnect the 14 pin connector from the old J644 and install the new battery monitor cable J367. You will need to take the wire/pin 8 from J644 connector and put it into pin 1 of J367 2 pin connector (T2az). Pin 2 on J367 needs to be run to pin 2 on the 20 pin CAN gateway. An option here to minimise running cables is to re-utilise one of the now no longer needed Convenience CAN wires from J644 Pins 9 & 10 (remove from CAN block T46a and solder a wire extension and run into pin 2 of the CAN gateway.

I'm not sure but according to ELSA diagrams, from J367 pin 1 (blue cable) should be run to pin 2 of CAN gateway and pin 8 of old J644 cable (and later to alternator), and J367 pin 2 (black/violet) should be run to "+" or maybe it can be soldered to J644 pin 14 ?
 
According to switching to new gateway/BEM:


I'm not sure but according to ELSA diagrams, from J367 pin 1 (blue cable) should be run to pin 2 of CAN gateway and pin 8 of old J644 cable (and later to alternator), and J367 pin 2 (black/violet) should be run to "+" or maybe it can be soldered to J644 pin 14 ?

This is true in terms of blue one. Black/violet was mentioned on couple of the forum but I personally ran new cable from + of the battery .
So :
Blue wire soldered to new cable which is coming from 2 pin of gateway to new battery monitor ( ran the cable along left side of the car to gateway ) and 2 pin of new battery monitor directly to + .

AC panel you have mentioned will also fit


Sent from my iPhone using Tapatalk
 
So blue one (pin 1) should be soldered both: to PIN 2 of gateway and PIN 8 of plug of old BEM ?