Cup Holder LED Lighting

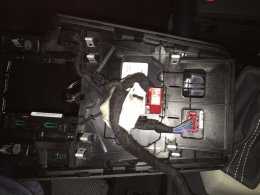
Thanks! I emailed ECS already but I'll pay a visit to my dealer and see if they have those parts. I did a quick search on those numbers and they seem to be for other connections too, not just this led ring, so maybe they're pretty common. I needed to go in anyway to ask if there's an alternate 12v source under there since I have my lighter socket set to always hot for the dashcam, or I'll wire the dashcam up properly.. Thanks again for the part numbers - all this really helps.
 
I finally got the connector and wiring, so I'll be finishing this up this week when the weather cooperates. In the meantime I got all the diagrams and everything else off erwin to install an auto dimming rear view mirror, and found something interesting about the official way the led rings are wired up.
When installed from the factory, it uses the same wiring as the light for the 12v cigarette lighter lighting. Grey/white for positive and brown for ground and go to the exact same ground point and connector on the vehicle electrical control module. Now to decide whether to go with red or white as the red led rings actually look ok..
As for console removal, the manual explains it probably worse than @Nathing32 did :)
 
Thanks - you're correct - all the warning lights went out after a short drive. Took a while and a bit of Internet searching to figure out how to reset the DSG knob button. There are a couple of YouTube videos out there that help.

All in all this was not the easiest of installs for a seemingly minor addition. The lights are cool but for the time and money it's probably not what I'd put at the top of the list of "simple" mods.

Hi, so it's installed but I did the same thing as you with the button on the shift selector getting stuck in.. Apparently locking button removal tool T40203 does the trick, but I don't have that kind of time :) How did you get yours reset? Searched all over and the manuals I got off erwin have a great write up (with that tool), but no luck.
 
Hi, so it's installed but I did the same thing as you with the button on the shift selector getting stuck in.. Apparently locking button removal tool T40203 does the trick, but I don't have that kind of time :) How did you get yours reset? Searched all over and the manuals I got off erwin have a great write up (with that tool), but no luck.
Any help?


Not sure if its exactly the same but might point you in the right direction.
 
  • Like
Reactions: MKC and kc1174
I'll start off by saying it's pretty tricky to reset. You have to 90% disassemble the shifter - carefully - so that you don't scratch or dent any parts. You need to use some small flathead screw drivers or better yet, some stiff plastic trim removal tools to pry each section apart. I followed a couple of YouTube videos I found to assist. They don't show our exact shifter but they are similar enough to get you most of the way there.

Try this one to separate the shifter from the leather boot:


After that step you need to remove each remaining piece. Start with the aluminum ring, then red ring and then the aluminum base of the knob itself (the part that has the S tronic insert) by carefully prying apart.

Once you have that last part separated you can look inside behind the button and see how the locking mechanism works. It helps to use a piece of good masking tape to pull the button out. It's spring loaded with a small aluminum or steel block behind it that needs to be snapped back into position so that the button pops back out. You can do it with a screwdriver.

Sorry this is hard to explain but if you play around with it for a few minutes it will make sense. Good luck!
 
  • Like
Reactions: kc1174
Any help?


Not sure if its exactly the same but might point you in the right direction.

This video is helpful in showing the tape trick but the way the lower aluminum piece is removed from our shifter is not the same. You just need to pry ours off with a screwdriver around the seam where it connects to the rest of the knob.
 
Cheers both! Yeah I ended up going to the dealer this morning and they had the tool. I might buy one to add to my collection (around $15 on the snap on Audi site but out of stock at the moment). I can see this happening again.. Led rings are looking good btw but connecting them to the gray wire for the cig lighter lighting has caused that to no longer light up :/ That said, I removed the cig lighter to free up the wiring, so I likely bent or broke something while removing the lighter (which is a royal pita to remove, even with the correct tool).
 
Cheers both! Yeah I ended up going to the dealer this morning and they had the tool. I might buy one to add to my collection (around $15 on the snap on Audi site but out of stock at the moment). I can see this happening again.. Led rings are looking good btw but connecting them to the gray wire for the cig lighter lighting has caused that to no longer light up :/ That said, I removed the cig lighter to free up the wiring, so I likely bent or broke something while removing the lighter (which is a royal pita to remove, even with the correct tool).


hey mate ,
i bought these led lamp lights from audi dealership with came with no wires either .
They tried to install it took off the console and told me there is no wiring to fit it . so they couldn't do it .
Now i can't even return the part cuz it came out of singapore and now is sold to me lol ....

can you please help me with this one .. where do i get the wiring and how do i get the diagram so i can show them
and get it done ..

thanks in advance
Hi, yeah the led rings don't come with the wiring or connector. There's 2 parts to buy listed earlier in the thread - got them from my dealer as despite the parts being cheaper elsewhere, the shipping is outrageous. Anyway, the the wire is one yellow wire with 2 pins. The 2 pins go into the connector that then go into the led rings. Cut the yellow wire in half - one will be positive the other negative. As nathing mentioned before, you'll find out which is which because if you get it mixed up, the led will be red. With the console off, those wires will need to be tapped into the cigarette lighter/12v wiring. The dealer should know which is which but brown is earth/ground, red is positive, and gray is the positive for the cigarette lighter light ring. I used the gray one so the rings come on when the headlights do, but I'm not sure that was the best thing as now the cigarette lighter light doesn't come on but the led rings do. Not sure if I broke something or there simply isn't enough current in the gray wire to power up both.
Anyway, the dealer likely won't touch anything where they have to tap into the existing 12v/cigarette lighter wiring. Attached is a pic of the cig lighter and wiring and colors. There may be/should be an oem harness for the led rings but I didn't see anywhere it would plug into when I was under there.
The hardest part of this though is removing the tabs off the underside of the center console to get the top off to access the black rings already in the cupholder and insert the new led rings. Again, the dealer likely won't touch that but with a dremel it's relatively easy. All this again is explained by nathing before. When you've got the new rings in there, give them a test and just clip back on the top and seal it up (I used silicone adhesive and it stunk for a bit but it's ok now). Wait til it dries and pop the console back on. Just remember where the wires plug back into the console (take some pics before you unplug them) and put the shifter/gear knob back on. If yours is automatic, don't press the locking button in until the shifter is fully seated or you'll have problems (see my posts above). All in all, it's a pain in the behind, but looks good when it's all done. Good luck.
 

Attachments

  • $_3 (1).JPG
    $_3 (1).JPG
    44.4 KB · Views: 1,416
Not sure if this helps the dealer but I just looked at the wiring diagram - the positive for the led rings goes to pin 10 on connector T10a (a white 10 pin connector that leads eventually to the Vehicle electrical control module system J519).
The ground goes to ground point 368 (ground connection 3 in the main wiring harness). Refer them to the April 2015 A3 wiring diagrams document - number 49/4. Wish those documents off erwin came with part numbers...
 
  • Like
Reactions: SRT
Yeah, forget about connector T10a - too much hassle - it's way over by the passenger door (LHD - see pic). RHD it's on the other side with a load of other connectors. Just tap into the 12v :)
 

Attachments

  • Screenshot_2015-08-06-01-52-21.png
    Screenshot_2015-08-06-01-52-21.png
    481.2 KB · Views: 1,427
  • Like
Reactions: SRT
Hi I am awaiting delivery of my 8v but didn't get the lighting package.
Can I have another link or website where I can purchase this part?
The eBay seller in the link provided has been suspended and I have been searching for days .
Regards
Hi, not sure where you are, but the part number is 8V0 947 157 A for the rings and the wire and connector are listed up on page 1 too (pics with post 38).
 
Hi, not sure where you are, but the part number is 8V0 947 157 A for the rings and the wire and connector are listed up on page 1 too (pics with post 38).

I have searched eBay using the part number, no luck! I have put in a parts request and the parts manager asked me to confirm. I'm not quite sure so I responded with the part number you have me inclusive of the wire and connectors.

I'm currently in the sunny island of Jamaica. I also have home in the US where I can receive the part
 

Attachments

  • image.jpeg
    image.jpeg
    29.9 KB · Views: 1,269
Recently bought them for mine £15 from tps
 
  • Like
Reactions: Chrisdragger
Thank you,

Compared to 15£ ,It was pricey but I ordered it nonetheless ... Should get it to my US address by mid week and hopefully I have it my hands on Xmas.

Any leads on wire and connectors?

There are 2 yellow wires and a connector to connect to the light unit its self

Thanks
 
  • Like
Reactions: H17YD L
Yeah, forget about connector T10a - too much hassle - it's way over by the passenger door (LHD - see pic). RHD it's on the other side with a load of other connectors. Just tap into the 12v :)

Suppose if you wiring it to the T10a you can set the brightness on the MMI?
 
  • Like
Reactions: SRT
Suppose if you wiring it to the T10a you can set the brightness on the MMI?
Sorry - haven't been online for a few days - not been well and this may or may not make sense but here goes. Actually, just get the led rings power from the 12v socket light wire - it's the gray wire coming from the 12v socket. You'll see that the 12v socket light only lights up with the headlights on, which is what you want the led's to do too - plus you can use the dim switch on the headlight switch to dim the led rings just like you do the other dash lights etc.
 
I want to fill with a few pictures taken during the removal of console.
On these pictures can be seen 2 of 3 connectors which are to be unplugged.
The 3rd is not visible in the picture It is located on the other side of the bracket.


DSC01561
DSC01555
DSC01557
 
  • Like
Reactions: glasgowdubber
So I got the light. Ready to install.Are there any videos on how to remove the stronic gear knobs and console?
Anyone so nice to oblige me?
 
The stronic gear knob should not be removed. The console can be lifted without removing the gear knob.
 
The stronic gear knob should not be removed. The console can be lifted without removing the gear knob.

Thats interesting considering what the others before have experienced. Maybe you can explain a little more. Are you saying that the console stays in the car and is not removed in order to extract the old fitting and replace with the LED one?
How is it removed then?
I have followed this thread in the hope I might undertake something similar but am now just a bit confused:blink:
 
I said that the gear knob should not be removed. The console must be removed in order to have access to old plastic rings.
In this previous post from Nathing32 It is well explained how to proceed.

For future reference - popping the center console off is actually super easy once you've done it once. The trick is locating a gap on each side (they about even with the MMI knob) and pushing wedges into the gap until you feel the clips release. Then you just lift the whole thing up with your hands and the other clips release. I can do it now in about 30 seconds.

See the first photo which shows the gaps in the sides and the second which shows the gaps in relation to the MMI knob in the background.

The third image shows the time consuming part - there are 12 of these "glue" tabs that need to be cut off to separate the textured overlay from the base console to access the old plastic rings and install the new rings. The picture shows four of them right in front of the cup holders.

The fourth picture shows the old black plastic rings removed. You can see the released glue tabs in the photo as well.
View attachment 62474
View attachment 62475
View attachment 62476
View attachment 62478
 
:blue: Its me being dim I guess as I understood that Nathing32 had issues with the stick knob etc - so the console just lifts up and the sticks gaiter/shroud detaches leaving the stick in place?
Forgive my confusion:blush:
 
You should start by unclipping the leather shift boot.
This is done using a flat screwdriver

DSC01558
 
Last edited:
  • Like
Reactions: glasgowdubber and SRT
I have done a little reccy of the console and it seems reasonably straight forward :readit:
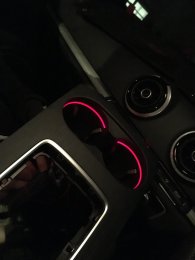
and s-tronic stick stays where it should:yes:
I have gone ahead and ordered parts as have others but I really want to wire my unit into the MMI controlled dimming facility as suggested by ming6068 and see that kc1174 refers to pin 10 on connector T10a and ground point 368. So my question is - can anyone point to the locations of the T10a connector and ground point. I dont have access to a wiring diagram. From earlier comments they would appear to be in (left) side of car? as its RHD
I dont suppose anyone with the ILP has looked at their set up, why would you:sadlike:
but maybe someone who has done this?
Thanks to you all for your diligence and doggedness:respekt:
 

Attachments

  • IMG_1178.JPG
    IMG_1178.JPG
    748.5 KB · Views: 1,280
  • IMG_1179.JPG
    IMG_1179.JPG
    1.6 MB · Views: 1,304
  • IMG_1183.JPG
    IMG_1183.JPG
    1.7 MB · Views: 1,243
Do they only have the LED lights in white? I would've thought the Audi-red light would look better?
 
The J519 on MQB A3 (our A3) should be same as the Golf mk7 one, which has a 73 pin , 39pin and another 'many pins' connector. You sure there is a T10a there?

I read the instruction from my local supplier, it is pin 3 on the 73 pin connector... footwell light is pin 72
 
You sure there is a T10a there?

I have no idea. Thats why/what I was asking. I wanted some guidance as I dont have wiring diagram and wanted to know where to connect the led cup lighting so that it is controlled via mmi:blush:
Thanks:calm:
 
Hi again ming6068. I was quoting from kc1174 where he mentions T10a.
Do you have instructions for connecting the cup led to the mmi.
Maybe you can advise/post?
Thanks:friendly wink:
 
It's better to have Elsawin to check the wiring diagram to confirm
But according to my source it should be J519 T73C plug, pin 3 (if you have Halogen headlamp) or pin63 or 53 (for Xenon, and that's the worst part as my copy of wiring diagram can't read clearly)
 
Last edited:
So just finished putting the cup holder light in, as said above somewhere if you switch the cables rounds the led is red,
I've had to be different and leave it red! Each to their own
 

Attachments

  • image.jpeg
    image.jpeg
    895 KB · Views: 1,383
  • image.jpeg
    image.jpeg
    1.9 MB · Views: 1,323
  • Like
Reactions: Schizophonic
So just finished putting the cup holder light in, as said above somewhere if you switch the cables rounds the led is red,
I've had to be different and leave it red! Each to their own

where did you wire them to mate? I had mine to the 12v supply but came up with light on the dash so I disconnected it help would be much appreciated.

thanks