Right here goes on folding mirror retrofit!
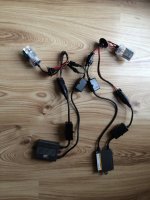
Parts needed for this model were listed above in this thread.
Tools required:
Phillips screwdriver
Long Phillips screwdriver
Set of trim removal tools
Various Torx bits ranging from T20 up to T45
Stanley blade
VCDS for recoding the door modules.
Ill start with door panel removal.
Firstly wind down the window all the way as this makes it easier to remove the door panel.
Remove the tweeter grill up next to the door handle using a trim removal tool in the end nearest the car as shown in photo. This is because there is a screw for the panel behind this grill.
http://i284.photobucket.com/albums/ll13/tony22593/IMG_0434_zpsmatqvtbd.jpg
The next thing to remove is the door trim, in my case the aluminium piece.
http://i284.photobucket.com/albums/ll13/tony22593/IMG_0433_zpsjnvdz93p.jpg
To do this, start at the hinge end and by gently pulling the bottom of the trim overcome the clip. Once its come away move to the middle and then lastly the end. Be careful with the end clip as it also has a hook and after you have released it you have to slide it towards the car to fully release it.
Once you've done this all screws to remove the panel are visible.
one behind the tweeter grill.
http://i284.photobucket.com/albums/ll13/tony22593/IMG_0435_zpsvrfxdyha.jpg
Two behind the door trim.
http://i284.photobucket.com/albums/ll13/tony22593/IMG_0438_zpsihfyov4c.jpg~original
one in a hole on the bottom of the door pull.
http://i284.photobucket.com/albums/ll13/tony22593/IMG_0440_zpsjnj0vfut.jpg~original
http://i284.photobucket.com/albums/ll13/tony22593/IMG_0441_zpskqfmzlxu.jpg~original
Last one is at the bottom of the panel.
http://i284.photobucket.com/albums/ll13/tony22593/IMG_0442_zpsj3h2tarw.jpg~original
Undo all of these screws noting that the long black one goes at the very bottom.
Once you have done this you need peel the edge of the panel out of the rubber door seal starting one side following round the bottom and up the other side.
http://i284.photobucket.com/albums/ll13/tony22593/IMG_0443_zpselhl9dmi.jpg~original
Now starting at the bottom you need to get your fingers behind the panel and give it a short sharp pull as this makes the clips slide and retract. follow along the bottom and up the sides with the same technique. Once all 6 clips have been released you can the lift the panel up and away from the door. You then need to disconnect the blue connector from the door module and the small connector from the tweeter. You also need to disconnect the door release cable from the clip and then unhook the cable, then the panel can be moved away to a safe place.
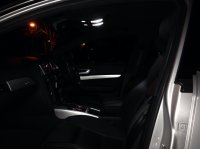
Now to remove the mirror, I had to lift the window frame up slightly to make a big enough clearance to fit the mirror connector and rubber grommet through.
http://i284.photobucket.com/albums/ll13/tony22593/IMG_0479_zps09uwmbdo.jpg~original
This is a picture that shows the hole in which you have to get the connector and gromet through. (with mirror removed for illustration purposes)
http://i284.photobucket.com/albums/ll13/tony22593/IMG_0482_zpsbdshcwyv.jpg~original
This is a picture with the frame lifted up about 1" 1/2 to 2". But it shows the added clearance in which it gives the connector and grommet to go through.
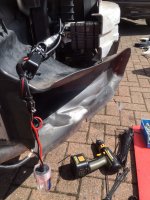
Heres how to lift the frame up.
Firstly un-peel the door seal from across the top of the door and unclip the seal from the top 2 clips on both sides.
http://i284.photobucket.com/albums/ll13/tony22593/IMG_0445_zpss5tyw2sz.jpg~original
http://i284.photobucket.com/albums/ll13/tony22593/IMG_0446_zpswrimqkk3.jpg~original
In this picture it is not shown but covering the part where the mirror bolts to the door there is a small plastic trim. Once you have peeled the seal off the top of the door it pulls of with a bit of gentle force
")
.
Now the tricky bit is finding all of the bolts for the window frame so you can slide it up.
There a 2 silver T45 bolts at the top of the door at either end of the window.
http://i284.photobucket.com/albums/ll13/tony22593/IMG_0461_zpsls4f7nav.jpg
http://i284.photobucket.com/albums/ll13/tony22593/IMG_0462_zpsakqwmlsr.jpg
Now you need to peel the top part of the sound deadening away to reveal a further T45 Black bolt hinge end and 3 further T20 bolts just a bit further down spaced along the door, you may need the stanley to carefully slice the adhesive for the deadening.
http://i284.photobucket.com/albums/ll13/tony22593/IMG_0466_zpsruynkxg2.jpg~original
There are 2 black T45 bolts at either end of the door further down
one is behind a blanking plug actually on the end of the door (latch end)
http://i284.photobucket.com/albums/ll13/tony22593/IMG_0470_zpsbdnaz3lo.jpg~original
The other is near the hinge end not much further down than the T45 silver bolt on that side.
http://i284.photobucket.com/albums/ll13/tony22593/IMG_0468_zpstv33kgib.jpg
There are 2 T30 Black bolts
one is at the bottom on the latch end of the door and the other is at hinge end underneath the top hinge.
http://i284.photobucket.com/albums/ll13/tony22593/IMG_0474_zpsdhwajwmx.jpg
You can see the first of these bolts removed from the bottom left hand side of the door in this photo.
http://i284.photobucket.com/albums/ll13/tony22593/IMG_0469_zpszze2m4vd.jpg
This is the second bolt just underneath the top hinge.
There is another T30 silver bolt just underneath where the mirror bolts to the door. Here it is;
http://i284.photobucket.com/albums/ll13/tony22593/IMG_0471_zps4o828jnw.jpg
As i had Bose i had to remove the speaker as there is a bolt for the frame under it. This is simple, there is one connector at the hinge end of the door and then pull the door wiring loom off of the speaker itself, there are 5 clips for the wiring loom and they just pull away from it. Then it is a case of removing the T25 bolts surrounding the unit. Don't have pictures of this bit! sorry guys.
Now you need to peel the sound deadening away from the bottom latch side of the door to reveal a T25 bolt
http://i284.photobucket.com/albums/ll13/tony22593/IMG_0459_zpsjyfu8r5a.jpg
Then there is another bolt exactly the same but at the other side of the door at a similar height
http://i284.photobucket.com/albums/ll13/tony22593/IMG_0464_zpsczcldevs.jpg
I believe this is all of the bolts holding the window frame.
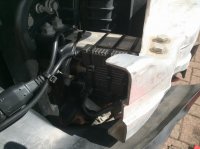
Another thing that needs to be removed is the window motor, this is relatively simple with one connector going to the door control module and 3 bolts holding the motor on. Once you have done that, the 3 receivers of the bolts for the window regulator have 2 clips on either side of them they must be pushed in and then all 3 receivers be pushed into the door. Now you can disconnect the mirror from the door module and push the grommet into the door and then feed the connector into the door. Then using an assistant, lift the frame about 2 inches evenly with one person at each end and then ask your assistant to hold it there while you take the mirror out. Undo the single bolt for the mirror and carefully wiggle out the grommet and mirror connector.
To remove the glass carefully lever the glass out starting at the outer edge, see picture;
http://i284.photobucket.com/albums/ll13/tony22593/IMG_0475_zpsirbq6vjw.jpg
then disconnect the heated mirror connectors holding the spade connector on the mirror with pliers as these can snap off.
Removing the mirror cover (painted part)
There is one T10 screw that needs to be removed
http://i284.photobucket.com/albums/ll13/tony22593/IMG_0476_zpsgoj6kigy.jpg
There are two tabs that need to be depressed at the top above the adjuster assembly (body colour)
http://i284.photobucket.com/albums/ll13/tony22593/IMG_0477_zpsz2skmg3g.jpg
I believe that there are two black tabs at the bottom you can only make out one in this photo.
http://i284.photobucket.com/albums/ll13/tony22593/IMG_0478_zps6qyxoz6e.jpg
Once you have given all the tabs a wiggle and unsettled them, the cover actually lifts directly upwards of of the mirror base remembering to disconnect the indicator integral to the mirror cover.
Once you have removed the cover you can slide it over your new mirror base firstly connecting the indicator and then fully sliding home ensuring all the tabs locate correctly then put the one retaining screw back in.
To refit the mirror glass offer the glass up to the mirror ensuring the 2 big plastic locators slide home.Once you are confident they are in then push all the glass all the way home until a positive click can be heard.
To refit the Mirror I carried out the reverse of disassembly, taking my time and double checking everything. To refit the window frame install all bolts ensuring all the large T45 bolts return to the same place in their respective hole as this can affect alignment, just make sure the bolts cover the circle marks they have left. Then refit the speaker, the window motor and re-stick the sound deadening to the door.
Before you refit the Drivers side door panel we must replace the switch and trim/door pull.
First turn your drivers door panel over and put it onto a protective sheet.
There are 10 T25 screws holding the door pull, window switch and mirror switch assembly to the door.
http://i284.photobucket.com/albums/ll13/tony22593/IMG_0450_zpsufeuamxp.jpg~original
3 of the screws are up the top of the door pull behind the mirror switch and another 7 going the length of the armrest with the window switches in.
Remove all 10 screws.
Then unclip the mirror switch and pull the connector clip free of the door panel.
Then unclip the electric window switch connector and then pull the assembly away from the door.
After that you need to separate the soft touch plastic part and the leather part, this is done easily by pulling the bottom pieces apart and then sliding the top out.
http://i284.photobucket.com/albums/ll13/tony22593/IMG_0453_zpsmkkygcek.jpg~original
Then you need to remove your window switches and install them into the new piece. The window switch is held in with tangs so you have to carefully lever the outer collar away from the switch itself and the push the switch out.
http://i284.photobucket.com/albums/ll13/tony22593/IMG_0454_zpswyl6v4kq.jpg
Then install your window switches into your new trim piece, once you have done that you can refit it to your door panel ensuring the wires for the door mirror switch go through the correct hole. Then screw it back to the door panel and reconnect the window and mirror switch and re-clip the mirror switch connector to the door panel.
Once you have completed all that, the door panels can be re-fitted to the doors in the reverse order of disassembly. Ensuring that the door panel clips are not broken and are all still in the door panel itself, as sometimes they can stay in the door. You can remove them by pulling the head of them out with a suitable tool and they may come out or they may break. I bought a pack of these clips just incase i had any breakages. Luckily I didn't have any but i did have a few stay in the door but using the mentioned method I managed to slide them back into the door panel. Once you have all the clips in the door panel ensure they are all in open mode, by that i mean all the heads of the clips are slid out. This is important as if they are not they open out and therefore they wont fit in the hole in the door. Offer the door panel up to the door and plug the blue connector back into the door module, plug the tweeter connector back into the door panel and reconnect the door handle cable. Hook the door panel back over the top and then you need to bang the panel in the areas where the clips are to activate the clips. Then reinstall the screws and the trim pieces. Also make sure the door seal is on top of the door panel and not trapped underneath.
And finally coding!
On my car I only coded the Front Passenger door module and Drivers door module. I found this was all that was needed for them to work and to not throw any codes. As my car has long coding it was relatively easy. When VCDS is loaded up and connected to it I went into "select control module" then into "passenger door elec" then into "coding" then "long coding helper" and then click on each box until a box underneath appears that says "folding mirrors fitted" then check that box and exit. Your new coding should appear and then click "do it!" Then do the exact same thing on the drivers door module. Once you have completed all of that the mirrors should work.
[object Url]
I hope this helps people that wish to do this to their cars. It may not be the best write up as it is my first but if anyone has anyquestions about i will do my best to help you.
Regards,
Tony