

Prawn and BigAls A3 Track Car
- Thread starter Prawn
- Start date
You are using an out of date browser. It may not display this or other websites correctly.
You should upgrade or use an alternative browser.
You should upgrade or use an alternative browser.

I really do love the wing! Can't wait to see it 100% finished!
Where's the side skirt update?
You will have to wait for the update, Travis Perkins is out of roofing plastics.

Do you have a Eurocell anywhere near you. I have used them a few times for fascia, soffit boarding, guttering etc and found the prices to be good.
http://www.eurocell.co.uk/8/branch-finder-1/region/southern
http://www.eurocell.co.uk/8/branch-finder-1/region/southern
Hi, we are going to wait for Travis Perkins to re-stock. We are particularly keen on the molecular structure of their fascia/soffit products and of course they only cost approx £10.00 per mile. Minimum 1/4 mile order plus p and p. Not that money is of any consideration. !!!
Not that money is of any consideration. !!!- Joined
- Dec 8, 2006
- Messages
- 12,100
- Reaction score
- 4,340
- Points
- 113
- Location
- Eastleigh
- Website
- twitter.com
- Joined
- Dec 8, 2006
- Messages
- 12,100
- Reaction score
- 4,340
- Points
- 113
- Location
- Eastleigh
- Website
- twitter.com
Ok ok, I'm busy
I'll do a proper write up tomorrow.
For now, I'll just leave this here

I'll do a proper write up tomorrow.
For now, I'll just leave this here

Sam_
Down under
- Joined
- Dec 8, 2006
- Messages
- 12,100
- Reaction score
- 4,340
- Points
- 113
- Location
- Eastleigh
- Website
- twitter.com
So, time for a bit of an update!
I’ve thought for a while, that with the splitter and the old rear wing, the side of the car was looking a bit bare. There was a really obvious visual difference at the sides, and it just looked a little strange to me:

When I added the new wing, I thought this suddenly became even more obvious:

So, I needed something to balance it out. Visually more than anything.
The curvy sides of the A3 Sills aren’t ideal from an aero point of view, because due to low pressure created under the car by the splitter, air running down the sides is encouraged to curl round the sills and under the car again, which isn’t what you want.
By adding some form of side below the sill, you can discourage air from getting back in under the car. How effective these are depends entirely on the depth of course, but anything is better than nothing here, and what I’ve done forms part of a larger plan that’ll hopefully become clear in the next few months also.
So – as we all know, I try to do EVERYTHING on a budget, meaning I’ll use materials from unusual sources, and make as much as possible myself.
I recently helped AndyP out with some work on his house, during which we fitted all new fascia boards and soffit boards front and rear. He just so happened to have a 5m length of Fascia board spare, which got me thinking…….

Hmmmmmmmmmmmmmmmmmmmmmmmmmmmm, I wonder?
A 30 second mock up with some cardboard was all I needed – this confirmed that there was at least possible SOME merit in the idea!

Maybe I’m onto something!

I told you to use eurocell .That looks like the stuff I fitted on our house. It weathers quite well and seems to survive in high winds. Not that deep though, Probably be Ok up until the point you run over a high kerb.
As you say, I think the flat side would discourage air going back under the car.
.That looks like the stuff I fitted on our house. It weathers quite well and seems to survive in high winds. Not that deep though, Probably be Ok up until the point you run over a high kerb.As you say, I think the flat side would discourage air going back under the car.

- Joined
- Dec 8, 2006
- Messages
- 12,100
- Reaction score
- 4,340
- Points
- 113
- Location
- Eastleigh
- Website
- twitter.com
I told you to use eurocell
You sure did, although these are actually already on the car on Saturday when you posted that, so I thought it quite a strange coincidence you suggested it
Great minds and all that The finished article isn't as deep as shown in the pic above, that was literally a 'hold in place for a photo' thing to see if the idea had any merit. where they are currently, at the height they're sitting, they'll never make contact with any kerbs on track
Dubster5
Registered User
- Joined
- Dec 8, 2006
- Messages
- 12,100
- Reaction score
- 4,340
- Points
- 113
- Location
- Eastleigh
- Website
- twitter.com

Dubster5
Registered User
haha I'll not mention the new end plates I can see in the pic as well then, I'll just shush and wait patiently for your post
- Joined
- Dec 8, 2006
- Messages
- 12,100
- Reaction score
- 4,340
- Points
- 113
- Location
- Eastleigh
- Website
- twitter.com
Thanks I'll get round to it soon enough. haha.
Perhaps we should have a game of spot the difference!
I'll get round to it soon enough. haha.Perhaps we should have a game of spot the difference!
- Joined
- Dec 8, 2006
- Messages
- 12,100
- Reaction score
- 4,340
- Points
- 113
- Location
- Eastleigh
- Website
- twitter.com
Wow, thanks Erik, that's quite a change!!!!
Saturday arrived, and RobinJI came over to say hello, it was quite nice for a change having some help whilst working on the car, and some input to the creation too. Robin as we know is pretty clued up on all thing aero, which is pretty handy at times
I was keen to make sure that where the skirts joined the sills, there was no obvious join is unslightly seam line visible.
It worked out pretty well, that I was able to remove the side trims and grind them back 1-2mm on the back face, to create a slot underneath to tuck the skirt behind.
At the door opening, I was worried it'd still be very obvious with the door open.
We decided to experiment on a spare offcut, and thinned the top edge right down to about 1mm thick:

This slotted in really well and seemed to work nicely, even looking like a proper fit at the transition from door to quarter panel:


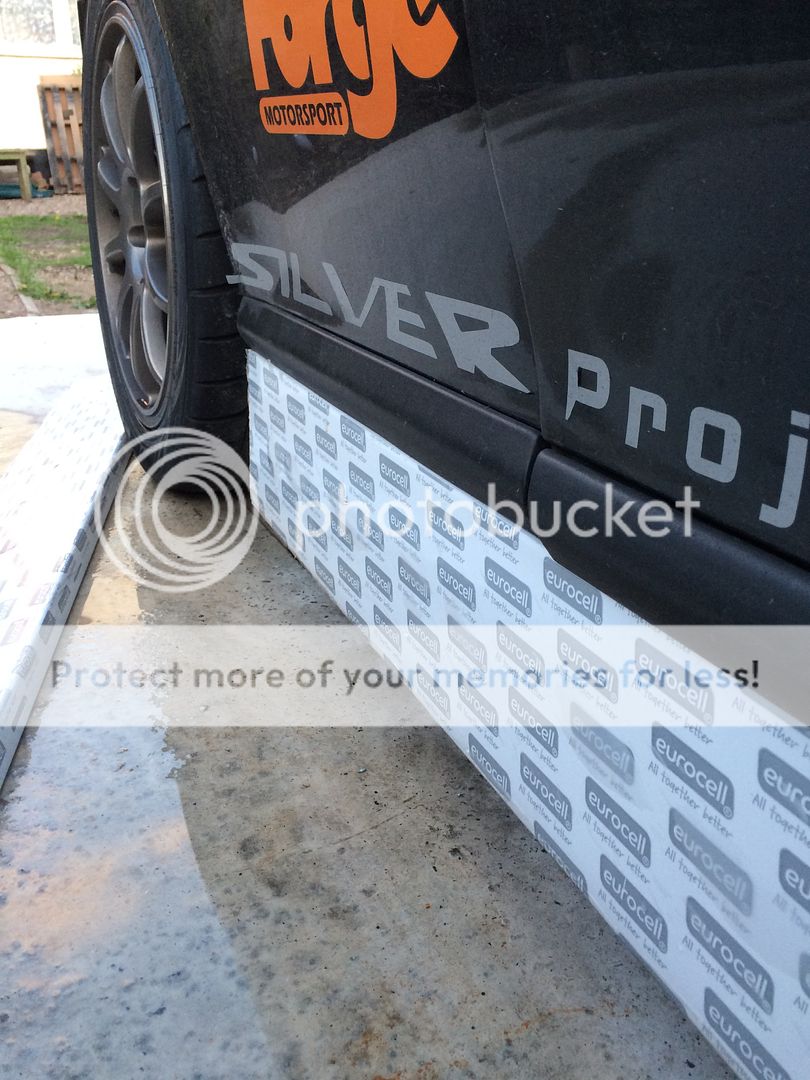
Having already taken a few measurements, we knew that the 150mm deep fascia board was going to be too deep. I thought I’d take the chance to chamfer the whole top edge at full height for a test fit though.
I trimmed the top edge right down, and test fitted it:

This worked well

Deep skirts would be more effective in terms of air flow, although they run the risk of potentially looking like a silly ‘hovercraft’ style drift kit, which I was keen to avoid.
With the theory proved, we did some measuring relative to various points on the floorpan, and decided to cut 30mm off the boards to give me a sensible depth skirt for this V1.
These were cut down, and the taper restored to the top edge, then test fitted:

To secure them, as per my sketch a few weeks ago, we made up some ali brackets to mount to the sills:

Which sit something like this:

Last up was a small cut out at the front of each skirt.

Reasons for this were 2 fold: partly to allow jacking access to the chassis rail, and partly to make some attempt at allowing wheel arch pressure to escape behind the wheel. At this point the skirt actually sits higher than the sill line, so hopefully it won’t be trapping too much hot air from the front arches in.
At this point, it rained like hell, and it was getting late, so we gave up for the day. Tori ****** dinner, and we chatted rubbish about cars late into the night over a few beers
Saturday arrived, and RobinJI came over to say hello, it was quite nice for a change having some help whilst working on the car, and some input to the creation too. Robin as we know is pretty clued up on all thing aero, which is pretty handy at times
I was keen to make sure that where the skirts joined the sills, there was no obvious join is unslightly seam line visible.
It worked out pretty well, that I was able to remove the side trims and grind them back 1-2mm on the back face, to create a slot underneath to tuck the skirt behind.
At the door opening, I was worried it'd still be very obvious with the door open.
We decided to experiment on a spare offcut, and thinned the top edge right down to about 1mm thick:

This slotted in really well and seemed to work nicely, even looking like a proper fit at the transition from door to quarter panel:


Having already taken a few measurements, we knew that the 150mm deep fascia board was going to be too deep. I thought I’d take the chance to chamfer the whole top edge at full height for a test fit though.
I trimmed the top edge right down, and test fitted it:

This worked well

Deep skirts would be more effective in terms of air flow, although they run the risk of potentially looking like a silly ‘hovercraft’ style drift kit, which I was keen to avoid.
With the theory proved, we did some measuring relative to various points on the floorpan, and decided to cut 30mm off the boards to give me a sensible depth skirt for this V1.
These were cut down, and the taper restored to the top edge, then test fitted:

To secure them, as per my sketch a few weeks ago, we made up some ali brackets to mount to the sills:

Which sit something like this:

Last up was a small cut out at the front of each skirt.

Reasons for this were 2 fold: partly to allow jacking access to the chassis rail, and partly to make some attempt at allowing wheel arch pressure to escape behind the wheel. At this point the skirt actually sits higher than the sill line, so hopefully it won’t be trapping too much hot air from the front arches in.
At this point, it rained like hell, and it was getting late, so we gave up for the day. Tori ****** dinner, and we chatted rubbish about cars late into the night over a few beers
- Joined
- Dec 8, 2006
- Messages
- 12,100
- Reaction score
- 4,340
- Points
- 113
- Location
- Eastleigh
- Website
- twitter.com
Morning came (as it has an irritating habit of doing!), and we were due to meet Jardo, Lewis, Mowgli, and Ash at Loomies for breakfast.
Feeling overly enthusiastic, I got up at 7am, and decided I HAD to have the skirts and wing fitted for our breakfast meet.
Thinking back, I remembered my good friend Duct tape, and set about wrapping the steel wing brackets, and both side skirts entirely in black duct tape to make it look (slightly) presentable.
The pikey wrapped parts were dropped on, and off we went in the torrential rain!


Breakfast meet was great. 6 of us, chatting and talking cars for a few hours over a fry up and a few coffees.
I had a brief drive of Jardos mk2, which was very interesting indeed in the wet, then we parted ways around 11am just as the rain was clearing and the sun was coming out.
Robin and I took a skirt each, and set about wet sanding them down ready for paint. We added a radius on every cut edge to make them look a little more ‘proper’ also.
2 coats of plastic primer first:

Followed by 3 coats of good old satin black!

Job Jobbed.
Next up was the end plates. I wasn’t keen on how the stock ones on the wing looked, and wanted to find a low cost alternative that was easy to work with and easy to form.
I got onto ebay, as you do, and ordered up 2x A4 sheets of 3mm perspec in gloss black:

In hindsight I should probably have gone with 5mm thick stuff, as these are slightly flexy, but that’s not a huge issue and easily changed for about £6.
We drew all sorts of shapes on them, and held them in as many ways as possible, and it was very hard to work out what would be best.
I added a 30mm radius to each corner of the A4 sheet, and they instantly looked better, but still not quite right.
Looking at various pics, and my old wing, I’d tapered the end plates on those, so we gave it a try on these new ones too:


It's really hard to get a feel for how they looked when sat on the drive, so the only real way to tell, was to take it out somewhere more open and get some better pics.
I'll add those when I've had some lunch! my lunch break is almost over now!
I think the side aero skirts work well. Whens the rear rx7 replica lower diffuser coming then!? 
- Joined
- Dec 8, 2006
- Messages
- 12,100
- Reaction score
- 4,340
- Points
- 113
- Location
- Eastleigh
- Website
- twitter.com
All in good time  you'll be pleased to know that plans are in place for that already
So, with everything seemingly finished, I topped up the meth tank for the first time in ages, and headed out for a little blast!
I wanted to get a few pics of it out in the open to look at the aero from a proper distance. I found a quite little spot, and took a few snaps:


What is strange, is that no matter what height or angle I take the pic from, any shots from the rear looking forward, make the wing look REALLY high up. You can see from the other pics that it isn't, but the camera somehow doesn't catch the proportions quite right.

The highest point of the whole wing is actually less than 10mm above the highest point of the roof, yet in pics it looks like loads more

Having seen it in the wild I'm much happier with the end plates size and shape now. I think they work pretty well.
I may still buy some 5mm sheet to make some more slightly stiffer ones, but for now at least, I'm happy
One last one just for Dad, as posted previously. There's obviously a running joke that half the car comes from the builders merchants, so I couldn't resist a shot outside my local TP:

you'll be pleased to know that plans are in place for that already So, with everything seemingly finished, I topped up the meth tank for the first time in ages, and headed out for a little blast!
I wanted to get a few pics of it out in the open to look at the aero from a proper distance. I found a quite little spot, and took a few snaps:


What is strange, is that no matter what height or angle I take the pic from, any shots from the rear looking forward, make the wing look REALLY high up. You can see from the other pics that it isn't, but the camera somehow doesn't catch the proportions quite right.

The highest point of the whole wing is actually less than 10mm above the highest point of the roof, yet in pics it looks like loads more

Having seen it in the wild I'm much happier with the end plates size and shape now. I think they work pretty well.
I may still buy some 5mm sheet to make some more slightly stiffer ones, but for now at least, I'm happy
One last one just for Dad, as posted previously. There's obviously a running joke that half the car comes from the builders merchants, so I couldn't resist a shot outside my local TP:
NikkiNokkiNoo
iTrack S3
- Joined
- Dec 12, 2014
- Messages
- 18
- Reaction score
- 9
- Points
- 3
- Location
- Mid Surrey
- Website
- www.idonthaveahomepage.com
Then rear bumper looks sad and left out from the cheapo mods, lol.
I'm a bit disappointed with the side skirt brackets, I was expecting self tapping screws into the body work
I'm a bit disappointed with the side skirt brackets, I was expecting self tapping screws into the body work
- Joined
- Dec 8, 2006
- Messages
- 12,100
- Reaction score
- 4,340
- Points
- 113
- Location
- Eastleigh
- Website
- twitter.com
Cheers chaps.
I've had this image in my head for a while, and I'm really glad it's turned out just how I hoped
Very pleased with how it's all gone together and the way it looks. I just hope it translates to equally improved performance on track
Sadly the first outing at Curby is too slow a track for it to have any effect at all!
jayjay101
Registered User
Lavis89
Registered User
- Joined
- Aug 18, 2011
- Messages
- 2,039
- Reaction score
- 825
- Points
- 113
- Location
- Plymouth
- Website
- www.facebook.com
- Joined
- Dec 8, 2006
- Messages
- 12,100
- Reaction score
- 4,340
- Points
- 113
- Location
- Eastleigh
- Website
- twitter.com

Serious!
Best thing I did, keeps the car cleaner and stops getting more stone chips on the body work behind front and rear wheels.
Not my car below obviously, I used cheapo sh!tty ones from ebay and self tapping screws....
Race car, no?

Best thing I did, keeps the car cleaner and stops getting more stone chips on the body work behind front and rear wheels.
Not my car below obviously, I used cheapo sh!tty ones from ebay and self tapping screws....
Race car, no?
- Joined
- Dec 8, 2006
- Messages
- 12,100
- Reaction score
- 4,340
- Points
- 113
- Location
- Eastleigh
- Website
- twitter.com
Just, no!
You couldn't pay me enough to fit a set of mud guards on it
You couldn't pay me enough to fit a set of mud guards on it
g60leigh
Registered User


Praaaawwwnnnnyyyyyyy im really liking it dude looks the part hey, well done bud
God those mud guards are offensive.
Like two used sanitary towels glued to the rear bumper.
Sorry.
Like two used sanitary towels glued to the rear bumper.
Sorry.
God those mud guards are offensive.
Like two used sanitary towels glued to the rear bumper.
Sorry.
you just said sorry are you feeling ok dude?
- Joined
- Dec 8, 2006
- Messages
- 12,100
- Reaction score
- 4,340
- Points
- 113
- Location
- Eastleigh
- Website
- twitter.com
Praaaawwwnnnnyyyyyyy im really liking it dude looks the part hey, well done bud
Cheers Miggles
I look forward to seeing yours go the same way in the near future A few more random pictures for no good reason


Cheers Miggles
A few more random pictures for no good reason

one day bud, if only things were as easily available down here as it was there. for the mk1 golf there is millions of extras you can pick up on any corner but for the 8L not even a percent of that
- Joined
- Dec 8, 2006
- Messages
- 12,100
- Reaction score
- 4,340
- Points
- 113
- Location
- Eastleigh
- Website
- twitter.com
Cheers Drewman
I finished prepping the brackets finally this evening. Dropping them off with Andy tomorrow for coating
I finished prepping the brackets finally this evening. Dropping them off with Andy tomorrow for coating