

Door/Puddle/footwell lights
- Thread starter T0m
- Start date
You are using an out of date browser. It may not display this or other websites correctly.
You should upgrade or use an alternative browser.
You should upgrade or use an alternative browser.
A big thank you to RobinA3 who installed puddle and warning lights into my A4 at the weekend with some limited help from me and they work great...we had some issues about the footwell lights as we are not sure which plug they connect into however Robin is going to find out for me and then we will fit them.
Robin makes all the looms and they look just like something you would buy from the dealer...he currently sells them for the A3's.
I have a question does anyone have the footwell lights in the rear and if so how are they positioned as there seems to be a lack of brackets for them to fit into. Does anyone have any pictures or can take any of theres so we can see how they fit?
Tom
I have a question does anyone have the footwell lights in the rear and if so how are they positioned as there seems to be a lack of brackets for them to fit into. Does anyone have any pictures or can take any of theres so we can see how they fit?
Tom
Cut and pasted this from instructions I made some time ago..............
***Requires VAG-COM to recode the Convenience Module***
(FW=Footwell)
Misc. Parts used:
- light duty flexible Twin speaker cable (feed for each FW light)
- Misc. connection wire
- 4mm female crimp spade connectors (red)
- Misc. Male & Felmale crimp connectors (Blue type)
- Heat shrink (various sizes)
- Self Amalgamating Tape
- Electrical Test Meter DVM (Volts / Ohms / Diode Check / etc.)
8E0 947 113 A6 PS Rear Reatainer (x2) @ £6.42ea
8E0 947 101 Rear FW Light (x2) @ £6.35ea
3B0 947 415 B Front FW Light (x2) @ £5.90ea
I used the following Maplin parts to enable me to disconnect the FW lights at the various connection points near to the lights - again I could have sourced the correct Audi plugs and wires but this seemed an easier option at the time. These Maplin battery race plugs do the job fine and I positioned them close to exisiting Audi connectors and out of site. For the seat connections they are next to the airbag / heated seat connectors in the floor, for the glovebox panel it is adjacent to the glovebox wire connector, and the drivers side panel is near the diagnostic port connector.
Maplin Parts:
Part Description Qty.
===================================
JG05F Race Pk Lead Female 4
JG04E Race Pk Lead Male 4
Maplin Total £22.06
Car Items to remove.......
- Take the front seats out (Various trims + 4 bolts each)
- Take the glove box out (6 bolts)
- Take out the panel under the steering wheel above the pedals.
The lights require a permanent +12v fused supply.
I managed to utilise a spare fuse slot in the fusebox and provide a dedicated feed using a larger physical fuse size - but still 5A.
(The wiring diagrams indicate S2(5A) as the correct fuse location but this is the small style fuse which I could not work out how to make a coonection too since the load side had no connector.)
This feed was routed back to the passenger side left kick panel
Front Seat lights for Rear Footwell lights:
Note - Airbag light will come on if you switch on ignition with seats disconnected - requires reset through VAG-COM.
Fit the retainer clips to the back of the seats. Make up a custom two wire loom and cable tie to under seat back to a Male Race lead connector. I integrated the new wires into exisiting hosing and utilised black heat shrink to make the cabling look factory fit. I used 4mm red female spade connectors to connec to the light units.Tip - normally you would crimp the connector parallel to the spade - rotate through 90 degrees and then crimp - you will then have room to slide this particular connector into the light male pins. I also heatshrunk the exposed metal of the spade connector for extra electrical safety.
At each seat connection point I positioned a female race pack connector and then routed this back to the passenger side left kick panel.
Front Footwell lights:
The light apertures are there to fit the lights in the Glove box panel and the under steering wheel cover. You may have to punch out the panel blank to expose the full rectangular hole and it may require a quick edge clean with a metal file.
Mount the lights and make up a wire loom utilising a race pack connector to enable panel removal - put the inline connector near the other panel connectors.
NOTE: The front Footwell lights are polarised with a diode so will only work one way - check which pin requires the 12V and 0V signals.
Route all footwell lights back to the passenger side left kick panel - you can make all your FINAL connections here behind the plastic connector mount panel.
TIP: once all the wires from all 4x FW lights are here - check they work with a battery - I used my 9.6v drill battery noting the (+) & (-) terminals for the front FW lights.
Convenience Module Connection:
(BE CAREFUL THIS IS A £220 module)
The convenience module (J393) is located under the front of the front left side of the passenger seat - getting access to this is the hardest part. You need to prop back the carpet. The Convenience module is located in a water tight box - pry the retaining clips open to gain access. You need to get four wires through the water tight seal to connect to the following connector pins of the convenience module. Pick out the rubber sealant and carefully push a small screwdriver through the wire seal - you should be able to push your 4 wires through - I pre-shrunk them as a loom with black heat shrink. Re-insert the rubber compund you picked out and then tape with self amalgamating tape to make water tight again.
Convenience Module J393 - Connector II
Pin 13 Front Right FW light
Pin 6 Front Left FW light
Pin 5 Rear Right FW light
Pin 14 Rear Left FW Light
The convenience module provides the switched 0v connection to your lights as and when each door is opened individually.
I used a 4mm red female spade connector with heatshrink over the exposed metal spade to connect to the convenience module Connector II for the 4 wires.
Final Connections: @ Left passenger Kick Panel
All the wires are routed to here.
Connect the relevant 0v side of the FW light to the above 4 wires in turn.
Connect the other side of the FW light to the new +12v supply.
VAG-COM Coding:
http://wiki.ross-tech.com/index.php/...Comfort_System
Convenience Module: 46
Channel 061: Variant Reduction
- +1 = Mechanical Window Regulators in Rear (PR-4R5)
- +2 = Footwell Lights (PR-QQ1)
Note: Adaptation value is the sum of the individual options.
That should be it - Footwell lights - Close all doors and then check by opening each door in turn!Hope this helps?


Woorlord -> many thanks for this....do you have any pics of the rear footwell lights installed?
Found this in my archives when I had the seat out to fit the rear footwell light........
You can actually wire up the lights to come on with the interior light or have then convenience module switch the lights seperately. I did it on mine where I can either have them switched seperately or all come on together. I control how I want them switched it by a 4 pole rocker switch from maplins.
4Pole Type : Toggle Switches : Maplin
I've got a schematic that I have drawn, but If someone can host it I'll gladly give it away. Also it shows how you can wire them up (all lights together) without having to access the convenience unit or VagCom recode the unit.
4Pole Type : Toggle Switches : Maplin
I've got a schematic that I have drawn, but If someone can host it I'll gladly give it away. Also it shows how you can wire them up (all lights together) without having to access the convenience unit or VagCom recode the unit.
Dsport
Registered User
Ive got 4 white lights, 4 red lights,4 illuminated handles and 4 door looms if your interested removed from A4
No VAG-COM or do not want to touch your Convenience Module?
Footwell Lights "ON" with Interior light:
Based on the Interior Light connector and if you want the footwell lights to come on with the interior light then use Pin 3 (red/yellow) and Pin 10 (red/white) - these connections are effectively across the Interior light bulbs of the roof light, so run these wires to all your footwell lights in parallel.
(Note: I have not tested this - but have looked at the circuit diagrams and this should work - also note you may want to fuse the feed to the footwell lights with an in-line fuse connection for added safety.)

No VAG-COM or do not want to touch your Convenience Module?
Footwell Lights "ON" with Interior light:
Based on the Interior Light connector and if you want the footwell lights to come on with the interior light then use Pin 3 (red/yellow) and Pin 10 (red/white) - these connections are effectively across the Interior light bulbs of the roof light, so run these wires to all your footwell lights in parallel.
(Note: I have not tested this - but have looked at the circuit diagrams and this should work - also note you may want to fuse the feed to the footwell lights with an in-line fuse connection for added safety.)
Probably a silly question, but are the wires for the interior light feeding back to fuse box? It should be pretty easy to fit the front footwell lights if this is the case as you could tap into the wires that are already there.
Probably a silly question, but are the wires for the interior light feeding back to fuse box? It should be pretty easy to fit the front footwell lights if this is the case as you could tap into the wires that are already there.
Unfortunately not - interior lights are controlled by the convenience module.
Ive got 4 white lights, 4 red lights,4 illuminated handles and 4 door looms if your interested removed from A4
Dsport.. do you by any chance still have these items... would be interested in taking them off your hands
Additional OEM Parts:
Convenience Module Connector (16-pin) - 4A0 972 883 C [To fit his connector, Repair Wire 0.5mm-sq = 000 979 006]
(Cover=443 972 807 / Housing=443 972 805)
Footwell Light Connector (2 pin) - 893 971 632 [To fit his connector, Repair Wire 0.5mm-sq= 000 979 021 or Solder/Crimp Contact = N 906 844 05]
Convenience Module Connector (16-pin) - 4A0 972 883 C [To fit his connector, Repair Wire 0.5mm-sq = 000 979 006]
(Cover=443 972 807 / Housing=443 972 805)
Footwell Light Connector (2 pin) - 893 971 632 [To fit his connector, Repair Wire 0.5mm-sq= 000 979 021 or Solder/Crimp Contact = N 906 844 05]
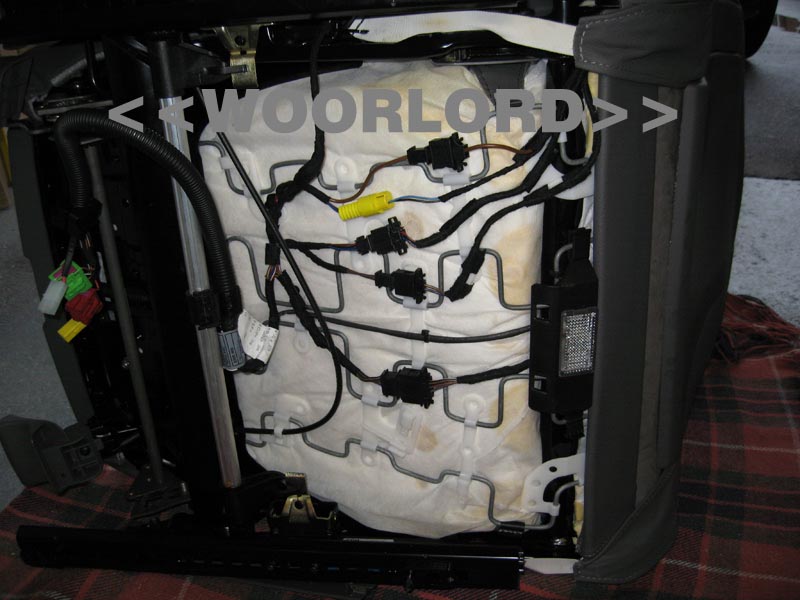
Found this in my archives when I had the seat out to fit the rear footwell light........
Hi in your pic of the underseat, is that the yellow connector for the airbag that comes loose?
Yes two yellow connectors in the picture on left and middle are the air bag connectors. They should interlock when correctly connected.
Yes two yellow connectors in the picture on left and middle are the air bag connectors. They should interlock when correctly connected.
Cheers for that will have a look when the rain stops
Hi there
Can the footwell lights front/rear be programmed to illuminate from the fob ie when unlocking the car and not hust when doors are opened. On my 2004 cab. The drivers footwell land both rears one on when drivers door opens and like wise. Passenger footwell and both rears when passenger door opens
Cheers
Today with the help of a member I have managed to get a template to make foot well lights (front and rear) kit for the B6 and B7 (can also do B8 as well).
The kit will come with instructions on fitting the kit.
Please PM me if interested in a kit.
The kit will come with instructions on fitting the kit.
Please PM me if interested in a kit.
Hi robin I was given your name by another rs3 owner as I asked how I can fit footwell lights in my 8p rs3 with led lights in the front and connecting the puddle lights also the led number plate lights and so on, I understand this comes as a kit is this something that you can help me with and how do I go about purchasing this to enhance the look inside my rs3?
Regards
David
Regards
David