

Stacey's Belated Yo Yo Build Thread
- Thread starter StaceyS3
- Start date
You are using an out of date browser. It may not display this or other websites correctly.
You should upgrade or use an alternative browser.
You should upgrade or use an alternative browser.
It has definately crossed my mindi bet you could build a permanent car port for less than the 1st one
")
Would be a lovely extension to the garage/workshop
Well went ahead and bought one of these which was also recommended by Graham off of SCN and Vortex
http://pages.ebay.com/link/?nav=item.view&alt=web&id=331378718703
Have to say it is really good quality and a solid bit of kit. It will certainly withstand a battering and is currently anchored down by 8 M10 fisher bolts to the concrete drive
The assembly of the shelter itself was quite a challenge as was doing it solo whilst building it around the car! I definately wished I had another set of hands
None the less it's done now and have run power to it and installed 2 35watt PIR LED floodlights. I was going to use tungsten filament floodlights but although the heat from them would have been welcomed from me I think the shelter would have suffered
Am hoping that this will really allow me to crack on with the car through the winter

I managed to get some more tar removed in the drivers seat area, both rear windows removed, bonnet, front bumper/crash bar assembly and then started on the screen....which in the process of starting to cut the sealant out I've managed to crack it! ****!!
I stopped at this point and called it a day

On another note I've eventually completed a job me and a friend started 18 months ago! This has allowed me to expand my list of parts that are growing in my US shipping mailbox got some right crackers coming which will really turn this car into an animal
http://pages.ebay.com/link/?nav=item.view&alt=web&id=331378718703
Have to say it is really good quality and a solid bit of kit. It will certainly withstand a battering and is currently anchored down by 8 M10 fisher bolts to the concrete drive
The assembly of the shelter itself was quite a challenge as was doing it solo whilst building it around the car! I definately wished I had another set of hands
None the less it's done now and have run power to it and installed 2 35watt PIR LED floodlights. I was going to use tungsten filament floodlights but although the heat from them would have been welcomed from me I think the shelter would have suffered
Am hoping that this will really allow me to crack on with the car through the winter

I managed to get some more tar removed in the drivers seat area, both rear windows removed, bonnet, front bumper/crash bar assembly and then started on the screen....which in the process of starting to cut the sealant out I've managed to crack it! ****!!
I stopped at this point and called it a day

On another note I've eventually completed a job me and a friend started 18 months ago! This has allowed me to expand my list of parts that are growing in my US shipping mailbox
got some right crackers coming which will really turn this car into an animalmarcgj
Registered User
Had a good read of this,very impressed and will continue to follow,btw is the Stella cidre one of your mystery mods lol.
T-wissle
Uno Rapido Audi
Had a good read of this,very impressed and will continue to follow,btw is the Stella cidre one of your mystery mods lol.
Thanks for the kind words and makes it fee worthwhile writing it up if it makes an interesting read
Not one of the mods as think it'll hinder performance unlike the ones to come, but if I'm off work then there's usually a Stella cidre or another form of Apple juice near by
Those Stella's pop up in a few shots. You Gotta wet your whistle.
I enjoy working on the car and nothing better can compliment it than a could beverage
....maybe should try for sponsorship from Stella for product placement lolHad a couple of parts show up today
Ignore the vibra mounts theyre for my friends mk1 golf, the other parts are steel shifter forks from darkside developments which i think are probably one of the best investments I have made on this build following breaking 2 boxes

That'll hopefully make the next box a bit more durable and able to sustain more abuse
The selector forks look so much more durable and meaty than the original riveted brass examples


Got some more done on the car
Removed the window assembly from both doors to allow better access and room to move in, I would be removing the whole door but can't get to the hinges whilst tent is assembled and not untying the cover to do so at the moment
The front screen I continued with which was going ok but I managed to break the blade on my cheap eBay tool

So as being impatient on waiting for another tool and with the screen already having a crack I pursued on using a Stanley knife, screwdrivers and pry bar to try and release the rest of the bonds between sealant and screen.
I still was struggling and couldn't get in the corners so I thought I'd pretend I was in an action movie and push it out with my feet lol
End result is this

You can see the state of the screen on the right
Quick pic of a package sitting in my US forwarding account

Sam_
Down under
Are they the OEM upgraded forks Tuffty was talking about? Going to get a set myself for sure.
Are they the OEM upgraded forks Tuffty was talking about? Going to get a set myself for sure.
Not sure as can't remember which ones tuffty posted? But these do look like an OEM part with some numbers stamped on them, which can post up if you want?
I picked these up from darkside to which from experience with derv bits are pretty much bang on the dealer price for OEM bits....hopefully i didn't get ripped off
- Joined
- Sep 14, 2008
- Messages
- 24,836
- Reaction score
- 6,078
- Points
- 113
- Location
- Wibbleton
- Website
- www.tuffty.co.uk
They look like the same forks to me... think they were around £140 from TPS for the pair
<tuffty/>
<tuffty/>
They look like the same forks to me... think they were around £140 from TPS for the pair
<tuffty/>
Yeah must be the ones as was £140 from darkside
Will get the part numbers next time I'm out there to confirm

Got a little more done today
Got the remains of the screen and sealant off
Then set on to removing the rest of the doors as they keep getting in the way, I had to undo the floor anchors for the shelter to shuffle it each way to give me room to access the hinge bolts

I then set out to remove the rest of the tar residue on the pass side

I then set out preparing the areas were the cage will be welded, starting by scraping back the seem sealer

Which then led me onto thinking about seem welding it but to be honest don't know a massive amount about it.
I know that you strengthen the chassis by welding the different parts rather than just the spot welds but really don't know what other benefits or things against doing it are???
This is how state of play is now till the next time

I did manage to get picks of both fork part numbers but somehow managed to loose and delete one of the pics so will grab that again next time

Also a quick pic of the destroyed screen lol

- Joined
- Mar 28, 2010
- Messages
- 10,073
- Reaction score
- 2,697
- Points
- 113
- Location
- Liverpool/Southport. N west
seam welding will increase chassis stiffness like the roll cage will.
Alot of work for probably very little gain tbh
Alot of work for probably very little gain tbh
seam welding will increase chassis stiffness like the roll cage will.
Alot of work for probably very little gain tbh
I think you may of miss read that buddy.
From what I can see, these "upgraded" selector forks are from the mk5 golf platform.
I will be purchasing a set of these in the new year as I am sure its my turn soon
Big update although not car related
On Tuesday morning I became a dad again....this time to a son! Both him and Chloe are well and fit

Not sure on a name yet there's a couple in the line up....
It's going to be brilliant with a son now and hoping I can pass the very little skills and knowledge I have onto him lol, but in seriousness really hope he'll love getting involved and enjoy making and working on things especially with the old man
Think the updates will probably slow a bit now for a while on the car as really have now got my hands full with the two of them
But on the car note did have this appear in my mailing account a while ago

- Joined
- Mar 28, 2010
- Messages
- 10,073
- Reaction score
- 2,697
- Points
- 113
- Location
- Liverpool/Southport. N west
Sam_
Down under
Congrats mate!
What did you go for? 725? 850? 850SS? Did you deal with Mike Hood? He seems to do the best pricing on Clutchmasters. I got my 850SS through him.
What did you go for? 725? 850? 850SS? Did you deal with Mike Hood? He seems to do the best pricing on Clutchmasters. I got my 850SS through him.
Karl is a great name
congrats buddy
Haha yeah I'm sure some people out there like it
Thanks mate it's looking like May be Freddie but bit unsure at the mo...I'm sure the decision will be finalised over the next day or so
Congrats mate!
What did you go for? 725? 850? 850SS? Did you deal with Mike Hood? He seems to do the best pricing on Clutchmasters. I got my 850SS through him.
Thanks bud
Tbh I completely forgot about the SS as doesn't seem to be listed anywhere and probably would of settled on that! Had been speaking to Kevin Gomez at CM back and forth for a while and came to the decision that although the FX400 would work it probably wouldn't last long at all if launch and drive it to hard so the next model in line was pointed to was the FX850. Was going to head to ringer racing as remember you getting a deal from them but caught it on sale @ vivid racing with >$600 off the RRP so pounced on it
Think it will take some getting used to but now I'm going to be the only one driving it and it will be used a lot less frequent I should be able to live with it, also on a plus side should be able to take a lot more of a beating than the 2 southbend setups have put in

- Joined
- Nov 24, 2010
- Messages
- 15,084
- Reaction score
- 1,131
- Points
- 113
- Location
- Plymouth
- Website
- wheelsnwires.blogspot.com

Congratulation buddy.
Damo Approves.

Haha that's brilliant! I'm sure there's a bit more of a background story I'm unaware of though
Just finished all the christmas present sorting and sat down to find me HPA have sent me something sort of in time for christmas as is now sitting in my US mailbox, it took its time as ordered it nearly 8 months ago, it will be worth the wait i hope

On another note merry Christmas all hope you have a good one

On another note merry Christmas all hope you have a good one
- Joined
- May 28, 2004
- Messages
- 10,217
- Reaction score
- 2,385
- Points
- 113
- Location
- nr Glos
- Website
- www.badger5.co.uk
the controller is 'finally' available then?
Yeah took its time but eventually has arrived to my mailing account in California on Xmas eve, won't see it in the flesh for probably a couple of months though
I looked back at previous emails to Darryl out of curiousity and I placed the order and payed at the start of May!
But on the other hand I was in no rush and glad they have hopefully got it spot on rather than could of rushed it out in a panic with the first problematic screens/supplier
Can't wait to have a play with it, should really change the way the car behaves and the drag setting will be brilliant for the strip
The old man was over today visiting the grandchildren so whilst he was here I got home him to give me a hand getting the shell sitting in a decent position before starting the cage work as definately don't want to weld it in with the chassis ****** and twisted
Got it in a pretty good and final position, I had to raise it up a good 200mm or so at the back
I used the door sills to check from front to back on each side to which although not level its equal side to side with the front being slightly higher


I then used the crash bar mounts at the front followed by checking in a couple of places at the back to get it level left to right


At the back of the rear seat by the spare wheel well

I offset the front stands to get the different heights and used various bits of wood and metal plates to shim the back to the desired positions
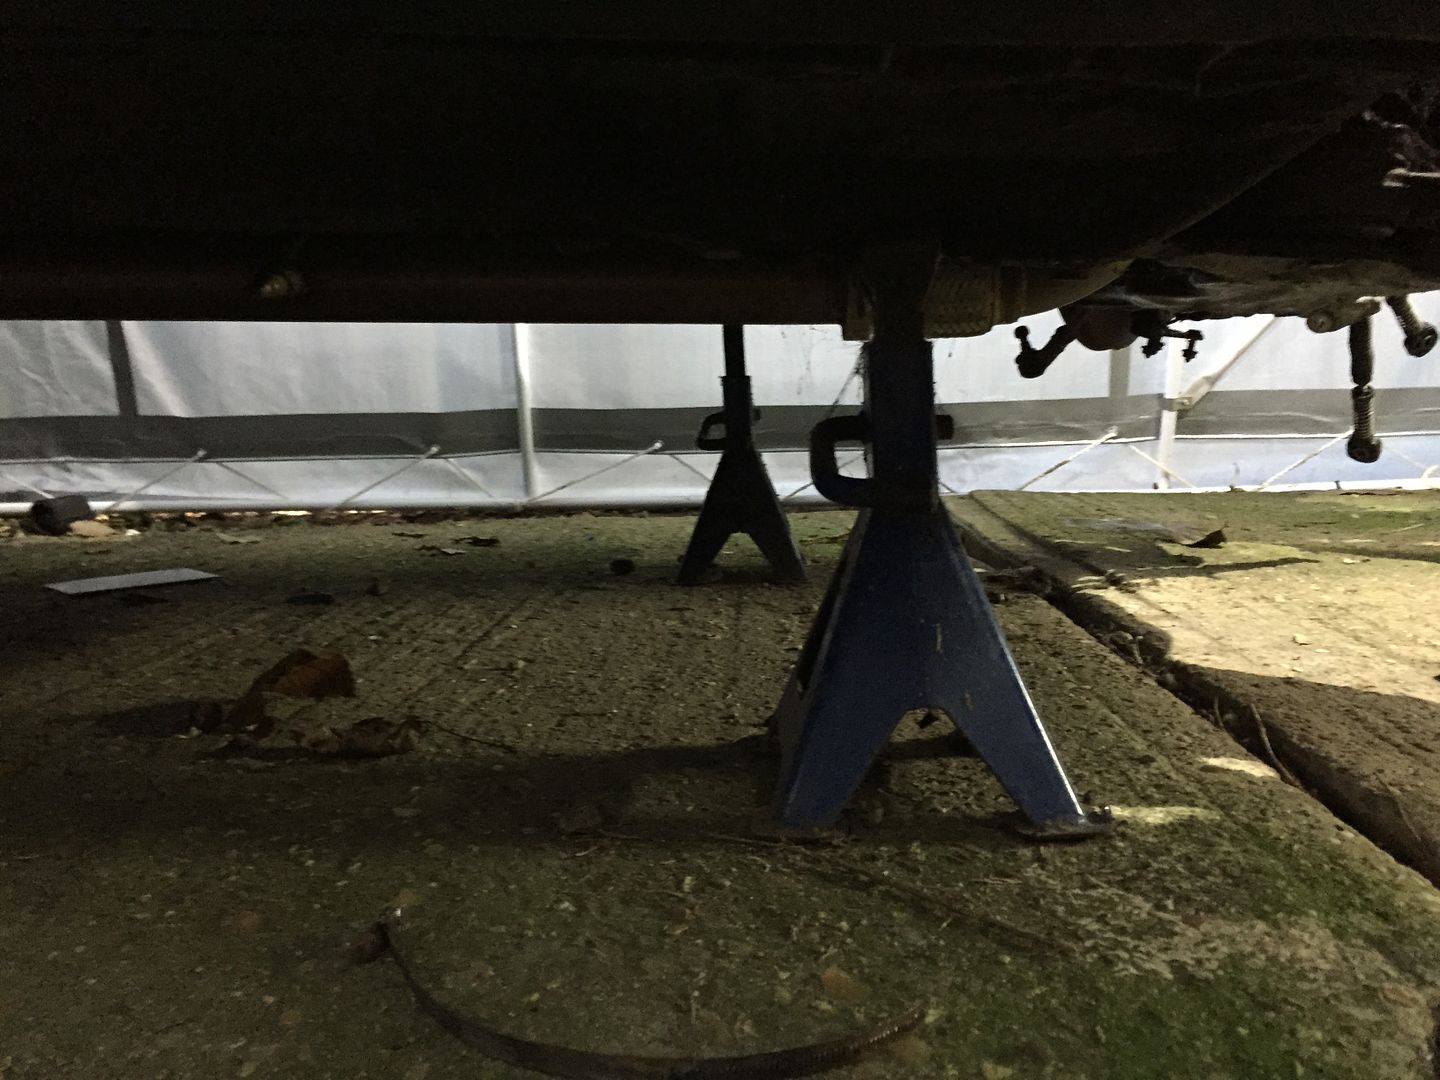


Am hoping to get a nice full day out there before I return to work on Friday but we'll wait and see hey
Got it in a pretty good and final position, I had to raise it up a good 200mm or so at the back
I used the door sills to check from front to back on each side to which although not level its equal side to side with the front being slightly higher


I then used the crash bar mounts at the front followed by checking in a couple of places at the back to get it level left to right


At the back of the rear seat by the spare wheel well

I offset the front stands to get the different heights and used various bits of wood and metal plates to shim the back to the desired positions


Am hoping to get a nice full day out there before I return to work on Friday but we'll wait and see hey
Well i feel like i have eventually achieved something whilst working on the car today
First off i started by removing the front subframe, steering rack assembly and steering column which gave me more room to work in and my friend will be dissecting the subframe for his mk1 golf
I then disconnected as much of the loom as possible bar the two lengths to the rear and threw it out the front window out the way
After the enormous package had sat there for 3 months i decided to crack it open and check the cage over to which there was more pieces than had considered there would be, i layed all the bits out and went through the checklist supplied with the kit


Once all sorted and identified a couple of miss labelled parts i set onto prepping the areas where the feet mount, i used a wire wool attachment as recommended by CC

I then started with the front footplates which are a 3 piece combo per side, they didn't fit to brilliantly and as later found out they all require modifying a tad to fit be it bending, trimming or cutting

Tacked in place for now


The last piece of the A pillar foot plate i will mod and fit later once am finalising the positions of bits

I then went onto the main hoop feet which obviously required a lot more modifying and no clear instructions to how they recommend to do it with only some photos they provide which are just the same as the ones on the website

There was no way that this flat plate was ever going to sit on there well and provide a good solid base


I did try to see if could bend the footplate around the contours of the base area but that was a fail so straightened it back out and resorted to making some witht the material supplied using pics to try and work out the rough area the base of the hoop will be

Good bit of CAD (cardboard aided design) as Prawn would say

Tacked it all into place before removing to run a nice bead down the inside

The other side

Update TBC (probably tommorrow nursing the hangover) as the other half is eventually nearly ready and got to go out and wet my whistle
Happy new year everyone
Now have got the front and main hoop footplates sorted i went onto the main hoop position
All i had as instructions were a couple of the pics they supply which helped but couldn't actually pick reference points as is in a R32 mk4 golf


The hoop was without a doubt to tall and there was no chance of it fitting, looking at their pics and the S3 it seems that the 8L has tapers in more near the top of the car and has thicker roof supports/rails, I started off by a couple of minor dents and taking 10mm off each end of the hoop
The hoop also gets pushed right out to the full width of the car with the center bar knocked in, the center bar did need persuading to get in as you can see it preloads the hoop as the gap is narrower in the pic

10mm cut off the base of the hoop

Dent to allow the room


Quite happy with the first trial position of the hoop i then went to offer up the A pillar leg, i already cut 10mm off the bottom to keep it equal and square to the main hoop
I came across the same problem with it being to tight to the roof support above the door and also at the top corner of the windscreen cross support

Its hitting here on the windscreen support stopping it being situated close enough to the a pillar


This is were is to tight to the roof rail above the B pillar

This is the state of play as i finished

My options as i see it are
1. Take more off of the hoop and A pillar tubes to give more room and this will keep the angles the same if take equal on each
2. Try to gain more room by denting
3. Cut room for poles to sit and weld them to the body after but don't want to start cutting the structural part of the car
4. Just for now cut the A pillar poles and go from there
Personally i'm strongly feeling option 1 with maybe a tiny bit of 2 if needed? Whats peoples thoughts and ideas?
Will be a little while before getting back on there as got a 85 hour week ahead
Thanks
- Joined
- Dec 8, 2006
- Messages
- 12,100
- Reaction score
- 4,340
- Points
- 113
- Location
- Eastleigh
- Website
- twitter.com
you want to keep it as tight to the shell as possible really mate. Although obviously you need to be able to access it to weld it in place.
I know on pretty serious builds they hole saw the floor to drop teh cage down for welding.
Good work so far!
I know on pretty serious builds they hole saw the floor to drop teh cage down for welding.
Good work so far!
you want to keep it as tight to the shell as possible really mate. Although obviously you need to be able to access it to weld it in place.
I know on pretty serious builds they hole saw the floor to drop teh cage down for welding.
Good work so far!
Thanks mate
Will be keeping it as close as reasonably possible but think with the A pillar bars I'm going to have to bring them down some more to clear the windscreen support but should actually then allow me to get closer to the A pillars and the roof support above the door...I hope
On CC's generic install video on YouTube they advise like you say to cut holes and drop the cage through the deck, not sure if I'll get away with doing that to easily though unless can pull it all forward slightly to come off of the ledge either side of the rear bench
Time will see but can't wait to get out there and play some more
- Joined
- Sep 14, 2008
- Messages
- 24,836
- Reaction score
- 6,078
- Points
- 113
- Location
- Wibbleton
- Website
- www.tuffty.co.uk
Bill cut holes and then used heavy gauge plates on the Mk2 Golf track car we did... you could also create a box platform too allowing you to cut an 'amount' off the legs to drop it down enough although I don't know if regs or specific specs would have to be considered...
I guess if you are using the car as a track day car and not for specific competition purposes then you have a degree of flexibility
<tuffty/>
I guess if you are using the car as a track day car and not for specific competition purposes then you have a degree of flexibility
<tuffty/>
Cheers Paul, thats a good shout on the raised feet as that could certainly get me out of troubleBill cut holes and then used heavy gauge plates on the Mk2 Golf track car we did... you could also create a box platform too allowing you to cut an 'amount' off the legs to drop it down enough although I don't know if regs or specific specs would have to be considered...
I guess if you are using the car as a track day car and not for specific competition purposes then you have a degree of flexibility
<tuffty/>
Although i will probably never need the car to comply with regs i will try and keep it pretty near to regulations if i can without much agro
Been meaning to update for a while now but life has been extremely busy with poorly children and myself...poxy cold and flu bugs that keep doing the rounds!
Managed to spend a good bit more time on the car, i ended up taking another 10mm off the main hoop and A pillar uprights which made everything sit a lot nicer to the shell and push the A pillar tubes outwards more.


The screen bar really shows how much different the A3 roof and upper shell profile must be from the golf, i had to cut 4cm off of each end of the screen bar which still provided a nice tight fit that had to be knocked up between the A pillars further forcing them out nearer the A pillars


This brought me onto the roof diagonal, this came profiled on the end to fit into the corner but the other end is just a square cut.
I held it up and roughly marked which part side will be cutting followed by using a profiled cut on another piece to trace the rough profile desired


Now all these are all tacked in this brings me onto the door bars which will put on shortly
Nick_sheep
All The Gears But No Ideas
I managed to get onto the door bars which by the looks of things is going to require some modification and decisions as by loosing 20mm off the bottom of the hoop and pillars its changed the positions to where the X mounts....
I started with the one piece diagonal on the pass side then used that to set the angle on my level to get it matching

As you can see its slightly out and the profile on the end didnt match to well so removed some more from there to get it butt up better and level it to the otherside


Forgot to take the pic to show it level....DOH
That brings me onto the diagonals...
1st way which is the correct way but seems very high even to CC's demo pics they supply
If i place them correctly how they're labelled (upper and lower) this is how they sit, they will need a little bit shaved off here and there to get the two to line up correctly but not to much work

My main concern of doing this is that it sits very high and looks as if is going to be an **** to get in and out
2nd way Middle height
This way is to reverse the poles and sit the top one in position and cut the bottom to match to keep a straight line

3rd way (lowest)
This way was to reverse the poles again and sit the bottom one in position and cut the top one which will give the shallowest angle and lowest upper cross bar

The only other downside of lowering the crossbar at the front is that it wont meet the A pillar upright at the same place as the support the front turrett?
Ummmmm decisions decisions, I could go for the practicality route and not even fit the upper X support? Or just accept as i get older and fatter i may not be able to get in the car..
Thats about where im up to at the moment

First way. It's a cage...it's not meant to be easy to get into
Neither of the other ways look right.
Neither of the other ways look right.
Very true George and the more I think of it, it would be silly to move the mounting point on the A pillar upright as it will be there at the same point that goes to the front turret that will transfer energy to the door section in the event of an impact.
At least it may put passengers off getting in which will be less weight to slow me down
Thanks Lee, it's been a long time waiting and hopefully I'll be able to drive it again this summer? I'm also sure Prawn will be along soon with some input as I'm sure he knows more about the subject than most
At least it may put passengers off getting in which will be less weight to slow me down
Thanks Lee, it's been a long time waiting and hopefully I'll be able to drive it again this summer? I'm also sure Prawn will be along soon with some input as I'm sure he knows more about the subject than most
- Joined
- Dec 8, 2006
- Messages
- 12,100
- Reaction score
- 4,340
- Points
- 113
- Location
- Eastleigh
- Website
- twitter.com
Just think about load paths mate.
On a cage like yours no tubes should be joining another mid run unless there's a corresponding tube to transfer the load path. The exception to this is in the corners, where it's transfered down the 2 adjacent legs.
If you have front turret supports to go forward from the front legs, I'd suggest they need to be inline with the upper and lower parts of the door bars so the loads are transfered through the whole cage.
One thing to be VERY careful of is elbow clearance too. If you sit very low you may well find it's tight on elbow room. I'd yeah fit a seat and check that before welding anything up.