i appreciate the helpThink you need 19s for these to fit

actually i have those brakes under 18" oem facelift wheels...

rotors have different inner spoke design so 18" don't fit.
i appreciate the helpThink you need 19s for these to fit
Great job with everything you've done on the car mate. I quite like those alloys.
i appreciate the help
actually i have those brakes under 18" oem facelift wheels...
rotors have different inner spoke design so 18" don't fit.


Really good progress thread mate - enjoyed the read.
Car looks amazing and your weather/scenery is even better! I look forward to seeing what more you do....

thanks, you can have this one when i get bored with it mate...Beautiful S3
I want one
thanks Jack, a very minor update but i fitted the card drawer below the rnse. i'm not a fan of button blanks so the other two blanks will be taken up with wmi on/off switch and a wmi status led...Look forward to seeing the updates mate - keep up the good work!

thanks, you can have this one when i get bored with it mate...

Can you tell me for the zf aerial error fix, did you have to buy the 3 port antenna amp or was it just a case of re wiring them?


Very nice but A grand like WTBLEEPohhhhhhhh yeahhhhhhhhhh, the calipers finally turned up. i was a bit worried at one point that i had blown a grand and somewhere in europe someone was throwing a party...
i now have all the goodies for the install:
- OEM TTRS Calipers
- OEM TTRS Discs
- OEM TTRS Pads
- HELL RS3 Black Braided Brake Lines
- NO time what so ever to install them!
i was planning to install them myself and bought a pressure bleeder already. due to zero time i might give p&p a call to see if they can fit them ready for the next happy laps...
a quick pic of a caliper, releived that they arrived in the condition they were advertised in...

thanks Jack, a very minor update but i fitted the card drawer below the rnse. i'm not a fan of button blanks so the other two blanks will be taken up with wmi on/off switch and a wmi status led...
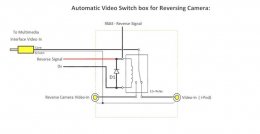
not happy with the drawer fitting alignment but read there are issues with this (ignore the rnse fitment, i was messing with my reverse camera auto switching). i will see if there is anything i can do to install the drawer with a prefered gap spacing...

Sorry to high jack your thread and a little off topic, what's the part number of the above pictured card holder?


Not as elegant but worked straight out of the box.

And the costs keep going up and up eh,...