

MUSH Developments` S3
- Thread starter MUSH
- Start date
You are using an out of date browser. It may not display this or other websites correctly.
You should upgrade or use an alternative browser.
You should upgrade or use an alternative browser.
Chlippo
Registered User
I do want a boost gauge fitted before it sees the road though, and will probably go for a stack. Anyone got or have an opinion on steering column pods?
I bought an MK4 dual gauge column pod (i need one for afr and one for boost) and it didnt fit bolt on, but ill make it fit. It will need a bit of trimming and i assume it will go in place.
Any pics of the intercooler yet mush?
Not yet matey, only just dropped it off on sat as both me and Ben were busy. Be a week id imagine then ill pop down to see him. This time i went armed with about a million measurements so that we get it right. It seems there is plenty of space at the front, however its not quite a conventional shape, hence the funky pipes. Ill let you know as soon as ive got it.
Ill update this soon as ive been playin with stuff today.
I bought an MK4 dual gauge column pod (i need one for afr and one for boost) and it didnt fit bolt on, but ill make it fit. It will need a bit of trimming and i assume it will go in place.
Hmm, yeah been told it takes a bit of modding. If your doing it soon id be interested in seeing pics. I seen a pals single gauge on his octavia and to be fair i wasnt overly impressed. I dont want it literally blocking the DIS or a good chunk of the dials. Maybe ill just have to resort to a nice neat A pillar install.
Anyways, as mentioned i got the intercooler off to my pal for final modding. When i took it last time i only took a few measurements and a brief description. As Bens a skilled lad he made it quite well, however on fittting, the bumper did foul slightly and one of the pipes wasnt quite right. So i took lots of measurements, made a few sketches, photos etc and made sure he had all the info required to finish the job this time. You live and learn eh...?
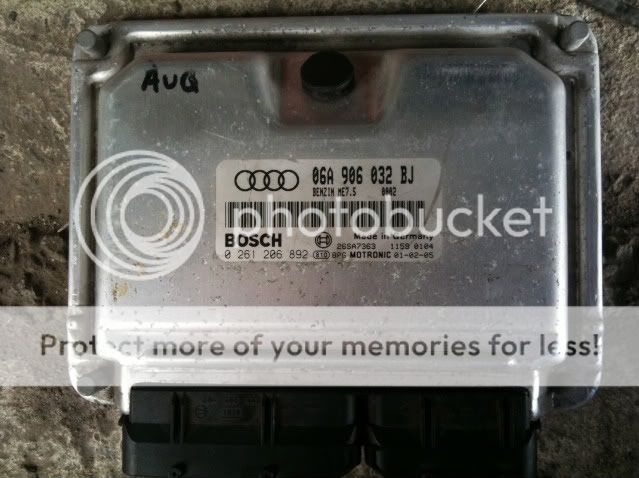
Whilst on my travels i popped in to see Andy Outhwaite, who decoded my ECU for me. Always nice to see Andy, top lad and top service. So now ive got a nicely decoded ECU...
Which as i had a few hours spare today, i fitted...
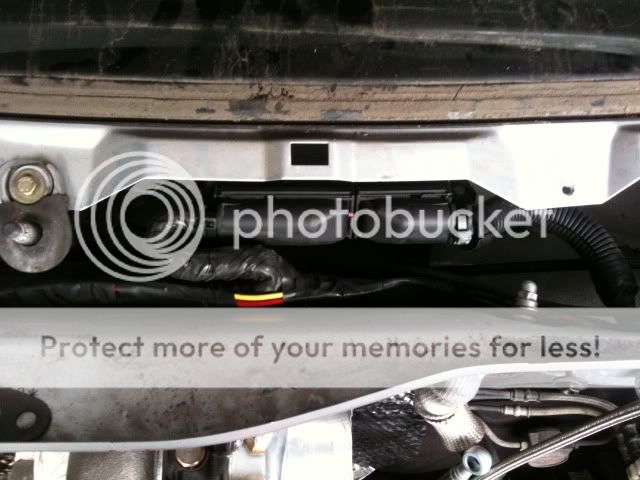
And then i cracked on with fitting the the remaining heatshield to the top of the engine bay. Cut my hands to absolute bits with this last fiddly bit!! I used the existing fixing points on the bay from the old heatshield and also the metal coolant/breather pipe that normally sits at the rear of the bay. im ditching this pipe as one of the pipes is the coolant, which i can easily re route, and the other is the charcoal cannister breather pipe which is also going the distance, so the pipe is redundant, and to be fair in the way!! lol
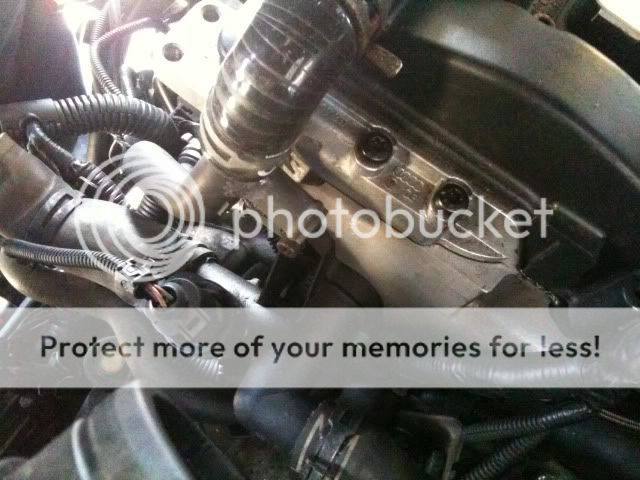
So with that now fitted i could get the turbo re fitted...

And then i could re-check the tolerance on the turbo to bulkhead distance..
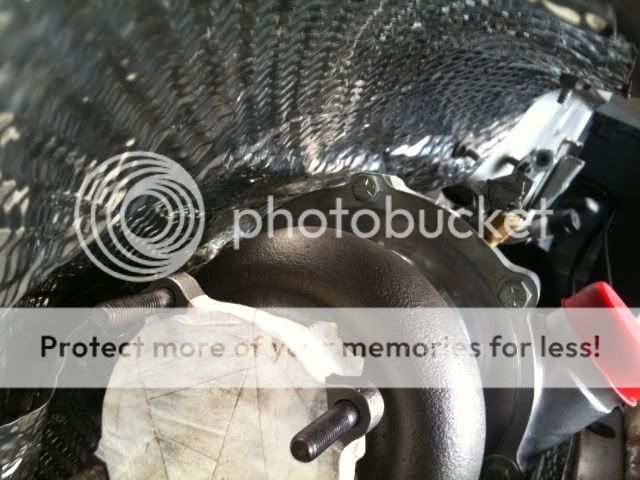
Theres basically 10-15mm between the top of the turbo and the bulkhead, and theres even more at the rear. To test i put the car in gear and rocked the car to get the mounts really working. I dont think the turbo comes near at all so im happy that its all ok. If i do get problems ill see about a poly insert for the dogbone.
I could also crack on with gettin the coolant pipes all fitted...

Which im happy with. Did a load of little jobs like connecting the main earth strap to the engine, aswell as the main +ve terminal to the starter motor. And then i thought id get the battery box on, so that i could get the Neuspeed Pflow induction kit fitted and have a look for issues...
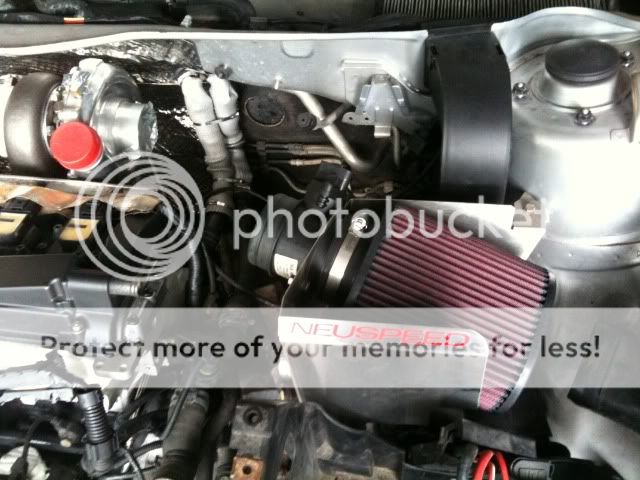
I bought the p flow kit ages ago and now that its out of the box im thinking about whether its up to the job of supplying the air i need. Thoughts on this please as its a nice piece of kit, but ideas on whether its big enough for my requirements would be good...
I cracked on fitting little bits and bobs though...

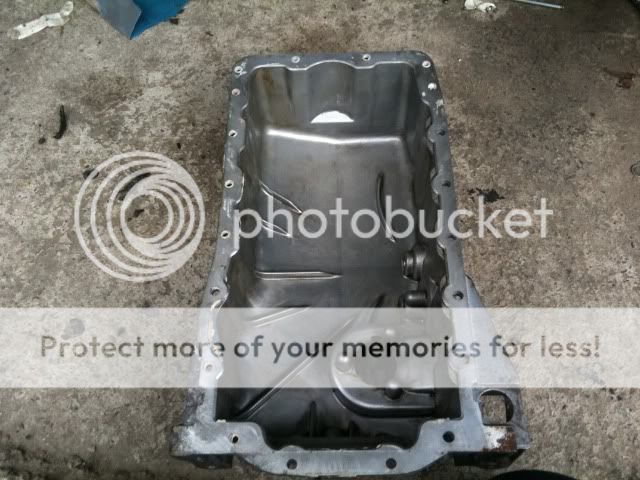
And then the job of replacing the sump for the oil sender type. Sump off...

This is what your oil pickup should look like...

One final scrub up of the sump my pal donated...
And then i fitted a magnetic sump plug. Good little bit of kit this, esp as itll be running in so therell probably be lots to catch...lol

And fitted...

And then just a simple case of silicone, and faff on witht he bolts, all to 15NM as per elsawin...
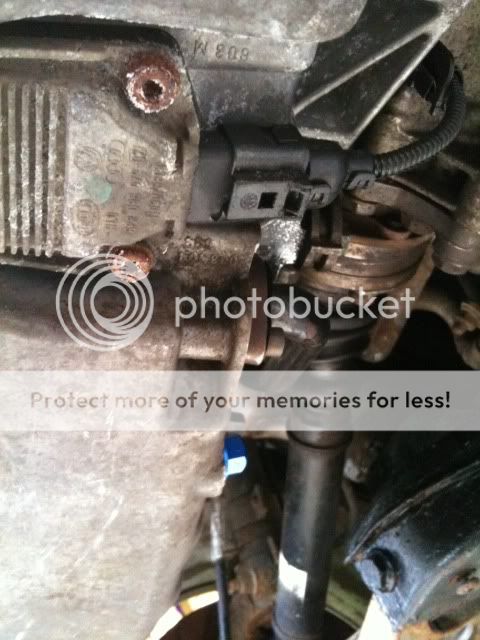
And now i have the sensor cable all dressed in and connected.
The only other little task i set about today was the PCV system. Im keeping the 90deg bend out the of crankcase breather, however this connected to some gash pipes etc, so i simplified this with one little bit of pipe to join tot he metal pipe...

Which is good to have. On my AUQ lump i had in the mk2, this metal pipe didnt exist, s i had to connect the crancase breather to the rocker cover breather and T off to the catch can. I wanted to do this a bit different so to achieve te same i needed to add a takeoff to this pipe...

Which i cut off an old coolant pipe i had lying around...S3_kev
")

First i decided where i wanted this takeoff, and then pin punched it...

Broke out the cone cutters...

And cut the hole...

Then switched to a sharp countersinking bit...
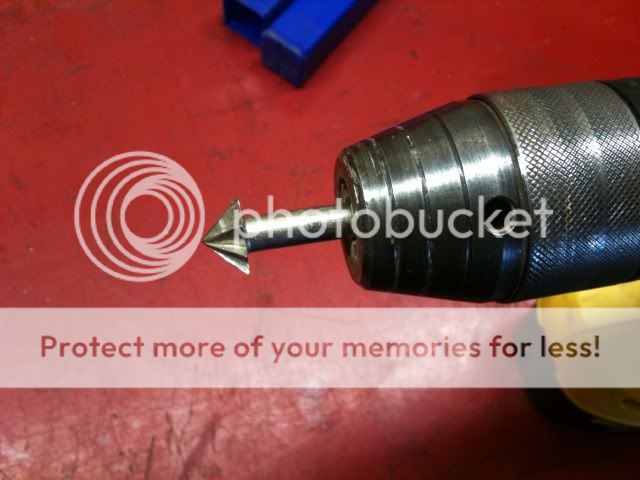
to ream the hole out...
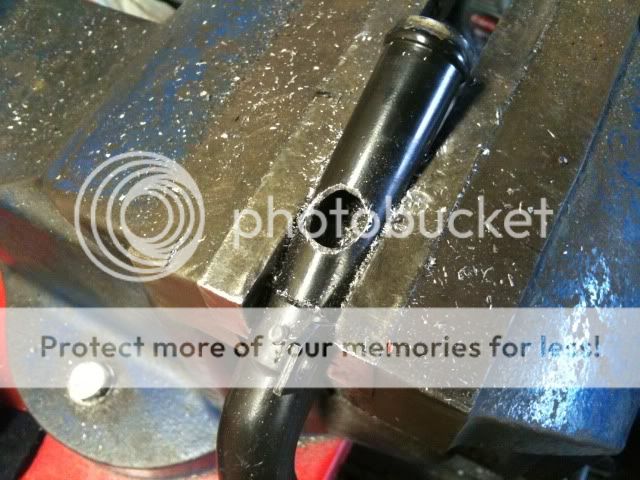
Photo taken mid way through the reaming. I then offered the takeoff up...
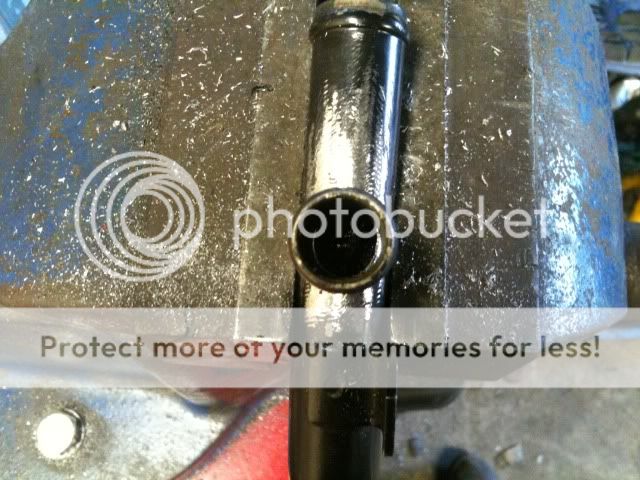
And had to file that little bit showing on the right of the inside of the pipe. Then with a little bit of work with the files, got the two to mate nicely...

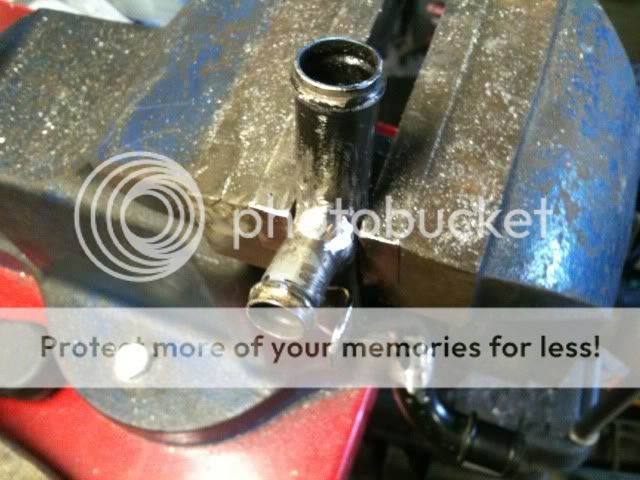
And then spot welded it (crap pic i know...!!)

And then lots of nicely penetrating spot welds all around...

Dressed them back with a file...
And when i was happy i prepped and painted the pipe...
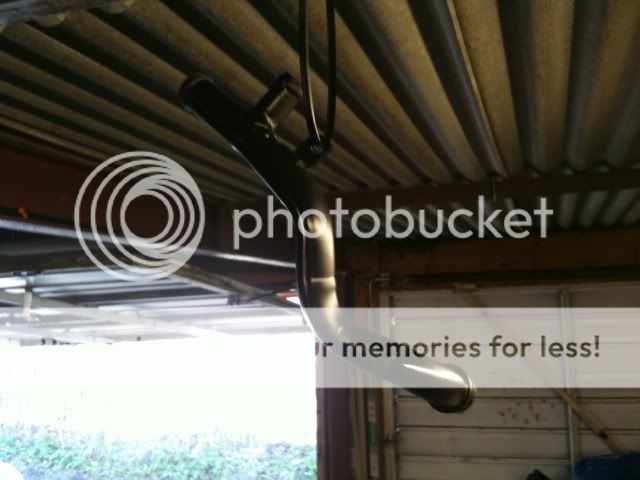
So with it all finished and new takeoff added...

Ready to fit onto the engine...
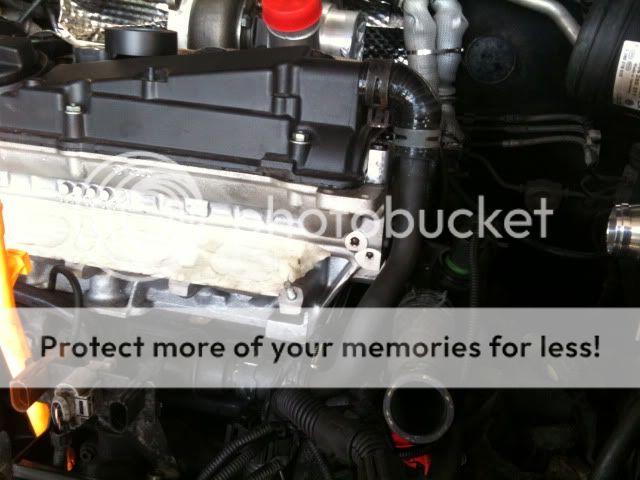
And on the engine with the takeoff at the rear...
So i can neatly fit a bit of 19m ID pipe to go off to the catch tank

Although thats not fitted yet, so im sure thatll be next...
Cheers for looking...
So i can neatly fit a bit of 19m ID pipe to go off to the catch tank
Although thats not fitted yet, so im sure thatll be next...
Cheers for looking...
- Joined
- Jun 19, 2009
- Messages
- 3,883
- Reaction score
- 619
- Points
- 113
- Location
- Leeds
- Website
- www.aldevelopments.com
Where did you get the downwards facing bits for the heater matrix ?
PM Me if you don't want to say on here?
PM Me if you don't want to say on here?
Where did you get the downwards facing bits for the heater matrix ?
On a standard k03'd mk4 golf/leon/a3 20vt you get one straight connector and one 45 deg connector. I had one from the leon i broke, so i had to go to a scrappy for the other one.

DaveA3
Audi A-Trizzle!
someone called destroy disliked his post. dunno why though. He only said the below lol
Excellent write up...
- Joined
- Jan 30, 2008
- Messages
- 18,708
- Reaction score
- 909
- Points
- 113
- Location
- Glenrothes, Fife, Scotland
I have to say i dont think you have enough clearance for that turbo.
Check out the video on bills youtube of a 450hp ibiza on the dyno and look at how much the motor moves:
YouTube - sean-gt30-thru-gears-dyno.MOV
Check out the video on bills youtube of a 450hp ibiza on the dyno and look at how much the motor moves:
YouTube - sean-gt30-thru-gears-dyno.MOV
I hate to burst your bubble on this but this ECU is from a VVT K03 car and is 1MB, it won't be happy running your engine, you're better off using a 1/2MB NVVT ecu as would have been fitted originally to this engine/vehicle alternatively you could also use a MK3 ibiza ECU as you can run the S3 factory software in these ECU's without any issues
- Joined
- Jan 30, 2008
- Messages
- 18,708
- Reaction score
- 909
- Points
- 113
- Location
- Glenrothes, Fife, Scotland
I hate to burst your bubble on this but this ECU is from a VVT K03 car and is 1MB, it won't be happy running your engine, you're better off using a 1/2MB NVVT ecu as would have been fitted originally to this engine/vehicle alternatively you could also use a MK3 ibiza ECU as you can run the S3 factory software in these ECU's without any issues
cheers, im not naiive enough to think i can just run this ECU without modification to the looms. That has been done with the provision of VVT to be kept in. I obviously dont have the VVT tensioner but i have been told this function can be coded out. If thats incorrect then it isnt really a problem to change the tensioners over, more a ballache than anything else. Maybe you can confirm whether it is removable from the map? If not then ive been fed some BS and ill happily jump on getting a tensioner to remedy this.
The reason i didnt want to use the standard ECU is already mentioned, as it couldnt support the functions i require.
I have to say i dont think you have enough clearance for that turbo.
Check out the video on bills youtube of a 450hp ibiza on the dyno and look at how much the motor moves:
YouTube - sean-gt30-thru-gears-dyno.MOV
point taken matey, ive just sorted a poly dogbone bush to help the cause, however ill just have to see how it goes when running whether bulkhead modifications are required.
With the box in gear ive rocked the car quite forcefully to gauge engine movement under load and the deliberate canting of the engine doesnt cause a problem with clearance. Although this may all change on the road, we'll have to see i guess.
If its being custom mapped why would it matter?
if it was being kept norrowband without VVT etc then the work involved would be massive and a waste of time but being that it's being converted to wideband it's worthwhile
no that makes perfect sense if you're going to run wideband
Great, my thoughts exactly, and your opinion on the VVT? Can it be removed or should i look at tensioner fitment?

- Joined
- Jan 30, 2008
- Messages
- 18,708
- Reaction score
- 909
- Points
- 113
- Location
- Glenrothes, Fife, Scotland
If you want to remove the VVT you need to bridge it with a resistor, as well as coding out the fault code, or your fuel trims wont adapt.
If you want to remove the VVT you need to bridge it with a resistor, as well as coding out the fault code, or your fuel trims wont adapt.
Yep thats what i thought i would have to do.
Not exactly a big update, as to put it simply i havnt done much. Been dragged kicking and screaming into the garden to assist the other half. Hate gardening!
I have got a hold of some facelift rear lights so spent 5 mins swapping them..
So now, even though its a crap pic...

Im certainly not really into making my pre look like a facelift model. But these are much nicer! End of.
Should have a good update by next weekend as the car goes for full downpipe/exhaust to be made on tuesday. Cant wait!!
I have got a hold of some facelift rear lights so spent 5 mins swapping them..
So now, even though its a crap pic...
Im certainly not really into making my pre look like a facelift model. But these are much nicer! End of.
Should have a good update by next weekend as the car goes for full downpipe/exhaust to be made on tuesday. Cant wait!!
So the day came when the car was booked into AAS for the exhaust work to be done.
Had to get the car out the garage which i roped me old man into helping me. **** me i forget how heavy this little lump is!! even though theres a slight ramp i could quite easily roll my mk2 in and out by myself but the S3 is just far too heavy so i needed a hand.

And as the lane is a little tight it takes a few trys to get it right. Nice pic of the facelift lights which are much better than the originals as first pictured when i first got the car...
So, after some exertion of energy, the car was out and nice and straight..

Albeit it missing the front end...

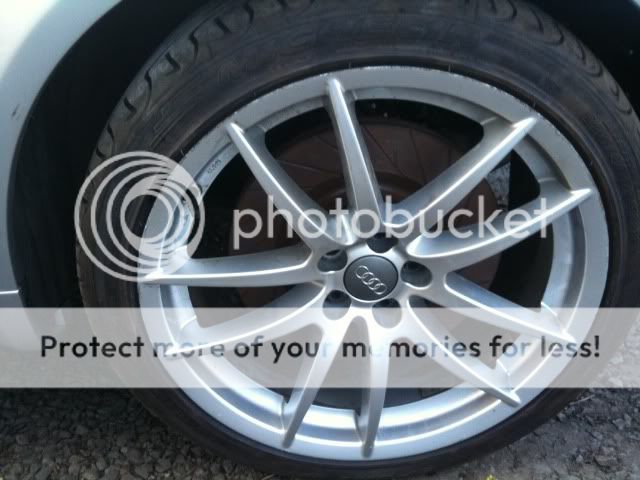
And i still need to fit the brakes...lol but the discs look nice compared to standard. Anyone seen these wheels before? Theyre genuine Audi but i dont recognise them from anywhere...? Shame this one is a little scuffed as the other 3 are totally straight with no kerbage.
Pushed he car up the lane as me mate Richy came to pick it up this morning on his recovery truck...

And on the truck...

Only takes 5 mins to get to AAS from my house so it wasnt long before it was parked up inside, ready for fettlement...

And thats how i left it and went to work this morning. Luckily i finished a bit early and had a chance to pop down to see how they got on. I armed them with this pic that Clay from CTS gave me for an idea of pipework...

And they have made a similar linkpipe for the wastegate, however they have tilted the wastegate over to allow for ease of wastegate fitment, and also to keep it away form the strut brace. So heres a quick pic of the work so far...

Absolutely chuffed with the work so far, cant wait to see it finished!!
Had to get the car out the garage which i roped me old man into helping me. **** me i forget how heavy this little lump is!! even though theres a slight ramp i could quite easily roll my mk2 in and out by myself but the S3 is just far too heavy so i needed a hand.
And as the lane is a little tight it takes a few trys to get it right. Nice pic of the facelift lights which are much better than the originals as first pictured when i first got the car...
So, after some exertion of energy, the car was out and nice and straight..
Albeit it missing the front end...
And i still need to fit the brakes...lol but the discs look nice compared to standard. Anyone seen these wheels before? Theyre genuine Audi but i dont recognise them from anywhere...? Shame this one is a little scuffed as the other 3 are totally straight with no kerbage.
Pushed he car up the lane as me mate Richy came to pick it up this morning on his recovery truck...
And on the truck...
Only takes 5 mins to get to AAS from my house so it wasnt long before it was parked up inside, ready for fettlement...
And thats how i left it and went to work this morning. Luckily i finished a bit early and had a chance to pop down to see how they got on. I armed them with this pic that Clay from CTS gave me for an idea of pipework...
And they have made a similar linkpipe for the wastegate, however they have tilted the wastegate over to allow for ease of wastegate fitment, and also to keep it away form the strut brace. So heres a quick pic of the work so far...
Absolutely chuffed with the work so far, cant wait to see it finished!!
- Joined
- Dec 2, 2008
- Messages
- 17,400
- Reaction score
- 1,104
- Points
- 113
Excellent progress mush. Do you have a date for completion that you're aiming for? Looks like you'll have it on the road fairly soon.
- Joined
- Mar 28, 2010
- Messages
- 10,073
- Reaction score
- 2,697
- Points
- 113
- Location
- Liverpool/Southport. N west
- Joined
- Sep 14, 2008
- Messages
- 24,836
- Reaction score
- 6,078
- Points
- 113
- Location
- Wibbleton
- Website
- www.tuffty.co.uk
I reckon those wheels are off the new tt. ****** nice, suit the 8l very well and modernise it.
New TT is 5x112 PCD so unless PCD adaptors are being used then they are either reps or off something else...
<tuffty/>
Excellent progress mush. Do you have a date for completion that you're aiming for? Looks like you'll have it on the road fairly soon.
Not really mate, it gets done when it gets done. Id obv like to get some use out of it this summer and ideally itd be sorted for midy may to june ish ready for inters but if it isnt ill not be worried. I should get the car back and be able to collect the front end by this weekend which means i can mock up boost pipe routes and make the tip which will be a big step forward. Then its just a case of some little niggly jobs to complete before i fire it up.
Cheers for the comments!
New TT is 5x112 PCD so unless PCD adaptors are being used then they are either reps or off something else...
<tuffty/>
defo 5x100 as they dont run adaptors so must be something else
- Joined
- Nov 11, 2009
- Messages
- 10,099
- Reaction score
- 739
- Points
- 38
- Location
- west yorks
- Website
- www.stainless-engineering.co.uk
DaveA3
Audi A-Trizzle!

- Joined
- Jan 30, 2008
- Messages
- 18,708
- Reaction score
- 909
- Points
- 113
- Location
- Glenrothes, Fife, Scotland
If they're genuine Audi rims they'll have a part number on. Post it up and i'll look it up for you.
- Joined
- Nov 11, 2009
- Messages
- 10,099
- Reaction score
- 739
- Points
- 38
- Location
- west yorks
- Website
- www.stainless-engineering.co.uk
Similar threads
- Replies
- 7
- Views
- 2K