

You are using an out of date browser. It may not display this or other websites correctly.
You should upgrade or use an alternative browser.
You should upgrade or use an alternative browser.
- Joined
- Sep 14, 2008
- Messages
- 24,836
- Reaction score
- 6,078
- Points
- 113
- Location
- Wibbleton
- Website
- www.tuffty.co.uk
Nothing as yet really... I have started to strip the head and the EGT bung has been made... I am sorting out the 60mm alloy bends to do the charge pipe work and I have now got all the bits I need to fit my stereo gear..
Just a case of finding time and getting the rest of the bits to get it all done really... Shouldn't be too long hopefully")
<tuffty/>
Just a case of finding time and getting the rest of the bits to get it all done really... Shouldn't be too long hopefully
<tuffty/>
- Joined
- Sep 14, 2008
- Messages
- 24,836
- Reaction score
- 6,078
- Points
- 113
- Location
- Wibbleton
- Website
- www.tuffty.co.uk
Certainly hope so... just need to get off my fat **** in the evenings and get the stereo in and maybe take a week off work so I can use Bill's place to get the head built and fitted and all the pipework sorted for him to weld...
Need to order the valves and springs yet and get the head off for the machine work to be done... Once I have accumulated the bits it will just be a case of getting it done then really...
<tuffty/>
Need to order the valves and springs yet and get the head off for the machine work to be done... Once I have accumulated the bits it will just be a case of getting it done then really...
<tuffty/>
finesse
Registered User
Certainly hope so... just need to get off my fat **** in the evenings and get the stereo in and maybe take a week off work so I can use Bill's place to get the head built and fitted and all the pipework sorted for him to weld...
Need to order the valves and springs yet and get the head off for the machine work to be done... Once I have accumulated the bits it will just be a case of getting it done then really...
<tuffty/>
More work? Are you aim for 400bhp or something?
- Joined
- Sep 14, 2008
- Messages
- 24,836
- Reaction score
- 6,078
- Points
- 113
- Location
- Wibbleton
- Website
- www.tuffty.co.uk
More work? Are you aim for 400bhp or something?
400bhp would be nice yes...
<tuffty/>
- Joined
- Sep 14, 2008
- Messages
- 24,836
- Reaction score
- 6,078
- Points
- 113
- Location
- Wibbleton
- Website
- www.tuffty.co.uk
Small update... not much actual work done as yet just accumulating bits at the moment...
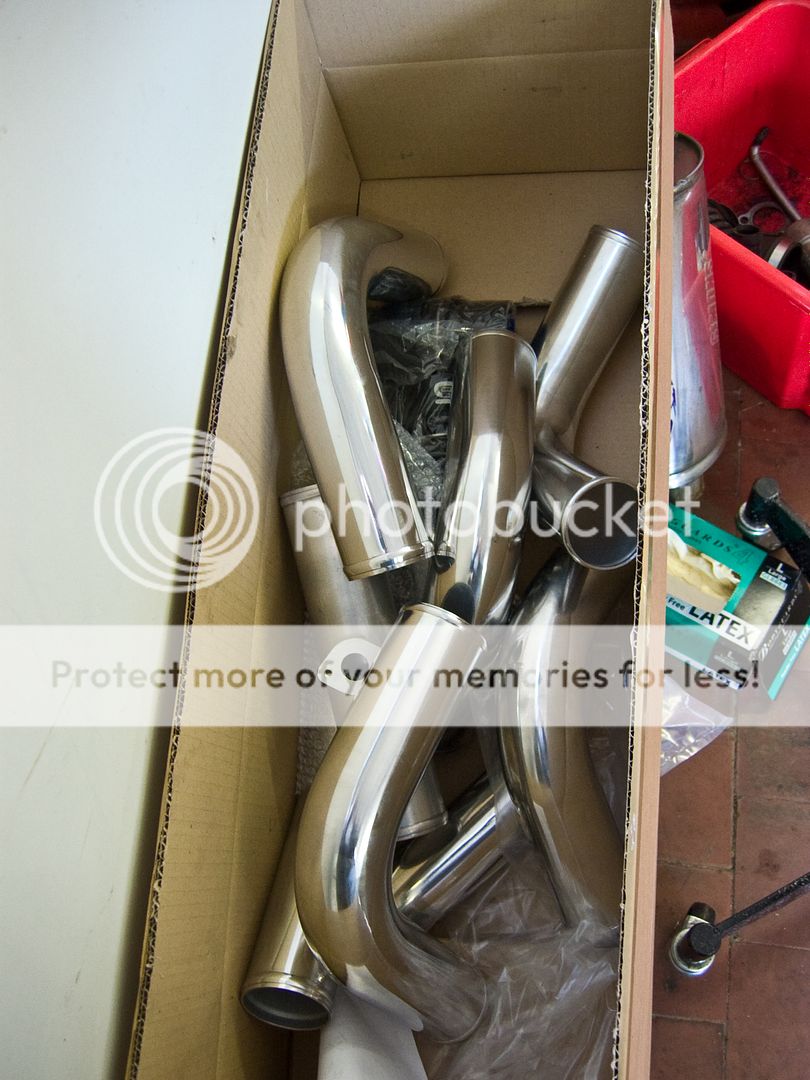
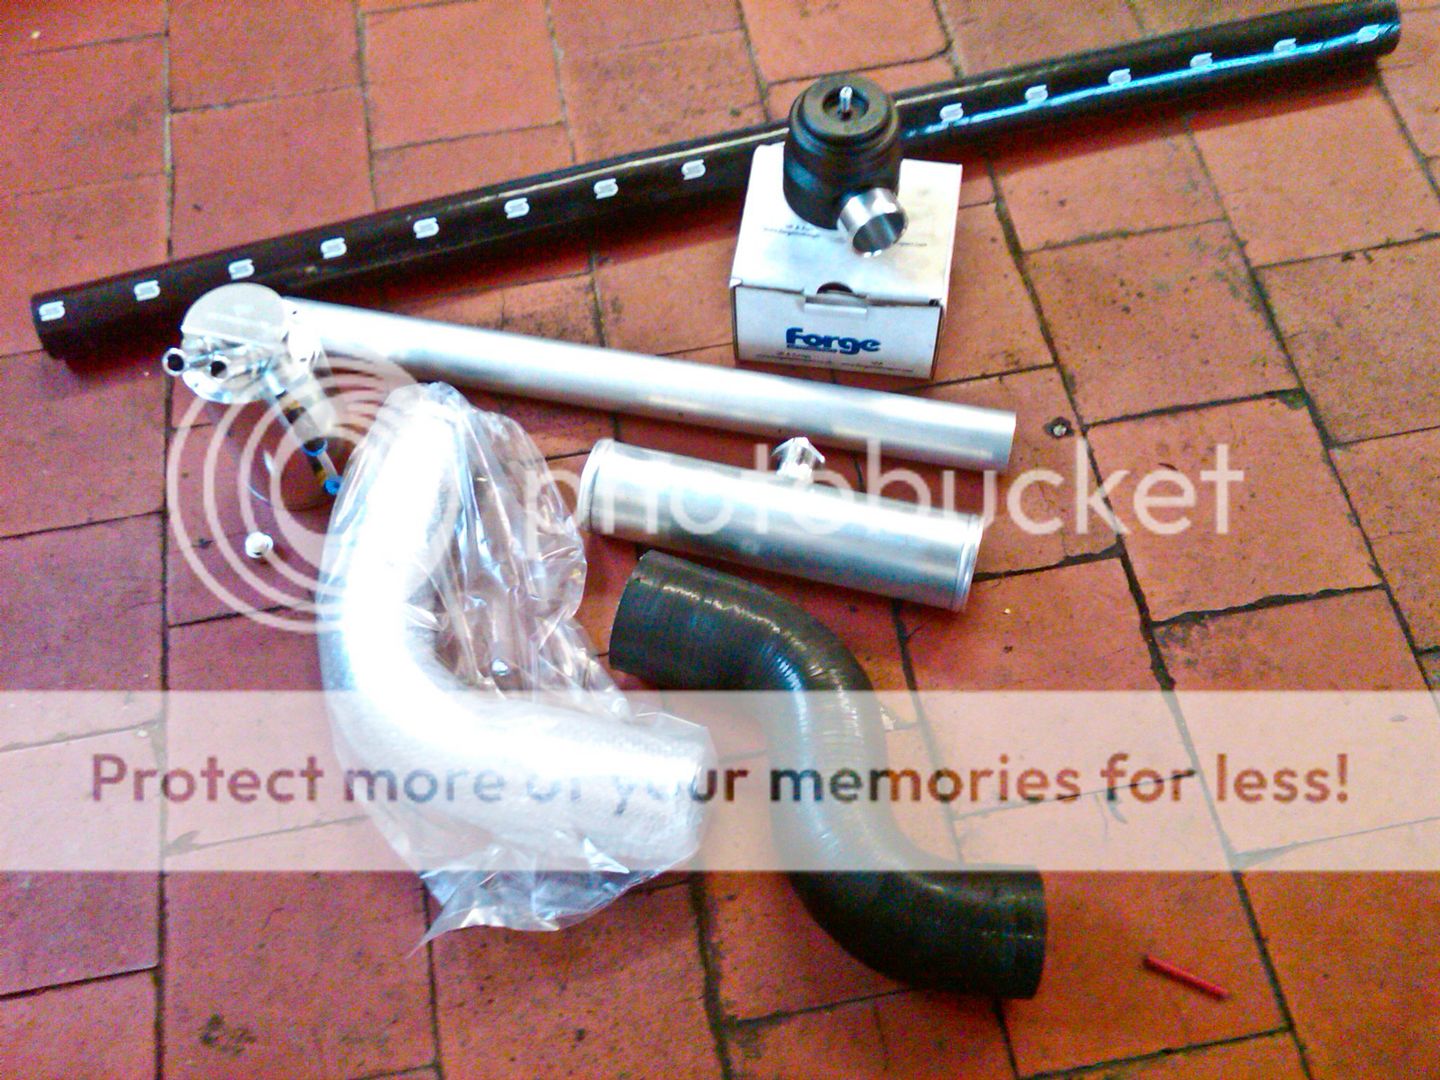
Got all the bits now to have a go at going 60mm charge pipe all round including modding the FMIC to take a 60mm outlet replacing the current 51mm ones and fitting the super size DV...
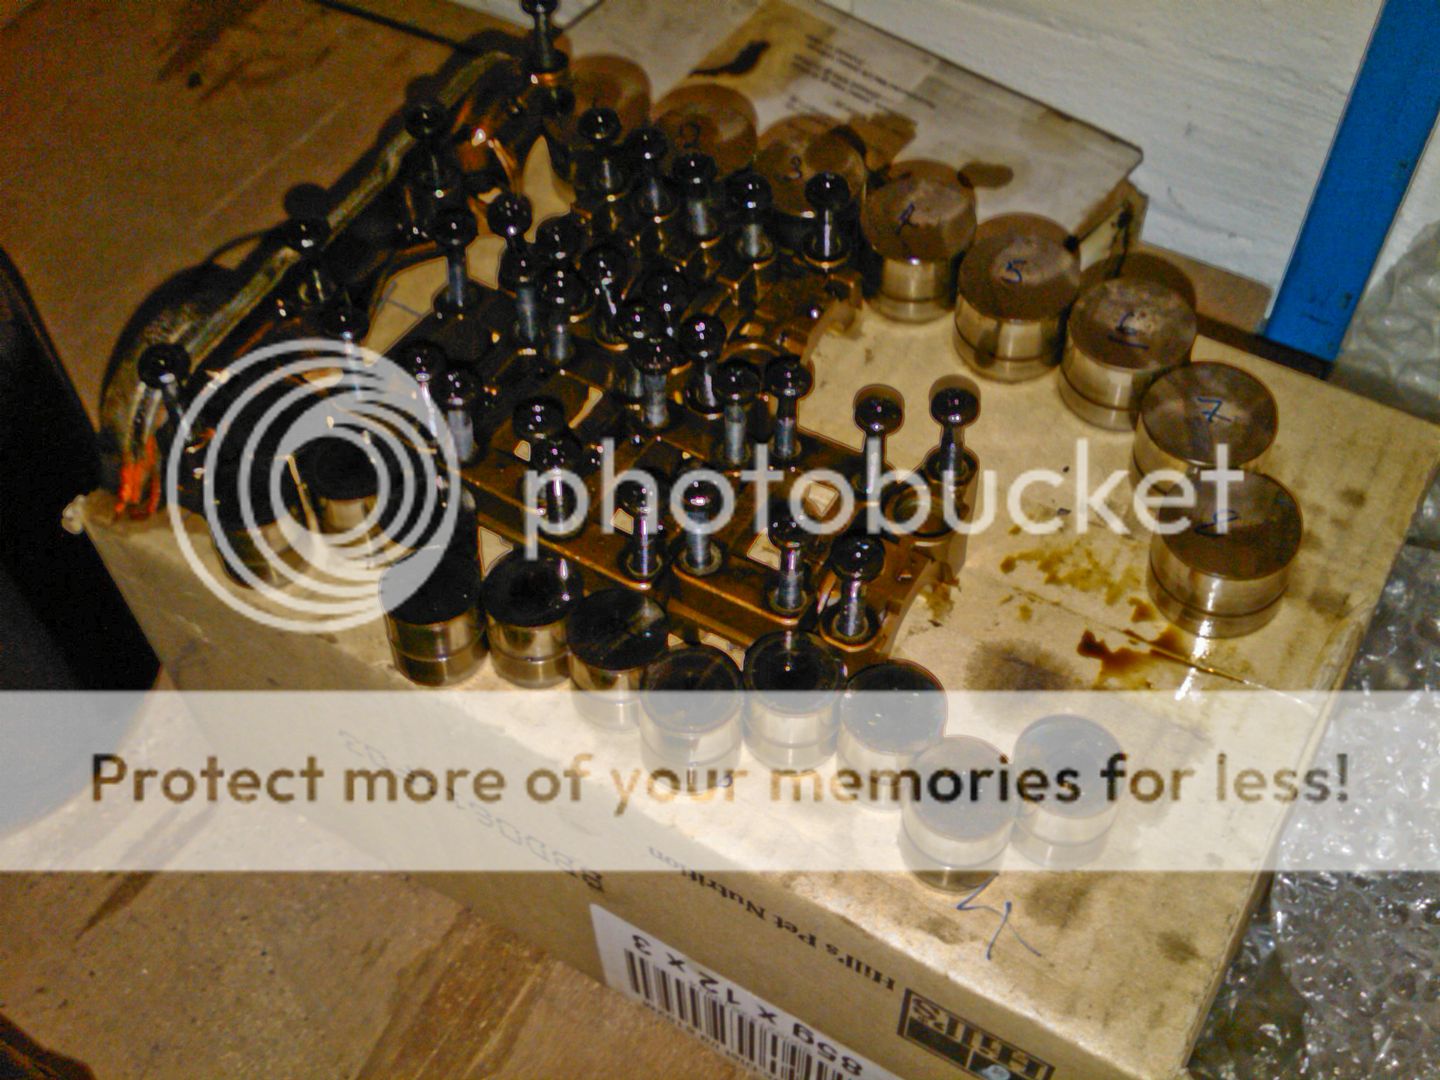
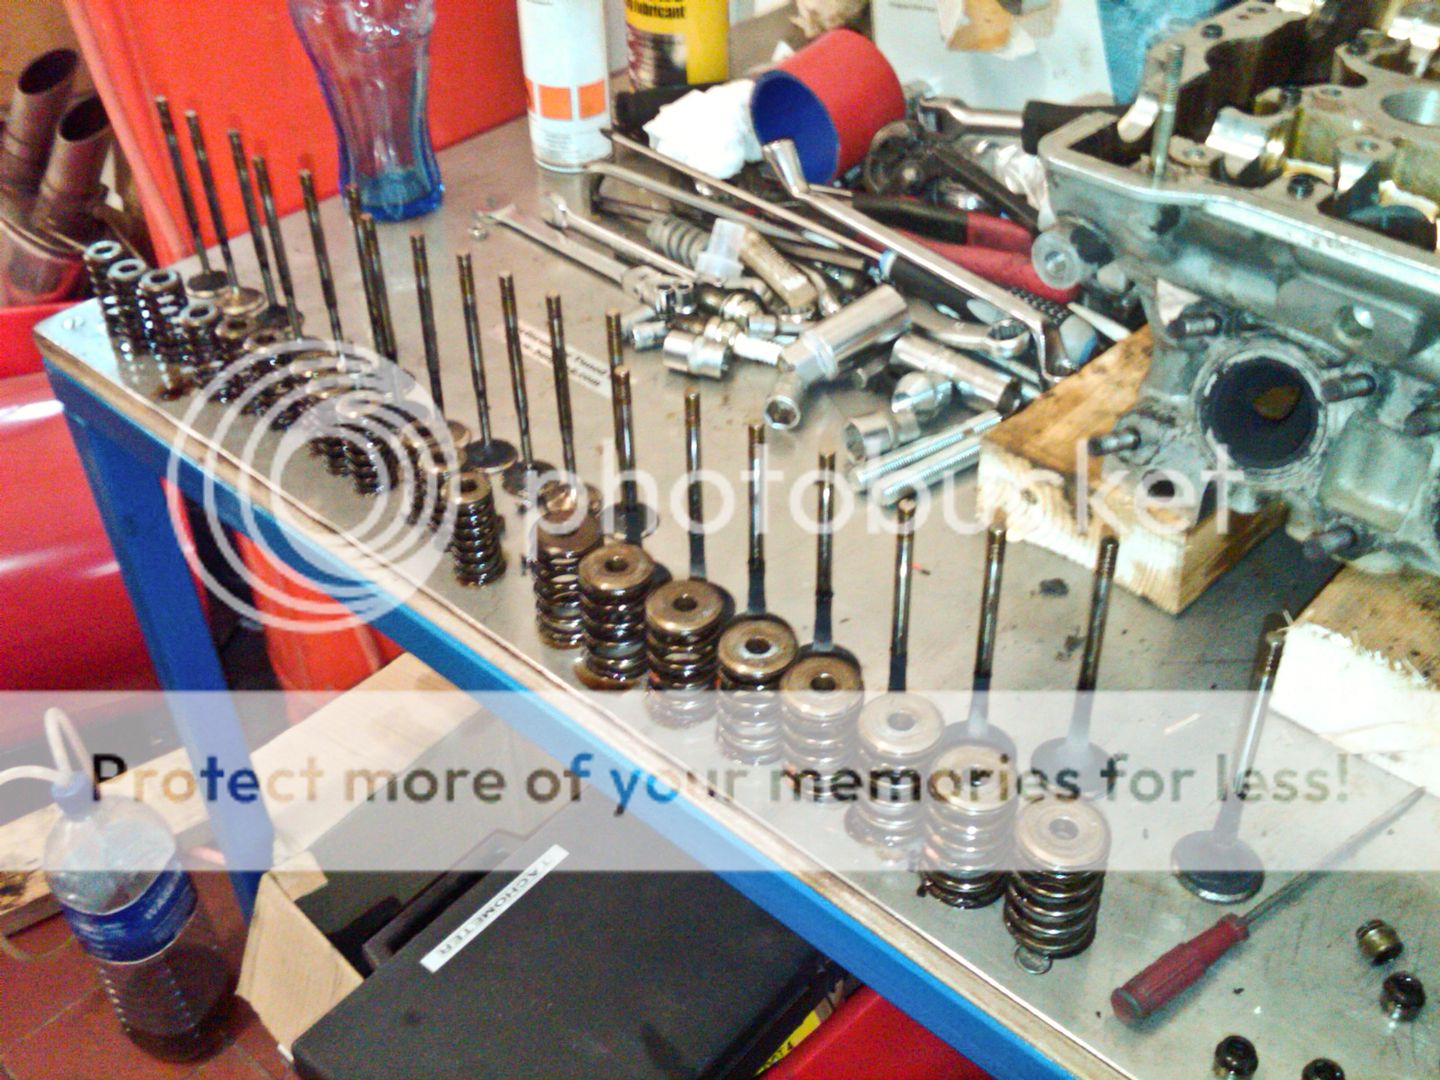
I have bought some Supertech valves and valve springs now and have started stripping the head ready for a light skim and new valve guides...

I will be using the cams and followers from my current small port head as I know these to be ok.
Notice the difference between the large port head in the foreground and a ported small port in the background..
...and a closer look at the inlet ports...
Ported small port
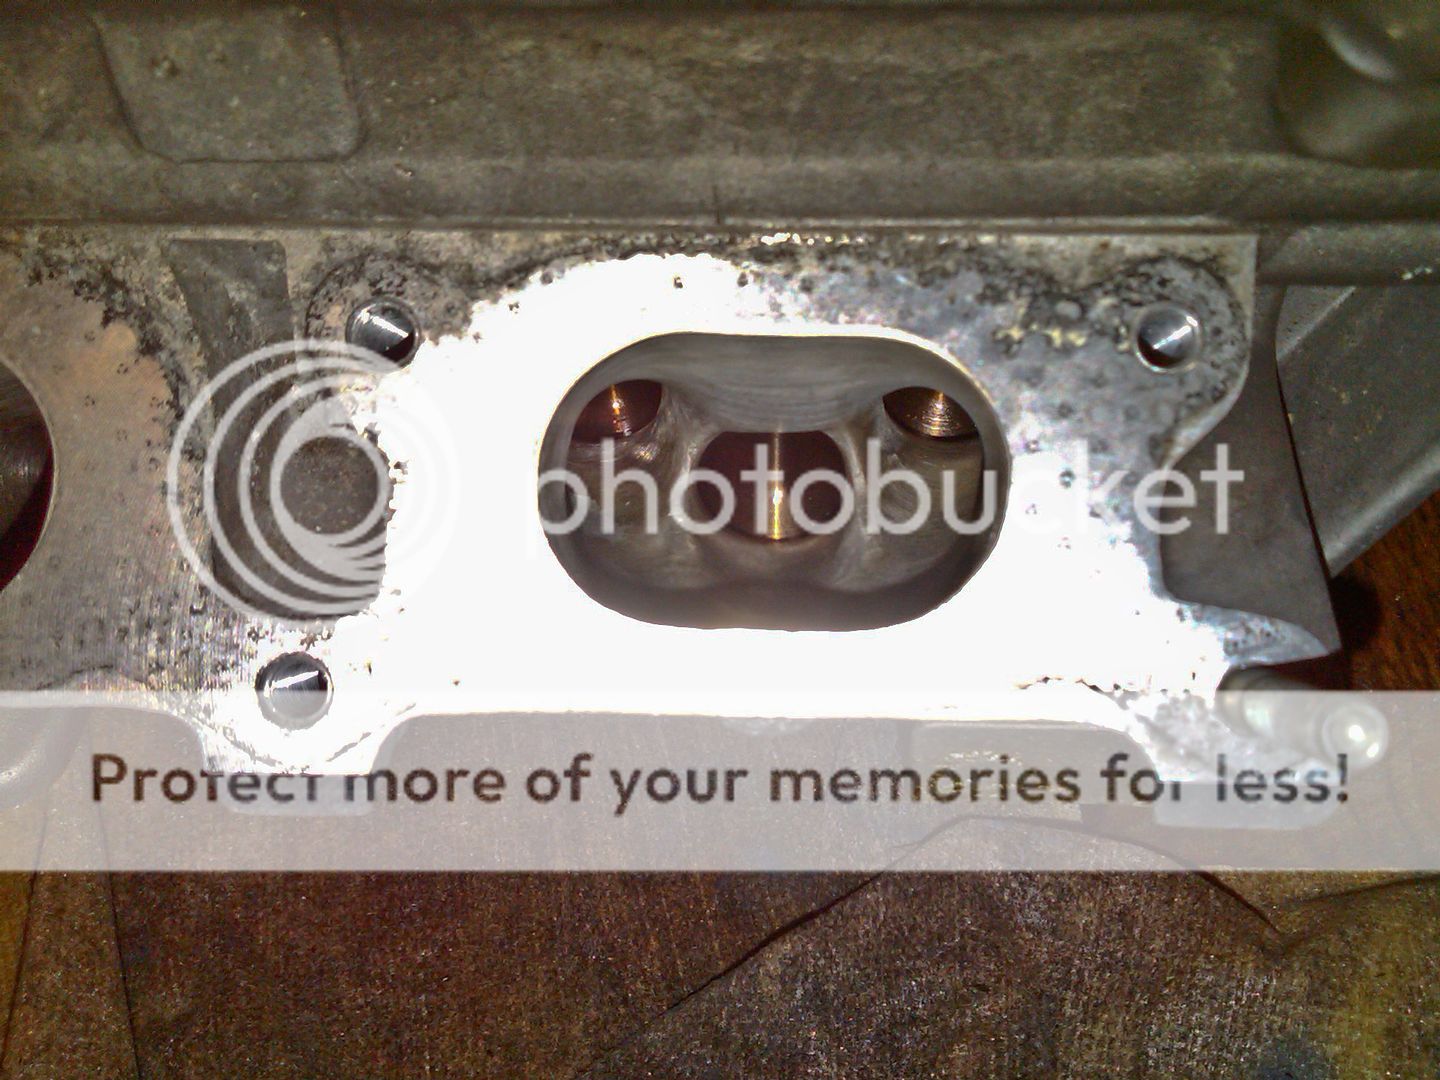
Non ported large port
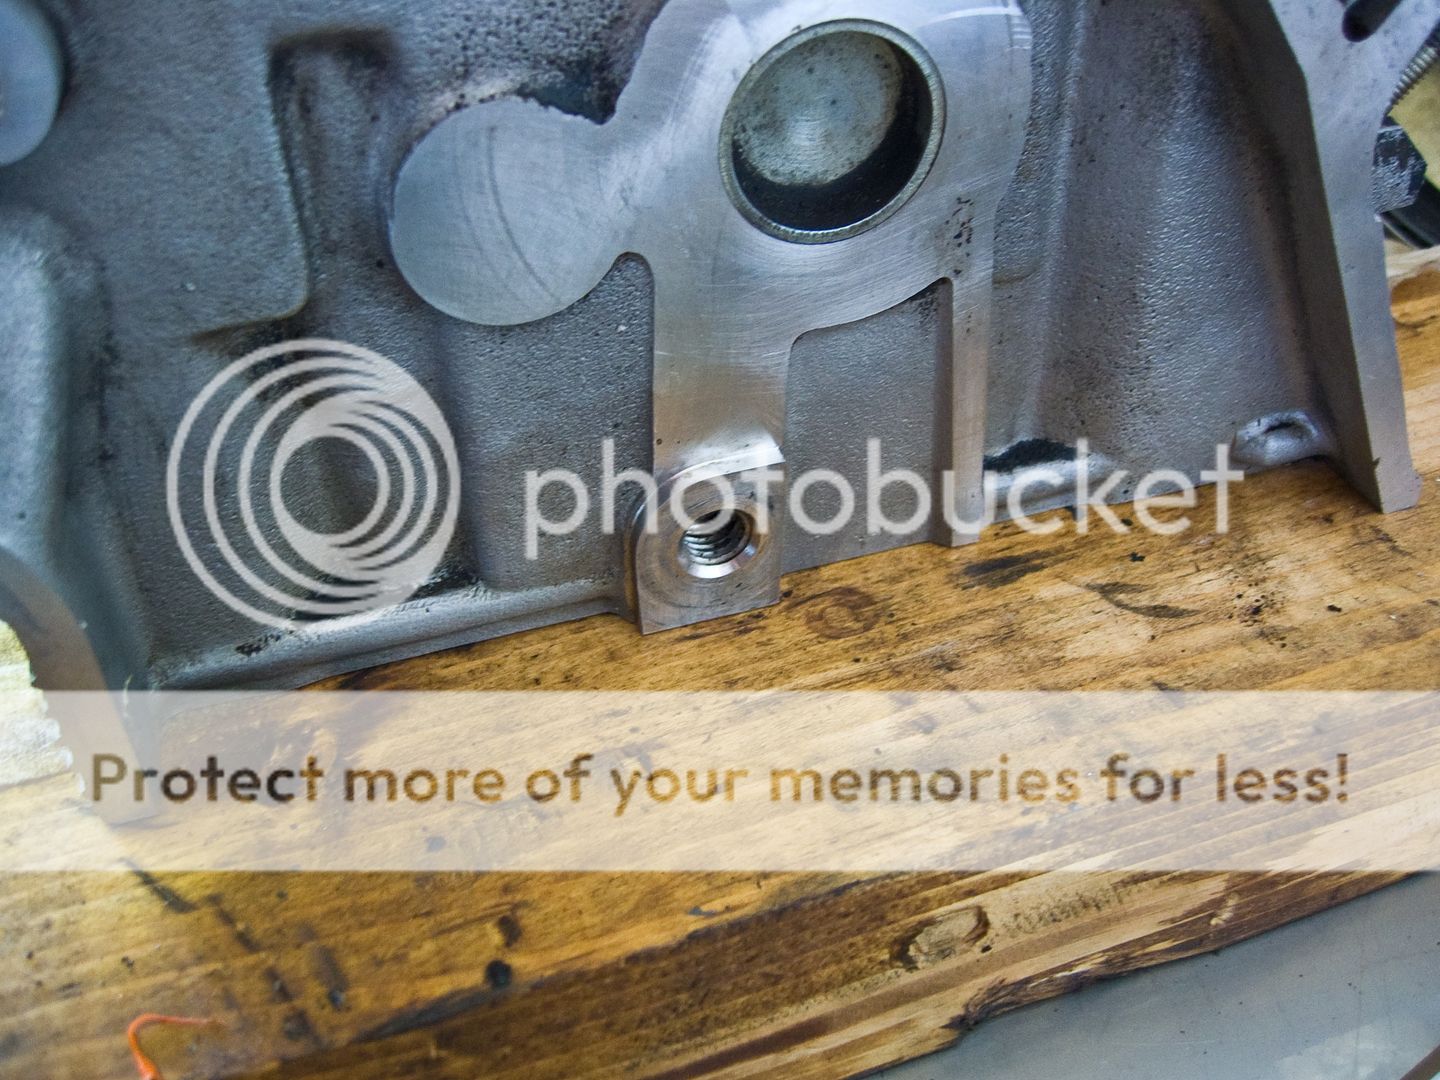
One thing I did notice with this head is the threaded hole for the cam belt tensioner roller has a raised platform compared to all the other heads currently residing at Badger 5 so I will have to get this machined flush too...
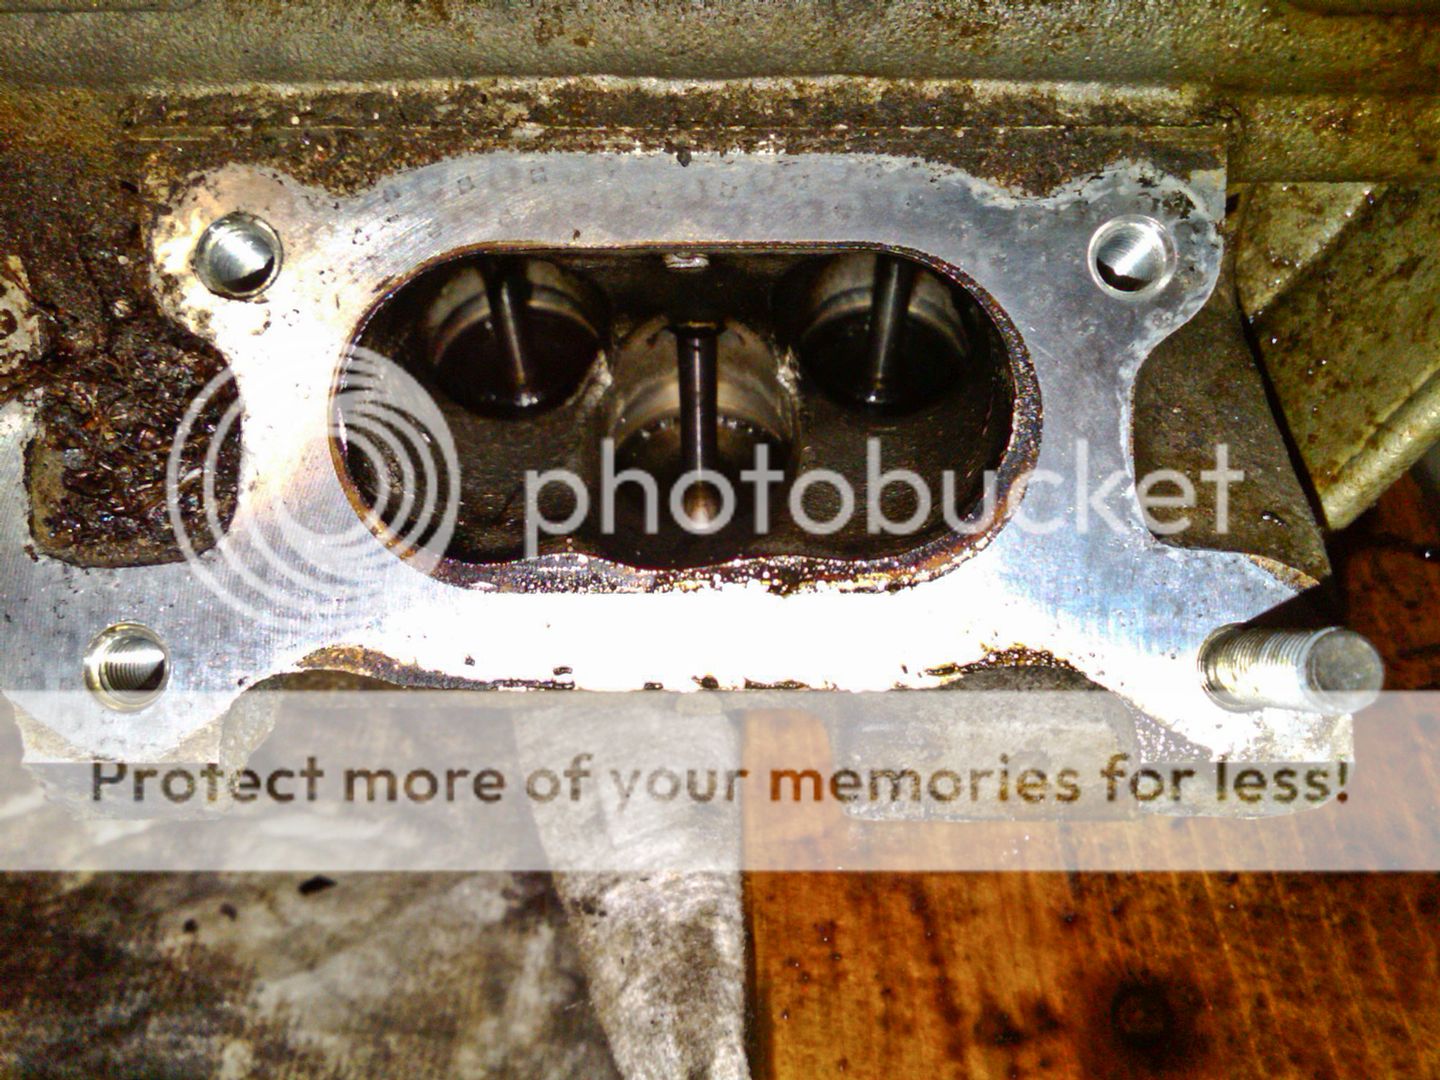
My large port head
A N Other head...

In the process of sorting a rig out to compress valve springs without damaging the follower bore... the VAG kit seems a little belt and braces...
Still accumulating bits and need to get the existing valves out before I can do much else with the head...
I now have all the bits to fit the rest of my stereo gear now so may have a crack at that in the next week or so to keep things moving until I have everything ready to take the car off the road and get the head and 60mm charge pipework fitted...
<tuffty/>
Got all the bits now to have a go at going 60mm charge pipe all round including modding the FMIC to take a 60mm outlet replacing the current 51mm ones and fitting the super size DV...
I have bought some Supertech valves and valve springs now and have started stripping the head ready for a light skim and new valve guides...
I will be using the cams and followers from my current small port head as I know these to be ok.
Notice the difference between the large port head in the foreground and a ported small port in the background..
...and a closer look at the inlet ports...
Ported small port
Non ported large port
One thing I did notice with this head is the threaded hole for the cam belt tensioner roller has a raised platform compared to all the other heads currently residing at Badger 5 so I will have to get this machined flush too...
My large port head
A N Other head...
In the process of sorting a rig out to compress valve springs without damaging the follower bore... the VAG kit seems a little belt and braces...
Still accumulating bits and need to get the existing valves out before I can do much else with the head...
I now have all the bits to fit the rest of my stereo gear now so may have a crack at that in the next week or so to keep things moving until I have everything ready to take the car off the road and get the head and 60mm charge pipework fitted...
<tuffty/>
Last edited:
- Joined
- Sep 14, 2008
- Messages
- 24,836
- Reaction score
- 6,078
- Points
- 113
- Location
- Wibbleton
- Website
- www.tuffty.co.uk
Nice update tuffty, so does this mean ull be ditching the foglights or are u gonna try and make it work with 60mm piping?
one way or other I will be retaining the foglights...
<tuffty/>

- Joined
- Sep 14, 2008
- Messages
- 24,836
- Reaction score
- 6,078
- Points
- 113
- Location
- Wibbleton
- Website
- www.tuffty.co.uk
doing the valves yourself mate?
Yes mate... Might as well give it a go
<tuffty/>
Last edited:
Lee Goodall
Registered User
Where are you going to hide the catch can mate?.. surely there's not any more spare room to hide any more mods lol

- Joined
- Sep 14, 2008
- Messages
- 24,836
- Reaction score
- 6,078
- Points
- 113
- Location
- Wibbleton
- Website
- www.tuffty.co.uk
Where are you going to hide the catch can mate?.. surely there's not any more spare room to hide any more mods lol
Its a poser and as yet I am unsure as to final positioning... I may even use a different catch tank yet depending but will see what happens when everything else is in place...
<tuffty/>
Lee Goodall
Registered User
- Joined
- Sep 14, 2008
- Messages
- 24,836
- Reaction score
- 6,078
- Points
- 113
- Location
- Wibbleton
- Website
- www.tuffty.co.uk
..thought it was a bit 'bling' for your taste lol.
don't worry, it would have been painted black :icon_thumright:
<tuffty/>

- Joined
- Sep 14, 2008
- Messages
- 24,836
- Reaction score
- 6,078
- Points
- 113
- Location
- Wibbleton
- Website
- www.tuffty.co.uk
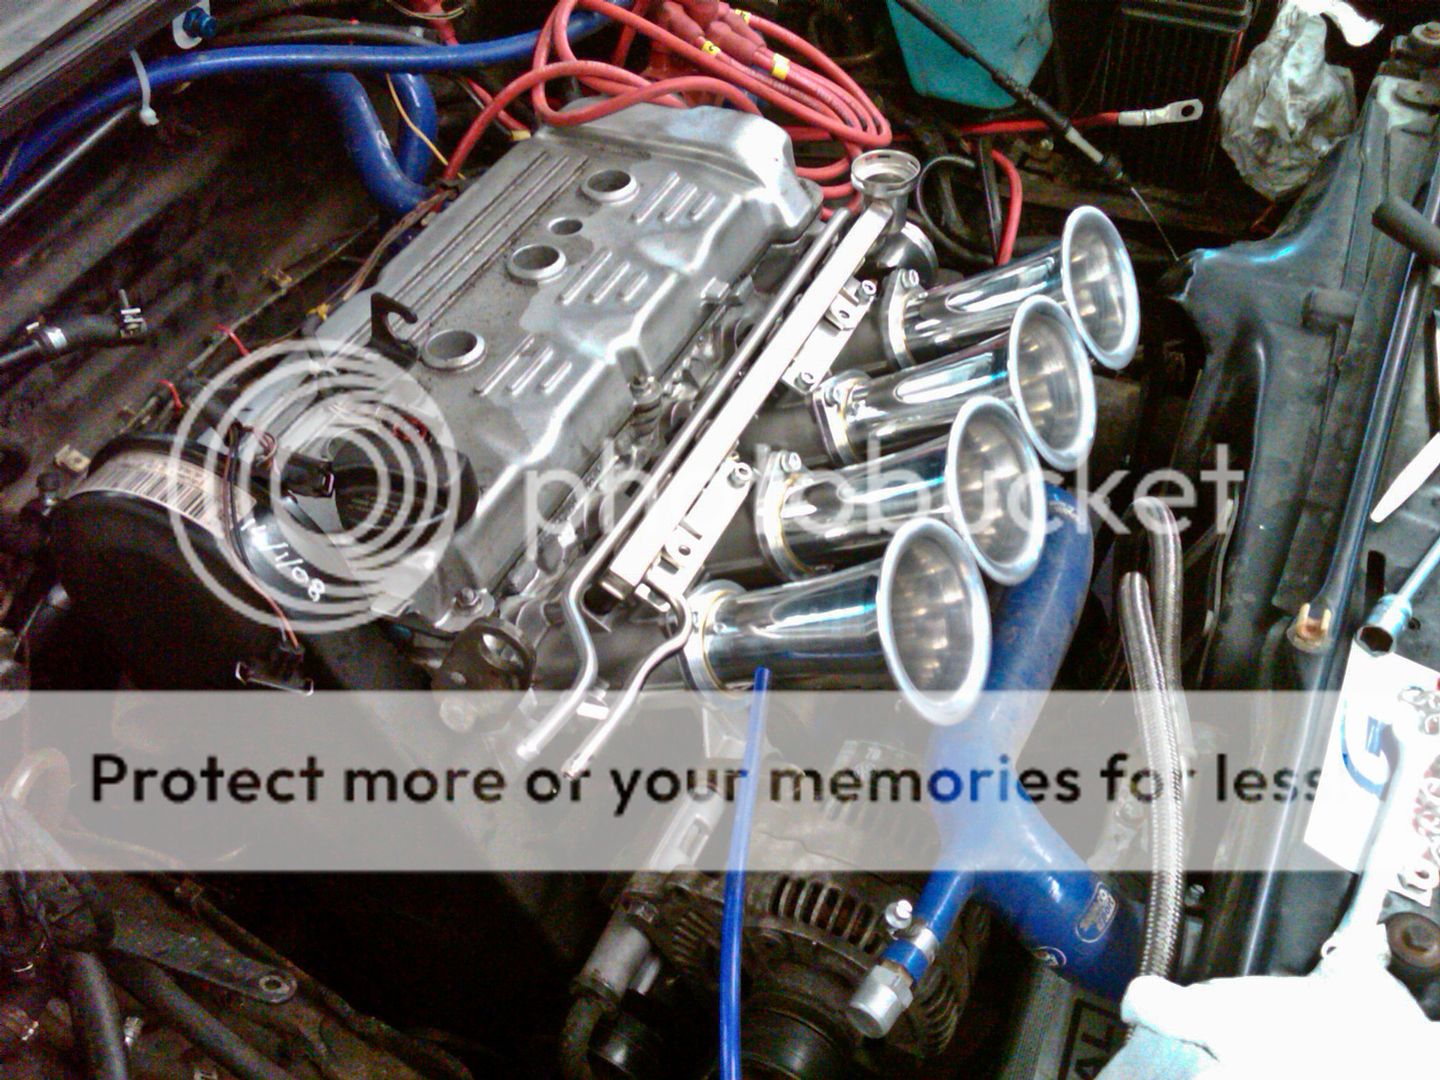
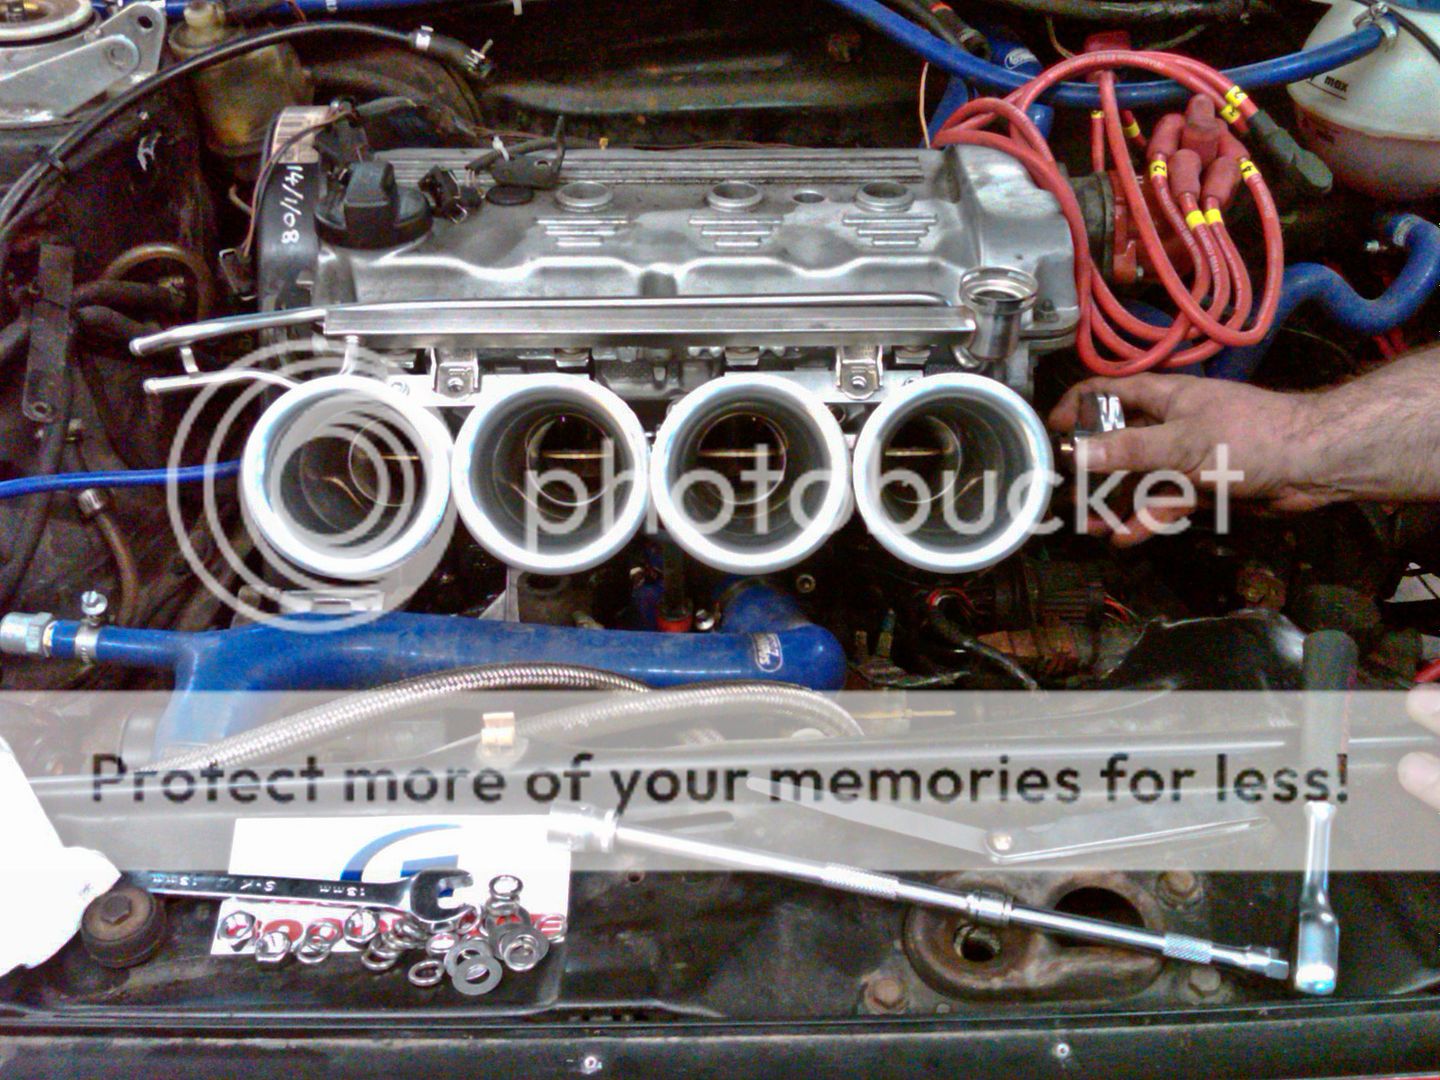
60mm charge pipes...
Im sure i recomended this ages ago
Ah well, good luck with this job. Mine was a pig and i nearly threw in the towel.
My reasoning and comments about using 51mm still stand mate... 51mm is still the easiest way to get a decent FMIC onto an S3... period... for most people its more than enough and certainly so for the lowly K04... If it wasn't due to running a GT30 and going large port head it would still be... it still cools and flows enough to produce over 350bhp....
Going 60mm is just another step in my cars evolution... If I didn't have the access to the resource I do have with Bill's workshop and excellent fabrication skills I probably wouldn't bother....
<tuffty/>
- Joined
- Oct 27, 2006
- Messages
- 2,851
- Reaction score
- 110
- Points
- 63
Lets not go there again...
My reasoning for going 60mm from the off was to put in place something i maywel require in the not too distant future.
I agree 51mm will always be the best ( easiest route) way to go about a fmic.
BUT,
The larger set up "should" aid the flow of charged air to the engine, I do envy you that you have Bills workshop available as the people i use work on a range of cars so sometimes the aproach taken is slightly away from what the audi scene will follow , But we all get there in the end,
The plan for my car is/was to fit a gt3076r to the forged engine ive just fitted. BUT with the high costs involved with this it may or maynot happen, So each step i take towards it is a causious one.
Im sorry for my poor spelling
Good luck with your project and i look forward to seeing what 400+ is like in an S3
- Joined
- Sep 14, 2008
- Messages
- 24,836
- Reaction score
- 6,078
- Points
- 113
- Location
- Wibbleton
- Website
- www.tuffty.co.uk
Wasn't going anywhere bud
Thanks for the support though, always appreciated... Yep I agree... larger bore will help with the flow... Bill has been badgering me (no pun intended) for ages about it... he likes his flow ;P same with the large port... wasn't gonna cave but I need to change the valves so may as well do it to a head that will suit the airflow the GT30 can provide...
I know what you mean about cost... I have no idea how much I have spent so far... its not a great deal comparatively tbh as I have done most of the work myself but it all adds up and while I have caved in a little with things like the 60mm and large port head I have tried to stick with my original plan to only upgrade bits that needed it and retain an OEM look to the work I have done... hopefully I have pulled that off...
400bhp is the goal, how close I get to it I don't know but with the latest round of planned mods I guess it will be as close as I can get to achieving it with the turbo/manifold combo I have and any possible restriction the inlet mani is providing...
If you do look to go for a larger turbo (and I hope you do, its worth it :icon_thumright I hope what I have done here gives you a little help in deciding how you go about it... GT3076r will certianly benefit form a large port head and you will have to do the valve train to as the rev limit will need to be upped to make any use of the power that turbo will be capable of...
Good luck with yours d00de
<tuffty/>
Thanks for the support though, always appreciated... Yep I agree... larger bore will help with the flow... Bill has been badgering me (no pun intended) for ages about it... he likes his flow ;P same with the large port... wasn't gonna cave but I need to change the valves so may as well do it to a head that will suit the airflow the GT30 can provide...
I know what you mean about cost... I have no idea how much I have spent so far... its not a great deal comparatively tbh as I have done most of the work myself but it all adds up and while I have caved in a little with things like the 60mm and large port head I have tried to stick with my original plan to only upgrade bits that needed it and retain an OEM look to the work I have done... hopefully I have pulled that off...
400bhp is the goal, how close I get to it I don't know but with the latest round of planned mods I guess it will be as close as I can get to achieving it with the turbo/manifold combo I have and any possible restriction the inlet mani is providing...
If you do look to go for a larger turbo (and I hope you do, its worth it :icon_thumright
I hope what I have done here gives you a little help in deciding how you go about it... GT3076r will certianly benefit form a large port head and you will have to do the valve train to as the rev limit will need to be upped to make any use of the power that turbo will be capable of...Good luck with yours d00de
<tuffty/>
- Joined
- Oct 27, 2006
- Messages
- 2,851
- Reaction score
- 110
- Points
- 63
Ive already put the wheels in motion regarding the head. ( a fully built spec'd up large port item ) Im still unsure where the story will end.
It realy is a squeeze with the bigger boost pipe work though, Be good to see how you tackle it,
It realy is a squeeze with the bigger boost pipe work though, Be good to see how you tackle it,
- Joined
- Sep 14, 2008
- Messages
- 24,836
- Reaction score
- 6,078
- Points
- 113
- Location
- Wibbleton
- Website
- www.tuffty.co.uk
My biggest concern is the the strength of the join at the end tank tbh... the extra 'leverage' the 60mm bend I am looking to use is a worry but I think I will look to strengthen it by supporting fillets etc to make sure vibrations etc won't crack the joins... I have got some 60mm silicon bellows too to try and introduce so 'give' into the pipe work.
I will update the FMIC sticky if this is successful and feed back to Alex at AH Fabs to see if this is a viable option to the 51mm FMIC I originally designed...
<tuffty/>
I will update the FMIC sticky if this is successful and feed back to Alex at AH Fabs to see if this is a viable option to the 51mm FMIC I originally designed...
<tuffty/>
- Joined
- Oct 27, 2006
- Messages
- 2,851
- Reaction score
- 110
- Points
- 63
If i remember rightly... the problem was getting around the fog light mounting brakets
I trimmed mine back as far as i would like . i added a silicone joiner on the drivers side... about where the middle of the side mount cooler would be... to make it easier to fit/ remove and allow for a bit of flex.
I trimmed mine back as far as i would like . i added a silicone joiner on the drivers side... about where the middle of the side mount cooler would be... to make it easier to fit/ remove and allow for a bit of flex.
Andy123
Registered User
Does the AEB/AGU head need any work to fit it to the amk/bam bottom end on the s3 or is it a direct replacement apart from the different size in ports? Does the VVT system still work? Are all of the internals still the same size on the heads? Cheers Andy
ALPINE
Yes its diesel, now cry u lost
- Joined
- Sep 14, 2008
- Messages
- 24,836
- Reaction score
- 6,078
- Points
- 113
- Location
- Wibbleton
- Website
- www.tuffty.co.uk
Does the AEB/AGU head need any work to fit it to the amk/bam bottom end on the s3 or is it a direct replacement apart from the different size in ports? Does the VVT system still work? Are all of the internals still the same size on the heads? Cheers Andy
.....and breathe....
AEB is A4/Passat, AGU is A3.... the AEB I have is an earlier one by the looks but essentially all 1.8t heads are reusable across the VAG range... As I pointed out in an earlier post, there is a bit of work needed to get my AEB sorted as it would appear the earlier head had a different design for the cam belt tensioner roller mount. The A4 cam pulley is not the same as the transverse engine but I will be using the cam gear from my AMK head anyway.
The VVT mech is a simple bolt on replacement for the non VVT cam chain tensioner.
Valves/springs/followers are the same across the 1.8t range... I now have my Supertech valves, springs and titanium retainers (pics to follow) and I will be using the followers from my AMK head.
AGU is more of a 'bolt on' replacement for transverse engines than AEB/ADR but all parts are transferable...
<tuffty/>
ALPINE
Yes its diesel, now cry u lost
.....and breathe....
AEB is A4/Passat, AGU is A3.... the AEB I have is an earlier one by the looks but essentially all 1.8t heads are reusable across the VAG range... As I pointed out in an earlier post, there is a bit of work needed to get my AEB sorted as it would appear the earlier head had a different design for the cam belt tensioner roller mount. The A4 cam pulley is not the same as the transverse engine but I will be using the cam gear from my AMK head anyway.
The VVT mech is a simple bolt on replacement for the non VVT cam chain tensioner.
Valves/springs/followers are the same across the 1.8t range... I now have my Supertech valves, springs and titanium retainers (pics to follow) and I will be using the followers from my AMK head.
AGU is more of a 'bolt on' replacement for transverse engines than AEB/ADR but all parts are transferable...
<tuffty/>
i wish i had enough money to give my car to you or/ and badger to rape!! would be a monster!
- Joined
- Sep 14, 2008
- Messages
- 24,836
- Reaction score
- 6,078
- Points
- 113
- Location
- Wibbleton
- Website
- www.tuffty.co.uk
Got a chance to take pics of the new valves... not very exciting I know but this wouldn't be a proper build thread if I didn't show them off
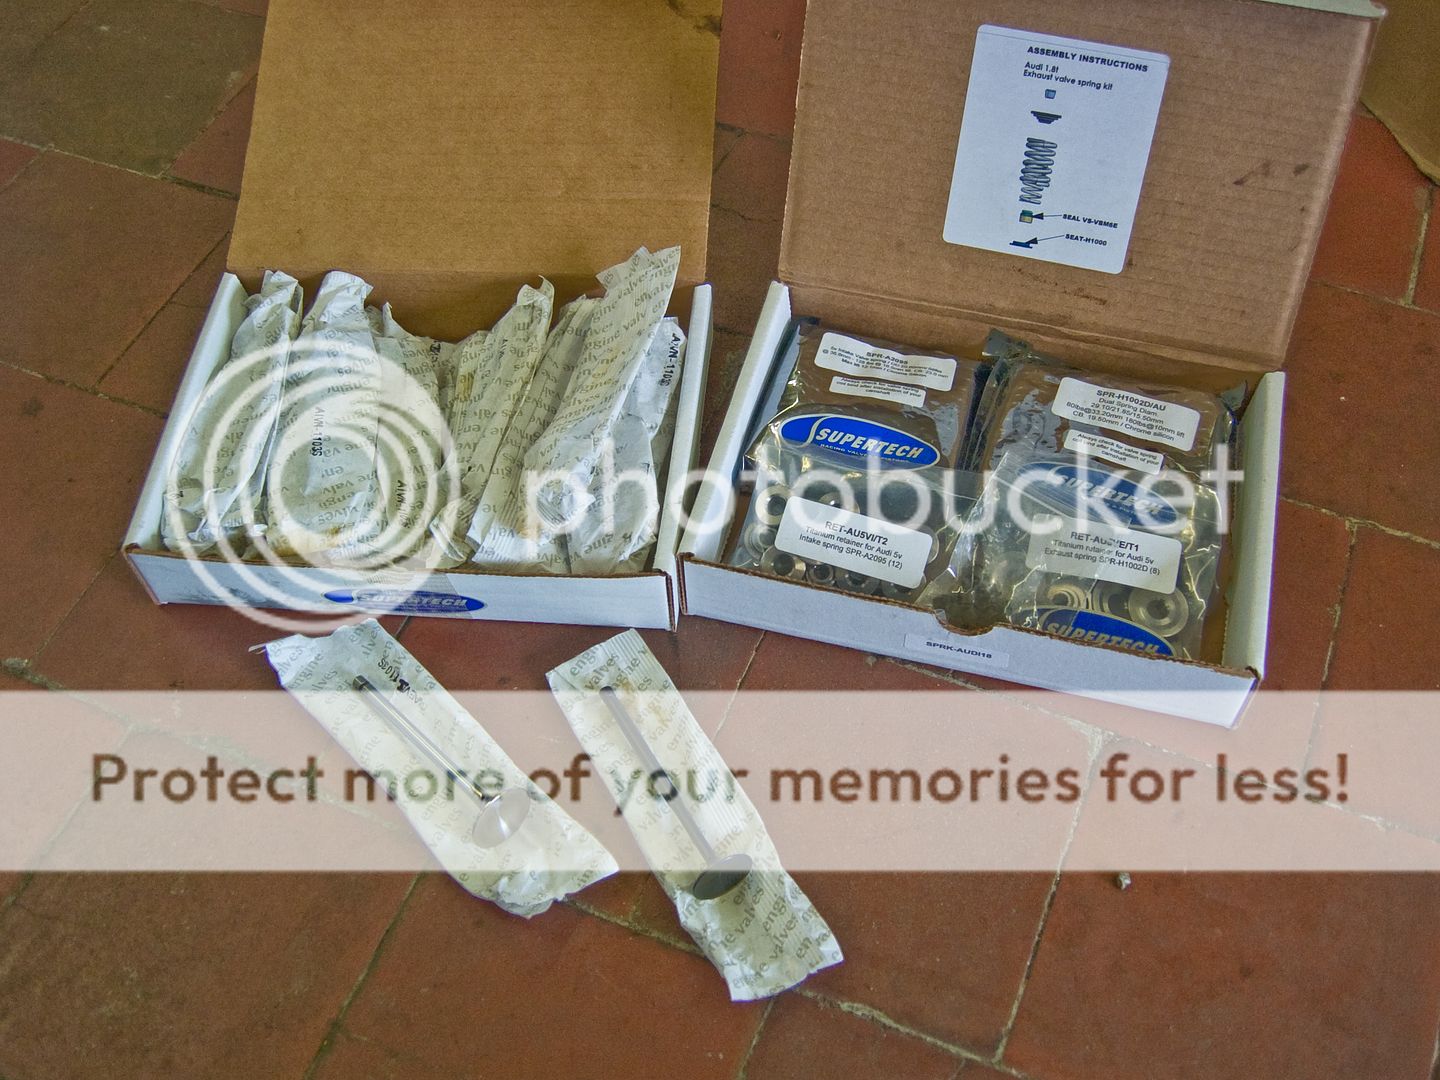
Supertech springs with titanium retainers and collets for the single groove valves...

Inconel exhaust valve (left) and black nitrided intake valve (right)

I have most of all I need now to get the next phase of mods done but I will probably wait a while before I actually get around to do it all as I want to be able to dyno the difference each of the tweaks makes and for that I will wait until Bill has got his dyno installed.
Plan is to get the EGT boss welded into the DP and fit the EGT probe properly... I will then baseline the cars power in its current configuration. Once that is done then I will do the 60mm charge pipe/FMIC upgrade and dyno that to see if the potential increase in flow develops any more power then see if I can turn up boost to get any more out... I will then fit the large port head and dyno that...
This should hopefully show what difference (if any) each of these additional mods can make so that anyone wanting to go big turbo can make their own mind up as to how far you wish to take your car..
<tuffty/>
Supertech springs with titanium retainers and collets for the single groove valves...
Inconel exhaust valve (left) and black nitrided intake valve (right)
I have most of all I need now to get the next phase of mods done but I will probably wait a while before I actually get around to do it all as I want to be able to dyno the difference each of the tweaks makes and for that I will wait until Bill has got his dyno installed.
Plan is to get the EGT boss welded into the DP and fit the EGT probe properly... I will then baseline the cars power in its current configuration. Once that is done then I will do the 60mm charge pipe/FMIC upgrade and dyno that to see if the potential increase in flow develops any more power then see if I can turn up boost to get any more out... I will then fit the large port head and dyno that...
This should hopefully show what difference (if any) each of these additional mods can make so that anyone wanting to go big turbo can make their own mind up as to how far you wish to take your car..
<tuffty/>
Last edited:
Coming along nicely Paul. Looking forward to seeing it at an event soon. Might have to get you to talk me through it over a pint!
- Joined
- Sep 14, 2008
- Messages
- 24,836
- Reaction score
- 6,078
- Points
- 113
- Location
- Wibbleton
- Website
- www.tuffty.co.uk
Coming along nicely Paul. Looking forward to seeing it at an event soon. Might have to get you to talk me through it over a pint!
Thanks mate and no problemo

<tuffty/>
- Joined
- Sep 14, 2008
- Messages
- 24,836
- Reaction score
- 6,078
- Points
- 113
- Location
- Wibbleton
- Website
- www.tuffty.co.uk
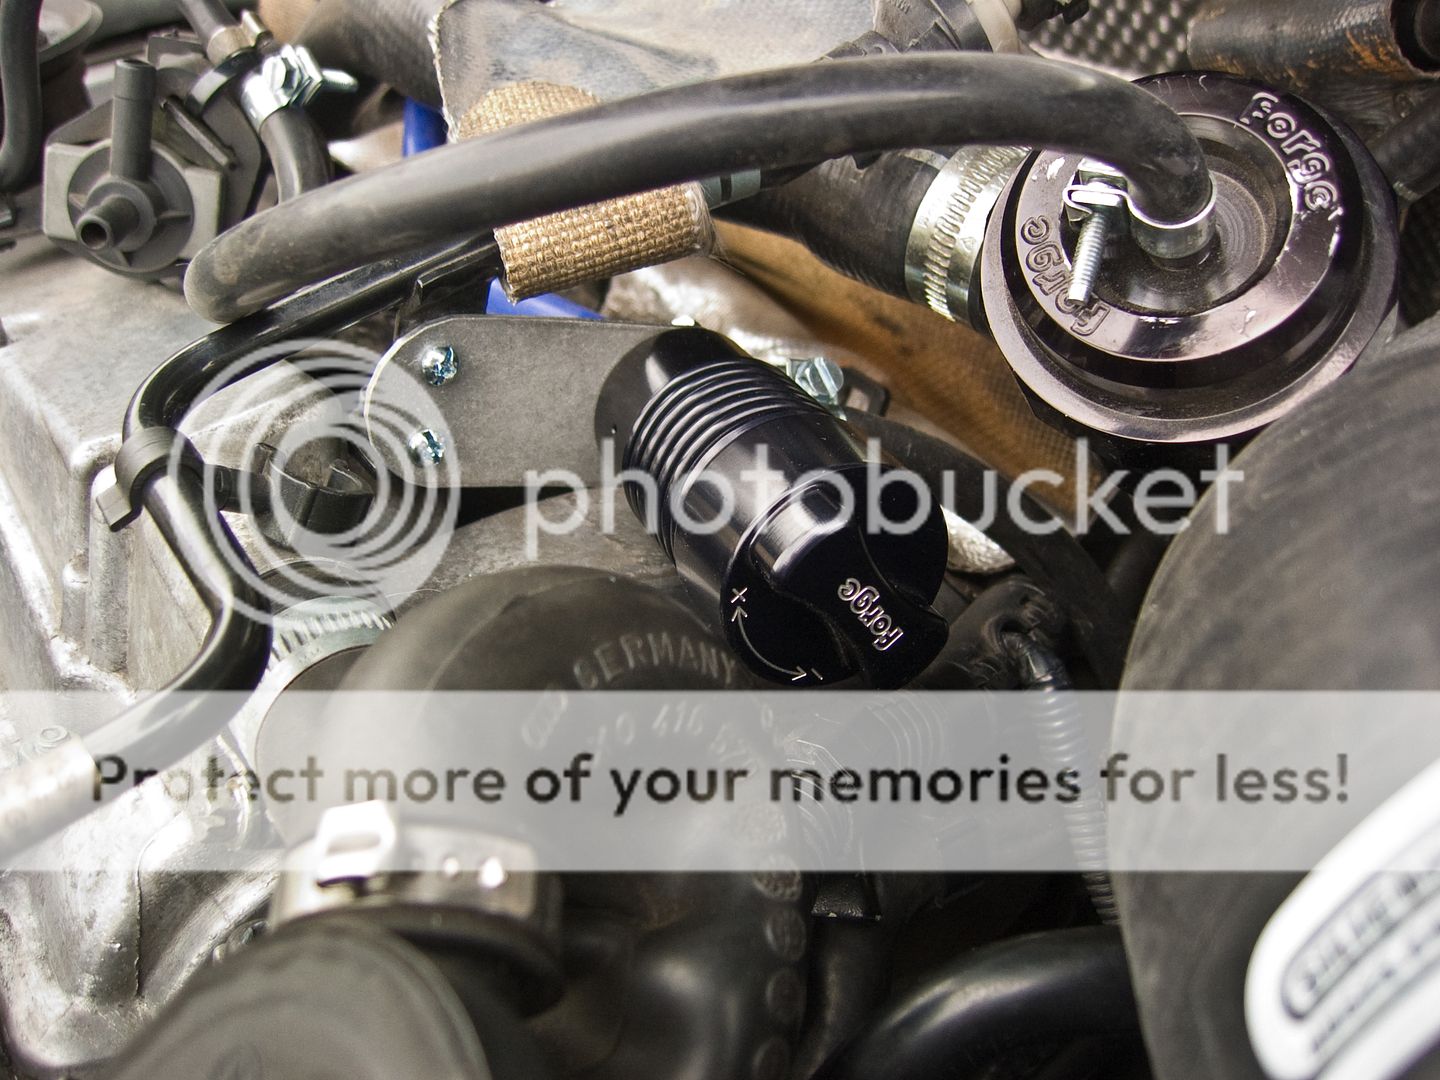
Had some time to myself this afternoon as I wasn't at the workshop. I have been having a few issues with boost control ever since my latest map had the boost upped from 1.4bar to 1.7bar.... Boost has been dropping off randomly or wavering between 1.4 and 1.6bar rather than holding as it should... I initially put this down to the actuator and was going to try a bit more preload as this helped the last time I had a similar issue...
I have tried an MBC (manual boost controller) before but without much success... I couldn't be bothered to play with it previously but thought I would give it another go...
Using a Forge UNOS MBC I bypassed the N75 completely (leaving it electrically connected and blocked the pipe going to the TIP) and gave it a try.

It was one that Bill had used on the Polo build while mapping so should be set about right... however, when I tried it I was still getting varying boost so I fitted the stiffer spring that comes with the UNOS, wound it back to its softest setting and tried again... steady 1.4bar this time... wound it up 20 clicks... over 2bar!! eeep!!... wound it back 5 clicks and it settled nicely at 1.8 (ish) bar....
Car was pulling nicely and it held boost pretty much up to the redline...sweet!!!
Think I will fit that in properly now as its just lazing about the engine bay at this moment (I have cable tied it in now)

Max airflow I got from that run was 282g/s... this is lower than I have been getting in the past as my MAF is a little tired... I have previously been only getting in and around the 270 mark where I have logged over 290 before... I have previously tried a MAF Bill had on the shelf and my airflow was back up at 292g/s so a new MAF and pre-cat lambda are on the shopping list for the end of the month.
The 282g/s was encouraging though as the MBC appears to be working nicely and maintaining boost keeping the airflow up. This was when I decided to have a go at de-meshing the MAF...
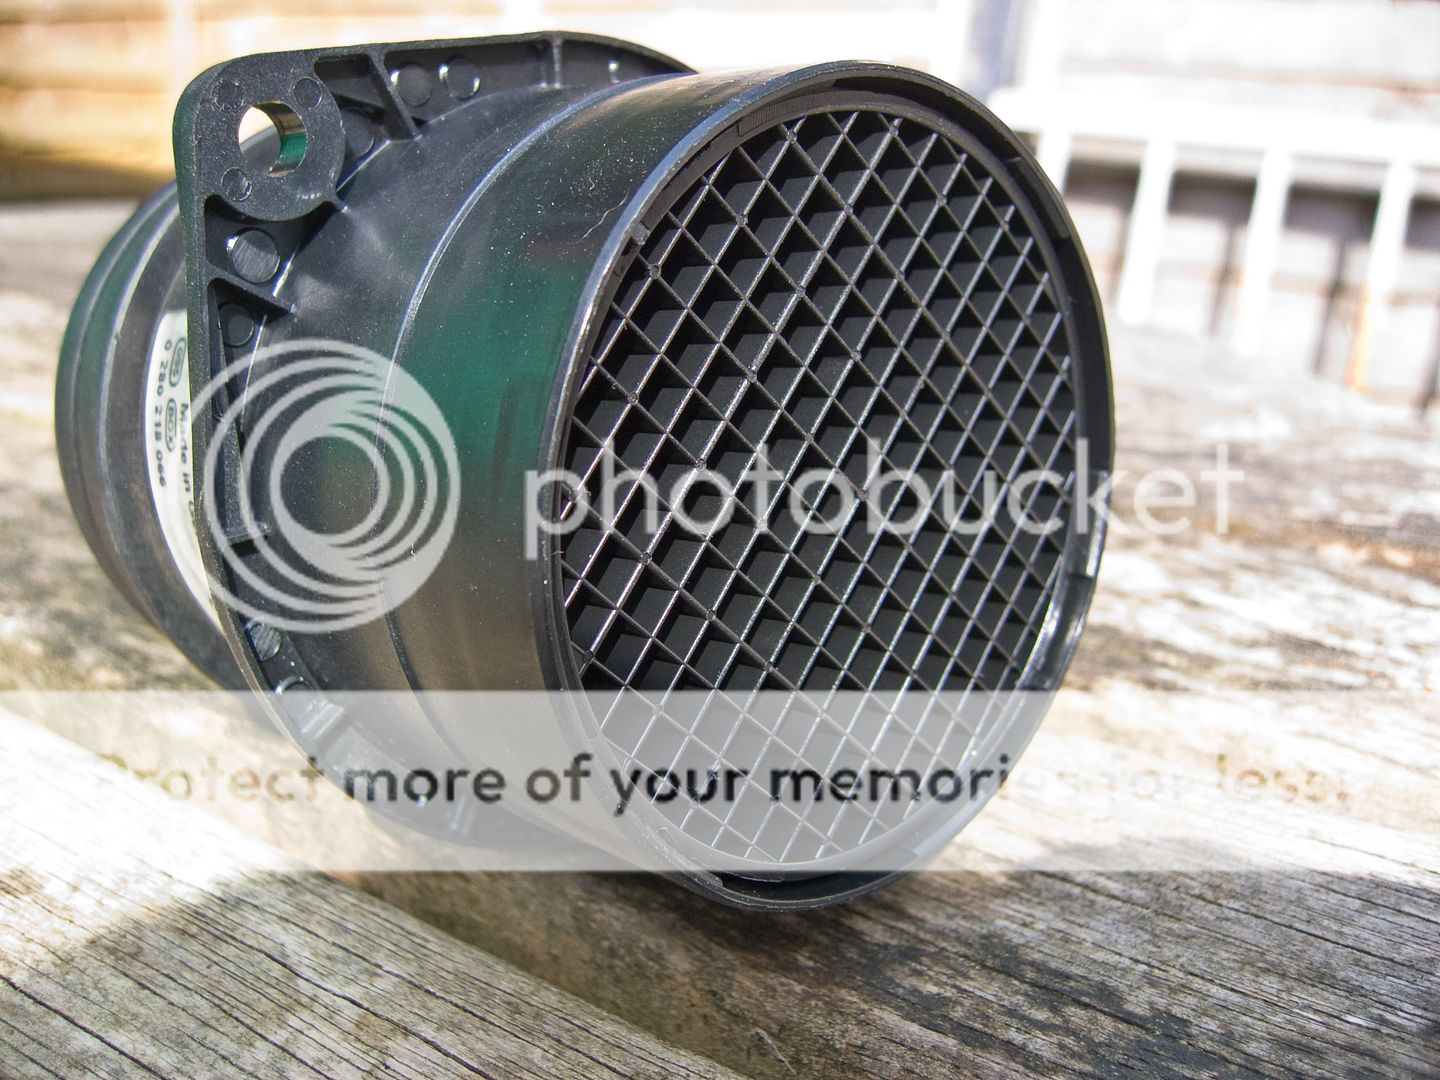
De-meshing the MAF has been discussed before and that ASN pioneer of modding Welly has done his... I am little sceptical but thought 'what the actual hell!!!'
Here we have an S3 MAF... grille thingy at the front (airbox side)
..and TIP side...
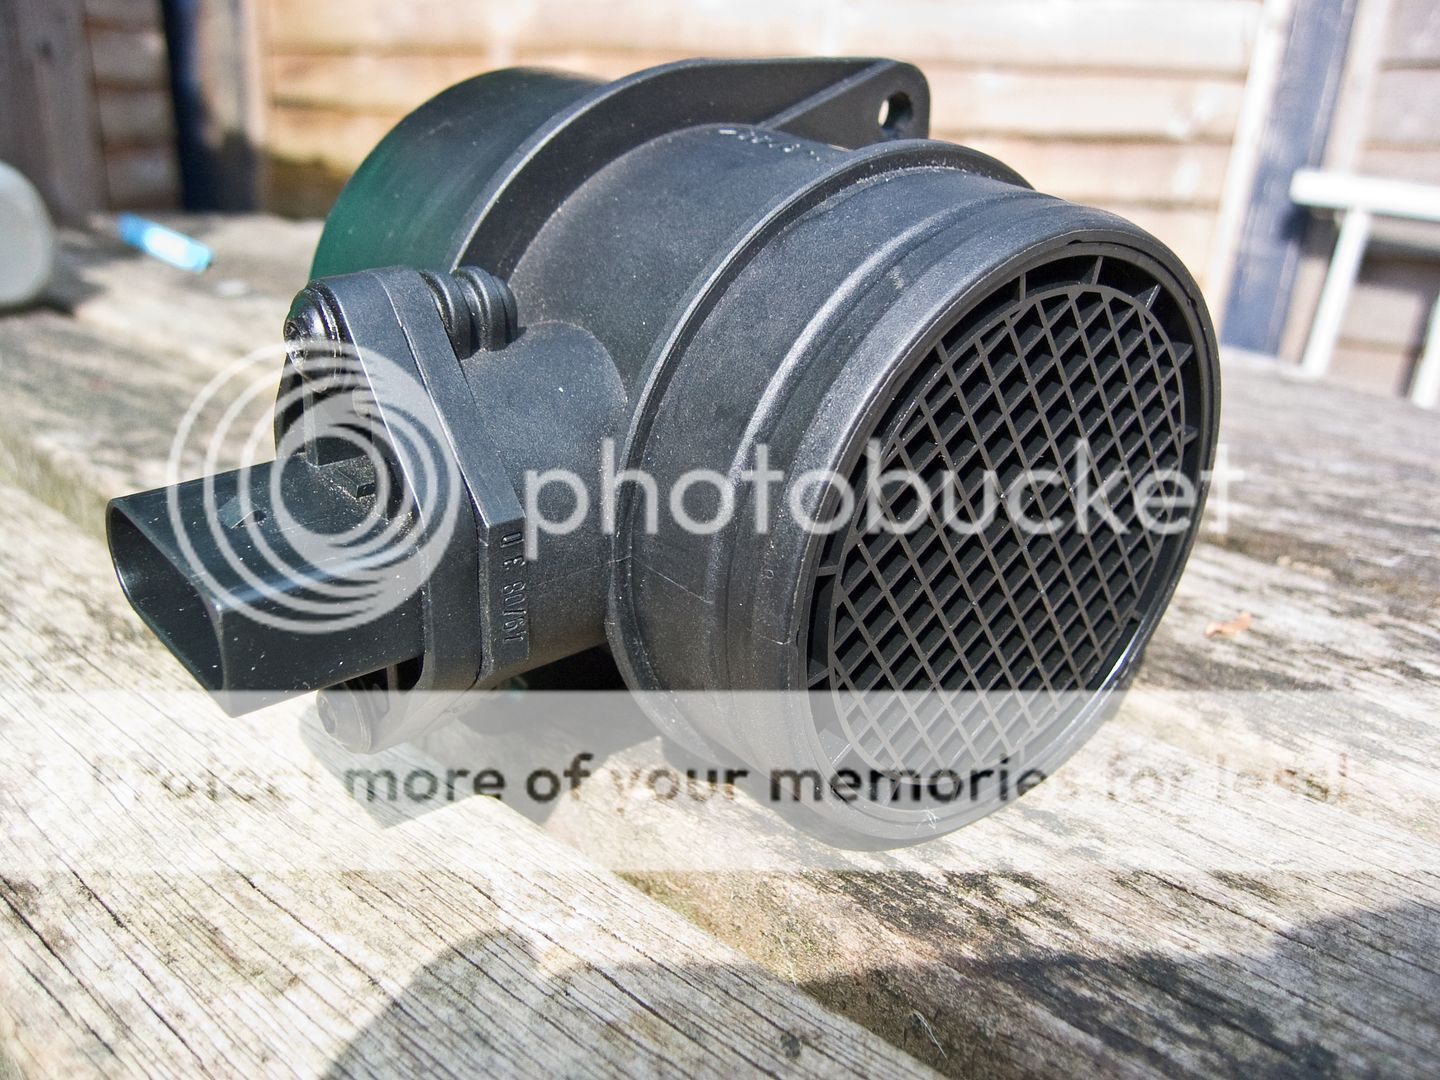
TIP side grille was an easy job to remove..


The airbox side less so... this is where the 'mesh' is. The plastic grille is retained in the MAF housing so I ended up having to push from the inside of the MAF while unclipping the retainers to allow the grille and mesh to pop out... I damaged the mesh doing this, good job its not going back in
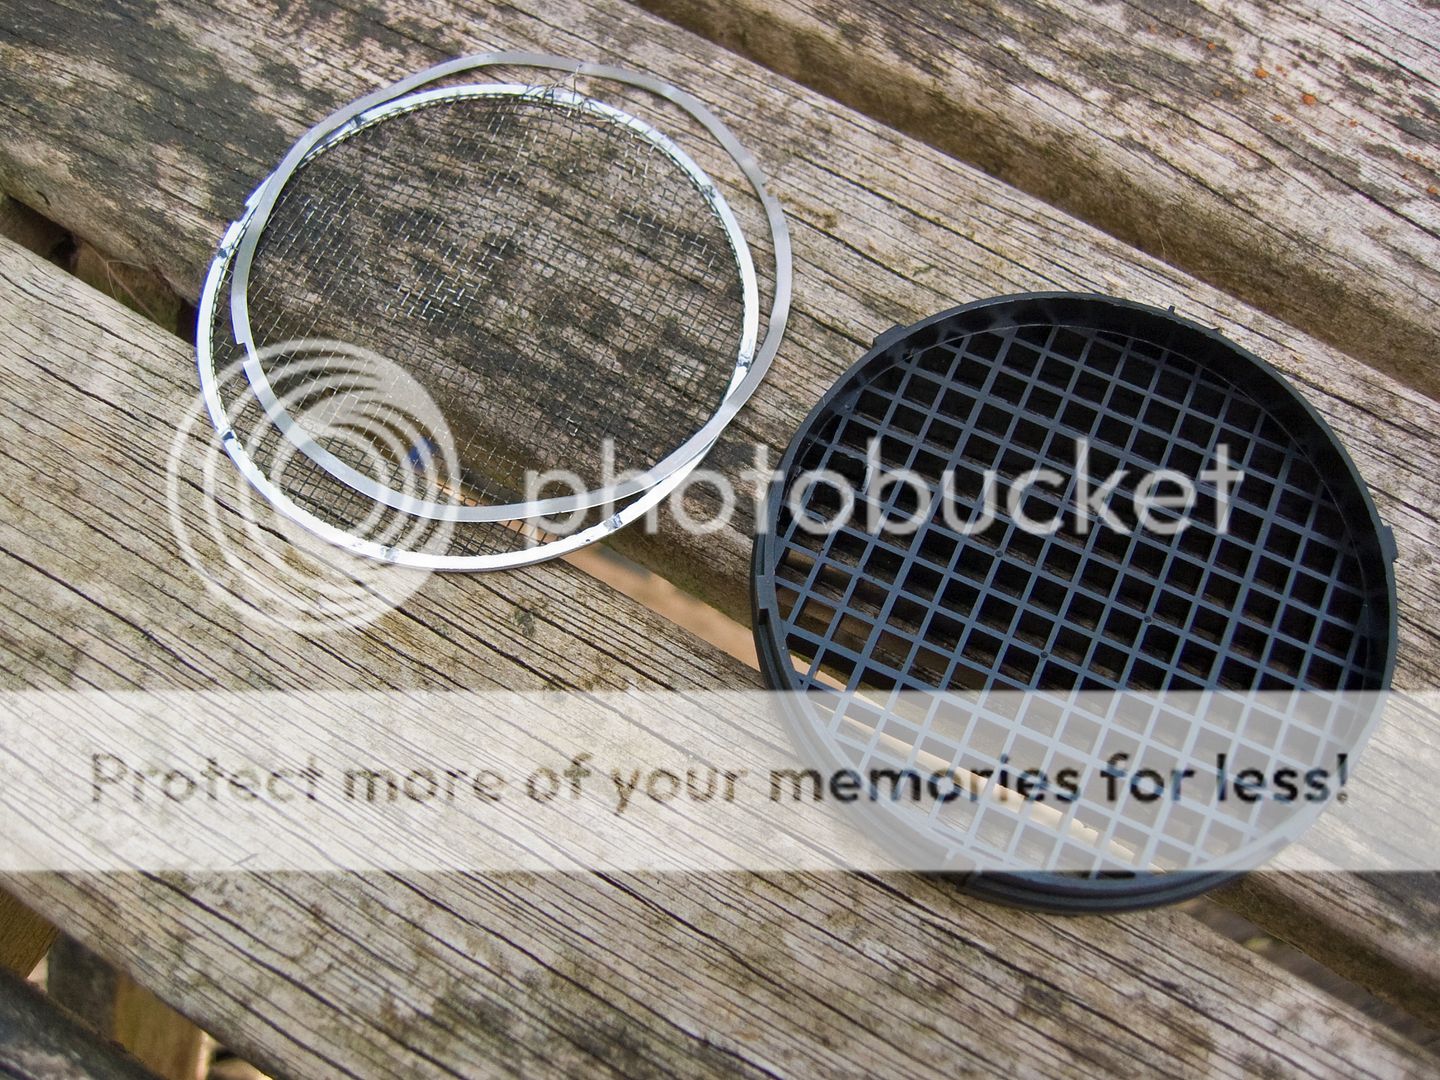
And there you have it, one de-meshed MAF...
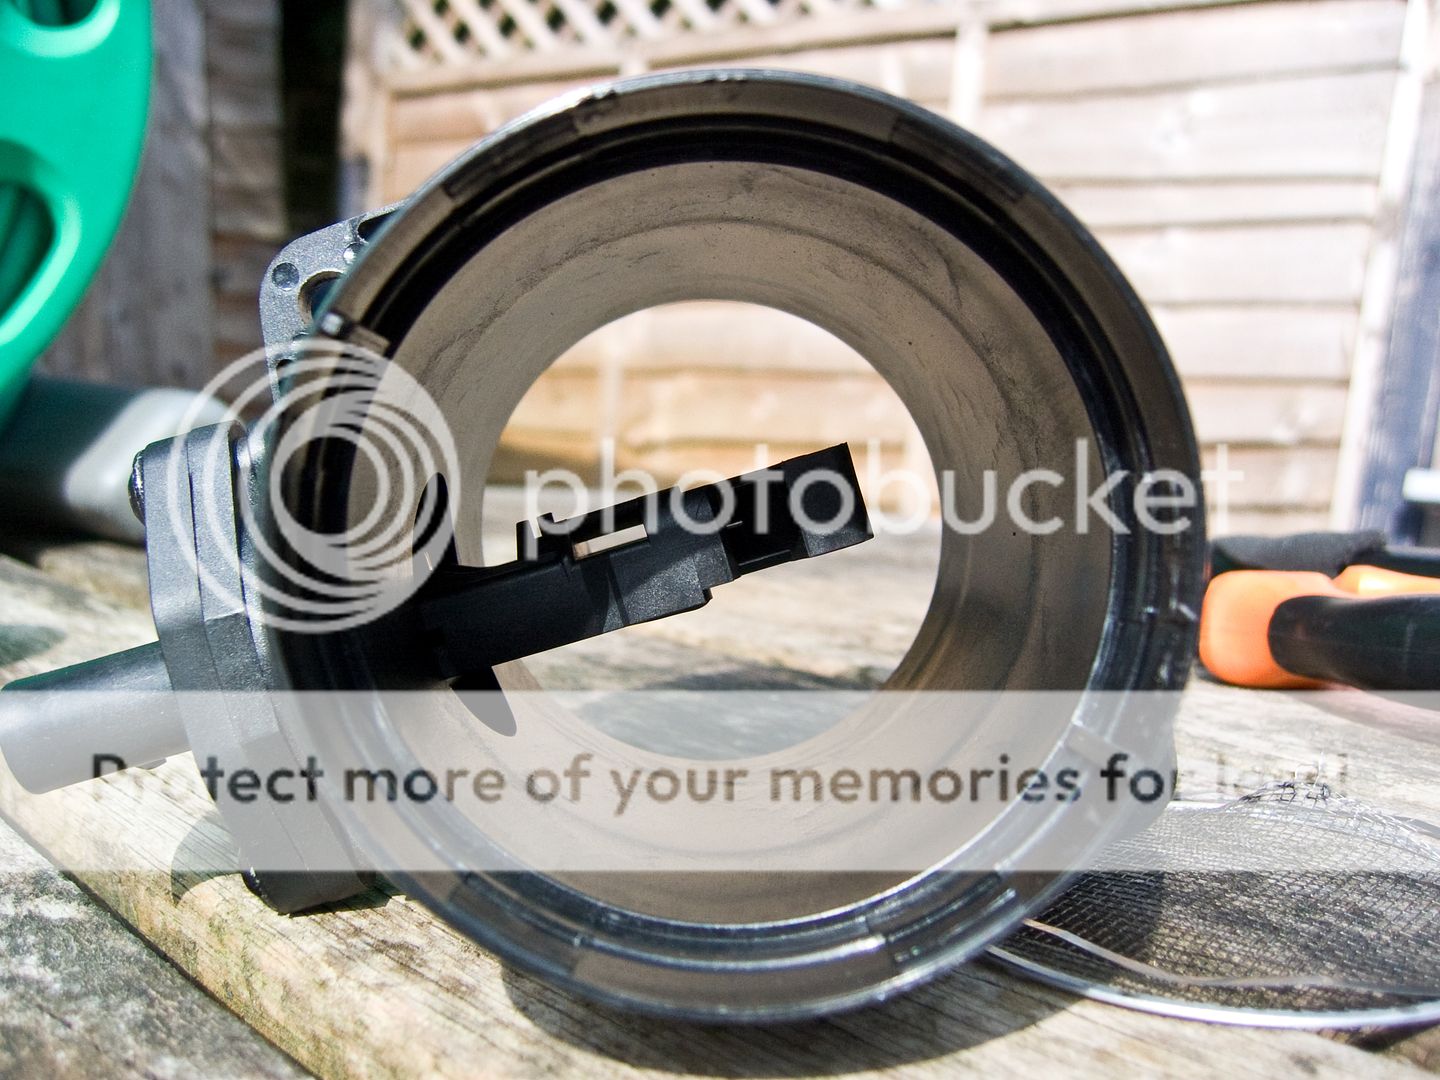
Fitted it back on the car and did a couple more runs.... got an airflow of 291g/s!!! same setting on the MBC, just a de-meshed MAF...
Not a bad increase for a hours messing about... 270 to 290 g/s :icon_thumright:
There is some discussion on another thread about the validity of this increase and the MAF ability to now accurately measure the airflow now that it can no longer be stabilised by the mesh screen... I am on the fence with this, I am not convinced it would over read the air but under read if anything at all. I will be logging block 001 amongst others to keep an eye on real time ECU correction to fuelling and keeping an eye on long term fuel trims to see if fuel is being removed or added in any great quantities that would back up a misreading MAF.
Hoping to get the new MAF, lambda and finally my EGT probe sorted next weekend if I and of course Bill can find the time.
Car is driving great at the moment, feels stronger than it has done in a long while... I is a happy chappy
<tuffty/>
I have tried an MBC (manual boost controller) before but without much success... I couldn't be bothered to play with it previously but thought I would give it another go...
Using a Forge UNOS MBC I bypassed the N75 completely (leaving it electrically connected and blocked the pipe going to the TIP) and gave it a try.
It was one that Bill had used on the Polo build while mapping so should be set about right... however, when I tried it I was still getting varying boost so I fitted the stiffer spring that comes with the UNOS, wound it back to its softest setting and tried again... steady 1.4bar this time... wound it up 20 clicks... over 2bar!! eeep!!... wound it back 5 clicks and it settled nicely at 1.8 (ish) bar....
Car was pulling nicely and it held boost pretty much up to the redline...sweet!!!
Think I will fit that in properly now as its just lazing about the engine bay at this moment (I have cable tied it in now)
Max airflow I got from that run was 282g/s... this is lower than I have been getting in the past as my MAF is a little tired... I have previously been only getting in and around the 270 mark where I have logged over 290 before... I have previously tried a MAF Bill had on the shelf and my airflow was back up at 292g/s so a new MAF and pre-cat lambda are on the shopping list for the end of the month.
The 282g/s was encouraging though as the MBC appears to be working nicely and maintaining boost keeping the airflow up. This was when I decided to have a go at de-meshing the MAF...
De-meshing the MAF has been discussed before and that ASN pioneer of modding Welly has done his... I am little sceptical but thought 'what the actual hell!!!'
Here we have an S3 MAF... grille thingy at the front (airbox side)
..and TIP side...
TIP side grille was an easy job to remove..
The airbox side less so... this is where the 'mesh' is. The plastic grille is retained in the MAF housing so I ended up having to push from the inside of the MAF while unclipping the retainers to allow the grille and mesh to pop out... I damaged the mesh doing this, good job its not going back in
And there you have it, one de-meshed MAF...
Fitted it back on the car and did a couple more runs.... got an airflow of 291g/s!!! same setting on the MBC, just a de-meshed MAF...
Not a bad increase for a hours messing about... 270 to 290 g/s :icon_thumright:
There is some discussion on another thread about the validity of this increase and the MAF ability to now accurately measure the airflow now that it can no longer be stabilised by the mesh screen... I am on the fence with this, I am not convinced it would over read the air but under read if anything at all. I will be logging block 001 amongst others to keep an eye on real time ECU correction to fuelling and keeping an eye on long term fuel trims to see if fuel is being removed or added in any great quantities that would back up a misreading MAF.
Hoping to get the new MAF, lambda and finally my EGT probe sorted next weekend if I and of course Bill can find the time.
Car is driving great at the moment, feels stronger than it has done in a long while... I is a happy chappy
<tuffty/>
Last edited:
- Joined
- Sep 14, 2008
- Messages
- 24,836
- Reaction score
- 6,078
- Points
- 113
- Location
- Wibbleton
- Website
- www.tuffty.co.uk
I thought you were going to go for a Rs4 MAF?
I still may do... depends how things go with the large port head etc... when Bill has got his dyno up and running then I will try an RS4 MAF housing to see if there are any gains from it...
<tuffty/>
I still may do... depends how things go with the large port head etc... when Bill has got his dyno up and running then I will try an RS4 MAF housing to see if there are any gains from it...
How is the head getting on,you built it back up yet? have you thought about giving the ports a going over while the valves are out.do you know when is bill getting his rollers?
- Joined
- Sep 14, 2008
- Messages
- 24,836
- Reaction score
- 6,078
- Points
- 113
- Location
- Wibbleton
- Website
- www.tuffty.co.uk
Head build is waiting on a valve spring compressor at the moment... Bill has a proper VAG one but it has a habit of marking the bores for the followers when used so he is looking into a way around that... when he has that sorted then I will be stripping the old valves out and getting the machining done ready for a clean up and rebuild with new guides and the supertech valves etc...
Not going to 'port' the head but may give it a tickle... will see when its stripped..
Bill has got his dyno but its not set up yet... be another month or so before its sorted tbh as he is very busy atm...
<tuffty/>
Not going to 'port' the head but may give it a tickle... will see when its stripped..
Bill has got his dyno but its not set up yet... be another month or so before its sorted tbh as he is very busy atm...
<tuffty/>
- Joined
- Sep 14, 2008
- Messages
- 24,836
- Reaction score
- 6,078
- Points
- 113
- Location
- Wibbleton
- Website
- www.tuffty.co.uk
Small update...
Been using the car this week for work to see how the MBC is working and new MAF... new MAF isn't flowing any more than the previous one since the MBC was fitted... logging on the way to Bill's Monday night I saw 290g/s... on the way home with the new MAF I saw 291g/s which doesn't mean a thing in the grand scheme of things..
Car feels more responsive now even driving around town off boost but on the open road its like a different car... I can only put it down to the wavering boost that was making the car feel lethargic and giving me varying airflow readings as it night and day different now...
As a result I have decided to mount the MBC properly....
...I will be changing the blue pipe for a black one

..and of course in keeping with my BT install, stealth/OEM...

Roll on tomorrow when I can drive her again
<tuffty/>
Been using the car this week for work to see how the MBC is working and new MAF... new MAF isn't flowing any more than the previous one since the MBC was fitted... logging on the way to Bill's Monday night I saw 290g/s... on the way home with the new MAF I saw 291g/s which doesn't mean a thing in the grand scheme of things..
Car feels more responsive now even driving around town off boost but on the open road its like a different car... I can only put it down to the wavering boost that was making the car feel lethargic and giving me varying airflow readings as it night and day different now...
As a result I have decided to mount the MBC properly....
...I will be changing the blue pipe for a black one
..and of course in keeping with my BT install, stealth/OEM...
Roll on tomorrow when I can drive her again
<tuffty/>
- Joined
- May 28, 2004
- Messages
- 10,217
- Reaction score
- 2,385
- Points
- 113
- Location
- nr Glos
- Website
- www.badger5.co.uk
- Joined
- Sep 14, 2008
- Messages
- 24,836
- Reaction score
- 6,078
- Points
- 113
- Location
- Wibbleton
- Website
- www.tuffty.co.uk
oil breather pipe looks linked over mate
Think its on it last legs tbh bud... be getting rid of all that in favour of a catch tank when we get the head on methinks
<tuffty/>
- Joined
- Sep 14, 2008
- Messages
- 24,836
- Reaction score
- 6,078
- Points
- 113
- Location
- Wibbleton
- Website
- www.tuffty.co.uk
Productive weekend...
Managed to get a chance to finish stripping the large port head ready for a skim and new valve guides...
The OEM tool a bit of a 'tool' to use, Bill has an idea for a rig that will hold the head still and make it easier to use but I couldn't be bothered to wait

...inlets are tight, have to be careful not to catch either the follower bore or the cam bearing...

20 ****** valves later!!!
Pulled out the stem seals next, the rubber on these were hard as nails...
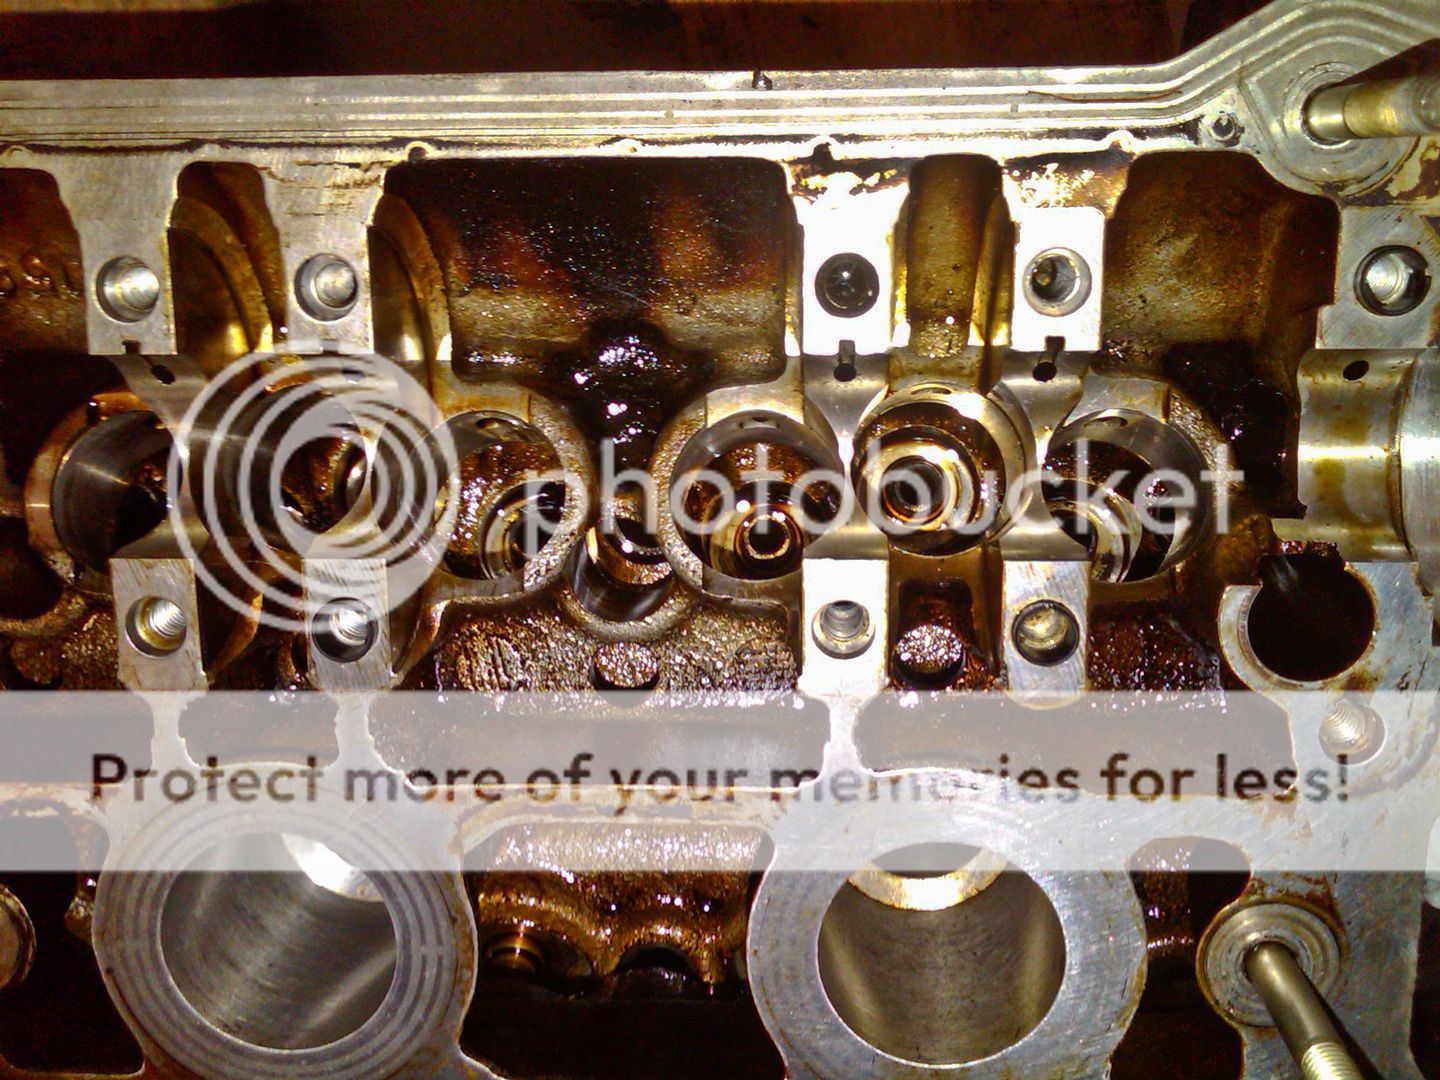
All done and ready for cleaning... I will get the machine shop to clean the chambers..
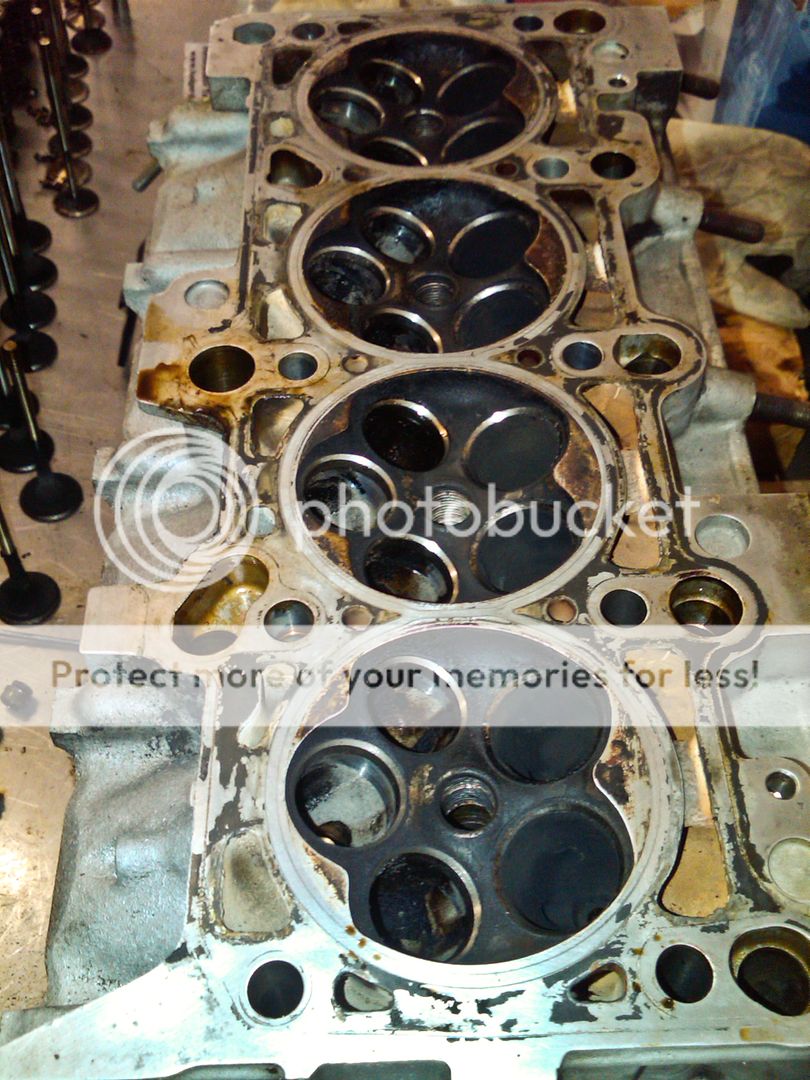
Into the parts washer and looking nice and clean now...
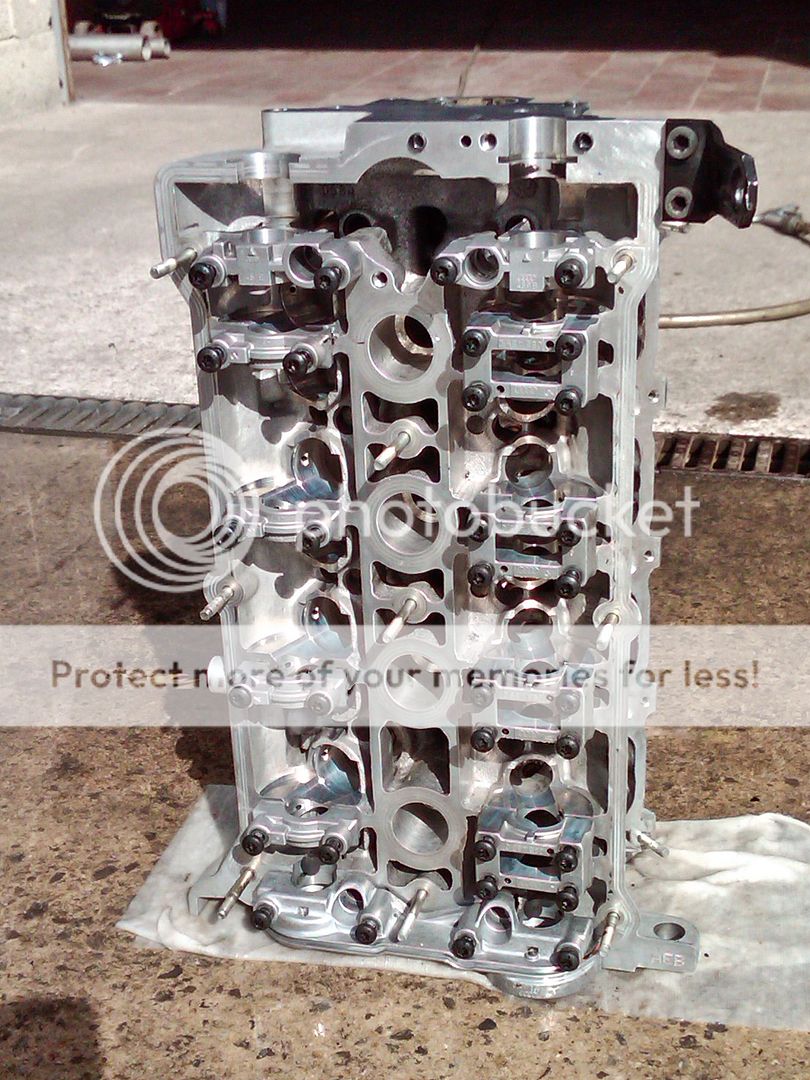
Thats it for now, will give the machine shop a bell this week to see when they can sort the work out for me...
As an aside, Bill has a couple of Mk2 Golfs in at the moment, I have been doing some work on one that has a 1.8t fitted to it and is getting a GT30 and Bill has been playing with the other fitting the very thing that effectively started Badger 5..
...and the money shot...
<tuffty/>
Managed to get a chance to finish stripping the large port head ready for a skim and new valve guides...
The OEM tool a bit of a 'tool' to use, Bill has an idea for a rig that will hold the head still and make it easier to use but I couldn't be bothered to wait
...inlets are tight, have to be careful not to catch either the follower bore or the cam bearing...
20 ****** valves later!!!
Pulled out the stem seals next, the rubber on these were hard as nails...
All done and ready for cleaning... I will get the machine shop to clean the chambers..
Into the parts washer and looking nice and clean now...
Thats it for now, will give the machine shop a bell this week to see when they can sort the work out for me...
As an aside, Bill has a couple of Mk2 Golfs in at the moment, I have been doing some work on one that has a 1.8t fitted to it and is getting a GT30 and Bill has been playing with the other fitting the very thing that effectively started Badger 5..
...and the money shot...
<tuffty/>
Last edited: