information req. on suspension fitting

scottie123

(●̮̮̃•̃) (●&#
Joined
Oct 4, 2008
Messages
1,972
Reaction score
3
Points
38
Location
(.) (.)
I am going to be fitting some eibach springs and dampers on the weekend to my car.


This is my first time ...oo er ... :)

Just a couple of questions i need to ask.

firstly, is the rear camber adjustable on the sportback, just need to know so i have an idea what the alignment cost will be after i have done it. The place i phoned to see if they do it asked the question.

Secondly, i dont suppose any one knows what/ or if torque settings are used when this would be done by a qualified audi shop sort of thing.
I dont want to be stripping any threads but i also dont want to putting not enough torque on.

Also, if any one has got any tips, etc , please feel free to say ..

heres to sunday and my car to stop looking like a tractor...:)
 
the rear camber of the 8p is adjustable - there is an offset bolt and it gives quite a good range of adjustment - the neg camber increases dramatically as you lower the car (pity the front doesnt too!)

i think standard was about -1.5 but i reduced mine to -1.0 at the rear after lowering.
 
the rear camber of the 8p is adjustable - there is an offset bolt and it gives quite a good range of adjustment - the neg camber increases dramatically as you lower the car (pity the front doesnt too!)

i think standard was about -1.5 but i reduced mine to -1.0 at the rear after lowering.

Have you noticed any tyre wear with the reduced camber?
Interested in that myself, should fill out the arc a bit better

cheers for the info dunk
 
On the rear all you need to do is remove the damper and change it by removing the 2 bolts at the top and the bolt at the bottom, with the springs just drop the bottom arm off so it swings down so you can remove the spring, to put the arm back in place with the new spring just use a trolley jack to lift the arm into place as you are going against the spring force, no need for spring compressors.

As for the front make sure you have an 18mm deep socket, you could use a spanner but an 18mm deep socket on a breaker bar would make life much easier to remove the tierod bolt, if you find that the bolt on the tierod moves with the nut then use an 18mm spanner and a allen key to hold the bolt still to undo it and to tighten it, you don't need to drop the driveshaft out or anything, remove the pinch bolt and just move the steering from lock to lock in order to get the damper strut out, keep the 3 bolts on at the top of the strut and use your foot to stamp the damper out of the hub, i sprayed some WD40 to help it move.
 
changing the rear camber from -1.5 to -1 isnt going to change tyre wear - if anything it should improve things - the main thing is trying to reduce the standard audi setup of more negative camber at the rear than the front, which tends to increase the understeer.

more negative at the front and less at the back , long with stiffer rear ARB will reduce the understeeer.
 
thanks robinA3. By the sounds of it, there is some very usefull information there.Especially the trick to remove the front damper ! cant wait till the weekend now :)

Cheers again dunk. I think the camber info will be really usefull as i have a set of 43 offset wheels on and they will be a squeeze for them to be within the arc line. Hopefully by changing the camber slightly at the front, it might just do it. How much movement on the top of the wheel would you expect to see by 0.5 degree adjustment? I would imagine some where around 2-3mm? (pure mathmaticle guess :) )

Borrowed myself some axle stands ready for the weekend also.

As i have said earlier, this is my first large mechanical job on a car. Never even jacked a car up till week ago neither! how sad. So i presume the best place for the axle stand is where the scissor jacking point is?
 
ohh

is it best to jack the whole front end /rear end , or just one corner at a time when fitting the dampers and springs?

:)
 
i did one corner at a time but there is no reason why you can't use 2 axle stands and do one whole side at a time.
 
sorry but theres no camber adjustment at the front at all - the only option is to move the subframe to ensure that both front cambers are equal

lowering the car will add negative camber however, - the -30mm springs should give you about -0.7 or so at the front

the rear gains camber much more by lowering and has adjustability

luckily with low offset wheels its usually the rears that catch - keeping the camber at about -1.5 with 43 offset should just about clear at -30mm springs - it might just catch one of the plastic liner bolts but these can be cut down anyway

Cheers ,

That is handy to know about the front camber not being adjustable. Will wait and see if the garage trya nd charge me for adjusting it when i get it done. When i asked for a quote on the phone a while back, he told me it would be adjusted and charged for.:)

So if i was to not touch the rear camber after lowering, would it be nearly right?
:whistle2:
 
If your just removing the shocker/spring I would imaging it will be ok. If you need to remove the bolt that has the adjustment, mark it with tipex so you can line it up again.
 
dropping the height will give you a big increase in rear camber - up to -3deg so you will have to adjust - the old 8L couldnt be adjusted so you had to buy adjustable tie bars or put up with it

there are 3 ways to adjust the front camber
1) drill new holes for the top mounts in the body - this is easy and cheap but non-adjustable and only has a limited range due to the design of the top mount
2) morego make a non-adjustable bottom arm which gives about -1.5 deg neg camber but it moves the bottom out not the top in, so fat wheels can still catch and it costs about £600 for an a3
3)k-mac top adjustable mounts give upto -3.5deg neg camber and a few degrees of adjustable caster for about £200 plus fitting, but they do tend to clonk on rough roads, but they work extremely well to improve front end grip, steering feel and reduce the lift on throttle
 
pictures would be good on how to do this, also if you do go ahead by all means jack upboth sides but only do one at a time, then if you get stuck you will have the other side as a reference if need be also the pictures can help.

Let us know how you get on !
 
There is a special tool for spreading the hub and to allow you to remove the strut from the hub. I would recomend buying this as it saves soo much hassle.

VW Part Number - 3424

Available to order from dealers for around £10 depending on your discount level.

Spreader3424.jpg
 
got the fronts done now after much hassle!!

Now doiung the rears.

Anybody know how to get access to the top bolt on the rear damper?

I am presuming you have to remove some trim inside the boot to do this?

instant help required!!
 
Pull the wheel arch liner aside and you should see two bolts, 13mm socket IIRC.

Be careful not to cross thread them when putting them back in.
 
yes m8!!!

worked a treat :)

will write up in abit........
 
Yeah did one shock & spring earlier today, would have finished rears but got dark & I forgot to replace the top plastic cap so had to take it all of again, lol, one thing on the rears, the existing shocks had a grey plastic locating trim on the top of the shock housing that stopped the black plastic tube from moving side to side, it didnt fit the FSD shock on the top so I dremeled out the centre more to make fit, anyone have this part aswell & did you refit or leave of.

Oh Marc I have some Eibach Pro 30mm for the quattro for sale if you're interested, I got of Robin for £110 then realised was for 4wd, yours is 4wd isnt it??

When I measured the springs they seemed to be 10-20mm shorter
 
Uh just out of curiosity, do the springs have to go up a certain way as I cant see any difference in ends & yeah there are markings just for part number & brand, but cant see anything that would make a difference.
 
Ok well although springs are same each end Damian@dpm advised to have them with printed name etc up right way, rears done, now fronts, joy.
 
well, all i can say is what an experience!

@ NHN . i put my springs in also with the writing facing the right way up :p

Have a bit of a problem from when i was doing the job, my camera has lost all the piccies :crying:

So the best i can do is give a description of what i did :p

In regards to the fronts....

Jacked car up, and used a axle stand under the aluminium like bracket which supports the wishbone strut. Nice and safe.

Once you remove the wheel, the first thing is to remove the anti roll bar fixed to the damper. 18mm nut 1 off.

Remove the steering tierod from the hub again this is a 18mm nut. As mentioned before, there is an imperial allen key fitting located in the bolt so if the tierod end spins , you can use a key to remove the nut. When the nut is off, it may need a small whack to free it up to remove it. (well mine did!)

Removing damper.

This wasnt as straight forward as i would have liked.

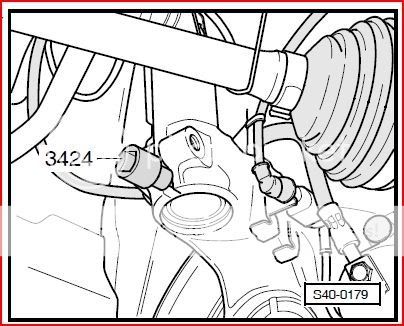
Firstly completely remove the pinch bolt from the lower damper housing.
Apparantly, the trick to removing the damper from the lower housing is to turn the steering from lock to lock while forcefully booting the lower hub to free the damper. However, i found this wasnt going to happen on my car. I found that there just wasnt enough distance between the top damper mounting and the lower at full extent to give enough space to remove the damper.

After much swearing, i decided to use my trusty bottle jack to seperate the 2 :)

Using the 'play' in the wishbone etc, i managed to jack them apart. When you have seperated the damper from the lower housing, you can then undo the 3 13mm bolts from the top to remove the damper. Access is gained to these by removing the front tray in the engine bay. You will have to remove your windscreen wipers is you want to take it off totally.

Use spring compressors to tension the spring, so you can then remove the top damper mount from the damper.

The is a iirc a 20mm nyloc on top of the damper and again a imperial fit allen key fitting. I found the only way to undo this was sabatage a sparkplug socket by removing the rubber insert, so this would allow me to insert an allen key down the middle to hold the damper shaft, while using a spanner to undo the nyloc with the spark plug socket. Improvisation rules!

Fitting the ne damper is the reverse of above. However, i again struggled to get the damper in the bottom housing again as there just wasnt enough distance between the top and bottom mounts to allow it to go in. Again, the trusty bottle jack came to the rescue.!

The rears.

From previous information given, i was expecting the rears to be a doddle, alas i must be cursed.

I placed an axle stand on part of the rear subframe box section so it was nice and sturdy.
Firstly , removed the fixing for the damper at the base. This is a 21mm bolt and very tight. Due to the restricted room, it took a while to undo :)
Once this is removed, take out the 2 bolts fixing the upper part of the damper . These are 16mm bolts. They are hidden behind the arch liner. You can get access to the by pulling the liner to the side, but i found it easier to just remove the arch liners so i made sure i didnt cross thread the 2 bolts when putting them back as the are at a funny angle and could easily be cross threaded.

The spring was also a abstard to remove. When robinA3 did his, he told me his rear springs did not need compression to remove from the housing , and also when fitting the new ones , he inserted the spring and used a trolley jack to compress the spring.
This unfortunately wasnt the case for my car:(

Due to the restriction of space around the rear spring, i had to cut down one of my spring compressors so it would fit behind the spring , and then used the other one on the front. Being very confined for space ,this took a while to get the right amount of pressure on the springs to be able to remove them.

Fitting of the new rear dampers and springs is the reverse obviously as above :p


I was given a price of £200 for fitting the dampers and springs by a local garage. This also included tracking afterwards. I decided to do it myself as i thought it couldnt be to hard .

Well i started at 8 in the morning , and finished at 6, so all in 10 hours. Lot longer than i thought.

Anyway, i have had the car laser tracked today and all the cambers checked, and everything has been tweaked to get in perfect now. All the tracking on each wheel was slightly out, and also, as expected the rear camber was to . Also adjusted and good now. Cost me £60 at STS.

I have now had a days worth of driving the car with the new suspension, and i am looving it :)

The eibach springs and dampers together, really are the dogs reprodutive sacks!

They are not to hard, not to soft , infact just perfect. On casual driving, they really dont appear to be much bumper than the tractor suspension which was on previous. However, start chucking it round a few fast bends, and the transformation is amazing. As the saying goes 'sticks like shiet to a blanket'.

I was also worried that as i was running a 43 offset wheel, i mayt have rubbing issues over big bumps. Happily , none what so ever. I have to change my tyres to a 225 from a 235, but it is worth it !

So all in all i am happy :)

I took these couple of piccies on my phone cam, luckily, so at least i have some piccies.

Before

DSC00893.jpg


After

This is just after they were done, they have already settled a lot more, especially the rear, so i will get some pictures on the weekend of what it has settled to.

DSC00896.jpg
 
As for the front make sure you have an 18mm deep socket, you could use a spanner but an 18mm deep socket on a breaker bar would make life much easier to remove the tierod bolt, if you find that the bolt on the tierod moves with the nut then use an 18mm spanner and a allen key to hold the bolt still to undo it and to tighten it, you don't need to drop the driveshaft out or anything, remove the pinch bolt and just move the steering from lock to lock in order to get the damper strut out, keep the 3 bolts on at the top of the strut and use your foot to stamp the damper out of the hub, i sprayed some WD40 to help it move.

Slight correction, its not an alan key on the end of thread for the top connecting link to shock absorber, it appears to be a star head as I have now found out after sticking alan key in & what looks like the link has already been worked on as the socket is screwed so checked other side, so new connecting link, good start to the monday!!!!!!!
 
I think you'll find it's actually a splined tool for the end of the drop links and the track rod ends.

I have found the easiest way to do the fronts is to remove the entire hub from the car so in addition to the guide above -

Remove the plug for the ABS sensors and the brake pad warning (n/s only)

Disconnect Xenon self leveling sender.

Undo the large nut on the drive shaft, remove the two bolts holding the brake caliper on and tie it up, remove the 3 nuts from the bottom ball joint. Push the bottom wishbone down to release the threads clear and then using a socket gently tap the end of the drive shaft to push it free of the hub.

A little extra work but this allows you to remove the entire strut and hub away from the car and seperate the them on the floor/bench.
 
Yeah you're right spline as went out earlier in the ******* rain to check with my spline set as bothered me, but star, spline whatever you wanna call it, it isnt an allan key lol, you get the just

As for removing the whole hub for a shock change, IMHO thats totally to much work needed to just change the shock, it might be my 1st go but even I can see thats an overkill from my experience on my cars, but given I personally have to change the brakes anyway I will consider it Stu, but not for just shocks.
 
I've done quite a lot of these suspension changes and I have found it easier to drop out the entire strut assembly. Just my method, everyone will have their own preferences.

The 'correct' method detailed in the manual does state to remove the drive shaft from the hub, leave the hub in situe and use a special tool to support it.
 
you & your manual, lol, pity they ****** well covered the top bolts with the plastic trim & wipers have to come of to get to bolts.
 
lol classic phrase :rtfm:

Hey quote your manual all day long fella, doesnt bother me & more than welcome, just funny thats all
 
I myself didn't have any trouble with getting the damper out of the hub, but maybe because they have been out before. On the rear, I undid the lower wishbone from the hub to remove the spring, once again, this had been out before so was pretty easy to do.

For the scuttle I just lifted it up slightly. I didn't think it would just pop off it I took the wipers out, looked like it was secured elsewhere.

Also a 5mm allen key does fit into it. I assume it is a star fixing and not a torx as mine wouldn't fit in securely whereas the 5mm did feel nice and snug. Will have to see what star fitting it is.

Anyway now have a set of KW V1's for sale, roll up roll up :)
 
well a 5 allan key was what I tried after Robin said was & you're right it fit very snug, until I realised someone had fecked up the spline socket which is why I saw it as an allan key fitting at 1st, which inturn made me check other side & realised wasnt allan key socket afterall, lol.

I know I tried a T30 torx, think was nearer the T25, but did try a spline head & it fit perfectly but cant remember which size, will know tomorrow.

Ok Stu does the emmanuelle say that you can use the abs systems to bleed the brakes or is it manual as I've read somewhere you can use the abs system to do this aswell, just curiosity really fella.