Lorryz S3 8l

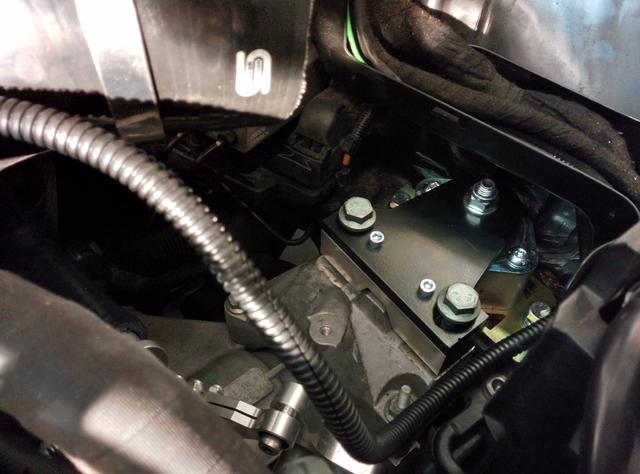
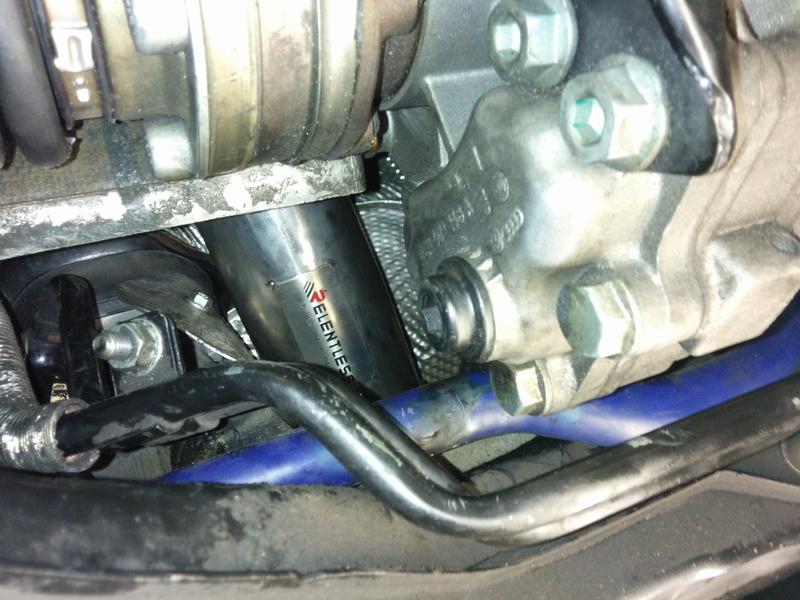
I got a few things done this weekend. Starting with the gearbox dog bone bushes.
img0593eo.jpg


I had previously fitted the yellow bushes to the dog bone, but i forgot to replace the centre circular bush.
img0596if.jpg


I used a vice, 20mm socket and a couple bits of wood to push the old bush out.
The rubber in the bushing fell apart in my hands, so it was well over due for changing.
img0597kl.jpg


I used the same method as above to push the new poly bush into its home.
Once fitted, the car felt better under heavy load shifting.
p1000441xg.jpg


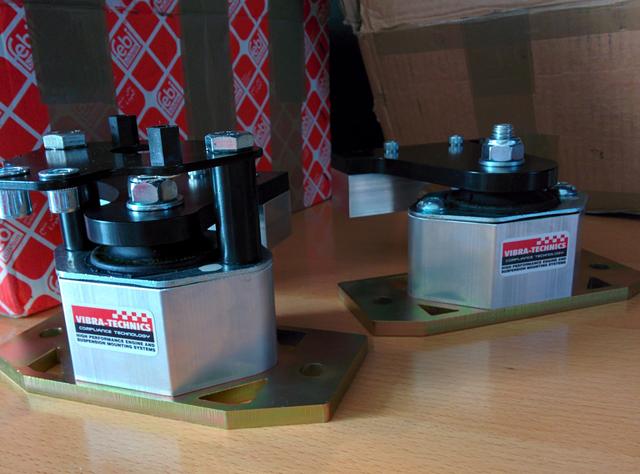
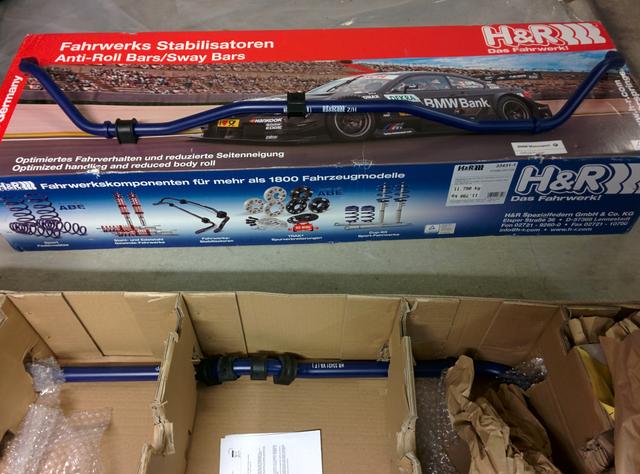
Next, I fitted Neuspeed RS adjustable control arms.
I wanted to fit polybushed arms after hearing other members having issues with ball joint bushes. But i got these for a good price and so far haven't had any issues.

I fitted them as the top arms, since they were to big for the light auto level bracket.

I found it surprisingly easy. 3 bolts per side and I was done.
img0603kr.jpg


p1000451y.jpg


p1000454l.jpg


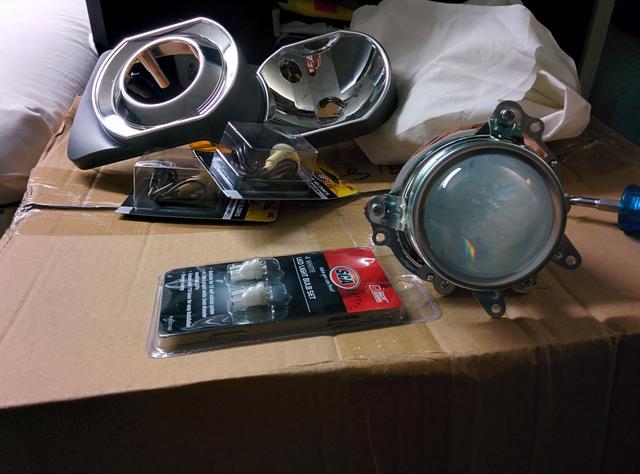
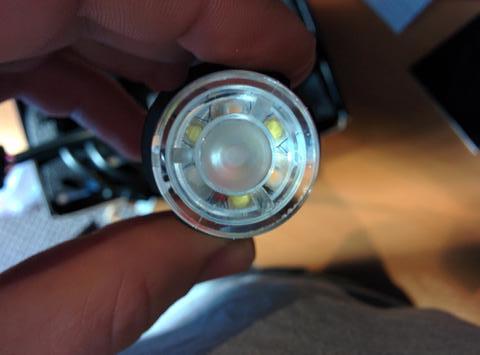
Next on the list, Aero-wipers. A set of late mk4 arms and wipers popped up cheap. So i snapped them up.
p1000476k.jpg


And i got the polo aero arm and wiper to match.
p1000479n.jpg


Last job were the brakes. I was due to fit new pads and rotors on the rears.
While i was there, i gave them all a new coat of paint.
p1000481t.jpg


p1000482o.jpg


p1000484l.jpg


p1000486z.jpg
 
Last edited:
  • Like
Reactions: jaykay8L and s3dave
Looking good mate. Those Neuspeed arms look really awesome quality. A guy in europe has been running them with the original rose joints for 75,000 miles so they're probably decent quality :)
 
Hey, amazing looking car there mate. What colour is it?
 
Looking good mate. Those Neuspeed arms look really awesome quality. A guy in europe has been running them with the original rose joints for 75,000 miles so they're probably decent quality :)

Ah, awesome. That makes me feel better :)
They looked like good quality items, but i haven't seen many people with them ( I guess there a bit over priced).


Hey, amazing looking car there mate. What colour is it?
Thanks mate, I believe its Dolphin Grey.
 
Another small update. Got big things lined up for the next few weeks.

But this weekend I installed a Creationsmotorsport stainless steel footrest. Its rubber backed and comes with everything needed to fit.

Plus it looks pretty sweet.
qms9.jpg


Next I installed some footwell lighting, to show off the petals and provide some courtesy lighting.

Cheap and easy mod, I used some red LED strips with sticky backing.
And I wired it into the Light switch. So it comes on with the the rest of the red interior lights.
ior9.jpg


The pictures don't do it much justice, but this mod does look very good at night.

And it it looks like standard lighting.
5gci.jpg
 
AH Fab v2 Front mount intercooler turned up yesterday. Its a quality looking cooler.
Should make a bit if a difference when summer comes around.

6ftq.jpg


4evk.jpg


Unfortunately, It did sustain some damage while in transit.
48xt.jpg


It looks like the passenger side pipework took a pretty big knock.
n4fa.jpg


I pushed the dent out as best as I could. Hopefully it will hold boost. Now waiting on the silicone pipes to check my bodge.
968o.jpg
 
Ok, So I got the AH Fab v2 cooler fitted. As per the fmic thread.

I needed 2 x 63mm 90 deg alloy bends and 2 x 63mm silicon 90 deg elbows to make this work.

However, i found that the pipework on the passenger side, didn't quiet line up with the stock oem straight hose.

So for the test drive, I improvised and used the kinked rubber hose that connects the stock driver side cooler to the center connector pipe. And it worked a treat.

ijh4.jpg


Test drive ready.
835p.jpg


I probably could have left the oem hose on there. With no problems.

But I decided to replace it with a fresh 63mm silicon 45 deg elbow. While i still had the bumper off.

esvg.jpg


Trimmed down bracket for hood latch and horns moved to the usual spot on the passenger side.
y6dl.jpg


Everything back together and the car is looking meaner than ever. Can't wait for summer.
y4ic.jpg


klnl.jpg
 
  • Like
Reactions: jaykay8L, Sam_, bigray and 4 others
I used that same OEM hose (I think I said in the thread at some point) and still do to this day. How did you find the bumper trimming? I still need to take mine off and trim some more when I replace the horns. Might be a job for this weekend if the weather's decent.
 
I used that same OEM hose (I think I said in the thread at some point) and still do to this day. How did you find the bumper trimming? I still need to take mine off and trim some more when I replace the horns. Might be a job for this weekend if the weather's decent.

Yeah i did trim a bit behind the grill. And yes it was very tight... still is tbh.

The main issue i had was the bolts holding the lcr splitter fouled on the cooler, so they had to be ground down a bit. And i put some 3mm thick rubber down to stop them rattling.

Yeah I have a set of hella supertones to go on. I just need to find them.
 
I've always found the horn on these cars a bit weak, so I went for a dig through my storage and found a set of Supertones from my old subaru.

I could have hidden them down where I put the stock horns, but I wanted to see how they'd look on an audi
edmk.jpg


I attached them using a bit of flat bar, as that's what I had hanging around. And it works fine.
But if I was going to spend the money, a 90 degree angle probably would have been the better choice.
8oop.jpg


Air temp sensor re-relocated back to its stock-ish location.
n6fk.jpg


I might black out the audi rings. A job for another day.
c20j.jpg
 
  • Like
Reactions: sssline and Sidey
I bought this heat shield ages ago from liquids3 and have finally gotten around to fitting it.

It looks very oem after a coat of silver manifold paint.

vznc.jpg


Next a gave plasti dipping a go.
I must say I love this product, as its 100% reversible and a 1000 time easier to use over something like vinyl wrap.

2y4e.jpg


For the rear, you simply mask off the badges, spray it on and peel off the excess. Amazing.

6569.jpg


c543.jpg


8bxb.jpg


p2al.jpg


wz8s.jpg
 
  • Like
Reactions: sssline, crispynz1 and Sam_
what heat shield is that? Where did you get it?
Looks good that black painting you did but now the mirrors are only chrome thing on your car and seems to me that not fit well anymore on car but thats just my opinion, its your car and if you like it then is ok.
 
I bought this heat shield ages ago from liquids3 and have finally gotten around to fitting it.

It looks very oem after a coat of silver manifold paint.

vznc.jpg


Next a gave plasti dipping a go.
I must say I love this product, as its 100% reversible and a 1000 time easier to use over something like vinyl wrap.

2y4e.jpg


For the rear, you simply mask off the badges, spray it on and peel off the excess. Amazing.

6569.jpg


c543.jpg


8bxb.jpg


p2al.jpg


wz8s.jpg

How long do you think the plastidip will last, or is it a temporary measure to see if you like it's all blacked out?
 
what heat shield is that? Where did you get it?
Looks good that black painting you did but now the mirrors are only chrome thing on your car and seems to me that not fit well anymore on car but thats just my opinion, its your car and if you like it then is ok.

I bought I from a member off here named liquids3. It was probably well over a year ago now. I have no idea if he still makes them.

I see what your saying about the chrome mirrors. In the flesh, there is enough alloy on the car with the wheels and the fmic to tie in the mirrors.

Personally I think the alloy/chrome mirrors on all S and RS model audi's help make the car, what it is.
 
How long do you think the plastidip will last, or is it a temporary measure to see if you like it's all blacked out?

I believe it meant to last a while. If it gets chipped, you just peel it off and spray more on. Doesn't get any easier than that.

I removed the front grill to spay it as I had the bumper off already. But you can do it with the badges still on the car. It just requires more prep work like with the rear.
 
Awesome work mate! The front end looks immense. Was in two minds about the Cupra splitter, but after seeing yours, think I'll definitely get one now ;)
 
Hi all, I had a few more things turn up.

Firstly, Silver project camber plates. I wasn't in the market for a set, but they popped up at a really good price.
I will be fitting as soon as my new sway bar links arrive.

dlT9pjZ.jpg


Second, A set of Ebay headlights.
After a few disappointing headlight restoration sessions. I decided to buy a set of cheap donor headlight units strip for parts. Mainly the exterior glass/plastic.

FOfAHmL.jpg


While I had a set of throw away headlight on the bench, I decided to experiment with a DRL (day time running light) Idea ive had for a while. Which utilises the projector lenses.

I'm Actually quite happy with how it turned out. And I will do a full howto this weekend when I incorporate it into my OEM headlights.

QIOq0XI.jpg


Z8Gz5XN.jpg
 
Very cool. I've wanted to sort out the sidelights on mine for a while but put it off. I was going to just fit LED sidelights though. I know what you mean about polishing the fronts. Still not happy with mine....
 
As I mentioned in my earlier post.
I bought a pair of cheap ebay headlights so I could pinch the exterior glass and reuse it on my OEM headlight unit.

I then tried a DRL idea I had, on the cheap lights (as I had no further use for them). And it turn out pretty well.

So I incorporated them into my current headlight units and here's a quick how to, for anyone that is interested:

Needed
- 2 x T10 LED's - White ( I chose a simple 4 bulb smd style, as it should resist the extreme heat of the xenon bulbs.)

- 2 x T10 lamp holders - I picked push in types.

- 2 x Rubber Grommets 5/16"i.d X 9/16"o.d (optional)

- Drill & drill bits

- Heat gun or oven to separate headlights.

- Wiring

This is how cloudy and pitted my headlight looked prior to the swap.

M1z5dFG.jpg


9neI4o3.jpg


You remove the internal headlight assembly winding the alignment cogs clockwise until it pops out.
f5PiyTk.jpg


The projector is only held to the shroud by 3 bolts
Rp2cBMU.jpg


Then the lens can be removed, leaving the plastic cone and light shield.
OmXWzuR.jpg


I'm using the push type T10 sidelight holder borrowed from my second headlight set.
Since its small and easy to install.
eTbG018.jpg


Next, I drilled an appropriate sized hole for the bulb holder.
The projector cone is made of plastic, so you must start small and work up to the larger dill bits.
yI09AiT.jpg


I located the hole at the bottom, slightly off centre. Due to the shape of the projector.
Try to locate the hole as close to the projector shield as possible.
fI1ZeBp.jpg


I fitted a 5/16"i.d X 9/16"o.d Rubber Grommet to help secure the T10 bulb holder.
pZ7Hd5x.jpg


This is how it should look,
In this location the LED is out of the way of the xenon bulb and wont disrupt the main beams light output.
KHxw8qX.jpg


Rt9oW4D.jpg


I drilled and located new wires for the LED here.
4NK473f.jpg


Bolt everything back together and test before resealing.
OTabY5S.jpg


And Yes I did paint my headlights red.
UC8IMiq.jpg


Wire into an ignition 12v live. I use the one under the drivers dash.
J0i9hgh.jpg


No Daytime pics yet, I need to give the car a good clean first.
IKqLxj9.jpg


AntbT4D.jpg


omaM0UC.jpg


Final note: They won't be as bright as real DRL's, but the look a whole lot meaner.
You could probably make them brighter by using larger LED, but then you run a larger the risk of them failing.
 
  • Like
Reactions: vrbob
Good work nice to see more people making their own mods and that defo looks better than the aftermarket LED strips everyone uses
 
Fitted some Vibra Technics engine mounts today. Amazing improvement, although my OEM engine mount were like jelly.

Still, I would recommend the investment to anyone. I wish i sorted the mounts sooner.

2zj3aHT.jpg


Utf20z7.jpg


Engine side mound just fell apart when I removed it. I'm guessing it was doing basically nothing.
tPOnBFK.jpg


I also got my catch can. Hopefully will fit tomorrow, when i figure out where it will live.
QDyqeb7.jpg
 
Recently I decided to fit a set of aftermarket sway-bars to the car. I went for the H&R 25mm front and 21mm rear set up (33431-1).
Once fitted, I found setting the front on its softest setting and the rears at there tightest to gives the car a good neutral feel.
So far, I'm pretty happy with my investment.

ZcJb9R7.jpg


Since fitting the front bar is such a PITA, I also decided to replace a bunch of parts while I was down there.

Here's the list I compiled with part numbers and torque figures for those interested.
- Left hand Sway bar link 1J0411315D
- Right hand Sway bar link 1J0411316D
- Powerflex front bush 45mm for wishbone PFF3-501
- OEM Audi TT rear bush for wishbone 8N0407181B
- 034 motorsport solid subframe Bushing Set. 034-601-0003

nBM2ire.jpg


- 2 x Ball Joint S8N0407365C
- 6 x Ball joint to wishbone nuts N10332002
- 2 x Ball joint to hub N90808801

- 2 x Rear wishbone Bolt N10262202
- 2 x Nut for rear wishbone bolt SN0150816

- 2 x Bolt for front wishbone SN90484004

Ball joint nuts (3) - 75 Nm

Ball joint to wheel bearing housing - 45 Nm

Sway bar link to wishbone - 25 Nm

Wishbone to subframe bolts - 70 Nm + 90°
It looks these are stretch bolts and should be replaced, but I put new nuts and bolts on everything since they were cheap.

iqBmkzW.jpg


Like a lot of people, I found it impossible to fit the stock sway bar bolt, due to the new bushing being fatter.
So I replaced it with the slightly longer M8 x 1.25 x 25mm bolt.
I9IQGJ3.jpg


Final note, I didn't have access to a mechanical press to remove and fit the new bushings.
My best method of removal was a power drill through the old rubber then a hacksaw to the old aluminium bands.

For fitment. I bolted my vice to some plywood, stood on it and slowly applied my weight to the handle. The new bushing went in really easily then.
FqZshva.jpg
 
  • Like
Reactions: Sam_
I also bought a Triton V3 led 6000k switchback kit. These things are seriously awesome.
I've been trying to set up daytime running lights in my car for a while now and these are the first things im truely happy with.
The only downside I've found so far is the price, they ain't cheap.

ZMb8QKk.jpg


I found with my previous attempt, the light output wasn't great. At lease not at the drl standards i was looking for.

The trition V3 doesn't have this problem as its fitted with 6 Philips Rebel 3W LEDs (3 white, 3 orange) and these things are blindingly bright.
Vxorjrs.jpg


The bulb is a universal design and theoretically could be fitted to any vehicle. It went into the s3 easily enough.

I opted for the optional hardwired adapter (3 wires, orange, red, black) and just wired the orange and black into the blinker harness. I then ran the red wire to an ignition live, to enable the day time running light, so its on when ever the car is on.

The white wire is an optional dim (dims the output by 50%). It's meant to be wired into the headlight so it lowers the light output at night. Id recommend doing it as these things are way to bright and scatted for night time driving.
UcSzofH.jpg


The most convenient spot i found to mount the box was under the headlight, so it would get a bit if air flow encase things got hot.
fzIK6Vp.jpg


Here are a few pics of them running.
7kGzmLw.jpg


RtAbsIS.jpg


I like how it looks like it could be OEM.
4boFzvw.jpg


The blinker active.
dBdz6zB.jpg


I will have to get a few more shots when its dark.
 
  • Like
Reactions: Rogue.Goofball, A3-Lee and Sam_
I moved to a new city about 8 months ago and the first thing I noticed was how shocking the roads are.
And once I overhauled the front bushings on the s3, it became clear that coilovers just weren't a suitable match for a inner city auto.

So off came the Bilstein PSS B14's and on went the Bilstein B12 Pro kit with the Powerflex poly strut top mounts.

ZtgQULh.jpg


Interestingly, the downgrade didn't transform the car into a super soft comfortable gt car.
The changes were quiet subtle, And my guess is that the B14 pss kit was still a very well balanced setup, but it was just to highly strung to cope with potholes, speed bumps and manhole covers effectively.

Overall I believe it was the right decision, the low profile tyres and big swaybars probably don't help. But the car is definitely more daily suitable than it was.

sGKrLln.jpg


Then less than 48hrs later I got sideswiped by a ute and trailer. And my first thought was "Oh S*** my new suspension".

BXJaWIK.jpg


The offending driver reckoned he didn't seem me, so maybe my daytime driving light retrofit wasn't so successful.
But i think he just didn't look, and you can't really prepare for poor driving.

Fortunately ( Or unfortunately) because the my cars wide offset, the front passenger wheel took the brunt of the impact. Luckily it didn't bend the wheel or cause any damage to the suspension.
So it could have been a whole lot worse.

28ImXWO.jpg


The trailer ended up hitting every panel on the passenger side and both wheels. So I'm super glad i was insured.

And it found out that S3's have aluminium doors, that deform really easily from small impacts.

me1z9Au.jpg


sgNDI9N.jpg


To take my mind off my car woes, I picked up a shiny relentless downpipe and cat.
I'd been putting it off for a while as I always figured id go big turbo, but it was relatively inexpensive (for an audi part) and hopefully it will improve the dull exhaust note.

PN9YFOg.jpg


e8RoQN3.jpg
 
Last edited:
No way :( Sorry to hear about the damage. Make sure you take it to a decent place (not Audi Artarmon!) to get the repairs done.

I know what you mean about Sydney roads. I just had to replace the rose joints in my top mounts because of all the sodding pot holes. I have quite a good pot hole radar these days.

Lol, I actually thought Sydney wasn't that bad. I'm up in brisvegas now and its shocking.
 
I joined the installing a 3" downpipe on jack stands club this week. Can't say I would do it again, but it was thoroughly satisfying once the job was done.

The old one came out in three pieces, then to get the new one in. I needed to lower the sub frame and undo the drive shaft.

I also chopped a 17mm spanner in half to tighten the turbo bolts. That made the job a lot easier.
ptUkB7f.jpg


OVahy0D.jpg


JTMKJlK.jpg


Once I had the downpipe in, I took the Cat section to my local exhaust shop. I got it modified slightly since the angle from the downpipe end was a bit wonky.

It fits good now.
sHvpLi5.jpg
 
  • Like
Reactions: jaykay8L
Nice project mate! Like the headlight mods. I will start modding my foglights with HID projectors this week.
 
An Update!

I've been quiet busy in the last 4 1/2 months since my last update. So unfortunately, I haven't had much time to fiddle with the car or take photos.

In that time, I had all the cosmetic damaged fixed on the car. Which included a new passenger door, fender and front bumper, as well as a refurb to the wheels (pictures to come).

But this week, I had a new toy arrive and warrant an update post.

TMAP-1.jpg


For those that don't know, this is HPA's new TouchMotion Haldex controller (for gen 1 Haldex units).

Supposedly a replacement for the blue and orange controllers.

The big advantage (other than being cheaper) of this unit, is its plug and play.

Second being mode adjustable.

TMAP-2.jpg


I was one of the lucky people that signed up to the group buy, back in June 2014.

8 months later, it finally turned up.

JRvPwgE.jpg


As I said earlier, its plug and play. This the T wiring loom that joins the Haldex unit to the new piggy back computer.

Ynp0voS.jpg


The haldex wiring harness is located just in front of the exhaust back-box. And is hidden behind this plate and 2 8mm bolts.

keprlha.jpg


Plugged in.

LzFsj43.jpg


I use the existing metal clip and a couple of zip ties to keep the new wire harness well away from the exhaust heat shield.

lHD1RQ4.jpg


I then brought the new harness through the conveniently located grommet under the spare wheel.

yCpbuGj.jpg


Added another zip tie, to stop the harness from slipping back down onto the hot exhaust.

wMC9KBJ.jpg


I then installed the new computer to the back of the boot using double sided tape.

This is it's semi permanent home.

I intend to move it, then fix it permanently inside the sub-box cubby. If and when I install a new sub-enclosure.

But this will do for now, It's out of sight and out of the way.

bbV27CV.jpg


Spare wheel back in and nothings hanging out.

GY4f2TT.jpg


The install took me 45 minutes tops, while taking photos.

The piggy back computer now connects wirelessly to the touch screen controller. Allowing you to change the settings remotely.

The computer will then remember the settings and default to them every time you start the car. Allowing you to keep the touch screen off and in the glove box. And only pull it out when needed.

I haven't had a lot of time to play around with the controller yet. But I could definitely feel a difference between stock mode and some of the higher settings, particularly when taking off at the lights. I will have to wait for a wet day to give it a true test.
 
  • Like
Reactions: <tuffty/>, crispynz1 and StaceyS3
Nice to see these controllers finally showing up... be very interested to see how you get on with this (seeing as @StaceyS3 has one but won't be on the road for donkeys years yet lol)

I have put off getting a controller as I have never felt the need to spend 700 quid on something that never really presented itself as a problem even with the power I have now...

This appeals more than the old blue etc controllers as its cheaper, more of a gadget (and who doesn't like gadgets!) and I am running out of things to 'upgrade' on my car now LOL... I think Stacey needs to lend me his for a while ;)

<tuffty/>

Years! :angrymod: it won't be that long...I hope lol

In fairness I sat on it not doing nothing to it for 6 months - a year

It's currently sitting over in the states PT in my shipito account but should be here in the near future, I'm pretty sure they're still doing a promo price on the controller if you wanted to jump on the bandwagon ;)

I am going to wait for at least service pack 1 mate... one thing I have learn't over the years of working in IT ;)

<tuffty/>
 
  • Like
Reactions: StaceyS3

Similar threads

Replies
8
Views
1K
Replies
10
Views
2K
Replies
5
Views
1K
Replies
6
Views
977
Replies
25
Views
2K