To save starting a new thread I'll add the info in to this one.
Could a mod tidy this up, remove the above posts cause they are pointless now, thanks.
Couple of things, I got carried away in doing the job and forgot to take pics at some stages, so you'll have to relay on my literary skills. This is a complete strip as you'll see in the pics.
I never removed the passenger air bag, I did this last time and found out there is no need to this time, it does make the dash weighted one side and a little awkward to remove but as long as you're careful and don't have arms like [FONT=arial, sans-serif]
Chandra Bahadur Dangi, you'll be fine.[/FONT]
[FONT=arial, sans-serif]
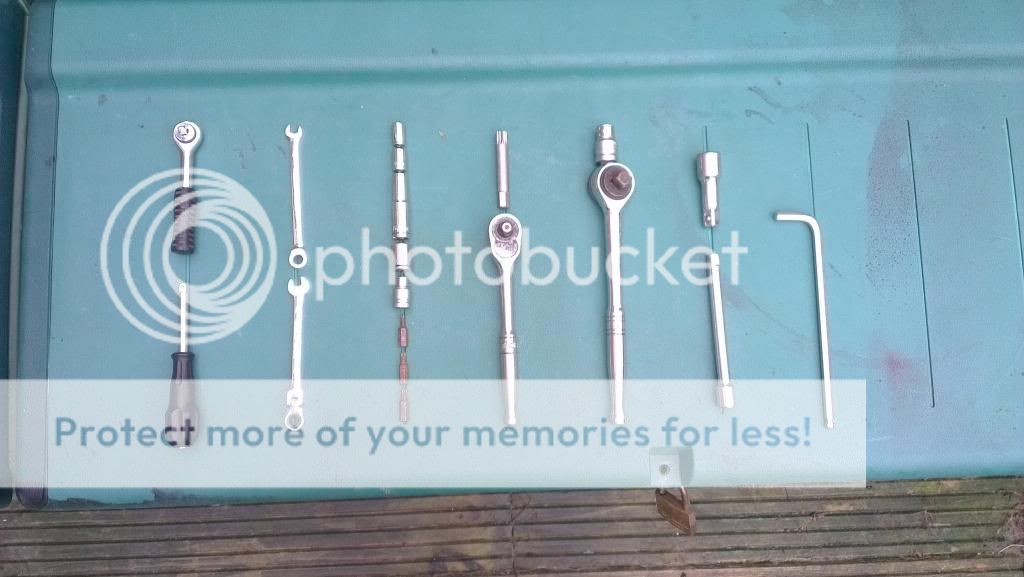
First off Tools. I forgot to add the phillips screw driver to the pic but you need one of them as well.[/FONT]
[FONT=arial, sans-serif]
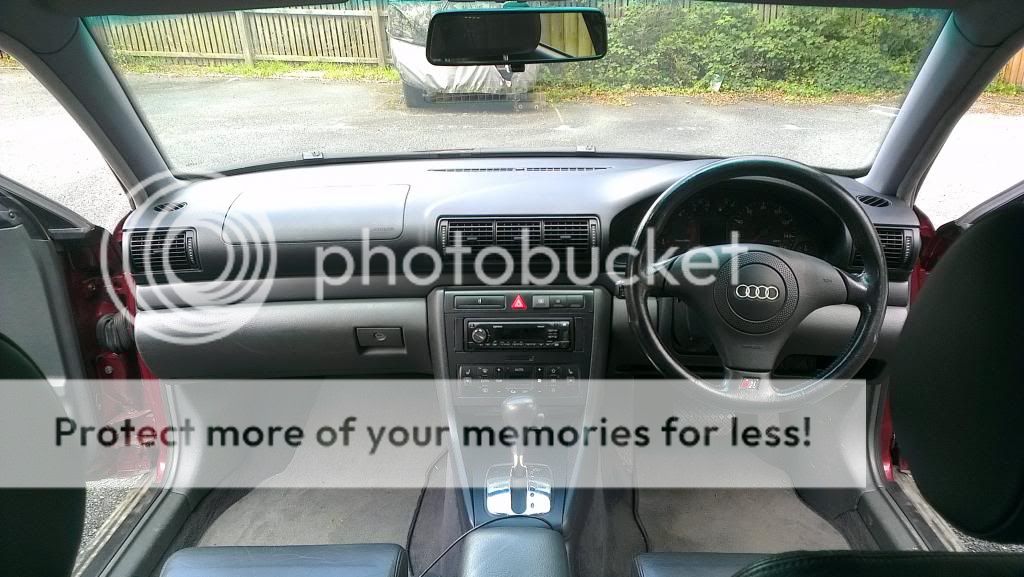
Take one A4 B5 dash.
[/FONT]
[FONT=arial, sans-serif]
Take your 8mm socket and remove all the 8mm bolts you can find. [/FONT]
[FONT=arial, sans-serif]
4 on the left and right hand side of the dash.[/FONT]
[FONT=arial, sans-serif]
2 under the steering wheel.[/FONT]
[FONT=arial, sans-serif]
3 in the glove box.[/FONT]
[FONT=arial, sans-serif]
3 on the side of the centre console, 2 on the left, 1 on the right. [/FONT]
[FONT=arial, sans-serif]
Remove the glove box and lower section under the steering wheel.[/FONT]
[FONT=arial, sans-serif]
Remove the rear ash tray and centre cuby hole carpet or cup holders if you have them.[/FONT]
[FONT=arial, sans-serif]
Take your 13mm socket and remove the 3 13mm nuts that hold the arm rest down.[/FONT]
[FONT=arial, sans-serif]
Lift the hand brake up really far and remove its cover.[/FONT]
[FONT=arial, sans-serif]
You should be ready to remove the back section of the centre console. [/FONT]
[FONT=arial, sans-serif]
I just lift and wiggle till it comes free, unplug the power socket and remove. When you handle the centre console, hold on to the arm rest, not the plastic. The plastic can't handle the weight of the arm rest and it will snap the lug at the front and then in turn will snap the two metal lugs off the arm rest base plate. [/FONT]
[FONT=arial, sans-serif]
lower sections removed, rear centre section removed, lets remove the steering wheel, clocks and steering surround.[/FONT]
[FONT=arial, sans-serif]
you need the T30 to remove the air bag. Undo them, pull air bag and remove plugs.[/FONT]
[FONT=arial, sans-serif]
Make sure the wheel is straight, mark it or remember it, just don't put it on the wrong angle, its a right pain in the ***.[/FONT]
[FONT=arial, sans-serif]
Take the 12mm multi spline Torx tool (I forget its name), extension bar and ratchet.
[/FONT]Hold the wheel with one hand and the ratchet with the other and lossen the bit bolt in the middle. Don't take it out all the way, leave it in a couple of turns and then lossen the steering wheel. Don't take the nut out and then remove the wheel cause the chances of it hitting you in the face can be rather high.
With the wheel out the way you can get the philips screw driver and remove the 2 screws in front of the surround and the two below. Move the steering wheel out and down as far as you can.
Take your T27 and remove the 2 torx bolts holding the steering wheel adjuster handle on and just to the left and back a little bit is another torx bolt. Remove that one.
The surround should now be loose and you can remove it.
You can unclip the air bag slip ring, 2 clips on the top, 1 clip and 1 plug underneath.
The leavers, take the T30, I think, its a allen key but the Torx work ok cause its not massively tight, and remove lossen the bolt at the top holding the leavers in place.
They should be loose enough to pull forward a bit and remove all plugs and put to one side.
At the bottom of the clocks is a 2nd surround, the top will remove if you pull it towards you, with that out of the way take the T20 and remove the 4 torx bolts that is holding the 2nd surround in place. The side torx are easy to get to but the 2 at the top can be a bit of a pain cause of the angle but a bit of playing you'll find them and they will come out.
Now we can remove the clocks.
Take the T20 again and remove the two torx bolts holding the clocks in place.
On mine the Green plug is really short and I find it easier to remove the green plug with the clocks in place by putting my hand behind the clocks. with that out of the way I can remove the clocks and access the other two plugs alot easier.
Time to remove the centre console, this is just a rough quick way of doing it, it will be different depending on your stereo, PFL or FL etc. Easiest way to is to pull the plastic trim from around the buttons and stereo. Pull the HVAC unit out towards you and remove the plugs from the back, remove the stereo.
You should now see 6 8mm bolts, 3 down each side. Remove These and the ash tray can be removed and the gear stick surround can be liffted up and removed.
The centre console should be ready to be removed. With it gone you'll be left with the cage. Remove the 4 remaining 8mm bolts and unplug any remaining plugs.
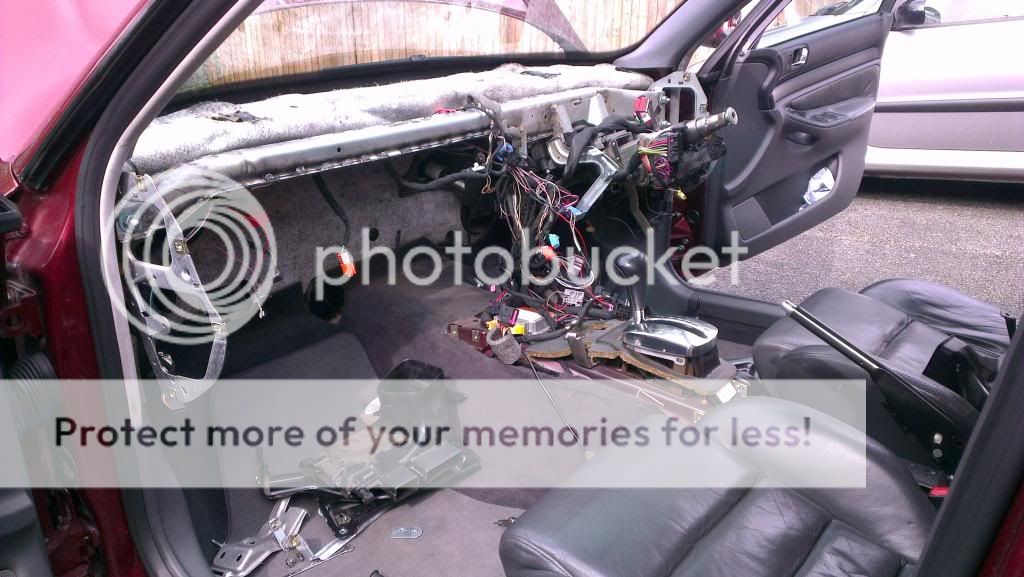
It should now look like this
On the drivers side and the centre you'll have about 4 8mm bolts underneath holding the dash on.
Remove theses.
On the passenger side the only thing that holds the dash in is the air bag.
This is where you need the 10mm.
Shove your head underneath and you'll see something like this.
You only need to remove 8 10mm bolts. 6 that bolts the air bag to the big bar at the back and 2 that holds it on to the heater matrix.
Remove all of theses and the 1 8mm bolt on the front of the dash, just to the left of where the glove box 8mm bolt would have been.
Couple of little bits left to do.
You have to remove the cable to the light sensor in the middle.
Unclip the cover and you'll see a phillips in the right hand corner near the wind screen. Lift the sensor up and remove the plug, give it a helping hand and poke it down the hole a little bit.
Take a 8mm socket and look in the middle where the centre console was and you should see a lonely 8mm nut on the heater matrix. Remove this.
The dash is ready.
Give each corner a quick tug to make sure its free, no bolts or any thing has been missed, all cables are unplugged and you should be ready to remove it.
Pull and wiggle till its free really, just remember you have extra weight on the right cause of the air bag.
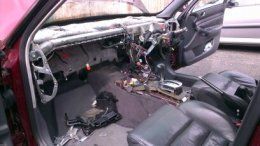
With the dash out, you should have this.
WOW, this is getting a long posts. I'm sorry.
Almost finish.
Around the centre console will be two metal uprights.
The one on the left is has 3 8mm bolts and 2 10mm bolts. Remove theses and it should come away.
The right hand one has the same but it has 2 extra 8mm bolts in a stupid place. Right at the back, on top of the heater matrix and at the bottom. You can't really see them but follow the metal bracket and you'll soon feel them. The one at the bottom is now to bad but the top one is a right paint, you need to remove the windscreen heater duct to get to it, you need to remove it any way.
There two 8mm bolts, they are at the ends of the ducts bolted in to that long metal bar. a ratchet spanner works well. You will need to unplug your brake light sensor before you can remove the metal bracket.
With that out of the way you'll be able to remove the top 8mm bolt and the metal bracket should be able to move away.
Before we go much further you need to remove the 2 coolant pipes from the engine bay, left of the battery and the AC pipes, right of the battery with a 8mm allen key.
On the left of the heater matrix is 2 10mm bolts, remove theses and make your way around the matrix removing all plugs you can find.
there is 2 on the left, 2 behind where the glove box would be, 1 in the middle at the bottom round the back, 3 (I think) on the right hand side and round the back in the same area.
Remove the 2 heating ducts for the rear foot well.
Double check all plugs are unplugged, pipes, bolts, if so it should be able to move and wiggle it about.
Make sure cables don't get caught, sit in the passenger seat and wiggle the heater box towards you and slide it out to the left and out of the passenger door.
Be careful of the motors, arms and sensors on the bottom and sides.
Hopefully it now looks like this.


")