W3STY's Progress Thread

What colour S3 Avus for the Track?

  • Porsche Guards Red

    Votes: 43 57.3%
  • Kawasaki Green

    Votes: 32 42.7%

  • Total voters
    75
I'm going to look at the earthing wiring tonight on my AEM kit. At the moment its attached to the main in car earth under the dash by the steering column. Is there any alternative earthing point I can use for testing?

Direct from the battery :)

<tuffty/>
 
Ok couple of pics of my wiring. Can someone please confirm that everything looks right under the dash:

Earth:

e4fb526c.jpg


79e74858.jpg


17d95f22.jpg


Ignition/arm for controller to the yellow connection. Permanent live feed for the pump, LED, and controller on the red connector:

63b68cbb.jpg


37a04171.jpg


If this all looks ok then I'm stuck! All my crimps and wiring is fine. I've tried earthing to the battery and tried putting the pump live to the battery direct but still the error. The test function works fine and the pump is happy as larry running at have power.

I'm going to contact AEM and the eBay seller and try to get the controller replaced.
 
Stop the press! I think it works :think:

I've not changed a thing except for how the earth now sits. you can see in this picture that the spade connector (supplied by AEM in the kit) has a hole that is a lot bigger then the other earths. I'd sat the controller earth on top of all the others and I can only imagine that there wasn't enough contact due to the hole being to big. Last night I sandwiched the controller Earth between 2 of the OE eath spades.

17d95f22.jpg


I didn't get time to test it last night but set the controller to come on half pump at 3psi and full pump at 9psi and this morning on the way to work got my boot down a bit and it worked, no error.

I need to do a bit more testing tonight but it looks promising.
 
  • Like
Reactions: sportstractor
Stop the press! I think it works :think:

I've not changed a thing except for how the earth now sits. you can see in this picture that the spade connector (supplied by AEM in the kit) has a hole that is a lot bigger then the other earths. I'd sat the controller earth on top of all the others and I can only imagine that there wasn't enough contact due to the hole being to big. Last night I sandwiched the controller Earth between 2 of the OE eath spades.

17d95f22.jpg


I didn't get time to test it last night but set the controller to come on half pump at 3psi and full pump at 9psi and this morning on the way to work got my boot down a bit and it worked, no error.

I need to do a bit more testing tonight but it looks promising.

Looking at that pic of the crimp and knowing what they can be like it may also be worthwhile giving it another squeeze at the end where you can see the copper poke out... it doesn't look (from here) as though the tinned part of the crimp is making that much contact... if all you have done is disturbed the connector and suddenly its working better that could be as much a culprit as the terminal being too large for the fitting...

Maybe fit a new crimp with the right sized hole etc may help too :)

<tuffty/>

I gave all the crimps a tug and checked that the wire is making contact with the metal of the crimp. I'll pop to maplin and get some red spades instead of using the crap AEM sent.

Just out of interest have you ever tried to run the pump with full pump mode set lower then half pump mode? I would expect the pump or controller wont like it as it wouldn't know whether to pump at half or full load :think:
 
on a seperate subject,

i saw this picture a year or so ago and saved it on my pc and only just found it... it may help you with your avus wheel colour choice!

P1020203.jpg


not quite kawasaki green, but fairly close
 
...Just out of interest have you ever tried to run the pump with full pump mode set lower then half pump mode? I would expect the pump or controller wont like it as it wouldn't know whether to pump at half or full load :think:

Never had a reason too mate so no...

<tuffty/>
 
Just done some proper testing and it's still not working :( it's not as bad because I can slowly load up the boost and it's ok but if I bang the boost in fast it throws the error.

I did some logging and outside temp was 5 degrees. Without WMI the lowest AITs I was seeing were 11 degrees. With the WMI (when working) I saw a low of 3 degrees but mainly 5-8 degrees, so damn impressive.

I'm awaiting a reply from the AEM chap but in the meantime I'll mess about with the earth again next week and just run half pump at the moment.

Oh and my clutch is getting even worse too.
 
Where do you take your earth from? Straight from the battery?
 
LOL I opened it on my phone yesterday and didnt see the pics.
Did you try running - & + straight from the battery ?
Did you change wires for higher rated ones?
I would suggest to get a proper crimp used in car audio which will be a bit more expensive but better than the crap one you have there now. Also, soldering crimp with the wire might help a bit (after you squeeze it ).
 
LOL I opened it on my phone yesterday and didnt see the pics.
Did you try running - & + straight from the battery ?

I haven't done yet as I thought i'd try the in car earth again.

Did you change wires for higher rated ones?

I have to use the controller wires that come supplied as they are hard wired directly into the controller. I have uprated the wire for the pump though.

I would suggest to get a proper crimp used in car audio which will be a bit more expensive but better than the crap one you have there now. Also, soldering crimp with the wire might help a bit (after you squeeze it ).

Dave above is sending me his kit so I can rule out my wiring. Once I know whether its my wiring or pump/controller I will solder it all to make double sure the connection is ok.
 
Haven't fully read this as I'm on my phone but it looks a ****** good thread :) will have to get on the computer just to have a good read of this ..... Well done keep up the good work

Rob
 
Only a small update.

I met Jason.S on Friday night and collected all the parts (4 bags full) I'd bought for my up and coming Easter engine build.

I dropped off my AEB cylinder head to a company called CHE (Cylinder Head Engineering) in Bedford who seem to have a good reputation. I left the guy with a list o things I wanted doing and handed over all new studs and seals that I'd got from Jase.

I'm waiting for my IE rifle drilled rods to arrive in the post and then I'll have everything ready for the build.

Hopefully I'll have some nice pics of a clean rebuilt cylinder head next week.
 
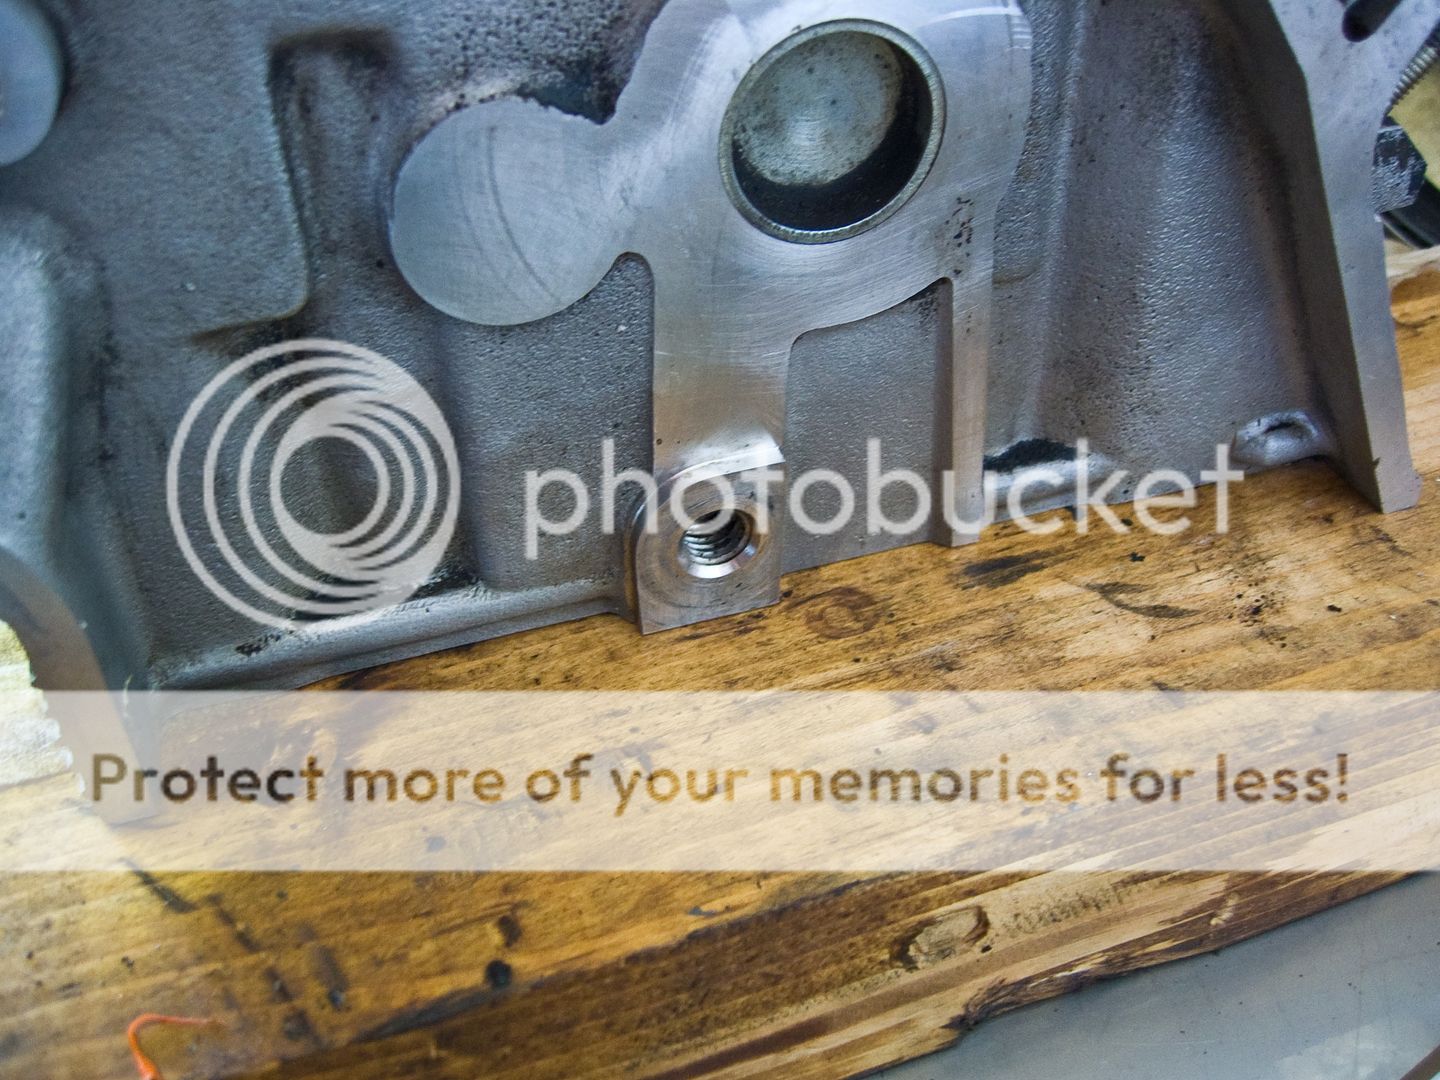
Quick question mate... some of the early AEB heads used different tensioners and had a protrusion in the casting to space it out... my first AEB head had this and I had to get it machined of... looks like this...
20100501_CRW_4059.jpg


but should be flat like this...
20100426_IMG00049-20100426-2008.jpg


<tuffty/>
 
Cheers Tuffty, I didn't spot this on my AEB head but I'll get these pics over to the head place and get them to machine it off if it's there :thumbsup:

I assume that the plastic part of the water hose that connects to the side of the head is interchangeable with other heads? I'm going to order up all new o-rings and crush washers for the water hose connection, water pump and oil pump.

Yeah, all the same mate...yours will fit straight on...

<tuffty/>
 
Thought so but wasn't 100%. I'm ordering new o-rings for it.

As far as swapping over the AEB cams for the Bam cams, is it a nice easy job? I've ordered cam seals, do I need anything else?

cam chain tensioner gasket and half moon seal, VAG sump sealant (its the best), cam seals can be a **** as the bolts are tight on the pulley... I normally hold them in a vice with a shed load of cardboard as padding so as not to damage the lobes... it can also be done in head with the appropriate tools to hold the pulley...

You can't use the AEB cams straight out anyway as the cam pulleys are different on them...

Useful info for all 1.8t related fun
VWVortex.com - -= 1.8t Technical Forum Guide { FAQs | Tuning/Modification Assistance | Troubleshooting } =-

Includes a link (that I post a lot on here) to
VWVortex.com - FAQ : Cylinder Head & Camshaft Removal + Re-Installation

IMPORTANT! head bolt sequence shown is for undoing the bolts not tightening them... tightening the head bolts is the opposite of the digram so start from the inside (10) and move out... 40nm first and go round the bolts twice, then 60nm and go round the bolts twice and finally two lots of 90 degrees with a breaker bar... do one round of 90 degrees followed by a final round of 90 degrees

Have fun :D

<tuffty/>
 
My clutch is getting worse by the day and is now slipping in all gears under any kind of spirited acceleration :(

I jumped on Elsawin earlier to have a quick scan through the process of changing the clutch. Annoyingly Elsawin only shows how to remove the whole gearbox to change the clutch and not just how to do the clutch with the box dropped.

Has anyone got a guide on how to change the clutch and flywheel as easily and quickly as possible? Any hints, tips, or advice you have please let me know as I think i'll be ordering the kit very soon.
 
Damn box out :(

I'll folow elsawin then. I have an engine support beam to be able to take some of the weight from about once the mounts are all loose and I'll use a jack underneath.

I'd best book a day off for this job and hopefully get it done in a day. Just need to make or buy a Centred Mandrel to align the clutch plate properly.
 
If youv never done a clutch before westy, I'd allow two days, or a day if somebody helps. It's a right job on the s3...
 
Its easier to get the box off (and back on again) once the bevel box is off mate... I took my box off with it still attached and it was a complete ****... it will save you hours of time and swearing removing it... you can get away with dropping the subframe but tbh I found it just as easy to remove it... just remember to support the rack as it can slip out the column joint and is a ****** to refit by all accounts...

Basics of how I would do it is...

Drain gearbox oil from gearbox plug and bevel box plug (have some fresh 75w90 semi or fully synth ready to replace afterwards)

Loosen front hub bolts (17mm hex bit or 30 something mm socket depending on if you have bolts or nuts... 32mm springs to mind but can't remember)... you will need to have some apply the brakes to do this as they are tight...

Unbolt driveshafts from gearbox flanges

Undo front arm balljoints (either balljoint nut or the 3 bolts on the arm... either way alignment will be needed and the balljoint will need a splitter to separate it which could damage the rubber cover)

Remove driveshafts

Remove bevel box

Drop or remove subframe (unbolt rack first)

Support engine

Remove gearbox

Fit new clutch/FW

Fitting is reverse of above steps and details of doing up the hub bolts is in a thread linked to in the stickies for changing driveshaft gaiters I did a while back..

Top up gearbox oil on a level surface (bevel box gets filled vis the gearbox so only need to pour oil in one place)

Thats it in simple terms but obviously there are quite a few things to remove to gain access to everything...

<tuffty/>
 
Do we think it's worth just waiting till I do my rods when half the engine will be apart and just remove the front slam panel and take the whole lot out?

tbh yes... doing a BT conversion on a TT at the moment and took the whole engine out... much easier...

<tuffty/>
 

Similar threads

Replies
9
Views
2K
Replies
26
Views
2K
Replies
225
Views
22K
Replies
1
Views
878