

I read about that Polo in redline mag when they put it up against a evo 10. Impressive build that but think its got too much power lol. Didnt gets full traction till end of 3rd I think the review said which aint fasts but probably pretty fun lol
You are using an out of date browser. It may not display this or other websites correctly.
You should upgrade or use an alternative browser.
You should upgrade or use an alternative browser.
- Joined
- May 28, 2004
- Messages
- 10,217
- Reaction score
- 2,385
- Points
- 113
- Location
- nr Glos
- Website
- www.badger5.co.uk
I read about that Polo in redline mag when they put it up against a evo 10. Impressive build that but think its got too much power lol. Didnt gets full traction till end of 3rd I think the review said which aint fasts but probably pretty fun lol
it would rain on your parade big time.. from its mere 2wd.
On the day, the Apexi speed went off scale (>5v) so lost the plot for its gear limit boost settings.. and the owner was struggling to apply the full power, which was his only option. It has gear limited boost as does the ibiza, which is essential to apply as much power as is tractable thru its 2 wheels. they're not blessed with 4wd, but also not hampered with an additional 200kg either!
A friend of mine has a Apexi boost controller on his TD04 Toyota starlet GT and I think he has limited his boost in the first 2 gears. Alot of manufactures are limiting boost in 1st or 2nd gears now to help try and limit wheelspin etc.
The Polo had a 0-60 of around 5 seconds I think but once it got going it left the Evo for dead, think I still got the mag somewhere.
The Polo had a 0-60 of around 5 seconds I think but once it got going it left the Evo for dead, think I still got the mag somewhere.

- Joined
- May 28, 2004
- Messages
- 10,217
- Reaction score
- 2,385
- Points
- 113
- Location
- nr Glos
- Website
- www.badger5.co.uk
A friend of mine has a Apexi boost controller on his TD04 Toyota starlet GT and I think he has limited his boost in the first 2 gears. Alot of manufactures are limiting boost in 1st or 2nd gears now to help try and limit wheelspin etc.
The Polo had a 0-60 of around 5 seconds I think but once it got going it left the Evo for dead, think I still got the mag somewhere.
aye, curse of the fwd..

my ibiza's only just sub 5sec on road tyres to 60 with a lot more power...
in gear acceleration tho.. EAK!
Blounter
Registered User
Just gone through your build threads tuffty (took 2 days on/off!)........fair play!!! I'm only up worcester way so will keep a eye open for ya when down your neck of the woods. (animals old un,don't think I try ya tho!)
I'm only up worcester way so will keep a eye open for ya when down your neck of the woods. (animals old un,don't think I try ya tho!)
Last edited:
- Joined
- Sep 14, 2008
- Messages
- 24,836
- Reaction score
- 6,078
- Points
- 113
- Location
- Wibbleton
- Website
- www.tuffty.co.uk
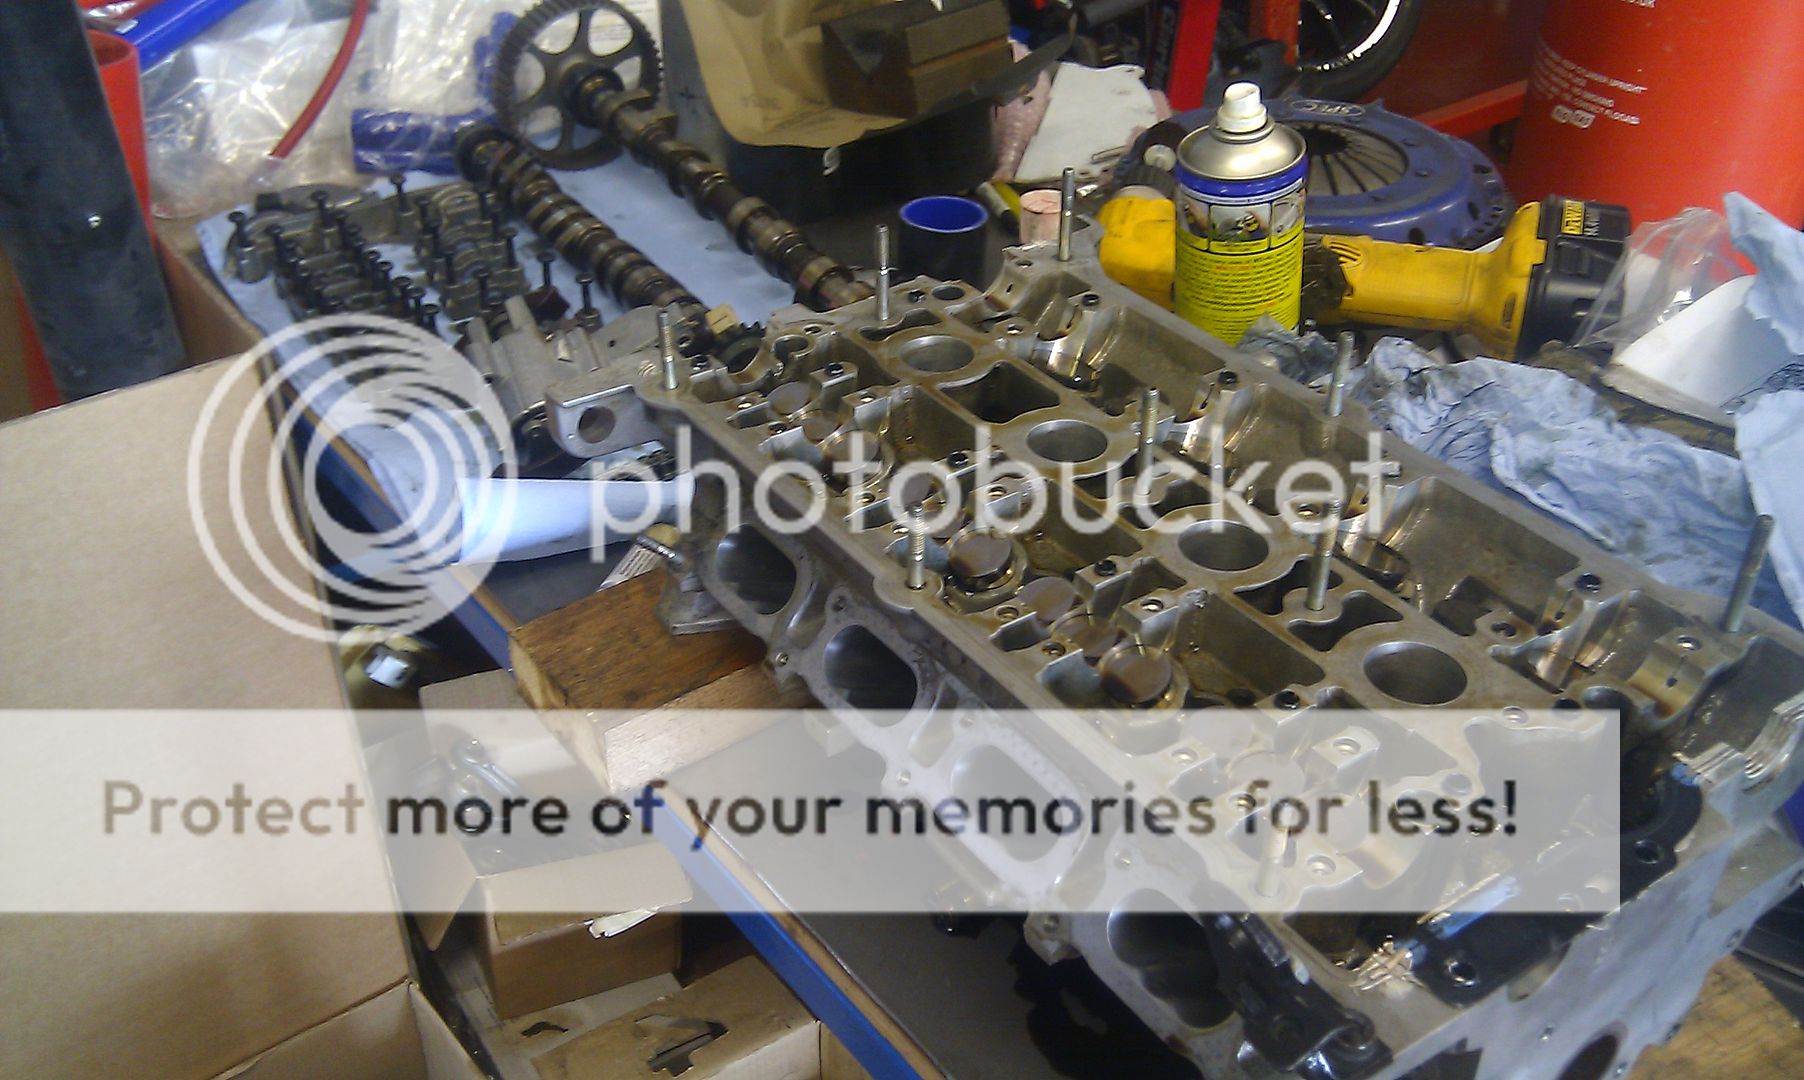
Had the day off today to do a few little jobs... still have the top end rattle and some say it may be due to a valve in the oil filter housing that bolts to the side of the block so I though I may as well take it off and give it a clean to see if that helps... wasn't convinced that it would be the miracle cure tbh but had to eliminate it as a possibility...
Came off easy enough and on inspection the valve in question didn't look as if it was a problem... here is my somewhat dirty housing next to one I removed from Bill's retired race engine...

...the oil retention valve...

...and where it sits...

...this valve is supposed to keep oil int the head to prevent rattling on first start... Bill said I could fit his (much cleaner) one to eliminate it as an issue... sadly it didn't appear to make any difference at all... so next job is to remove the head and swap it out with the one I recently acquired...

...this will be built using new followers this time too so fingers crossed its all good...
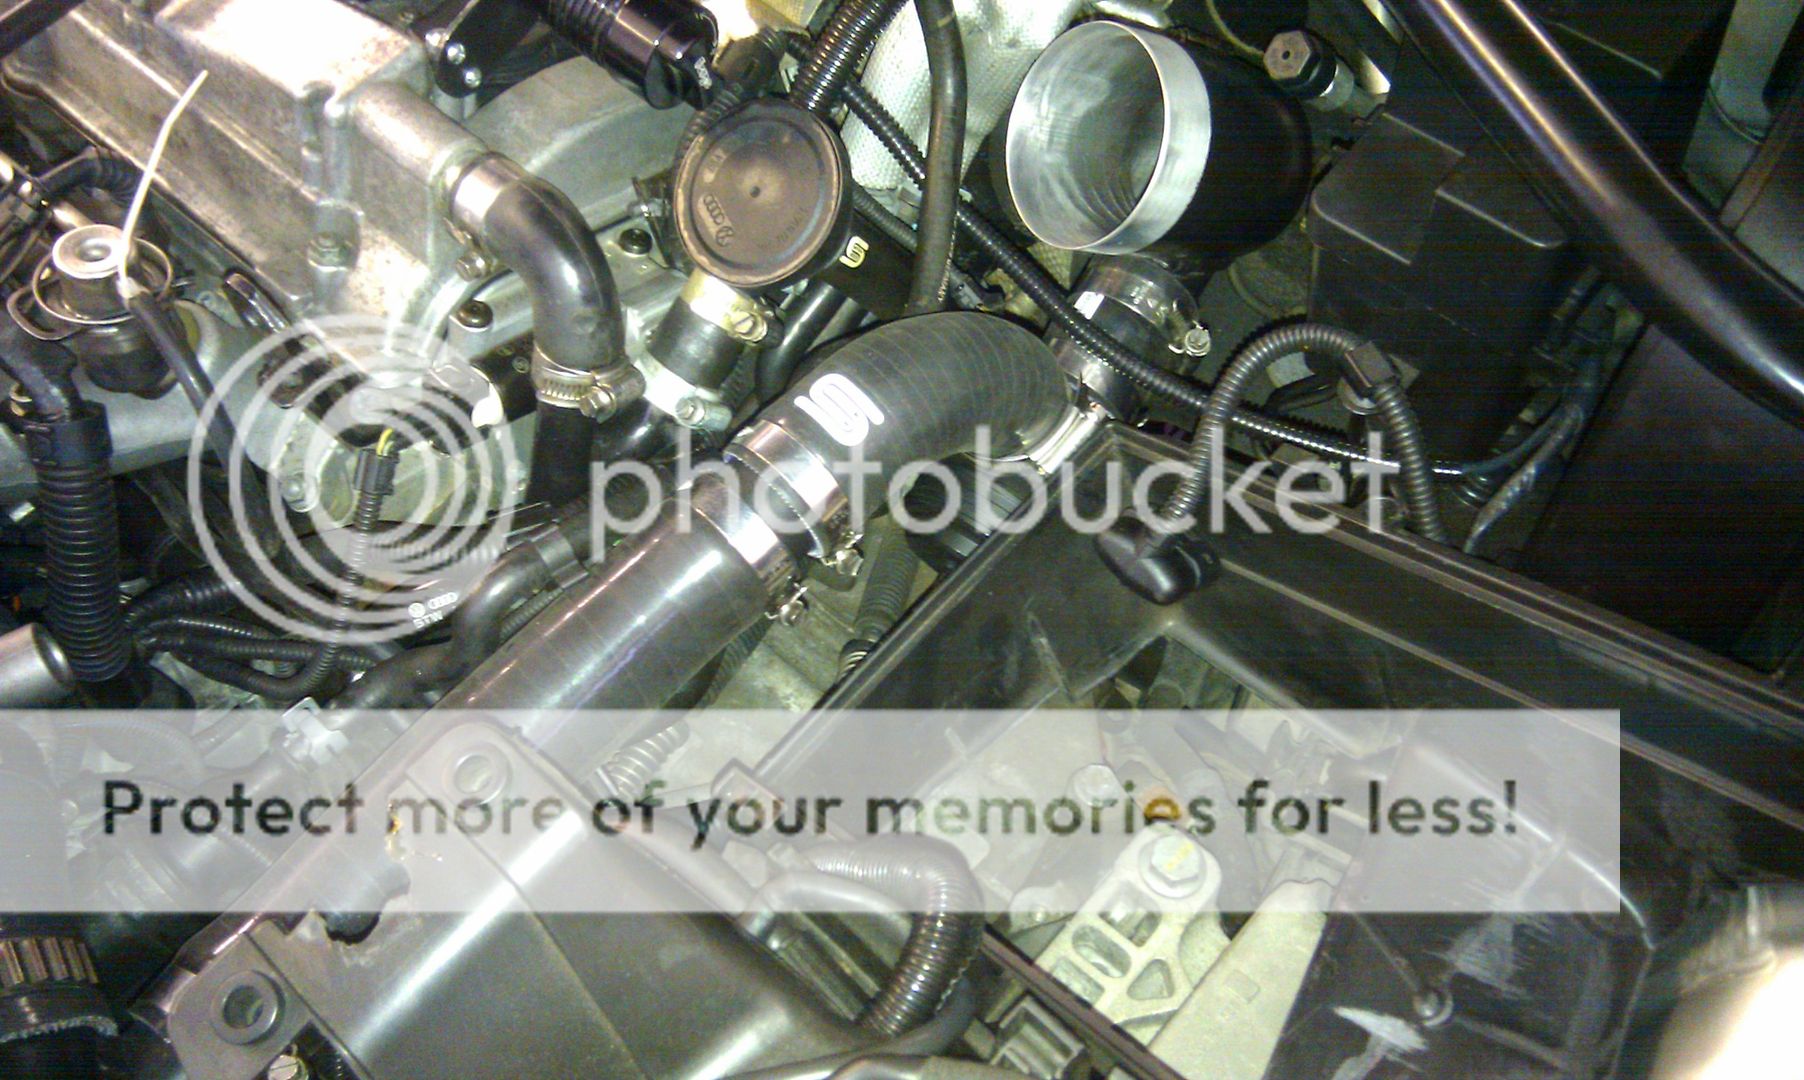
With that disappointing (but not unexpected) result I moved on to cleaning up the pipework for the MBC/N75 as it was a mess and relocated the N249 valve so I could bin the metal bracket allowing Audi easier access for when they change my coilpacks under the recent recall... the less they have to touch on my car the happier I will be...
Started by extending the wiring for the N249...
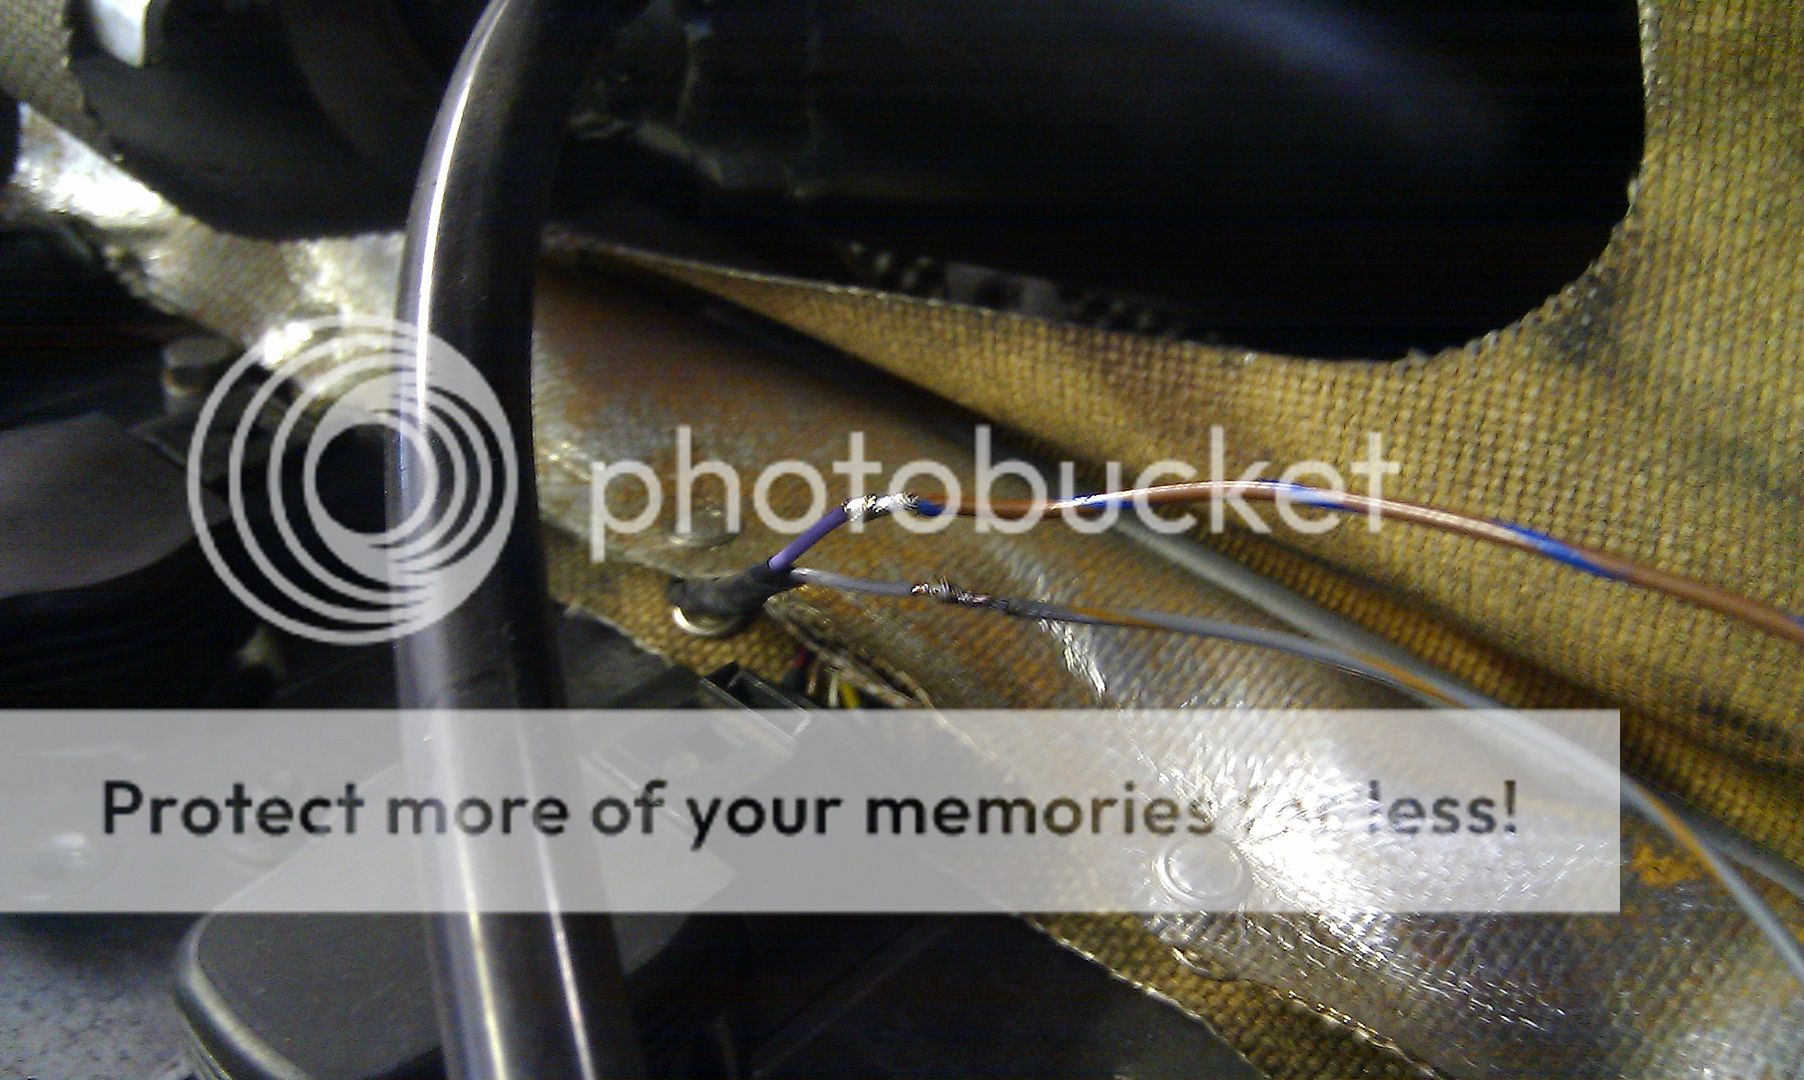
...then with a slight modification I routed the wiring to the little plastic box on the bulkhead and fitted the N249 inside...

...top back on and all hidden and out of the way...
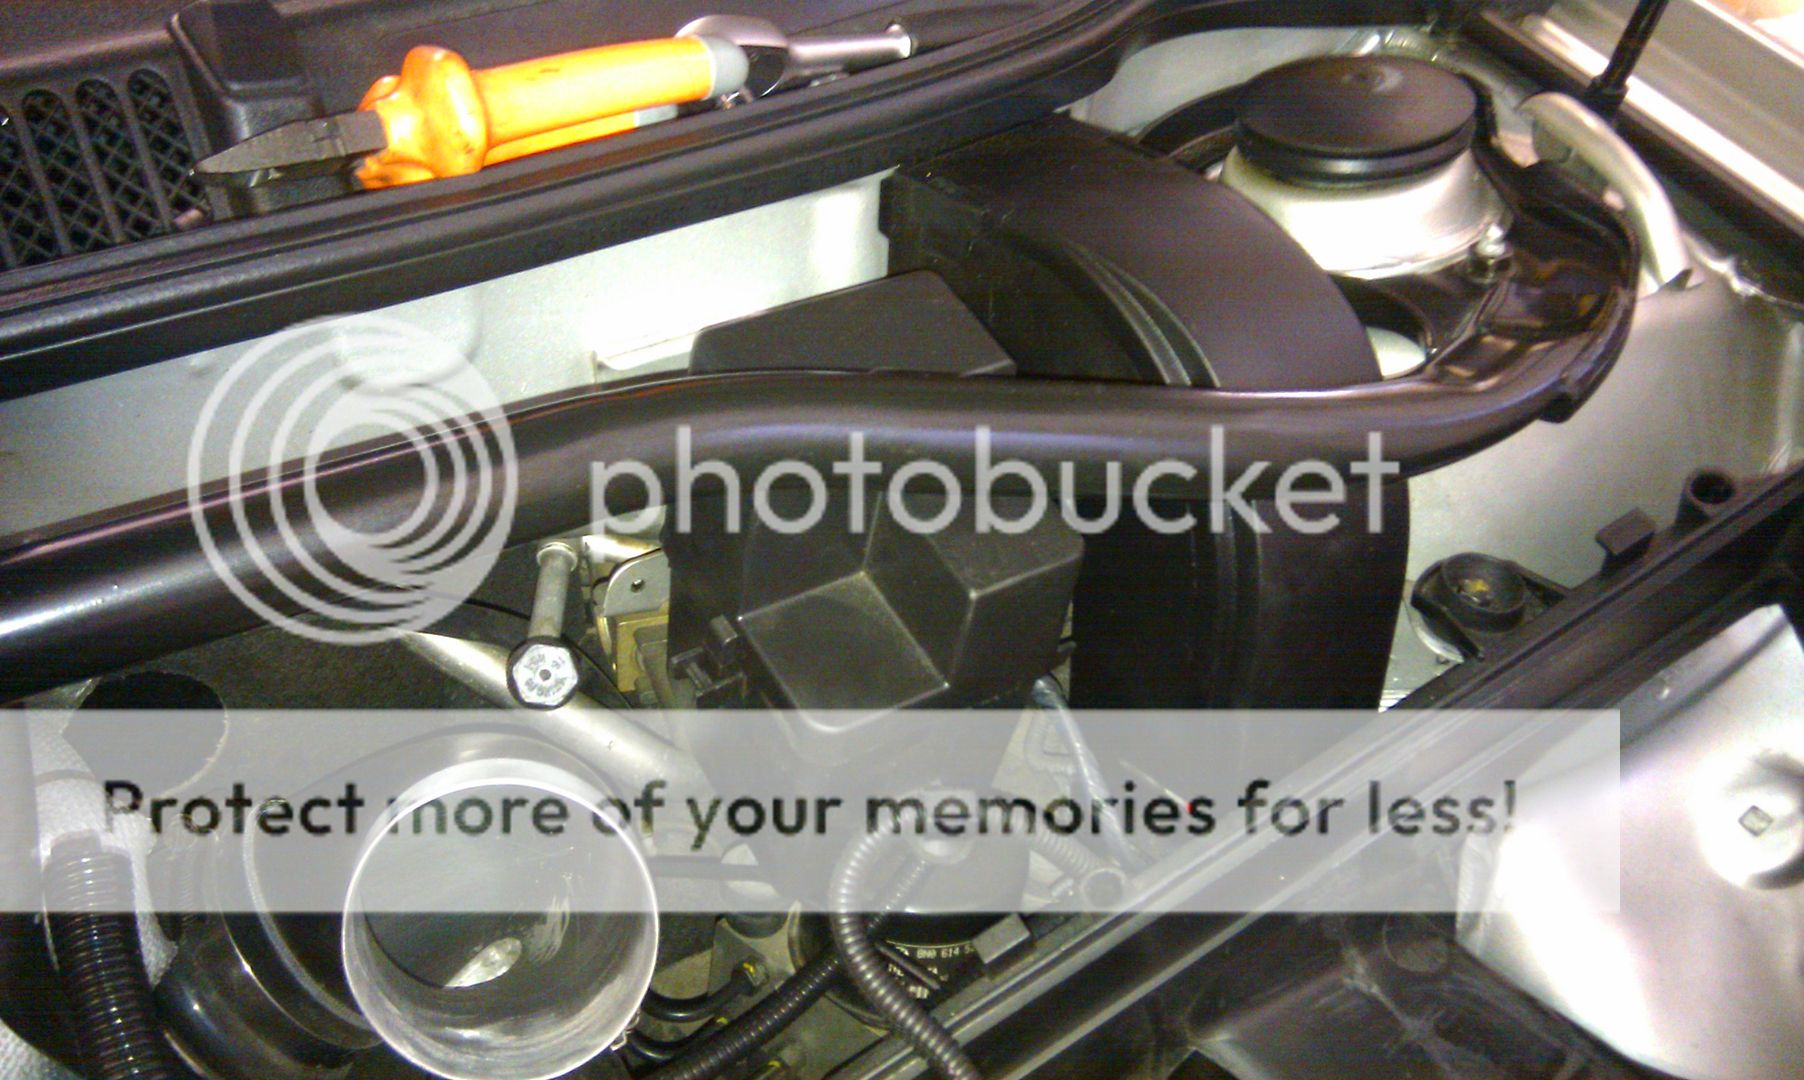
...making this top of the engine a neater place once I had finished the pipe work...
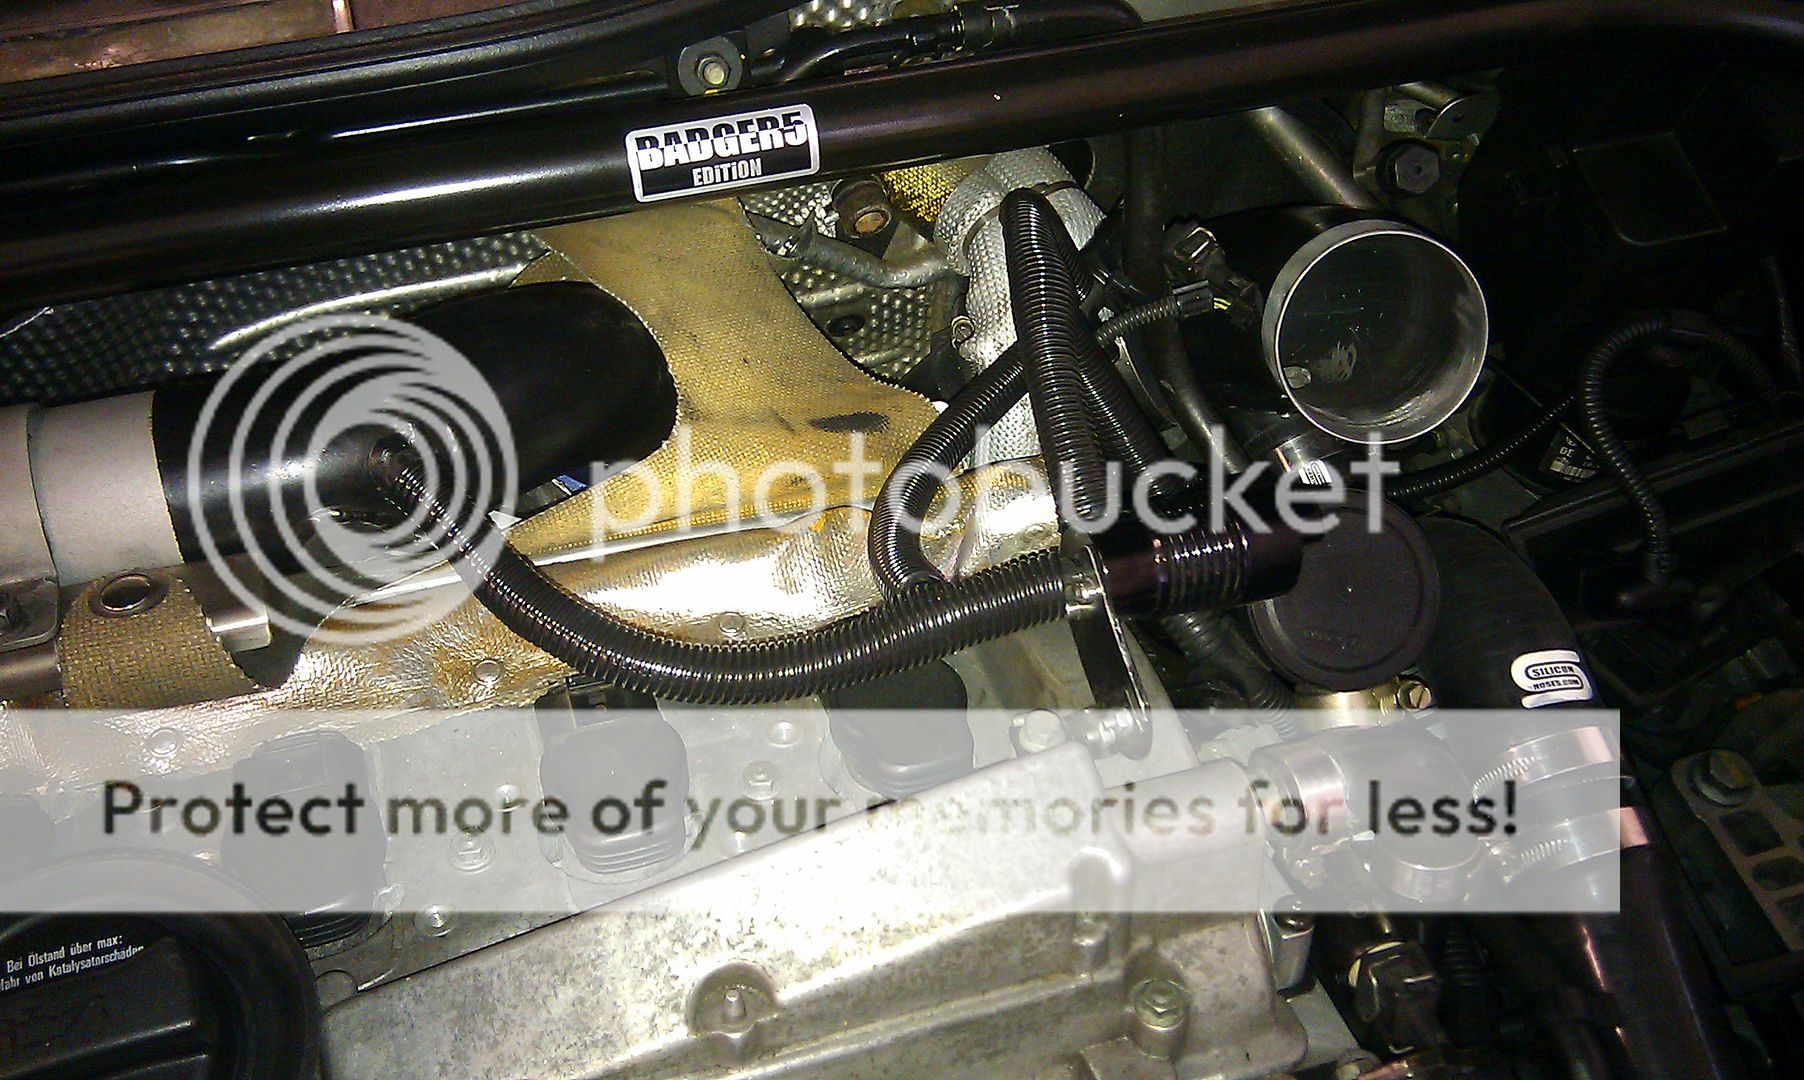
...I also moved the DV to the back of the engine bay as I get a funny noise on its operation so was thinking it was maybe due to its location...
Before...

After...
Sadly that didn't make any difference either... noise is still there... so, hoping its related to the running issues as a result of the rattly top end and pressure drop across the FMIC... will get those things sorted first then worry about it after..
On the subject of the FMIC, the core is now at AH Fabs and should be ready for me to fit next Friday... will of course update the thread when done...
<tuffty/>
Came off easy enough and on inspection the valve in question didn't look as if it was a problem... here is my somewhat dirty housing next to one I removed from Bill's retired race engine...
...the oil retention valve...
...and where it sits...
...this valve is supposed to keep oil int the head to prevent rattling on first start... Bill said I could fit his (much cleaner) one to eliminate it as an issue... sadly it didn't appear to make any difference at all... so next job is to remove the head and swap it out with the one I recently acquired...
...this will be built using new followers this time too so fingers crossed its all good...
With that disappointing (but not unexpected) result I moved on to cleaning up the pipework for the MBC/N75 as it was a mess and relocated the N249 valve so I could bin the metal bracket allowing Audi easier access for when they change my coilpacks under the recent recall... the less they have to touch on my car the happier I will be...
Started by extending the wiring for the N249...
...then with a slight modification I routed the wiring to the little plastic box on the bulkhead and fitted the N249 inside...
...top back on and all hidden and out of the way...
...making this top of the engine a neater place once I had finished the pipe work...
...I also moved the DV to the back of the engine bay as I get a funny noise on its operation so was thinking it was maybe due to its location...
Before...
After...
Sadly that didn't make any difference either... noise is still there... so, hoping its related to the running issues as a result of the rattly top end and pressure drop across the FMIC... will get those things sorted first then worry about it after..
On the subject of the FMIC, the core is now at AH Fabs and should be ready for me to fit next Friday... will of course update the thread when done...
<tuffty/>
- Joined
- Sep 14, 2008
- Messages
- 24,836
- Reaction score
- 6,078
- Points
- 113
- Location
- Wibbleton
- Website
- www.tuffty.co.uk
A little bit of good news after yesterdays disappointing day... I have found the problem with the fans...
Bill put me onto this one as he had a similar issue with his Ibiza when it was a road car... the fuses on top of the battery while looking intact hide a little secret where the 30amp fuse for the fans sit... over a period of time the connection degrades an so more current is drawn... not enough to blow the fuse but enough to get it all hot and unless you look hard you may not notice it straight away...
Here is what mine looked like..
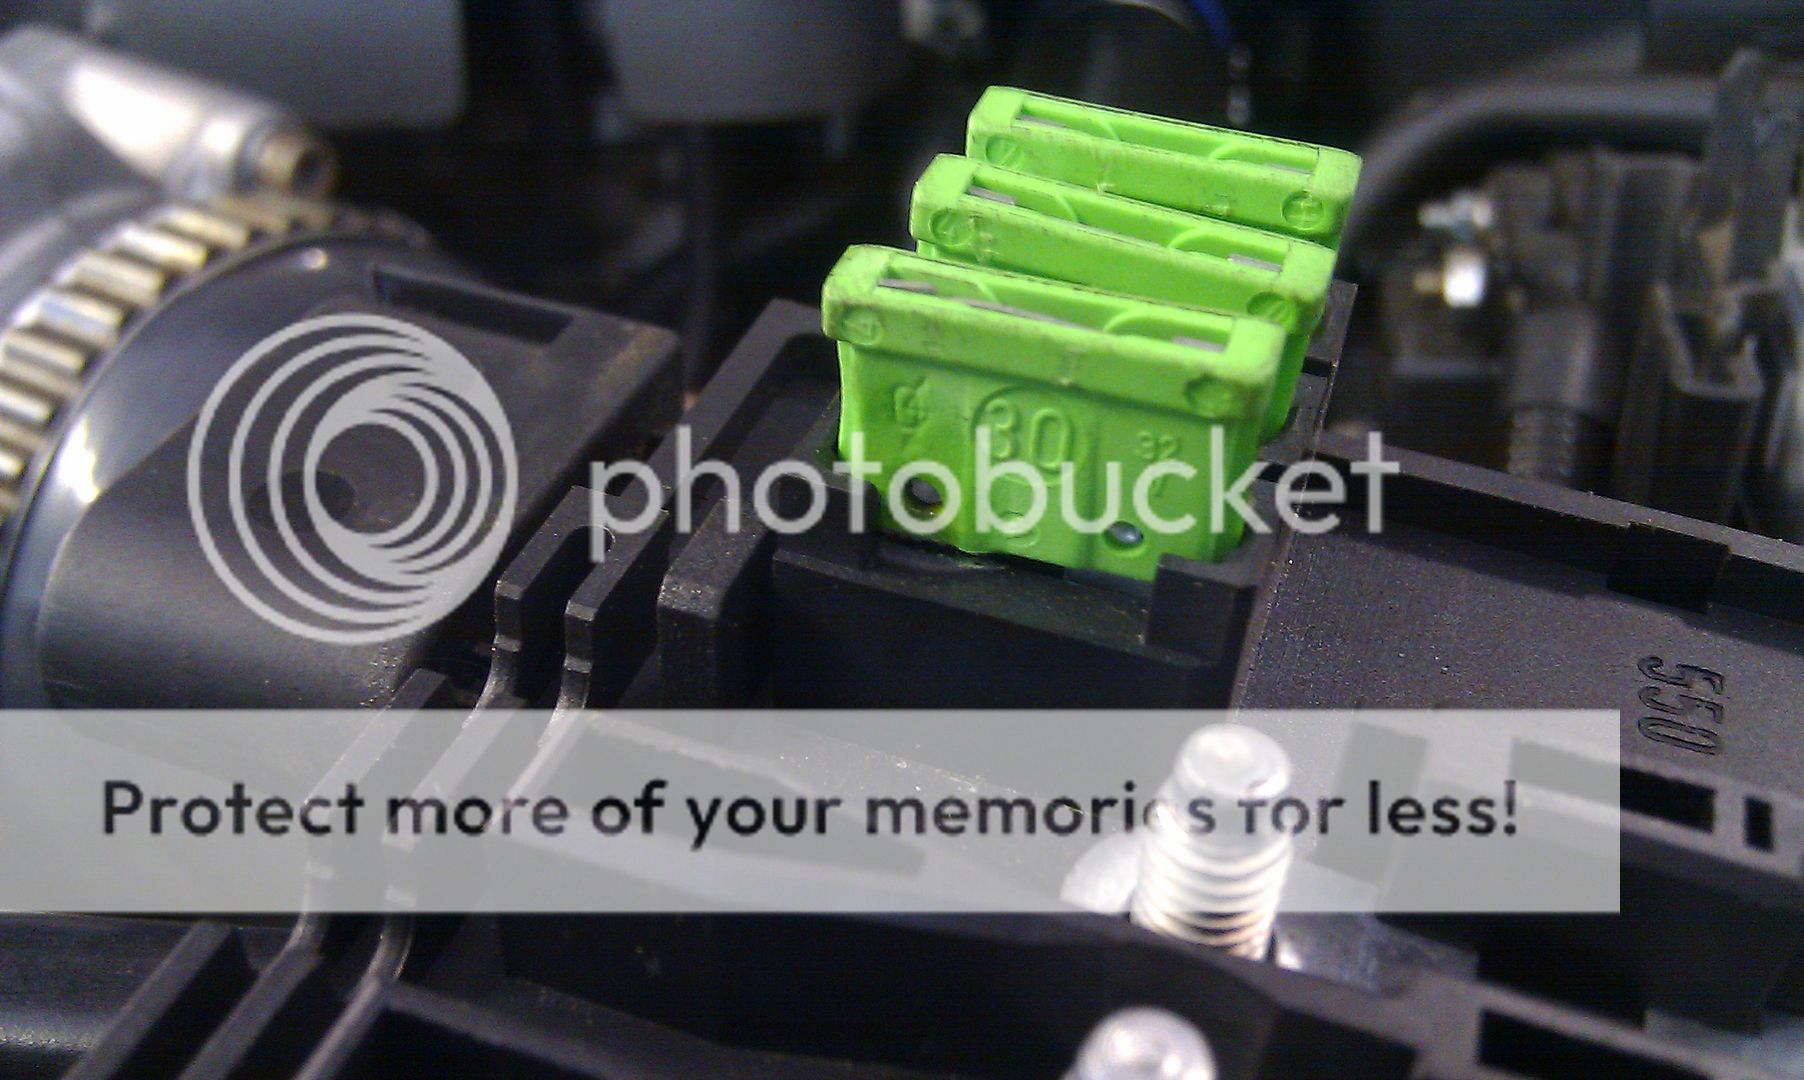
...and when I managed to prise the fuse out with a pair of pliers!!...

So, cleaned up the fuse blade and took a needle file and 180 grit wet and dry to the terminals and now I have fans, after run pump and aircon working!!
I think I will replace the fuse box in the coming months though as its a little bit of a mess but Bill has a doner Ibiza at his house that suffered from the same issue apart from it caught actual fire!! this is not a good place to be and seems that it isn't a marque or model specific issue...
Check yours today and if your after run pump/aircon/fans are not working or working intermittently then looks like this could well be the culprit...
The new part is around £50+vat btw...
<tuffty/>
Bill put me onto this one as he had a similar issue with his Ibiza when it was a road car... the fuses on top of the battery while looking intact hide a little secret where the 30amp fuse for the fans sit... over a period of time the connection degrades an so more current is drawn... not enough to blow the fuse but enough to get it all hot and unless you look hard you may not notice it straight away...
Here is what mine looked like..
...and when I managed to prise the fuse out with a pair of pliers!!...
So, cleaned up the fuse blade and took a needle file and 180 grit wet and dry to the terminals and now I have fans, after run pump and aircon working!!
I think I will replace the fuse box in the coming months though as its a little bit of a mess but Bill has a doner Ibiza at his house that suffered from the same issue apart from it caught actual fire!! this is not a good place to be and seems that it isn't a marque or model specific issue...
Check yours today and if your after run pump/aircon/fans are not working or working intermittently then looks like this could well be the culprit...
The new part is around £50+vat btw...
<tuffty/>
I had exactly the same problem with the fan/fuse. It melted most of the casing on the fuse and a bit of the housing. Now it's one of those things I just keep an eye on, every time I check fluids I give the fuse a quick clean and check the fans are going. The after run pump seems more sensitive to it than the fans too for some reason.
- Joined
- Nov 11, 2009
- Messages
- 10,099
- Reaction score
- 739
- Points
- 38
- Location
- west yorks
- Website
- www.stainless-engineering.co.uk
- Joined
- Jun 19, 2009
- Messages
- 3,883
- Reaction score
- 619
- Points
- 113
- Location
- Leeds
- Website
- www.aldevelopments.com
I had a problem with my fuse box when it over heated after the rebuild, it turned out to be the multi plugs that kept popping off
Fuses were the same as above also.
Fuses were the same as above also.
- Joined
- Sep 14, 2008
- Messages
- 24,836
- Reaction score
- 6,078
- Points
- 113
- Location
- Wibbleton
- Website
- www.tuffty.co.uk
Finally!!! AH Fabs managed to find a window in their busy work schedule to crack on with my FMIC...
Just to play catch up as it was some time ago since I fitted my original FMIC (more info here...http://www.audi-sport.net/vb/a3-s3-forum-8l-chassis/75425-ah-fab-ebay-forge-s3-fmic-image-heavy.html)....
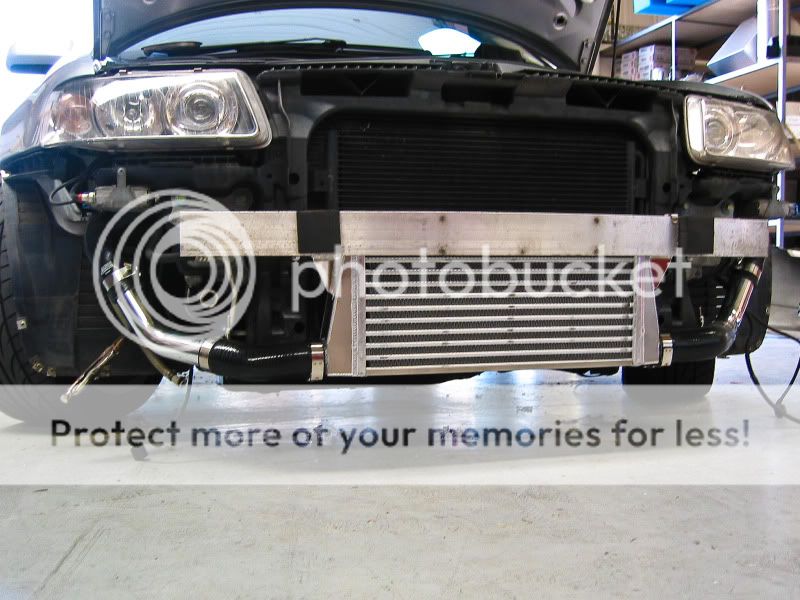
...this was fitted while I was still on the K04... since then quite a bit has changed and in the search of increased flow and performance I made a few changes to the original FMIC... going from 51mm outlets to 60mm outlets in this case...

...and changing the charge pipe work to suit...

...anyhoo... turns out that I have outgrown my little FMIC in the pursuit of power so needed something bigger especially as I had a bit of a pressure drop problem of around 8psi on spool and a steady 5psi after that...
First of all, big thanks to great mate Mark for his help and support today... much appreciated... and big thanks to Lars and Alex at AH Fabs for understanding my vague instructions and producing yet another fine product...
Started off with Alex sending me the core so I could measure it all up... after removing 4 rows from the original 25 and taking pics and measurements I met up with Lars who knew exactly what I wanted from my ramblings and bingo... one new FMIC complete with 63mm pipe work...
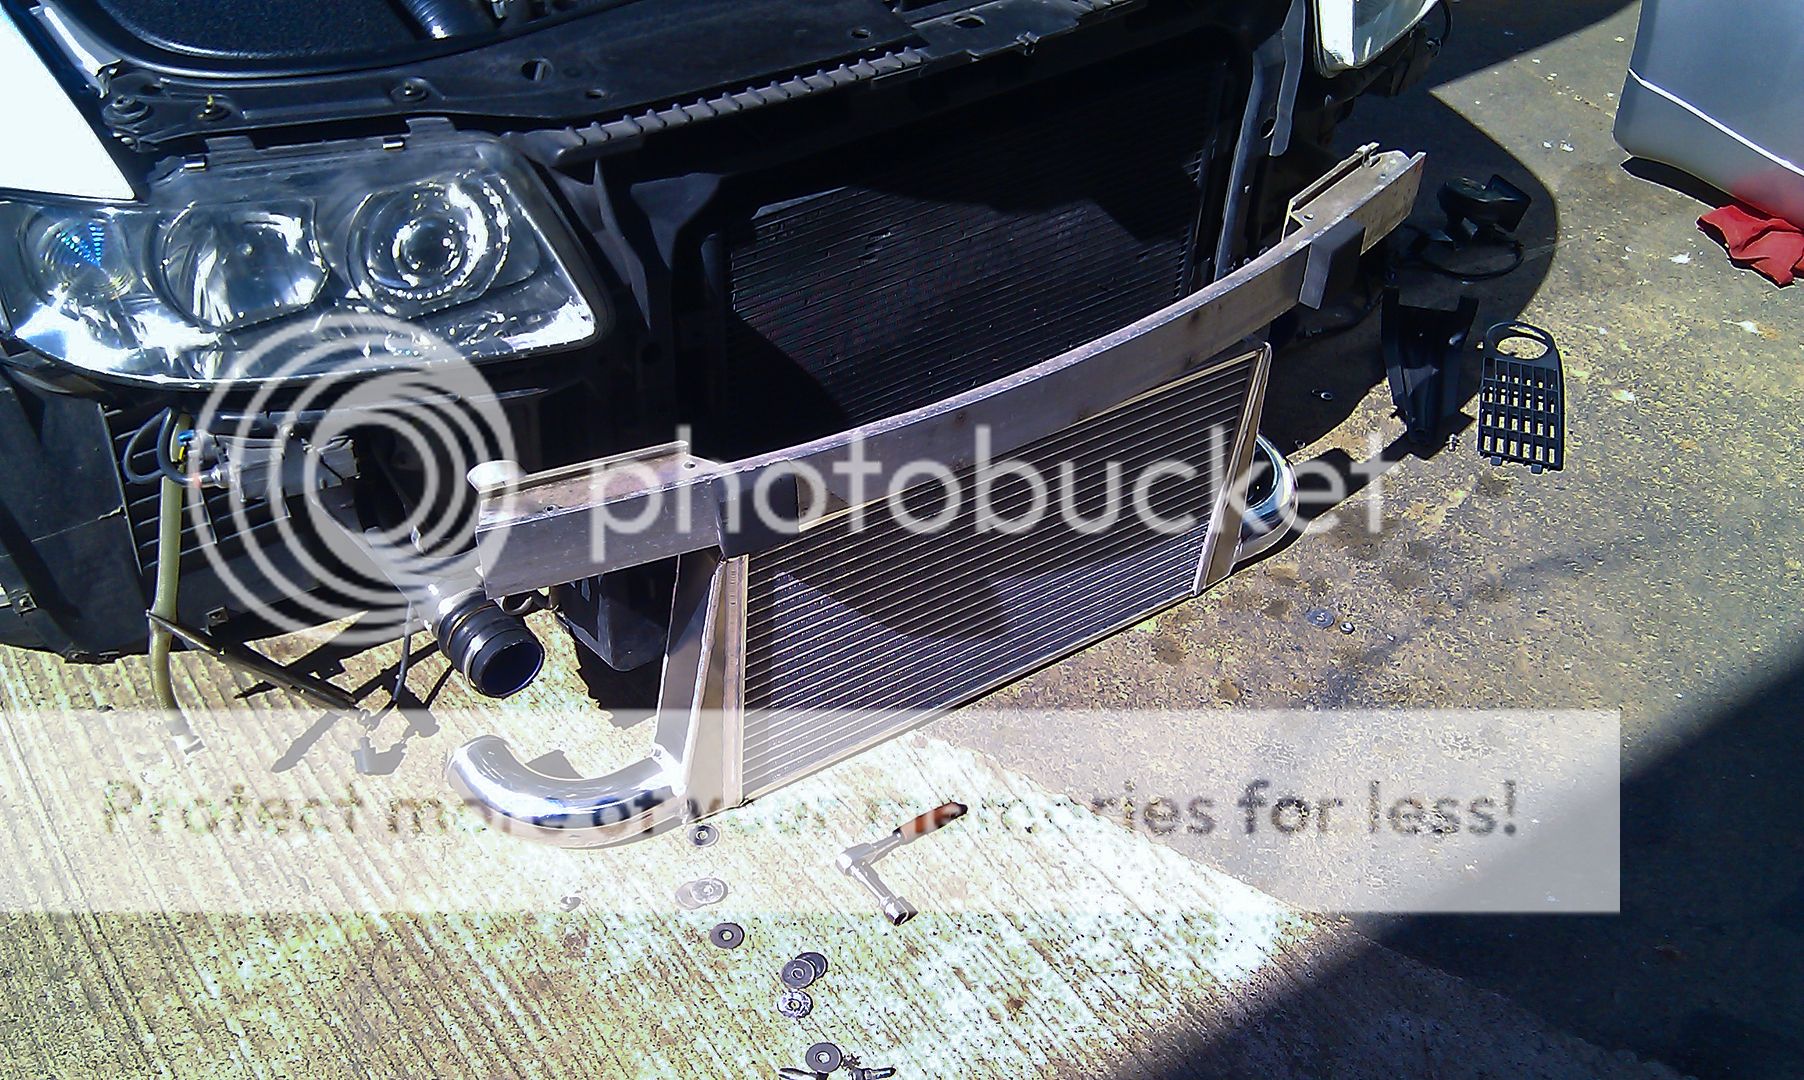
...bit of modding of the crash bar to allow for the extra width of the new core and its brackets... just shaved a little off the bottom to get the brackets flat...
...fitted...
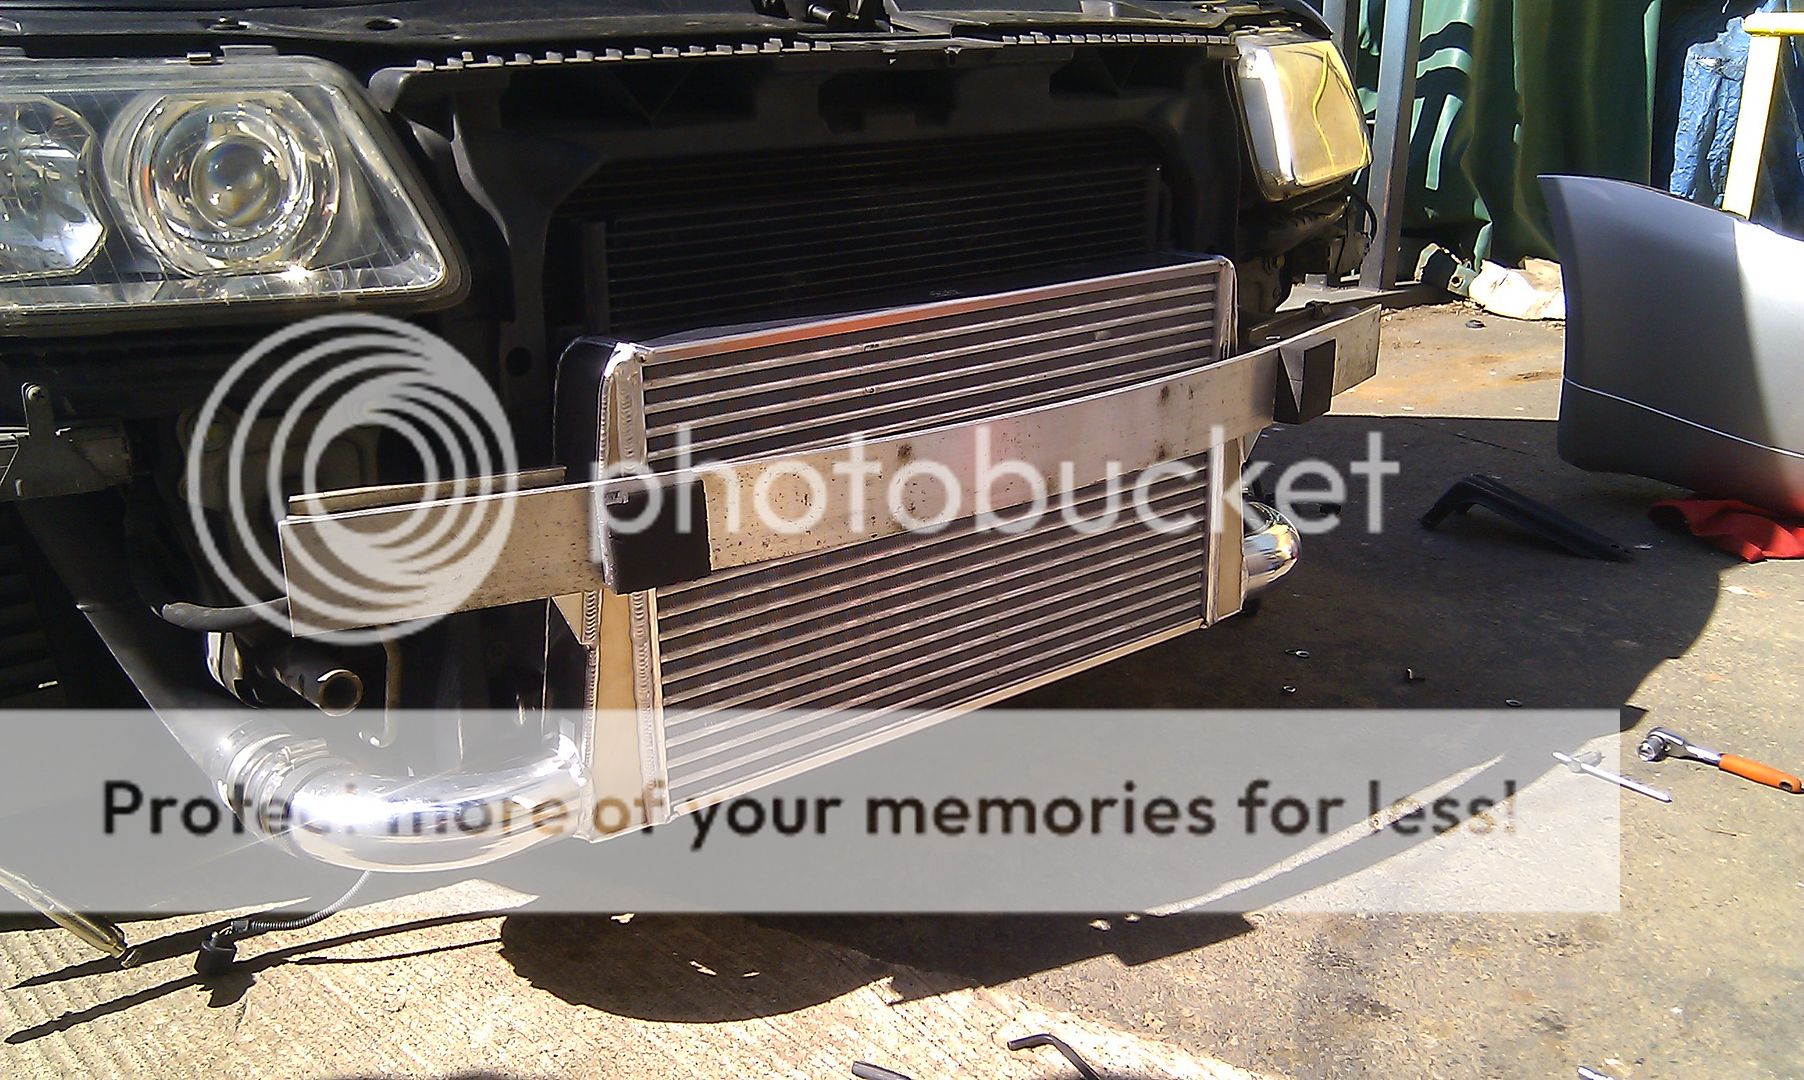
..got the car back to Badger5's workshop and relocated the horns to where the passenger side SMIC used to be by modding the bracket a bit...

...and of course the bumper fits on perfectly....

...still need to paint it black of course but initial feelings from the way the car now drives are promising but has also highlighted that my map really needs tweaking as boost control with the N75 is a little wiggy even with the MBC in place and had a couple of hiccups with a throttle cut on the way back to Bill's...
That does at least mean that I am heading in the right direction as all the boost appears to be getting through now but will of course do some testing next time I get her on the dyno...
Next thing to do is get the Golf MOT'd and taxed so I can change the head... again!!!
<tuffty/>
Just to play catch up as it was some time ago since I fitted my original FMIC (more info here...http://www.audi-sport.net/vb/a3-s3-forum-8l-chassis/75425-ah-fab-ebay-forge-s3-fmic-image-heavy.html)....
...this was fitted while I was still on the K04... since then quite a bit has changed and in the search of increased flow and performance I made a few changes to the original FMIC... going from 51mm outlets to 60mm outlets in this case...
...and changing the charge pipe work to suit...
...anyhoo... turns out that I have outgrown my little FMIC in the pursuit of power so needed something bigger especially as I had a bit of a pressure drop problem of around 8psi on spool and a steady 5psi after that...
First of all, big thanks to great mate Mark for his help and support today... much appreciated... and big thanks to Lars and Alex at AH Fabs for understanding my vague instructions and producing yet another fine product...
Started off with Alex sending me the core so I could measure it all up... after removing 4 rows from the original 25 and taking pics and measurements I met up with Lars who knew exactly what I wanted from my ramblings and bingo... one new FMIC complete with 63mm pipe work...
...bit of modding of the crash bar to allow for the extra width of the new core and its brackets... just shaved a little off the bottom to get the brackets flat...
...fitted...
..got the car back to Badger5's workshop and relocated the horns to where the passenger side SMIC used to be by modding the bracket a bit...
...and of course the bumper fits on perfectly....
...still need to paint it black of course but initial feelings from the way the car now drives are promising but has also highlighted that my map really needs tweaking as boost control with the N75 is a little wiggy even with the MBC in place and had a couple of hiccups with a throttle cut on the way back to Bill's...
That does at least mean that I am heading in the right direction as all the boost appears to be getting through now but will of course do some testing next time I get her on the dyno...
Next thing to do is get the Golf MOT'd and taxed so I can change the head... again!!!
<tuffty/>
- Joined
- Sep 14, 2008
- Messages
- 24,836
- Reaction score
- 6,078
- Points
- 113
- Location
- Wibbleton
- Website
- www.tuffty.co.uk
OMG, your car is pure porn tuffty
Do you know how much the new intercooler will be?
Not yet Dani no... Alex said he is going to work out a price sometime in the week once he gets a chance too as I supplied the 63mm pipework for mine so he needs to find out how much that would cost and factor it in etc...
I would imagine it will be a little more than the current one though... the hoses required to hook it up will be different of course... I don't know for sure but I would imagine 4 x 60mm 90deg silicon elbows (a 60mm elbow on the 63mm outlet is tight but nothing a little washing up liquid can't deal with...) , 4 x 60mm alloy couplers, 10 x 50-70mm JCS Hi-Torque stainless steel clips should do the trick...
<tuffty/>
Legendary mate, will you update your thread with the price? Well the credit cards primed and ready for this 1, its the perfect balance between the old AH Fab intercooler and wellys large ebay intercooler .
.- Joined
- Sep 4, 2003
- Messages
- 29,115
- Reaction score
- 3,862
- Points
- 113
- Location
- Solihull, Midlands
- Website
- www.audi-sport.net
Good stuff Paul, always interesting to see your car develop, and in all the time you have been tweaking, I've not touched mine at all in terms of tuning!
- Joined
- Sep 14, 2008
- Messages
- 24,836
- Reaction score
- 6,078
- Points
- 113
- Location
- Wibbleton
- Website
- www.tuffty.co.uk
Legendary mate, will you update your thread with the price? Well the credit cards primed and ready for this 1, its the perfect balance between the old AH Fab intercooler and wellys large ebay intercooler
I'll follow it up in the week if I get a chance but want to test the pressure drop across the core before getting back in touch so I have some info for him... pointless making them if it doesn't work but pretty sure there won't be an issue with this one...
Good stuff Paul, always interesting to see your car develop, and in all the time you have been tweaking, I've not touched mine at all in terms of tuning!
Thanks Jo... been a long time in development but getting there finally... every time I get closer to realising the full potential of the turbo... pleased that I have built the car this way though rather than wade in with a huge wad of cash as the development has taught me loads and given me a better appreciation of tuning with seeing what works and what doesn't...
<tuffty/>
Speedy Steve
Registered User
Awesome work paul loving how the bigger cooler still doesnt show through the bumper like some

- Joined
- Sep 14, 2008
- Messages
- 24,836
- Reaction score
- 6,078
- Points
- 113
- Location
- Wibbleton
- Website
- www.tuffty.co.uk
Hows the cooler performing tuffty? Any news on pricing etc?
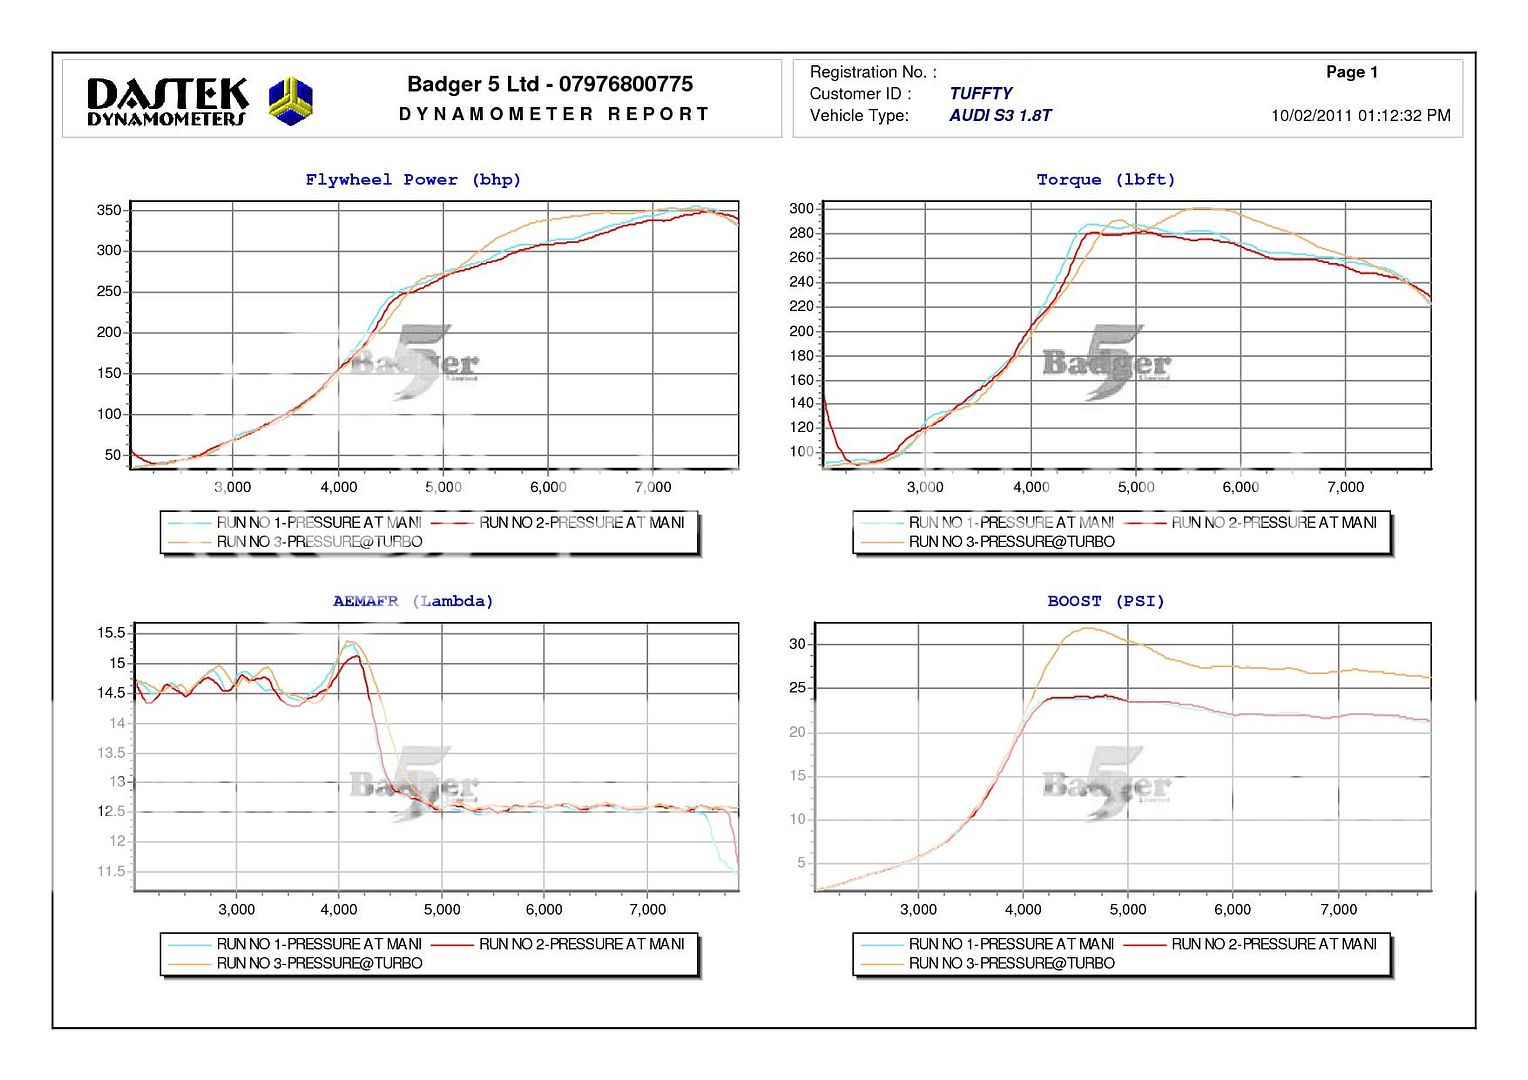
Cooler is performing well so far but its difficult to tell for sure as I still need to change the head and followers and get the mapping sorted... the boost control is way out at the moment so I am now running on actuator pressure until I have the rest sorted. I am still running the original map I had done before I went large port and larger turbine on the turbo so now everything flows so much better the boost control is too harsh and even with the MBC i place I am getting over 2bar spikes randomly... this could be sorted by playing with the MBC springs or just using the MBC rather than the N75/MBC parallel setup but I would rather wait until the mapping is sorted tbh...
Got my Golf taxed and tested now so just a case of finding a few days where I can grab the ramp at Bill's to do the head swap and then get the mapping sorted...
Thats probably not going to happen until midway through next month now as a combination of Bill being busy (Dane's hybrid conversion being one of them) and me being busy at work means neither of us have the time to get it done...
Will try and speak to Alex in the week regarding the pricing but tbh I haven't really tested it as yet and I will only know how good it really is when she is back on the dyno for mapping again...
If you are asking me have things improved since the swap then yes, things feel much better... the car drives better than it did on part throttle and IAT's are lower but the lower IAT's are also due to the turbo not going outside its efficiency curve to meet requested boost due to the pressure drop I had before and as always with my setup, the results are subjective at best as it is different to a K04 setup...
<tuffty/>
- Joined
- Sep 14, 2008
- Messages
- 24,836
- Reaction score
- 6,078
- Points
- 113
- Location
- Wibbleton
- Website
- www.tuffty.co.uk
Bill has been up to his old tricks again and leaving nice bits out for me to find and dribble over so I thought it would be rude not to at least admire it in its natural habitat....
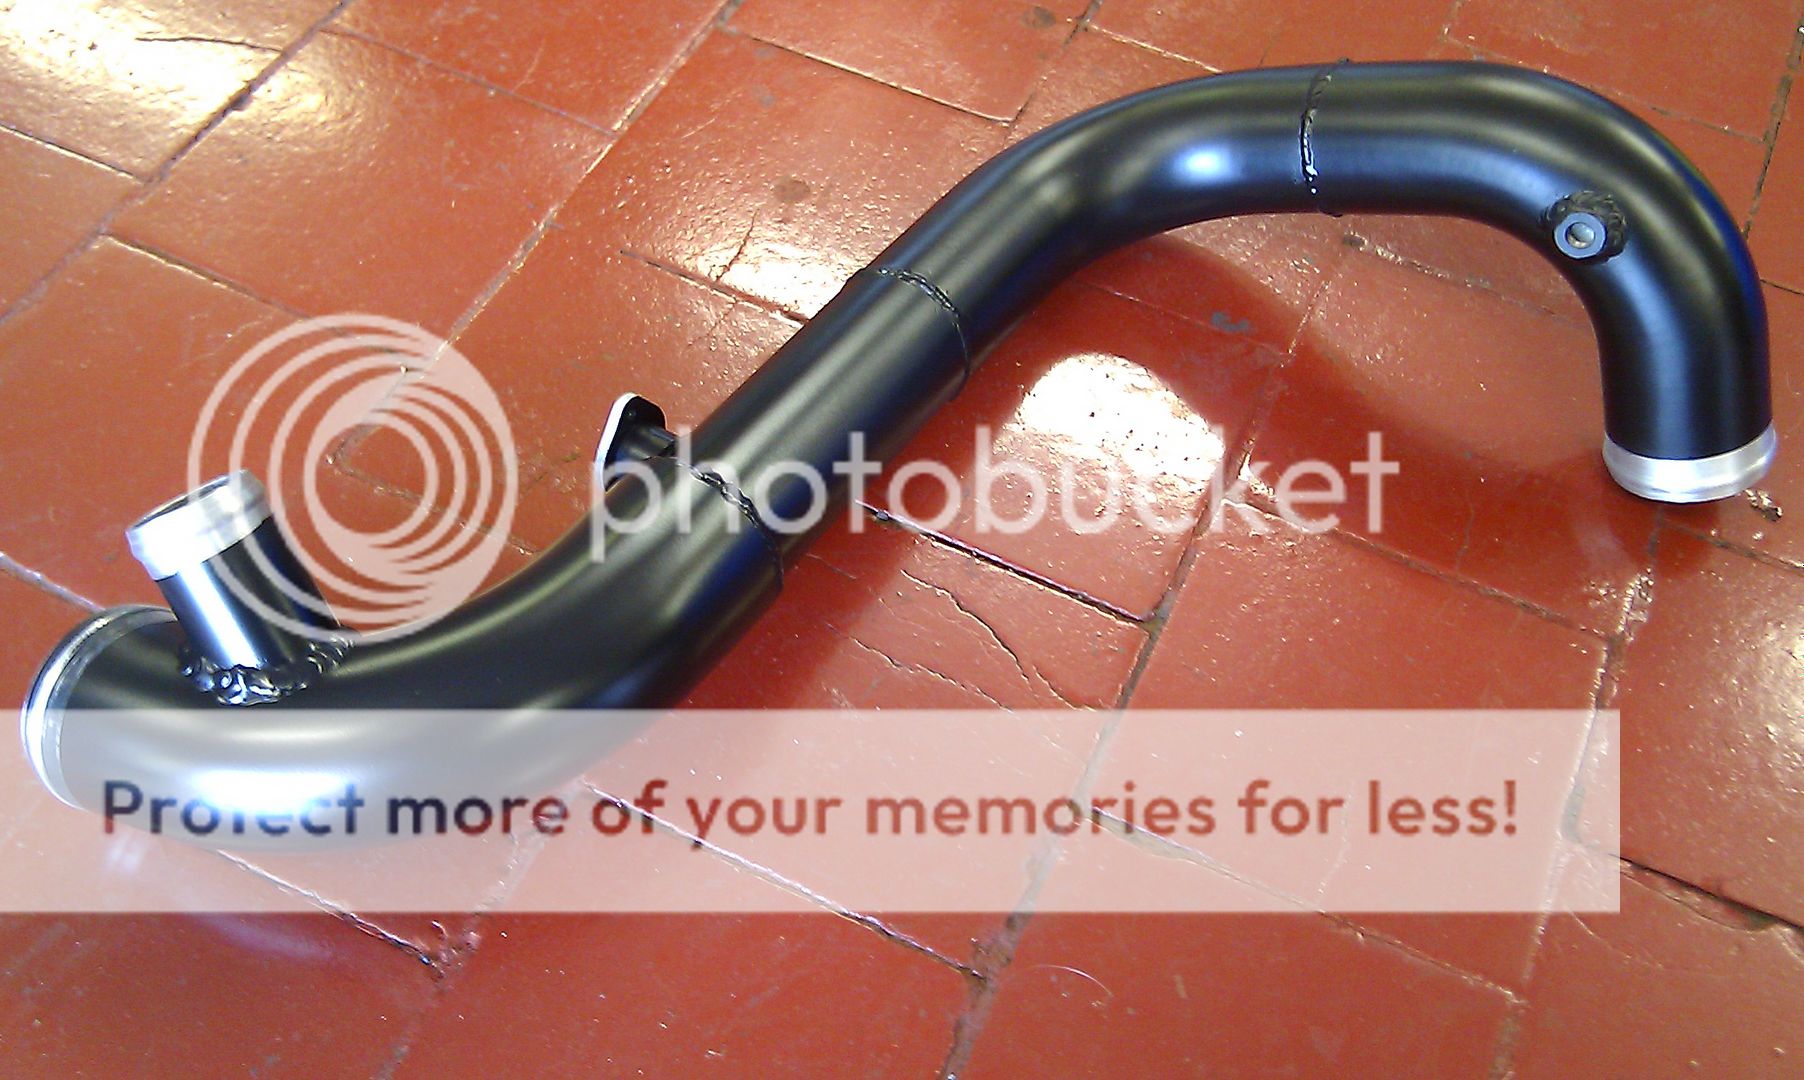
....anyhoo... took the chance to remake the drivers side charge pipe as Dane is having this as part of the deal with my old FMIC... the original was 60mm so seeing as I had the inlets of the new FMIC made up to 63mm I decided to make this pipework 63mm too...

I then spent the rest of the afternoon machine polishing Bill's Arosa and when I got home I started the summer detailing regime on the S3... this will take a few days of course as there is a lot to do seeing as I have been using the S3 all winter
Golf is going well though and finally changed the fuel tank that had an 'extra' hole in it... I can finally brim the tank without a load of it pouring back out...
Still have no idea when I will get around to changing the head over but hoping to find some time mid May... in the meantime I won't be driving the car as the rattle is getting worse as I let off the throttle... booo!!
<tuffty/>
....anyhoo... took the chance to remake the drivers side charge pipe as Dane is having this as part of the deal with my old FMIC... the original was 60mm so seeing as I had the inlets of the new FMIC made up to 63mm I decided to make this pipework 63mm too...
I then spent the rest of the afternoon machine polishing Bill's Arosa and when I got home I started the summer detailing regime on the S3... this will take a few days of course as there is a lot to do seeing as I have been using the S3 all winter
Golf is going well though and finally changed the fuel tank that had an 'extra' hole in it... I can finally brim the tank without a load of it pouring back out...
Still have no idea when I will get around to changing the head over but hoping to find some time mid May... in the meantime I won't be driving the car as the rattle is getting worse as I let off the throttle... booo!!
<tuffty/>
- Joined
- Sep 14, 2008
- Messages
- 24,836
- Reaction score
- 6,078
- Points
- 113
- Location
- Wibbleton
- Website
- www.tuffty.co.uk
Deja vu time...


Just need to strip out the valves and springs and then I can start to build up the new head with new followers...
I am tempted to take one of the piston assemblies out to check the small ends but tbh I am pretty confident that the rattle is a head related issue for whatever reason...
Back at it this evening to hopefully get the head stripped ready for tomorrow...
<tuffty/>
- Joined
- Dec 2, 2008
- Messages
- 17,400
- Reaction score
- 1,104
- Points
- 113
- Joined
- Sep 4, 2003
- Messages
- 29,115
- Reaction score
- 3,862
- Points
- 113
- Location
- Solihull, Midlands
- Website
- www.audi-sport.net
You have to love the title of this thread, 'minor modding' thread!! LOL! 
Good work Paul. :thumbsup:
Good work Paul. :thumbsup:
Deja vu time...
I am tempted to take one of the piston assemblies out to check the small ends but tbh I am pretty confident that the rattle is a head related issue for whatever reason...
Back at it this evening to hopefully get the head stripped ready for tomorrow...
<tuffty/>
TBH mate it's only some sealent and a few more nuts to drop one out at this stage..
- Joined
- Nov 11, 2009
- Messages
- 10,099
- Reaction score
- 739
- Points
- 38
- Location
- west yorks
- Website
- www.stainless-engineering.co.uk
- Joined
- Sep 14, 2008
- Messages
- 24,836
- Reaction score
- 6,078
- Points
- 113
- Location
- Wibbleton
- Website
- www.tuffty.co.uk
You love it don't you mate! Good luck with the head work.
I would prefer not to have to keep doing the same thing over again on mine if I was honest lol.... but thanks, fingers crossed
You have to love the title of this thread, 'minor modding' thread!! LOL!
Good work Paul. :thumbsup:
The irony was intentional however there are times when its just silly like now having taken the head off for the 4th time since starting the build!! lol... ah well, its a learning curve and its still a lot of fun... most of the time!!
TBH mate it's only some sealent and a few more nuts to drop one out at this stage..
I know mate... will build the head first then I'll be ready to take that on... although I have no backup plan if the little ends/pins are the issue
Good luck in sorting the noise, that will have been a costly rattle...
Thanks Dave... I asked Bill to have a quick look over the cams after I took them off and looks like the inlet is a little worn... Bill has a few cams on the shelf (std ones) so need to double check what they are from etc as there is a few different types... there is some info on a thread in Bill's forum on SCN..
inlet:
058109021 = ADR und AFY 8,78mm, 210°, 4° n.OT
058109021.B = APX, ANB, AEB,APU, AJL, AGU, AQA, ARZ, AJQ, APP, APY, AUL 7,67mm, 190°, 18° n.OT
058109021.K = ADR, APT, ARG, AVV 8,41mm, 202°, 16° n.OT
058109021.M = AWT, AUM, ARX, ARY, AUQ, AMK, BAM, AUL, APP 7,67mm, 190°, 18° n.OT
058109021.F = AGN, APG 8,41mm, 202°, 18° n. OT
058109021.E = AWB 8,6mm, 207°, 9° n.OT
058109021.D = ADR, AGN 8,41mm, 202°, 12° n. OT
esxaust:
058109022.B = AQA, ARZ, AJQ, APP, APY, AEB, APU, ANB, AJL, AWT, AGU, AUM, ARX, ARY, AUQ, AMK, BAM 9,3mm, 210°, 10° v.OT
058109022.C = ADR, AFY, APT, ARG, AVV 10,25mm, 210°, 8° v.OT
058109022.D = AGN, APG 10,4mm, 210°, 8° v.OT
...I'll check the numbers tomorrow...
The exhaust cam looks to be ok though so fingers crossed...
<tuffty/>
Interesting, so it looks like the AUQ inlet cam is the same profile as the AEB even though it differs in part number slightly? I was just wondering as im changing the tensioner on mine soon and didnt know wether to change the cam aswell as its listed as being different. Splendid!
Fingers crossed your problems have been head related!
Fingers crossed your problems have been head related!
- Joined
- Sep 14, 2008
- Messages
- 24,836
- Reaction score
- 6,078
- Points
- 113
- Location
- Wibbleton
- Website
- www.tuffty.co.uk
Mixed bag day today.... building 20v heads is a tedious enough job but stripping one then building one is worse lol...
Anyhoo... after remembering Super Tech exhaust springs are doubles and that they have a titanium seat that doesn't pull over the ****** stem seals I just removed the ones in the old head (which buggers them a bit) to get to the seats and will have to get some new seals for the new head as while it has newish seals already fitted I don't want to risk them getting damaged when I remove them to fit the exhaust springs so that will be a job for Saturday (hoping I will find someone open!)...
Once removed from the old head I lapped them all into the new head...

...then cleaned the head in the parts washer and fitted the inlets...
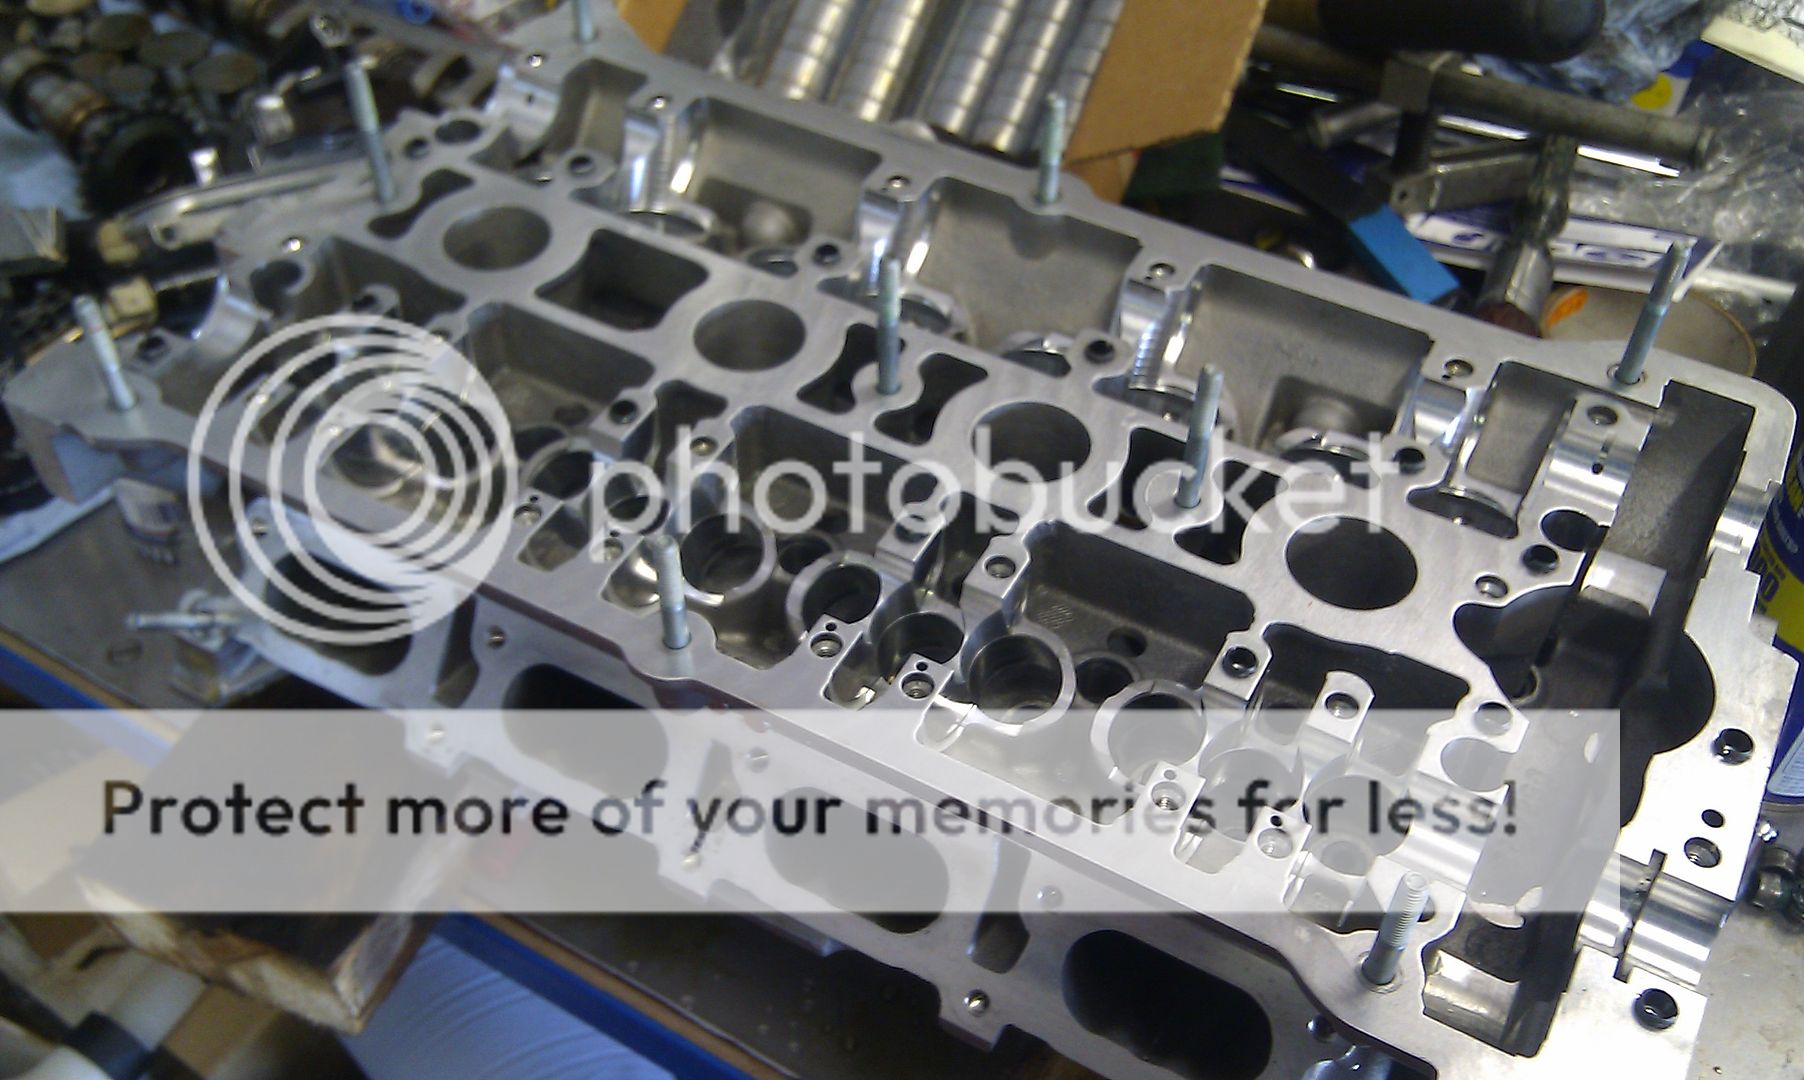
...I decided to reuse my old VVT unit which is an original one rather than the ebay one... main reason for this is I inspected the unit and there was some unusual wear on the top piston of the tensioner... this could be a result of the oil pressure issues I have been having with the old head so decided to reuses the tensioner pads on the old OEM VVT unit and fit that as tbh fitting the ebay unit didn't cure the rattle so will give that a go... I have a new set of followers to fit too so if this doesn't fix the rattle I am out of ideas

Hoping to have the head back together tomorrow and fitted back on the car... should be in a position to start her up if all goes well...
<tuffty/>
Anyhoo... after remembering Super Tech exhaust springs are doubles and that they have a titanium seat that doesn't pull over the ****** stem seals I just removed the ones in the old head (which buggers them a bit) to get to the seats and will have to get some new seals for the new head as while it has newish seals already fitted I don't want to risk them getting damaged when I remove them to fit the exhaust springs so that will be a job for Saturday (hoping I will find someone open!)...
Once removed from the old head I lapped them all into the new head...
...then cleaned the head in the parts washer and fitted the inlets...
...I decided to reuse my old VVT unit which is an original one rather than the ebay one... main reason for this is I inspected the unit and there was some unusual wear on the top piston of the tensioner... this could be a result of the oil pressure issues I have been having with the old head so decided to reuses the tensioner pads on the old OEM VVT unit and fit that as tbh fitting the ebay unit didn't cure the rattle so will give that a go... I have a new set of followers to fit too so if this doesn't fix the rattle I am out of ideas
Hoping to have the head back together tomorrow and fitted back on the car... should be in a position to start her up if all goes well...
<tuffty/>
- Joined
- Sep 14, 2008
- Messages
- 24,836
- Reaction score
- 6,078
- Points
- 113
- Location
- Wibbleton
- Website
- www.tuffty.co.uk
Mixed bag day today.... building 20v heads is a tedious enough job but stripping one then building one is worse lol...
Anyhoo... after remembering Super Tech exhaust springs are doubles and that they have a titanium seat that doesn't pull over the ****** stem seals I just removed the ones in the old head (which buggers them a bit) to get to the seats and will have to get some new seals for the new head as while it has newish seals already fitted I don't want to risk them getting damaged when I remove them to fit the exhaust springs so that will be a job for Saturday (hoping I will find someone open!)...
Once removed from the old head I lapped them all into the new head...
...then cleaned the head in the parts washer and fitted the inlets...
...I decided to reuse my old VVT unit which is an original one rather than the ebay one... main reason for this is I inspected the unit and there was some unusual wear on the top piston of the tensioner... this could be a result of the oil pressure issues I have been having with the old head so decided to reuses the tensioner pads on the old OEM VVT unit and fit that as tbh fitting the ebay unit didn't cure the rattle so will give that a go... I have a new set of followers to fit too so if this doesn't fix the rattle I am out of ideas
Hoping to have the head back together tomorrow and fitted back on the car... should be in a position to start her up if all goes well...
<tuffty/>
Last edited:
- Joined
- Sep 14, 2008
- Messages
- 24,836
- Reaction score
- 6,078
- Points
- 113
- Location
- Wibbleton
- Website
- www.tuffty.co.uk
Fingers crossed for you chief, hope you managed to sort it, can imagine jobs like this can dwindle funds down to nothing.
That could be said about the entire project lol... its more of a PITA than anything else tbh...
I have decided to use my current cams for the time being as all the 'used' ones I have seen so far look to have similar wear so while not ideal it does seem its normal for this mileage of 20v...
I will most likely get OEM replacements rather than go down the route of playing with NA cams or after market cams as I haven't seen enough information backing up the use of NA cams to warrant trying it for myself and I can't justify the expense of after market cams as I would rather use the money on a SEM or haldex controller tbh...
Hopefully will pick up some seals or at least a removal tool tomorrow and have the head on ready for some dyno time Sunday...
<tuffty/>

- Joined
- Sep 14, 2008
- Messages
- 24,836
- Reaction score
- 6,078
- Points
- 113
- Location
- Wibbleton
- Website
- www.tuffty.co.uk
taking heads apart and putting them back together again seems like a peace of cake for you now..
keep up the great work..
p.s. this must be the best 20vt threat on the net.. :thumbsup:
Thanks... I have done a few now.... mine a little too often though lol...
Getting it back together won't be a problem I just hope it fixes the rattle.... if it does that then I will feel much happier!
<tuffty/>
The use of NA cams is very scarce at best, they do seemed to be big in europe but trailing through the foreign threads and using google translate is a right ball ache. Im sidelining that idea until ive got the bodywork and suspension done.
finesse
Registered User
- Joined
- Sep 14, 2008
- Messages
- 24,836
- Reaction score
- 6,078
- Points
- 113
- Location
- Wibbleton
- Website
- www.tuffty.co.uk
Busy day... had to pop into GSF to grab some valve stem seals and then finished building the head...
Fitted the turbo back on and cleaned the remnants of the old gasket off then fitted the head back on and fitted (yet another) cam belt... engine mount on and timing covers on, oil in and called it a day...

Tomorrow should be just a case of reassembly and start up... fingers crossed the rattle is cured...
<tuffty/>
Fitted the turbo back on and cleaned the remnants of the old gasket off then fitted the head back on and fitted (yet another) cam belt... engine mount on and timing covers on, oil in and called it a day...
Tomorrow should be just a case of reassembly and start up... fingers crossed the rattle is cured...
<tuffty/>
Dane
Had an 8L S3, a B5 RS4 now I have a B8 S4
- Joined
- Sep 14, 2008
- Messages
- 24,836
- Reaction score
- 6,078
- Points
- 113
- Location
- Wibbleton
- Website
- www.tuffty.co.uk
head = rebuilt.... rattle = GONE!!!!.... tuffty = happy as a happy thing!!11111...
...now to the dyno!!!!
<tuffty/>
...now to the dyno!!!!
<tuffty/>