Cup Holder LED Lighting

TTLAW

Registered User
Joined
Nov 11, 2003
Messages
141
Reaction score
4
Points
18
Location
Walsall, England
I will shortly be taking delivery of a ex demo A3 Sportback and the only thing missing from my ideal spec is the Interior Light Package (It has lots of spec I didnt want but the price is right).

Most of the LED pack I can live without but would really like to get the lighting for the cup holders as I think that area of the dash is a bit dark without.

Does anybody have any idea what the cost of this would be? Also how easy a retrofit would be and if anybody knows any people capable of fitting?

Many Thanks

Steve
 
the LED light is quoted 13€ in ETKA

centre%20console.png


centre%20console2.jpg
 
Even if you do get this part from Audi, the cost of labour would outweigh the part.

Does any one know the connecting wires are already there and only the led ring light needs adding or is it a whole fitting required?
 
Looking at the diagrams it is something I would do myself if I could confirm what wiring needed doing?

Thanks for the diagrams they are perfect.

Steve
 
you're welcome :thumbsup:

I guess you could just wire it to the cigarette lighter ?
 
What's the part number guys ? I'm looking to do a retrofit also. Also can you put up the diagrams ?
 
  • Like
Reactions: RYuill
Has anyone actually managed to retrofit these.

I would be interested in doing this also.

Thanks
 
  • Like
Reactions: Zache
Hello everyone. :)

Cartrends.dk and myself have just retrofitted the original LED cupholder lights today.
Heres a picture.

11m3gn8.jpg
 
  • Like
Reactions: OliS3, illingworth22, kayemill and 2 others
Hello everyone. :)

Cartrends.dk and myself have just retrofitted the original LED cupholder lights today.
Heres a picture.

11m3gn8.jpg

Would you happen to have a guide or be able to explain your method.

Would love to do this. Thanks.
 
Hello.

Well, first of all you have to disassemble the centerconsole.
This is quite an easy job, you have to undo 2 clips and then you can lift the whole centerconsole(Cupholders, MMI steering) up over the gearknop. The cupholders are in 2 layers which are glued together, so you have to remove the glue so you can take it apart. After you've done that you can put in the new LED circle in which costs around 20 pounds, it comes with a wire and a stick.
The wire has to go into the stick, both ends, and then u have to weld the wire to the others wires (I didn't do this part, but it works with the auto light so it turns on and off like the rest of the interior lighting).
So it's pretty simple and a 30 minute job if you can understand my horrible english grammas :D
 
  • Like
Reactions: TimWills28, Wondering Soul, illingworth22 and 1 other person
Hello.

Well, first of all you have to disassemble the centerconsole.
This is quite an easy job, you have to undo 2 clips and then you can lift the whole centerconsole(Cupholders, MMI steering) up over the gearknop. The cupholders are in 2 layers which are glued together, so you have to remove the glue so you can take it apart. After you've done that you can put in the new LED circle in which costs around 20 pounds, it comes with a wire and a stick.
The wire has to go into the stick, both ends, and then u have to weld the wire to the others wires (I didn't do this part, but it works with the auto light so it turns on and off like the rest of the interior lighting).
So it's pretty simple and a 30 minute job if you can understand my horrible english grammas :D

Thanks. Doesn't sound too difficult. Might give it a go.
 
If someone else had a go can you take pics and do another install write up cause I'd also like to do this myself
 
Pics would be helpful.

Even if someone could indicate where the first clips are to get the console up.
 
can someone tell us the part number? and also where can i find the ekta catalogue for the 8v?
 
The parts are original Audi.
I just looked up a S3 and found the part.

Unfortunatly i don't have a better description on how to do it.
 
This thread is pretty old but I'm curious if anyone else has tried this install...? I have the parts but haven't tried to remove the console yet (2015 S3). Does anyone know where to plug the wiring into to get power to the LED rings?
 
  • Like
Reactions: mojo555
Not sure if there is an empty socket somewhere wouldn't know where to start TBH but I'd be tempted to tap into the switch illumination that comes on with auto lights think the 12v socket/cigarette lighter may also be an option.
 
  • Like
Reactions: Gazthesparky
Got the lights installed today. Took about 1/2 hour to figure out how to get the center console off and another hour to get the LED unit installed into the console. Involves cutting off lots of plastic glue tabs that hold the textured plastic overlay to the base of the main console. Not really easy but if you are determined it's not too hard.

I looked around for a good place to connect the power but couldn't find a "plug and play" solution. Instead I just patched into the cigarette lighter wiring. I tested the lights first on the bench to make sure they were actually 12v. They are.

Whole install took about 2-1/2 hours. Only issues now are getting the DSG shift knob back on. When I tried it the button is stuck down - anyone dealt with this issue before? I also unplugged the battery for safety sake and now with it reconnected I'm getting every malfunction light in the book (TPMS, Hill Hold, ESC, etc). Is this normal after disconnecting the battery?

I'll post pics shortly.
 
Nice work !!

I also unplugged the battery for safety sake and now with it reconnected I'm getting every malfunction light in the book (TPMS, Hill Hold, ESC, etc). Is this normal after disconnecting the battery?

Yes I believe so and that most will go out after a short drive.
 
Nice work !!


Yes I believe so and that most will go out after a short drive.
Thanks - you're correct - all the warning lights went out after a short drive. Took a while and a bit of Internet searching to figure out how to reset the DSG knob button. There are a couple of YouTube videos out there that help.

All in all this was not the easiest of installs for a seemingly minor addition. The lights are cool but for the time and money it's probably not what I'd put at the top of the list of "simple" mods.
 
  • Like
Reactions: Rob2k68
All in all this was not the easiest of installs for a seemingly minor addition. The lights are cool but for the time and money it's probably not what I'd put at the top of the list of "simple" mods.
Thanks for this write up, was looking at doing this as well but dubious about playing with the centre console. Think I'll leave this one!
 
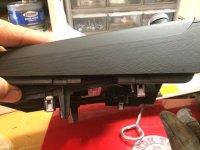
For future reference - popping the center console off is actually super easy once you've done it once. The trick is locating a gap on each side (they about even with the MMI knob) and pushing wedges into the gap until you feel the clips release. Then you just lift the whole thing up with your hands and the other clips release. I can do it now in about 30 seconds.

See the first photo which shows the gaps in the sides and the second which shows the gaps in relation to the MMI knob in the background.

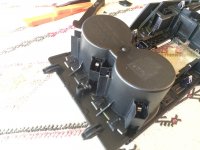
The third image shows the time consuming part - there are 12 of these "glue" tabs that need to be cut off to separate the textured overlay from the base console to access the old plastic rings and install the new rings. The picture shows four of them right in front of the cup holders.

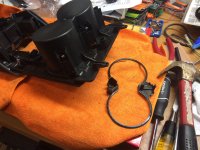
The fourth picture shows the old black plastic rings removed. You can see the released glue tabs in the photo as well.
Image
Image
Image
Image
 
Last edited:
  • Like
Reactions: Wondering Soul
@Nathing32 thanks for that, as you can see from my previous post I was dubious about trying this but now that you have explained it in a little more detail with some pics, I think ill at least give it a try ! Thanks !
 
@Nathing32 thanks for that, as you can see from my previous post I was dubious about trying this but now that you have explained it in a little more detail with some pics, I think ill at least give it a try ! Thanks !
No problem- the part number for the rings is: 8V0 947 157 A. Looks like a few places sell them now on-line.
 
  • Like
Reactions: Wondering Soul
@Nathing32

Great job on the write up! Thanks! About the wiring - did yours come with a connector and wiring? Just asking as mine arrived today from ECS and it's just the one piece with the two pins (after taking the photo, they seem to be labeled 1 and 2) in there for the power. If there's no wiring, what did you use to connect to the pins? Cheers!
 

Attachments

  • Screenshot_2015-07-14-23-36-05.png
    Screenshot_2015-07-14-23-36-05.png
    1.8 MB · Views: 2,190
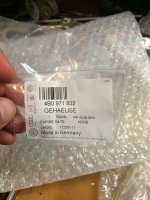
kc1174 - Mine came with two wires with pre-soldered plug ends and a plastic connector that they snap into. The plastic connector fits into the socket on the rings you show in your photo. See below for the part number and picture of the connector before snapping the wires into it. I don't know the part number for the wires themselves - they were in a plastic bag inside the box that the rings came in.

Since it's an LED the polarity has to be correct - if you connect the wires in reverse the lights glow red instead of white
 

Attachments

  • image.jpg
    image.jpg
    637.3 KB · Views: 2,036
  • image.jpg
    image.jpg
    571.4 KB · Views: 1,998
  • Like
Reactions: kc1174
kc1174 - Mine came with two wires with pre-soldered plug ends and a plastic connector that they snap into. The plastic connector fits into the socket on the rings you show in your photo. See below for the part number and picture of the connector before snapping the wires into it. I don't know the part number for the wires themselves - they were in a plastic bag inside the box that the rings came in.

Since it's an LED the polarity has to be correct - if you connect the wires in reverse the lights glow red instead of white

Thanks mate! Where did you order yours from by the way? I'll have to contact ECS and see what's going on. I used them before with no problems so maybe they received it incomplete.
 
Actually bought it off another forum. Some dude that got it straight from a dealership...so maybe the parts guy there included the wires and connectors and they aren't actually included in the package..?Here is what the wires look like:
 

Attachments

  • image.jpg
    image.jpg
    128.4 KB · Views: 2,017
  • Like
Reactions: kc1174