

The standard Audi B6 Siren (2001+) suffers from internal batteries becoming flat / leaking and they are not user replaceable requiring a new siren at a cost of at least £85+. The internal batteries are 2x large button cell type: "N3H 3.6v 160mAh", and are no longer made by the OEM in Germany. There are no same size equivalents!
My solution shows how to modify the current siren unit to accommodate 6x "AA" size Ni-MH 1.2v 2000mAh batteries.
Parts Used:
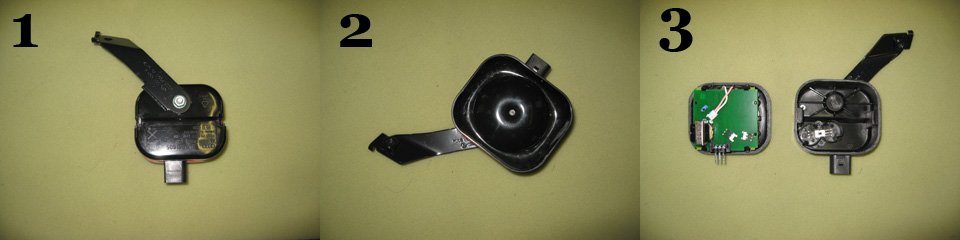
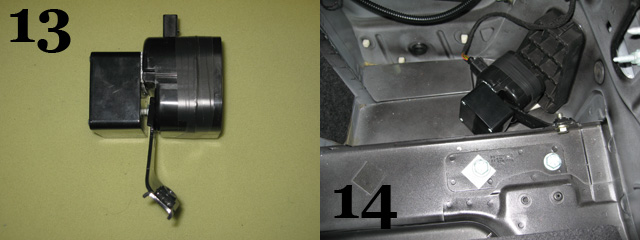
1. & 2. The siren unit removed from the car - in the saloon on an A4/B6 it is located at right rear corner in boot behind upholstered internal cover (pic.14). Carefully cut the siren unit open along the welded seam with a mini-hacksaw.
3. Shows Siren in two halves
 This image has been resized. Click this bar to view the full image. The original image is sized 960x240.
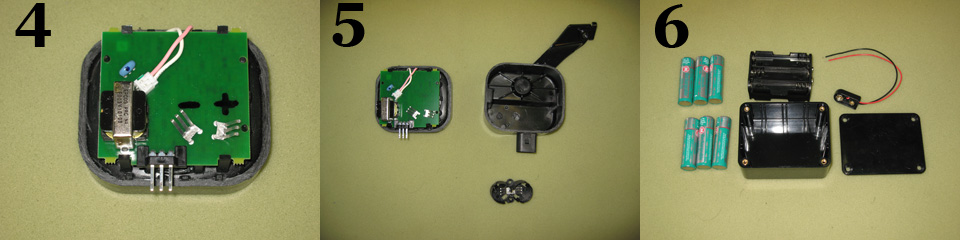
4. Label the existing terminals with a marker pen - avoids incorrect connection of new batteries, later on.
5. The "old" batteries are held in the lid by a two cell holder. Pull this welded plastic holder out with a pair of pliers and discard.
6. The new components obtained from Maplins are:
This image has been resized. Click this bar to view the full image. The original image is sized 960x240.
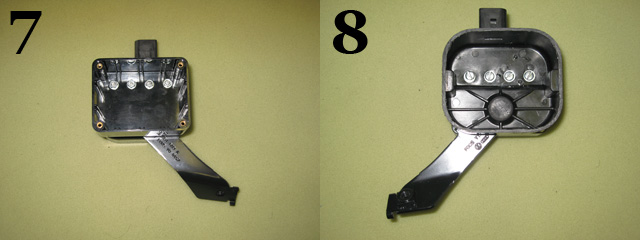
7. & 8. Bolt "new" battery box to siren lid. I used 4x M4 screws / nuts / washers. I also used bathroom silicon sealant between the two plastic boxes, although this unit should not get wet.
This image has been resized. Click this bar to view the full image. The original image is sized 640x240.
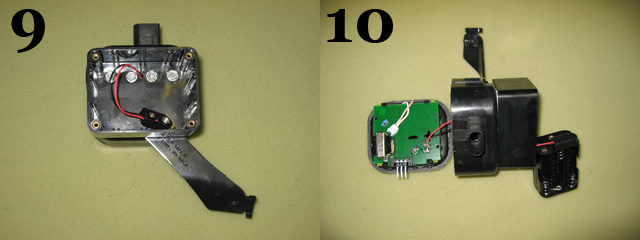
9. Shows battery clip in "new" battery compartment through small hole drilled between the centre two fixing bolts.
10. Shows other end of battery clip wires soldered to siren unit battery terminals. (Old Spring contacts were cut off with side cutters)
This image has been resized. Click this bar to view the full image. The original image is sized 640x240.
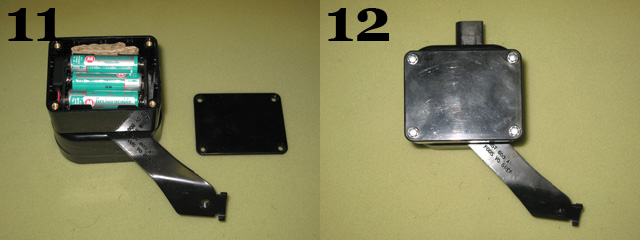
11. New batteries mounted in battery cell holder and small piece of cardboard used as packing to prevent battery movement.
12. "New" battery compartment with lid fixed with M4 security screws for added security.
This image has been resized. Click this bar to view the full image. The original image is sized 640x240.
13. For test purposes I taped the two halves together and tested in car. Once I was happy all was working after "testing" -see below, I glued the two halves back together with Araldite Epoxy Resin Glue.
14. The modified siren back in the car - you may need to very slightly bend the mounting arm.
This image has been resized. Click this bar to view the full image. The original image is sized 640x240.
Testing:
a. Mount and reconnect the siren in the car
b. Leave the siren connected in the car for ~24 hours - this ensures the new batteries are fully charged. (You could always pre-charge them if you have a suitable charger for the AA cells.)
c. Arm your car alarm - with your windows open - leave the system for a few minutes - move your arms inside the car to activate the Ultrasonic interior sensor - Alarm should sound. Disarm the alarm - siren should stop. Close the windows.
d. Pop the bonnet - Arm the alarm - after a couple of minutes disconnect the -ve side of the car battery. Within 5 seconds the siren should sound for ~30 secs. and re-arm itself - if the battery is still disconnected it will sound for ~30secs again, and so on. Reconnect the battery and the Siren should cease.
If the batteries should fail in the future you can easily replace them for standard AA rechargeable ones without the need to cut open the siren unit again.
NOTE: The batteries used here are significantly higher in capacity, 160mAh "old" vs 2000mAh "new" so should offer better backup performance for much longer if necessary ~12x longer.
That's it all done.

My solution shows how to modify the current siren unit to accommodate 6x "AA" size Ni-MH 1.2v 2000mAh batteries.
Parts Used:
Maplin LH21X @ £3.29
Box dimensions: Internal 97 x 73 x 39 mm, External 100 x 76 x41 mm
http://www.maplin.co.uk/Module.aspx?ModuleNo=1676
Batteries: 6x 1.2V Ni-MH "AA" Cells: Maplin N04BW (Pack of 4) requires 2 packs @ £7.99 each
http://www.maplin.co.uk/Module.aspx?ModuleNo=45787
Battery Holder: AA x 6, Maplin HQ01B @ £0.89
Dimensions: 58 x 44 x 28mm .....above box will accommodate this.
http://www.maplin.co.uk/Module.aspx?ModuleNo=31427
Battery Connector: Maplin NE19V @ £0.59
http://www.maplin.co.uk/Module.aspx?ModuleNo=31743
Parts Total: £20.75 + P&P (with 2 spare batteries left over!)
excluding optional security screws, bathroom sealant & Araldite.
Procedure:Box dimensions: Internal 97 x 73 x 39 mm, External 100 x 76 x41 mm
http://www.maplin.co.uk/Module.aspx?ModuleNo=1676
Batteries: 6x 1.2V Ni-MH "AA" Cells: Maplin N04BW (Pack of 4) requires 2 packs @ £7.99 each
http://www.maplin.co.uk/Module.aspx?ModuleNo=45787
Battery Holder: AA x 6, Maplin HQ01B @ £0.89
Dimensions: 58 x 44 x 28mm .....above box will accommodate this.
http://www.maplin.co.uk/Module.aspx?ModuleNo=31427
Battery Connector: Maplin NE19V @ £0.59
http://www.maplin.co.uk/Module.aspx?ModuleNo=31743
Parts Total: £20.75 + P&P (with 2 spare batteries left over!)
excluding optional security screws, bathroom sealant & Araldite.
1. & 2. The siren unit removed from the car - in the saloon on an A4/B6 it is located at right rear corner in boot behind upholstered internal cover (pic.14). Carefully cut the siren unit open along the welded seam with a mini-hacksaw.
3. Shows Siren in two halves
4. Label the existing terminals with a marker pen - avoids incorrect connection of new batteries, later on.
5. The "old" batteries are held in the lid by a two cell holder. Pull this welded plastic holder out with a pair of pliers and discard.
6. The new components obtained from Maplins are:
- 6x Ni-MH "AA" cells 1.2v / 2000mAh
- 1x 6-AA cell battery holder
- 1x ABS Box
- 1x PP3 style battery clip
7. & 8. Bolt "new" battery box to siren lid. I used 4x M4 screws / nuts / washers. I also used bathroom silicon sealant between the two plastic boxes, although this unit should not get wet.
9. Shows battery clip in "new" battery compartment through small hole drilled between the centre two fixing bolts.
10. Shows other end of battery clip wires soldered to siren unit battery terminals. (Old Spring contacts were cut off with side cutters)
11. New batteries mounted in battery cell holder and small piece of cardboard used as packing to prevent battery movement.
12. "New" battery compartment with lid fixed with M4 security screws for added security.
13. For test purposes I taped the two halves together and tested in car. Once I was happy all was working after "testing" -see below, I glued the two halves back together with Araldite Epoxy Resin Glue.
14. The modified siren back in the car - you may need to very slightly bend the mounting arm.
Testing:
a. Mount and reconnect the siren in the car
b. Leave the siren connected in the car for ~24 hours - this ensures the new batteries are fully charged. (You could always pre-charge them if you have a suitable charger for the AA cells.)
c. Arm your car alarm - with your windows open - leave the system for a few minutes - move your arms inside the car to activate the Ultrasonic interior sensor - Alarm should sound. Disarm the alarm - siren should stop. Close the windows.
d. Pop the bonnet - Arm the alarm - after a couple of minutes disconnect the -ve side of the car battery. Within 5 seconds the siren should sound for ~30 secs. and re-arm itself - if the battery is still disconnected it will sound for ~30secs again, and so on. Reconnect the battery and the Siren should cease.
If the batteries should fail in the future you can easily replace them for standard AA rechargeable ones without the need to cut open the siren unit again.
NOTE: The batteries used here are significantly higher in capacity, 160mAh "old" vs 2000mAh "new" so should offer better backup performance for much longer if necessary ~12x longer.
That's it all done.

")
