

N249 Bypass.
Car: 2000 S3 with APY.
Time taken: Approx 1 hour 30 mins (would have been less but we were messing about, and broke something).
Attempted by: Welly & his mate Jonny.
Needed: 4mm internal diameter vac hose. Allen keys. 10 MM socket. T piece.
Difficulty: A trained chimp could complete.
OK. This isnt a difficult task, and to anyone with even a flicker of mechanical know-how will, (once knowing what pipe is what) have this done with ease.
Pros and Cons:
Pros: It sharpens up DV response and eliminates the possibility of the ECU dumping boost mid rev (using the DV anyway).
Cons: Limits the ways that the ECU has to control overboost (although the N75 & MAP sensor will keep the ECU in the know and in control). Also, it removes one of the ways that the Traction Control uses to limit power.
The three items in question are a) the re-circ valve b) the N249 valve and c) the N112 valve (not on AMK or BAM engines)
So, lets begin .
Engine cover off .

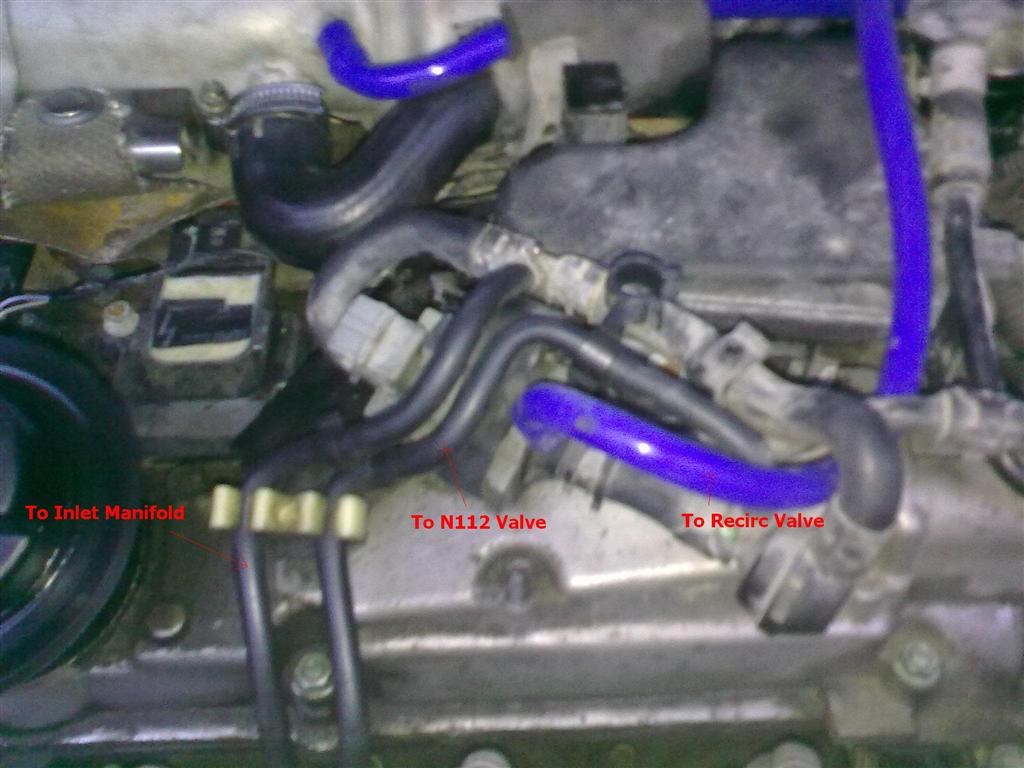
N249 is readily obvious on the APY engine as shown in image 1.
In image 2 you can see the three pipes that we need to keep on the engine.
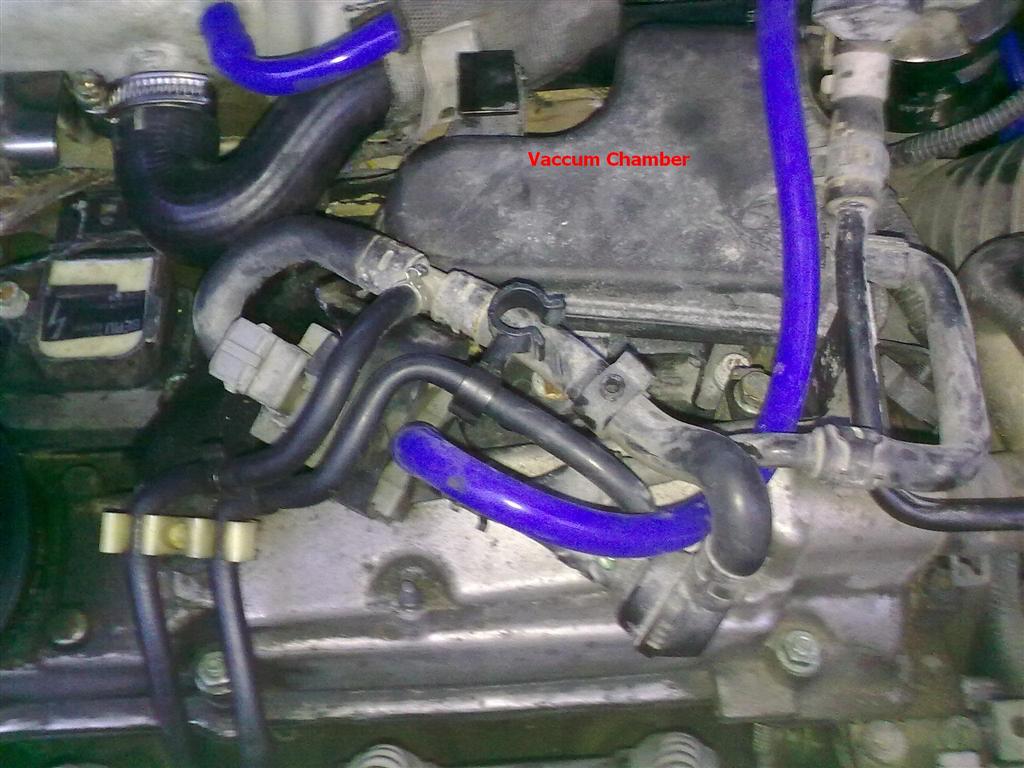
Image 3 simply shows the vac chamber that we will be getting rid of.
Removal of the metal plate attached to the inlet manifold is necessary at this point two Allen key bolts. Forgot to note what size sorry. Be VERY careful when removing plate as it has a lug which connects onto the dipstick shroud this will usually be brittle and easily broken (thats why mine isnt there. But I broke that fitting an alternator. Its been temporarily replaced with a wine bottle cork Pro bodge!).

Image 4 is showing you the underside of said metal plate. N112 pipe work is readily visible. Cut pipe to N249 as close to the nipple as possible. If replacing vac line to SAI also (if you have a bit of spare hose) the cut the second vac line. If not, simply pull off (be careful not to damage valve more on this later)
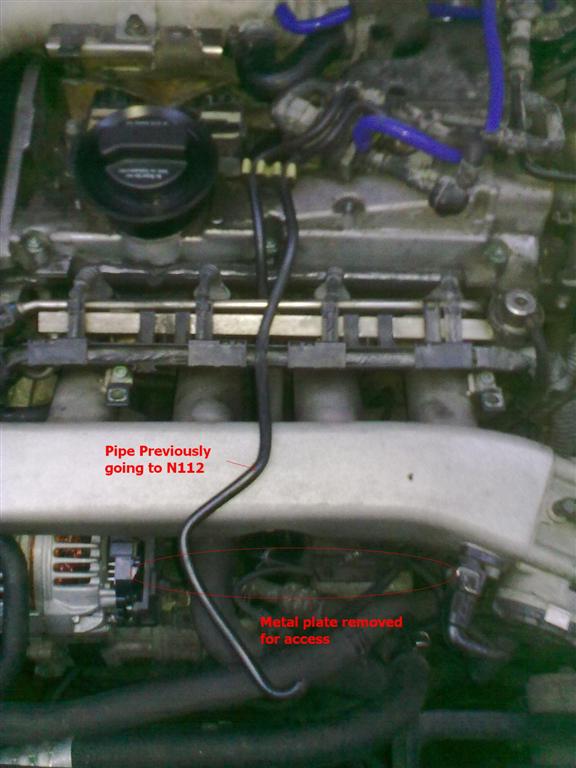
Image 5 shows the pipe to the N249 that was cut off in the previous step. This will need to be cut back but not yet.

Image 6 shows cutting into the vac feed from the inlet manifold. Again, will need to be cut for a good fit, but not yet.
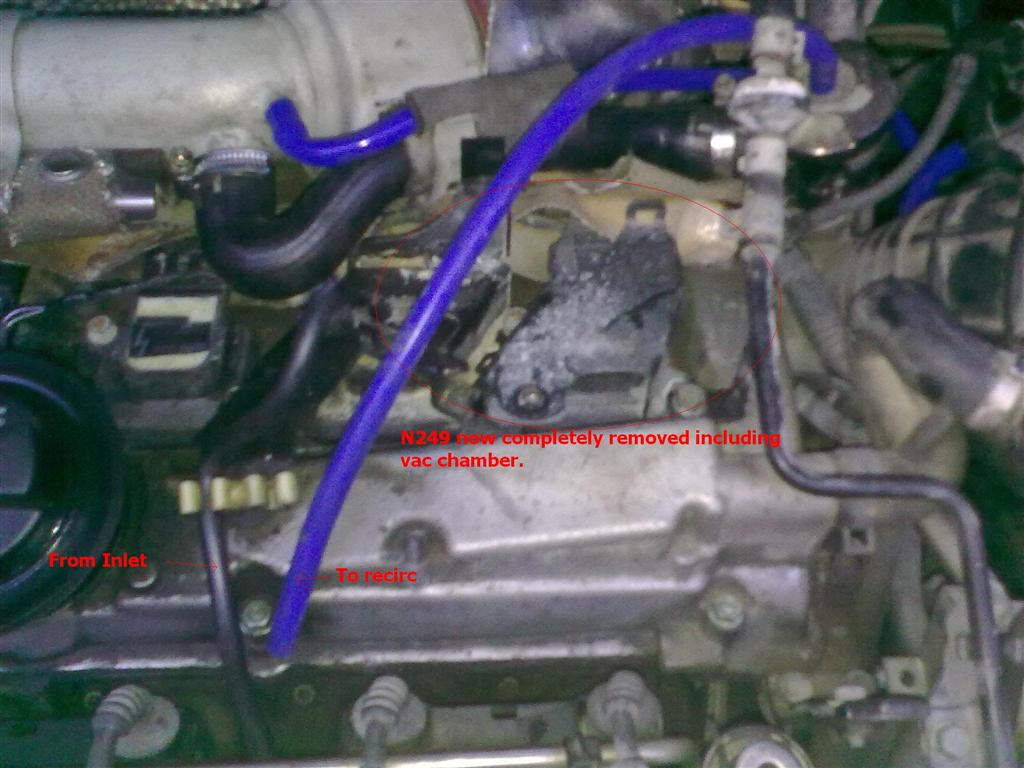
As shown in image 7, once this line is cut, you can unbolt the vac chamber (1 x 10mm bolt) and remove from the car along with the valve and pipe assembly.

Once out of the car, remove the clips from the two pipes connected to the N249 valve and pull free. Keep somewhere handy (and clean if you have OCD).
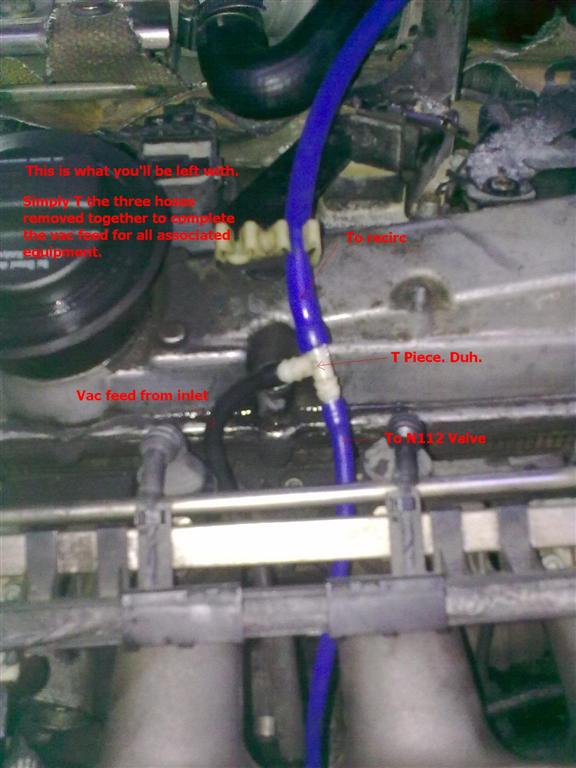
Image 10 is trying to show a few bits all at once T piece connecting (top) Recirc vac line (left) vac feed from inlet manifold (bottom) Vac feed to N112 valve.
It is worth mentioning here that you CAN T into the FPR vac line for the N112. I didnt however based on the fact that I dont like putting anything into the FPR vac line in case of leak. Ultimately meaning lean fuelling.

Refit N249 valve to rocker cover as shown in image 11. Make sure you reconnect wire.
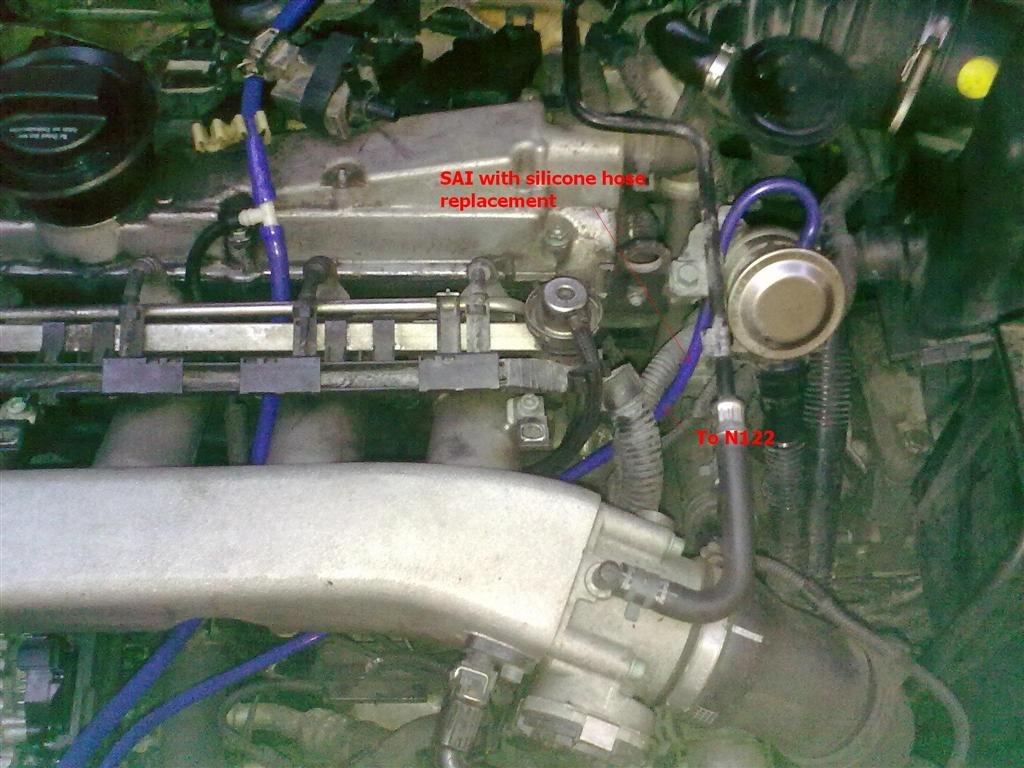
I replaced second N112 vac line to the SAI with silicone for good measure . You dont have to do this.
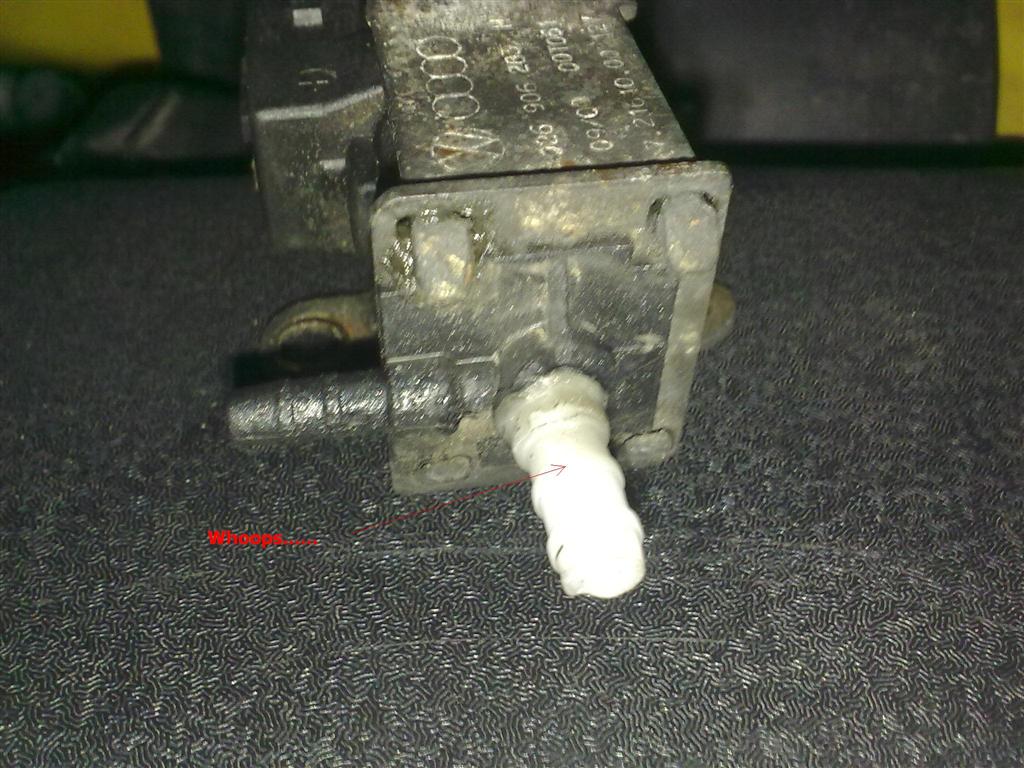
As mentioned before, this is the repair that we had to make to my N112 valve after the nipple breaking off . 1 x T Piece pipe cut down and plastic welded to the snapped stub.
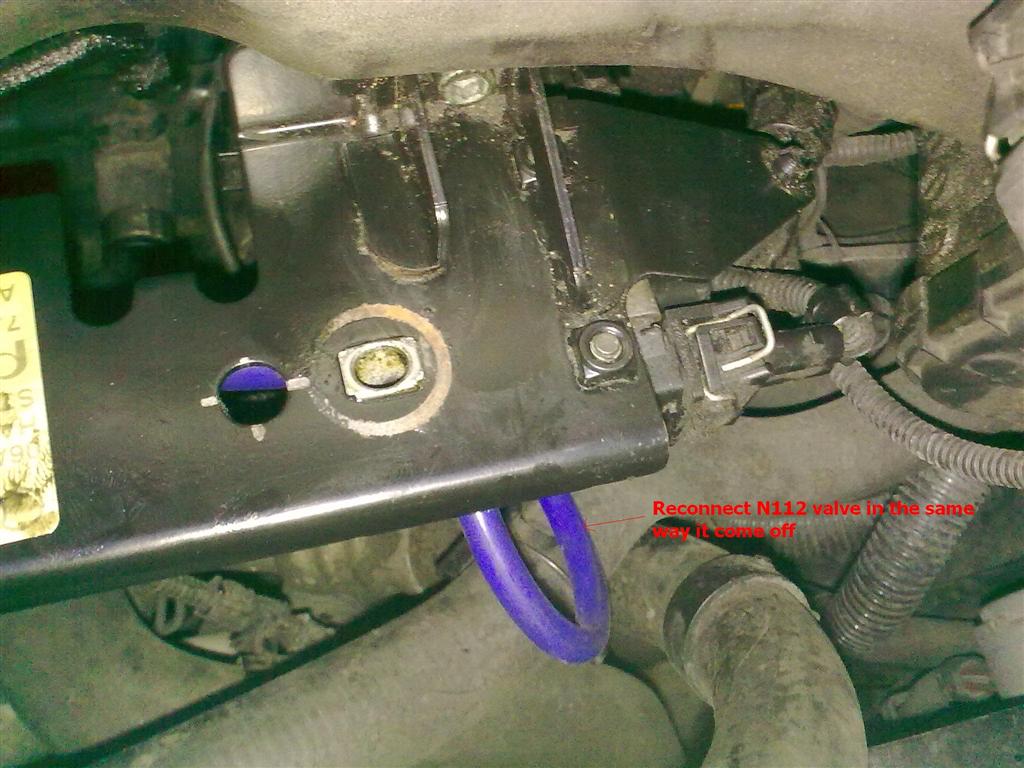
Reconnect N112 pipe work in the same way it was removed one to the new T piece and one to the SAI. Ensure N112 electrical plug is refitted.
Remove all equipment from engine bay and start engine.
Local test.
You should notice improved DV response at gear change, as it no longer has a third party interfering. You SHOULD NOT have any warning lights etc with this bypass. If you do stop and check all plugs correctly refitted.
Job Done.
Please note that SOME (I'm not fully aware of what engine codes) 1.8T engines have the N249 valve on the underside of the attached plate (next to N112 valve). The basic process for those is the same, you'll just have to figure out what pipes correspond to the pictures... And count yourselves lucky that yours is hidden!!
If anyone spots anything I've missed, please add it.
(NB. I take no responsibility for any damage you do whilst attempting this mod. But you should be fine!)
Car: 2000 S3 with APY.
Time taken: Approx 1 hour 30 mins (would have been less but we were messing about, and broke something).
Attempted by: Welly & his mate Jonny.
Needed: 4mm internal diameter vac hose. Allen keys. 10 MM socket. T piece.
Difficulty: A trained chimp could complete.
OK. This isnt a difficult task, and to anyone with even a flicker of mechanical know-how will, (once knowing what pipe is what) have this done with ease.
Pros and Cons:
Pros: It sharpens up DV response and eliminates the possibility of the ECU dumping boost mid rev (using the DV anyway).
Cons: Limits the ways that the ECU has to control overboost (although the N75 & MAP sensor will keep the ECU in the know and in control). Also, it removes one of the ways that the Traction Control uses to limit power.
The three items in question are a) the re-circ valve b) the N249 valve and c) the N112 valve (not on AMK or BAM engines)
So, lets begin .
Engine cover off .
N249 is readily obvious on the APY engine as shown in image 1.
In image 2 you can see the three pipes that we need to keep on the engine.
Image 3 simply shows the vac chamber that we will be getting rid of.
Removal of the metal plate attached to the inlet manifold is necessary at this point two Allen key bolts. Forgot to note what size sorry. Be VERY careful when removing plate as it has a lug which connects onto the dipstick shroud this will usually be brittle and easily broken (thats why mine isnt there. But I broke that fitting an alternator. Its been temporarily replaced with a wine bottle cork Pro bodge!).
Image 4 is showing you the underside of said metal plate. N112 pipe work is readily visible. Cut pipe to N249 as close to the nipple as possible. If replacing vac line to SAI also (if you have a bit of spare hose) the cut the second vac line. If not, simply pull off (be careful not to damage valve more on this later)
Image 5 shows the pipe to the N249 that was cut off in the previous step. This will need to be cut back but not yet.
Image 6 shows cutting into the vac feed from the inlet manifold. Again, will need to be cut for a good fit, but not yet.
As shown in image 7, once this line is cut, you can unbolt the vac chamber (1 x 10mm bolt) and remove from the car along with the valve and pipe assembly.
Once out of the car, remove the clips from the two pipes connected to the N249 valve and pull free. Keep somewhere handy (and clean if you have OCD).
Image 10 is trying to show a few bits all at once T piece connecting (top) Recirc vac line (left) vac feed from inlet manifold (bottom) Vac feed to N112 valve.
It is worth mentioning here that you CAN T into the FPR vac line for the N112. I didnt however based on the fact that I dont like putting anything into the FPR vac line in case of leak. Ultimately meaning lean fuelling.
Refit N249 valve to rocker cover as shown in image 11. Make sure you reconnect wire.
I replaced second N112 vac line to the SAI with silicone for good measure . You dont have to do this.
As mentioned before, this is the repair that we had to make to my N112 valve after the nipple breaking off . 1 x T Piece pipe cut down and plastic welded to the snapped stub.
Reconnect N112 pipe work in the same way it was removed one to the new T piece and one to the SAI. Ensure N112 electrical plug is refitted.
Remove all equipment from engine bay and start engine.
Local test.
You should notice improved DV response at gear change, as it no longer has a third party interfering. You SHOULD NOT have any warning lights etc with this bypass. If you do stop and check all plugs correctly refitted.
Job Done.
Please note that SOME (I'm not fully aware of what engine codes) 1.8T engines have the N249 valve on the underside of the attached plate (next to N112 valve). The basic process for those is the same, you'll just have to figure out what pipes correspond to the pictures... And count yourselves lucky that yours is hidden!!
If anyone spots anything I've missed, please add it.
(NB. I take no responsibility for any damage you do whilst attempting this mod. But you should be fine!)
Last edited:


