Ask a Professional Detailer Thread...

Detailed Image

Registered User
Joined
Jan 15, 2007
Messages
14
Reaction score
0
Points
1
Location
NULL
As a new member of Audi-Sport.net Detailed Image would like to open up a thread where you can ask us about anything relating to detailing. There is a lot of good and bad information out there about how to detail properly, so we want to provide you a place to get clarification on your detailing questions. While we don’t know everything, we do have a lot of experience with a wide variety of products that can provide you with meaningful insight. We specialize in helping people clean, shine and protect their vehicle’s interior, exterior and engine bay. We have hand-selected each product on our site that will help give you top quality detailing results.

Below we have posted some before and after pictures of work Detailed Image has done with the service side of our business. These results can be achieved by anyone who is willing to learn about detailing properly with the right combination of products. We can help you pick out a detailing package that best fits your vehicle’s particular needs. We also offer 10% OFF to all Audi-Sport.net members but it excludes buffers, vacuums and specials. Just type in "10offAS" and you'll get the discount when checking out.

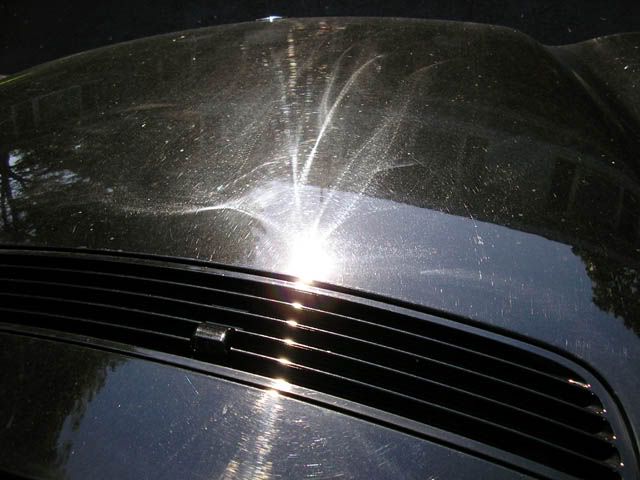
Before - Notice the house in the background through the haze?
http://i4.photobucket.com/albums/y118/detimg/Detailed Image/Hood-b4-1.jpg
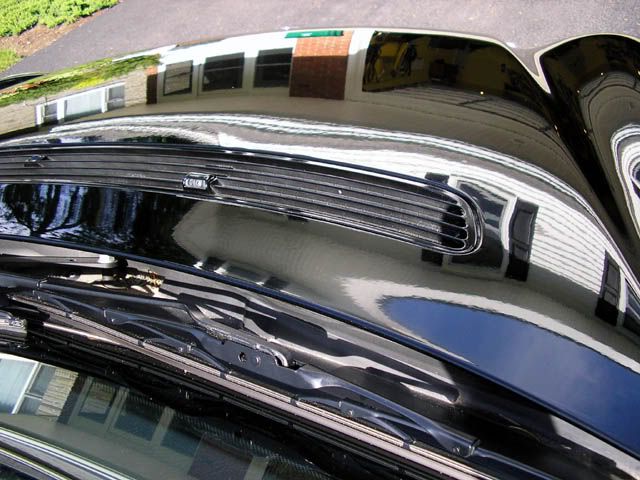
After:

http://i4.photobucket.com/albums/y118/detimg/Detailed Image/Hood-aft-1.jpg

Side by Side Comparison:

http://i4.photobucket.com/albums/y118/detimg/Detailed Image/DodVan99-sbs.jpg

Before:

http://i4.photobucket.com/albums/y118/detimg/Detailed Image/JagXJS93-before.jpg
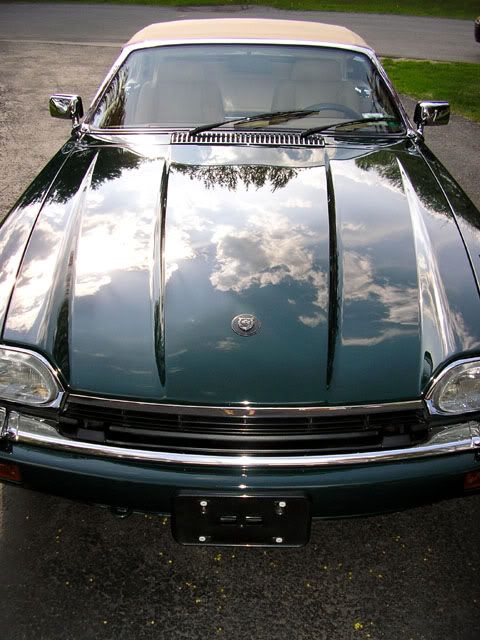
After:

http://i4.photobucket.com/albums/y118/detimg/Detailed Image/JagXJS93-a.jpg

Of course a pic of my B5 S4:

http://www.detailedimage.com/galler....DownloadItem&g2_itemId=178&g2_serialNumber=2

Don't be afraid to post up any questions that you have no matter how simple or complex it is. We’ll do our best to provide you a detailed and timely response. Thank you and we look forward to starting up some great dialogue!

Also, be sure to check out our new automotive detailing forum, Detail University, where there is lots of great detailing information and conversation going on.

George and Greg
Owners - Detailed Image
www.detailedimage.com
 
Hello there, welcome to the site :D

Site looks excellent! Full of lots of goodies, although I must admit I'm a bit scared to venture out of the 'Wash & Dry' section due to fear of not knowing what on earth to do with the product! :think:

Shame about the postage costs to the UK, otherwise I would have bought something :)
 
Thanks for the positive feedback Ed.

Understanding the entire process is just as important if not more important that what products you are using. We are here to help teach and inform everyone about the proper techniques, methods and process of detailing. If you have any questions regarding anything please do not hesitate to contact me, we want to take your detail to the next level.

Sincerely,

George @ Detailed Image
 
ive been using autoglym for years and im after something better and longer lasting now with a really nice deep shine. ive looked at meguiars but dont know which polish to buy, they seem to do several types. what's the best?
 
I don't think you'll see much difference by going to the Meguiars line of products coming from Autoglym. I would put those two brands on par with eachother as far as durability and looks.

From my experience, I would say some of the longest lasting and highest quality products would be the Menzerna line (for protection the Full Molecular Jacket), Klasse Twins and Zaino products.

As for a polish, I am a huge fan of the Menzerna polishes as well, especially the Final Polish II or PO106FF. Just make sure you follow up with your favorite sealant or wax to add protection and durability.

The BEST detail work comes from the best prep work, which means proper washing and drying, clay bar, and polishing out imperfections and making your clear coat as flawless as possible. After that is achieved, your sealants and waxes will last longer and look deeper and glossier.

What's the condition of your paint at this point? Are there a lot of imperfections (swirls, water spots, oxidation, etc.)?

Let me know and we can maximize your product selection.

George @ Detailed Image
 
Welcome George, as said before the web site looks good!!

I've recently bought my car from another member of this site, Raymie, the car is amazing, but want the paint in tip top condition for the summer show season, have noticed the swirl marks in the paint, and was wondering on techniques to remove these and prevent them returning.

Cheers

Chris
 
Tackling swirl removal can be a difficult and tedious task but perhaps the most rewarding step in any detail. Your results will come from the prep stages and typically will require multiple coats of polishes at different levels of aggressiveness. I will first talk about swirls, what they are and how to rid them, then proceed to discuss how to prevent future swirls from occuring.

Swirl marks are essentially dips and valleys in your clear coat. They typically occur during the washing and drying phase from using improper tools and techniques. Some swirls are deeper than other and may require multiple polishes and coats to effectively remove them. The way you remove swirls is by leveling out those dips and valleys, which means removing a small layer of your clear coat with an abrasive polish. Now this may sound scary in writing, but in reality when done correctly you have nothing to worry about.

Choosing your method of application is very important, you have 3 options.
1st option is hand application. You can apply polishes and get good results but expect an extremely sore arm and a lot of time consumed. With the proper applicator pad, such as the Lake Country Hand Applicator Kit, you can match the proper pad to the aggressiveness of the polish. For example, when using the most aggressive polish to really cut down on heavily swirled and oxidized paint you would use the yellow pad, for a finer finishing polish use the white pad, for something like a glaze or an even finer polish, the black pad, and to apply a sealant or wax apply with the blue pad. The benefit of using the hand applicator kit versus a regular applicator pad is that you can apply an even distribution of pressure and achieve consistant results. With a basic terry cloth or foam applicator pad you are only applying the pressure with your fingertips, which you need to exhert pressure on polishes to break them down effectively to remove swirls.

2nd option - best option - random orbital buffer
In my opinion there are only two model random orbitals that qualify as being powerful enough to effectively remove swirls and imperfections, the Porter Cable 7424 or the Cyclo. The buffer will be able to provide the most consistant results, constant pressure, generate enough heat to effectively break down the polishes, save time and yield better results. If you are serious about detailing, this is a sound investment to make. The Advanced Buffer Kit comes with everything you would need to get started with detailing: a velcro backing plate to easily switch pads and use a variety of pads, 1x orange cutting pad, 2x white polishing pads, 1x black finishing pad, as well as a few packets of Pad Cleaning solution.

3rd option - not recommended - rotary buffer
Leave this option to professionals. The speed of the buffer can generate enough heat to potentially burn thru the paint or create more swirls and haze if used incorrectly. I won't talk much about this since it is not a wise option for most detailers.

Now onto the polish selection. You always want to start your detail with the least aggressive polish to effectively give you the results you are looking for. You do not want remove more clear coat than necessary.

When using a buffer, my favorite line of polishes is the Menzerna line. To effectively remove significant swirls you will typically need a two-step polish. One that is more aggressive (medium) to quickly and effectively even out your clear coat and a fine polish (finishing) to make the clear coat as smooth as possible revealing maximum depth and gloss. The reason you use two coats of polish is because the medium aggressive polish can often leave a haze behind and the finishing polish clears that up.

Back to the polishes, the Menzerna Intensive Polish is my choice for a medium aggressive polish when using a buffer. I would typically use this with an Orange Cutting Pad and speed setting 5 - 6 on the Porter Cable. I follow that up with Menzerna Final Polish II with a White Polishing Pad and speed setting 5 - 6. Another great option, which I typically recommend when tackling this process by hand is the Poorboy's SSR Line of Polishes. The recommended two step polish in the SSR line is the SSR 2.5 and SSR 1.

At this point you should have little to no swirls (some may be too deep to safely remove). Preventing swirls from happening is relatively easy when you take the proper steps.

First off, never go through a car wash that has any kind of bristles, cloths, etc. touching your paint. These will add large sweeping swirl marks that are sure to dull the clear coat. Swirls are most commonly added during the washing and drying process so make sure your washing mitt/sponge and drying towels are as clean as possible. Contaminates get lodged between your mitt/sponge and the paint and they get grinded into the clear coat. Your washing tools should be replaced as they become saturated with debris, contaminates, etc. The safest and best washing tool I have is a Sheepskin Wash Mitt because of its ability to safely break up contamination and release contaminates when dipped in water. Its also very thick so it’s less likely to grind in contaminates as it breaks them up. I dry with two microfiber Waffle Weave Drying Towels, because they are paint safe and absorb so much water. I don’t really like cotton and other materials because they aren’t always paint safe. I only dry areas that have been washed thoroughly (I don’t use them to clean door jambs, panels underneath the vehicle, exhaust tips, wheels, etc.). Keep these towels as clean as possible. Do you use the two-bucket method? Basically one bucket has water another with water and shampoo. Dip your sponge and mitt in the shampoo and water mix and start washing some panels. After washing some panels, dip the sponge in the bucket with just water to release contaminates and then dip it back in the water shampoo mix and keep washing.

To help prevent more swirls from occurring, apply a durable layer of protection with a sealant. When your looking to apply the maximum protection for your vehicle you will want to use a sealant. Sealants are synthetic materials that are engineered chemically to replicate the characteristics of a wax. With improved technological advancements most sealants offer longer lasting protection than traditional waxes. Contamination tends to come off with a simple wash and dry when your vehicle is properly protected so make sure you paint has a proper coat of sealant on today.

One final note, for optimal results you will want to prep your paint with a clay bar prior to polishing. This will remove the most possible contamination and reveal your true clear coat. The polishes will work more effectively and your sealant or wax will last longer. It is a worth while step to do twice a year (Spring and Fall).


I know this is a lot to digest, so I'll be expecting questions. For more detailed information on the entire detailing process please check out our Detail University Section of our website. Understanding the process and what each step is doing is the first start to ridding your swirls.

Sincerely,

George @ Detailed Image
 
A4Quattro said:
whats the carriage charge to the UK?

It really varies on the size of the order, the heavier the box, the more expensive it will be. Our shopping cart can give you a shipping estimate prior to checking out. From my experience, shipping has been between $30 (for a few pound box) and $110 (for a complete detailing package weighing around 25 lbs).

Those are rates on the 4 - 10 day USPS Air Parcel Post. We can expedite the order for an additional fee. We do not use the 4 - 6 week option because in that time frame things can get lost / misplaced and can be a very drawn out process.

We have shipped all over the world with great success using USPS.

If you have any other questions, please do not hesitate to ask.

Sincerely,

George @ Detailed Image
 
Thanks George,

I use the two bucket method but fear the damage has been done prior to my purchase of the car.

I will be placing an order in the next few weeks and will give the polishing out of the swirls a go.

cheers

Chris
 
What do you think on the products like diamondbrite, supaguard etc that put a silcone skin on the car.

I have diamondbrite on my car and think it still looks good 3 years after application, have never waxed or polish the car and friends still reckon it looks like new ( got it cheap as mate does body work )
 
Onlyme,

I'm honestly not familiar with any of those types of products, they are not popular in the States. Maybe Polished Bliss can chime in on this one if he has any input.

George @ Detailed Image
 
Chris,

We look forward to doing business with you, if there is any questions that come up in the mean time please do not hesitate to ask.

Sincerely,

George @ Detailed Image
 
Cheers bud, would it be better to do a bulk order or order in smaller packages with regard to the old customs tax?

will be looking for a PC and some polish and wax as well as soap.

do you guys do a foam gun??

chris
 
PM Sent :)

As far as the foam gun is concerned, we do not carry them at the moment. I personally think of it more as a fun toy rather than being that much better or a more productive way of washing your car. I can see if you have a large bus or truck or trailor you are washing constantly it could be a help, but even with the foam gun you are still using 2 wash buckets and a wash mitt.

Also, you can typically make your own for much cheaper than the ones being sold on online stores by going to your local hardware store.

Hope that helps.

George @ Detailed Image
 
Onlyme said:
What do you think on the products like diamondbrite, supaguard etc that put a silcone skin on the car.

I have diamondbrite on my car and think it still looks good 3 years after application, have never waxed or polish the car and friends still reckon it looks like new ( got it cheap as mate does body work )

At George's request, my thoughts. All of the current dealer applied long life treatments in the UK fall into the following category; good quality synthetic paint sealants. However, the issue with these treatments in the cost, and the marketing material that accompanies them.

Many years ago, before I got seriously into detailing, I paid for a Supaguard treatment, that came with a gaurantee of lasting 5 years. Nine months later, the beading of water had all but ceased, and the treatment had clearly been eroded away to nothing. It is the same today with any of these treatments; even the best synthetic sealant systems such as those by Werkstatt/Klasse and Menzerna will only give 6-9 months of protection tops, and even then that's pushing it. These sealant systems typically cost £20-£30, and give a reasonable number of applications (enough to do 15-20 cars).

The long-life treatments sold by dealerships offer the similar quality protection, but for a price more like £200-£300, and you don't get top up products that last anywhere near as long. So, my conclusion is that these products (which don't take any great skill to apply) are way overpriced, and simply reflect another mechanism by which dealers earn good profits. My advice; consult with specialist companies like ourselves and Detailed Image, find out what works best on your car (given your requirements for the type of finish and durability), and then buy products and do it yourself!
 
WX51TXR Cheers for the info, my mate applied it so I got it for trade price, I cant fault the stuff, always beads and is very good, I was more worried about the possible UV damage, as basically all i do now is wash it with the diamondbrite shampoo and then wash it again with the conservor and then dry the car off, takes about 20, 30 minutes in total ( although i know take longer doing the wheels ) Not sure if i would ever pay the full asking price for it though but at £40 from my mate i think its really good.

Another Quick question, alloy wheel cleaning whats the best way, I use meguiars for slightly dirty wheels and MER alloy wheel cleaner for if the wheels are really bad, Is this safe or do you recomend just water and a bit of elbow grease ? vbmenu_register("postmenu_305754", true);
 
WX51TXR Cheers for the info, my mate applied it so I got it for trade price, I cant fault the stuff, always beads and is very good, I was more worried about the possible UV damage, as basically all i do now is wash it with the diamondbrite shampoo and then wash it again with the conservor and then dry the car off, takes about 20, 30 minutes in total ( although i know take longer doing the wheels ) Not sure if i would ever pay the full asking price for it though but at £40 from my mate i think its really good.

Another Quick question, alloy wheel cleaning whats the best way, I use meguiars for slightly dirty wheels and MER alloy wheel cleaner for if the wheels are really bad, Is this safe or do you recomend just water and a bit of elbow grease ?
 
WX that link will do, thanks again and good luck on this site
 
Hi, I have a couple of questions but would first like to say that I think your pages on cleaning, polishing etc are great. Well written, clear and concise, there great to read and give me the desire and confidence to sort out the paintwork on my 2002, 85,000 mile, A3 TDI Quattro.

My questions are (1) is there a simple way of determining which products will work well with others? Given the different 'ingredients' that are used some will work well together and some will not. (2) What polishing machines are available, I see the one used in some of you pictures, looks like it's based on an angle grinder motor, is as noisey as hell? All I can easily find are the two available from Halfords, a 240v version which looks to big to use with ease, and a 12v version which may not be powerful enough. Additionally the bonnets available from Halfords look terrible, cheap, harsh and flimsy.

Your advice would be appreciated, thanks, Christian.
 
Hi Christian, not sure if you're referring these questions to Detailed Image or ourselves, but here's out opinion anyway...

1. There is no simple way of knowing what will work well with what, and on what colour (this latter point is aimed at the fact that different products and product combinations give different results on different colours). We learnt what we know simply by trial and error, and keeping a careful eye on results posted on various detailing forums. What we simply say to customers is if they want help, they should tell us what colour car they have, whether they have any defects visible in the paint, whether they prefer a shiny and reflective look or a wet and glossy look, and whether they will be working by hand or machine. With this info, we can usually then provide some ideas and pictures of cars we've done to give a visual guide as to what to expect.

2. Pretty much every polishing machine available in the UK is useless. All of the bonnet style units you see on the high street should be avoided, as they do little in the way of work, and can actually make paint look worse if used incorrectly. A machine polisher is for polishing, using foam pads; buffing off with microfibre should be done by hand. The one and only machine we rate and recommend for enthusiasts is the Porter Cable 7424. It is a dual action unit with a long throw, which means it doesn't produce much heat and the level of friction is minimised; this is what makes it a very safe tool. However, with the right products, it is capable of a fair amount of work, and can be used to greatly improve defects even in relatively hard paint. Sadly this unit is an import only item, as it is not yet CE certified - however, importing is a very easy process, and the company we recommend is linked below. I can also provide a discount code that will secure you 15% off the online price. More info on the Porter Cable (or PC) can be found in the guide to polishing on our site.

www.autopia-carcare.com

Hope that helps,

Rich
 
Lo all :hi:

I dont have a question yet, but im sure i will do soon (jus ordered the 7424 Advanced Kit thnx to the info available here and @ detailedimage) :jump:

Just wanted to say cheers for the info, guides, advice and of course the sexy pix (love the B5 S4 btw) :)

Cant wait for it too arrive and practise on the missus's motor first :O (detailing noob atm :blush:)

Cheers.

Ollie
 
Hey Guys,

Ive ordered a red A4 s-line special edition and want to keep it looking as good as possible. To be honest I haven't really bothered looking after the paint work on my previous cars but I want to keep this as nice as possible.

What would you recommend ? Im a novice at this stuff by the way
 
Jeffs Werkstatt Carnuaba Kit - these products rock on red paint, and even more on Audi red, making it deep and beautiful looking. Check this thread out for pictures of these products on an S4...

http://www.audi-sport.net/vb/showthread.php?t=33294

and here's a link to the kit. Good thing about it is that it doesn't require much work either. Apply the basecoat of Prime Carnauba every six months, and in between add a top coat of Carnauba Jett every 6-8 weeks. Easy! :)
 
Hi there Polished Bliss.
Looking for a little advise please (well alot actually ) I've looked through many of your guides and I think I've learned a fair bit, thanks! I have a silver A4 avant S-Line and, weather permiting, I wash and polish it most weekends with Meguiars deep crystal and NXT tech wax. Its had a re-spray in the past and has a couple of light scatches here and there but nothing serious. Being silver its really hard to see some of the defects you talk about but I'm sure they are there!!! I'm fairly happy with the results but know it could be better and also it doesn't last that long. So in for a penny in for a pound, I've got access to a PC buffer and already have a Meguiars clay bar ready. So what I'm looking for is a light cutting polish, a final polish, a glaze, a sealant and a wax (is that in the right order ?) that will work well on silver and also give it lovely wet look finish. Sorry if I've waffled on a bit, any help greatly appreciated.
Thanks
Mick.
 
Mick S-Line said:
Hi there Polished Bliss.
Looking for a little advise please (well alot actually ) I've looked through many of your guides and I think I've learned a fair bit, thanks! I have a silver A4 avant S-Line and, weather permiting, I wash and polish it most weekends with Meguiars deep crystal and NXT tech wax. Its had a re-spray in the past and has a couple of light scatches here and there but nothing serious. Being silver its really hard to see some of the defects you talk about but I'm sure they are there!!! I'm fairly happy with the results but know it could be better and also it doesn't last that long. So in for a penny in for a pound, I've got access to a PC buffer and already have a Meguiars clay bar ready. So what I'm looking for is a light cutting polish, a final polish, a glaze, a sealant and a wax (is that in the right order ?) that will work well on silver and also give it lovely wet look finish. Sorry if I've waffled on a bit, any help greatly appreciated.
Thanks
Mick.

Hi mate,

I was going to say, its not good to continually polish your car but seeings as the Meguiars Deep Crystal Polish is actualy just a glaze and contains no abrasives then you'll be fine :)

PC Wise - for a light cutting Polish i would go for the Menzerna 106ff, this is a finishing polish but when used with a polishing or light cutting pad it can have a decent amount of cut, it also leaves very little dusting behind and leaves an incredibly glossy finish, we use this polish alot!

If you wanted something that has more cut than that then go for the Menzerna Intensive Polish, then follow up with the 106ff as a final polish.

Glaze wise - if you're using the Menzerna Polishes and especially on a silver car, you're not going to notice a huge amount of difference with this step.

What i would recommend for the last step is the Jeffs Werkstatt Acrylic products, these are one of the best products for silver cars especially and they will really help to make your metalic flake in the paint "pop", they give very good results durability wise also!

We have pics of some silver cars done with the Werkstatt Twins if you need further evidence but take my word, they're good ;)

Hope that helps, any more questions then feel free to ask :)
 
Just a quick question. Does the Porter Cable 7424 come with and american 2 pin plug, if it does do you need to buy a transformer?!?


Also im after some advice on what products to purchase.

I want to buy the Porter Cable 7424.

My car is ming blue.

Can you advise me what polishes that i will need?

I already have a clay bar but need to know what spray to use with it.

Thanks

Tom
 
Hello fellas, a quick question for you...

I recently got a Zymol Titanium kit and was just wondering what the best way to apply it is - I know you're supposed to warm the wax between your palms but am I right in thinking you apply it straight from your hands to the bodywork?

Also, once I've used the HD Cleanse should I just put the Titanium on top or would there be any used putting a glaze/sealant underneath it and would I benefit from claying the car beforehand or not?

I'll be doing all the above by hand rather than by PC or other machine.

Any advice gratefully received!!
 
tom-m said:
Just a quick question. Does the Porter Cable 7424 come with and american 2 pin plug, if it does do you need to buy a transformer?!?


Also im after some advice on what products to purchase.

I want to buy the Porter Cable 7424.

My car is ming blue.

Can you advise me what polishes that i will need?

I already have a clay bar but need to know what spray to use with it.

Thanks

Tom

Yes, the PC comes with a 2 pin plug, so you need to replace this with a 110V site plug and then use it in conjunction with a 750A 110V site transformer.

If your car only needs a light polish to remove wash marring and fine swirls then Menzerna 106FF is the place to start, using a polishing pad. If this isn't enough for the defects then switch to a light cut pad. If this in turn proves to be too light for the defects, then Menzerna PO85RD3.01 or 3.02 will be needed, using a light cut pad. Sadly both of the latter products are hard to get hold of just now, due to a shortage on the production line, but decent alternatives are Menzerna Intensive Polish of Meguiars #83.

The cheapest quick detailer to use with your clay is Meguiars Quik Detailer, see here...

http://www.polishedbliss.co.uk/acatalog/pb102clean.html

:)
 
joost said:
Hello fellas, a quick question for you...

I recently got a Zymol Titanium kit and was just wondering what the best way to apply it is - I know you're supposed to warm the wax between your palms but am I right in thinking you apply it straight from your hands to the bodywork?

Also, once I've used the HD Cleanse should I just put the Titanium on top or would there be any used putting a glaze/sealant underneath it and would I benefit from claying the car beforehand or not?

I'll be doing all the above by hand rather than by PC or other machine.

Any advice gratefully received!!

Aye, the was is best applied using your bare hands. Take out a pea sized blob with your nail, then rub between your fingers. Then rub into the paint by hand, using a hand over hand method to ensure you spread it as thinly as possible (this also keep the wax warm and supple, making it elastic and easy to spread).

The wax should be applied straight after HD-Cleanse for best results; HD is not just a paint cleanser, as it also lays down glazing oils, so is in many ways a glaze, albeit one with immense cleaning power! The problem with adding an in between layer of sealant is that sealants don't tend to bond well to oils, so you would end up losing the Titanium quite quickly. If you apply it over HD it will bond firmly, thus giving maximum durability.

:)
 
hi , anyone got any recomendations for cleaning products for

nogaro blue S3

aubergine (purpleish colour) G60 golf

currently use auto glym super resin polish
 
347 said:
hi , anyone got any recomendations for cleaning products for

nogaro blue S3

aubergine (purpleish colour) G60 golf

currently use auto glym super resin polish

Seeings as both these colours are metalics then i would suggest the Jeffs Werkstatt Acrylic range, they offer great durability and will help greatly to make the flake in the paint "pop" :)
 
My new car has a grey leather interior. With having kids its already showing signs where their shoes have left black scuff marks on the door panels and backs of the seat.

Apart from selling the kids, what would you recommedn to clean the interior vynl, plastics parts

Cheers

Simon
 
I would use the likes of Poorboys or Meguiars All Purpose Cleaner (APC) diluted something like 10:1 (water:APC) on a microbibre cloth or soft nail brush, this should remove the marks.

If you use this on the leather you should follow up with a good conditioner, Zymol do a very good one called "treat" :)
 
HEY IVE JUST BOUGHT AN IMOLA YELLOW S3 AND WANTED TO GIV IT A GOOD CLEAN BUT COULDNT GET THE DIRT OFF THE BACK OFF THE SIDE SKIRT LOWER ARCH ANY SUGGESTION ON HOW TO DO SO?
 
Probably clay, or strong paint cleaner like Jeffs Werkstatt Prime Strong. I would clay the area first, as it's probably just bonded grime. If this failed I'd crack out the Prime Strong, working in firmly with a German Pad. :)
 
The bright trim around the windows etc on my 1999 A6 has gone dull and milky looking. Is this proper metal trim that I can clean up with a metal polish, or is it some kind of plastic metal lookalike, in which case can anything be done with it. Thanks.
 

Similar threads