Rear wiper strip

ScottD3

I want your faulty electronics
Supporter
Joined
Nov 24, 2010
Messages
15,084
Reaction score
1,131
Points
113
Location
Plymouth
Website
wheelsnwires.blogspot.com
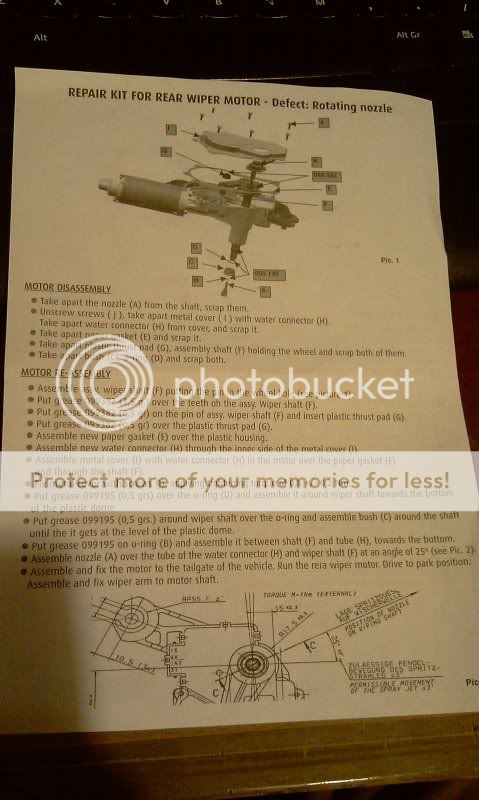
I felt like taking something apart so I dug out my old wiper motor and thought I'd strip it down, take pictures and share it with you lot.

First, get the wiper motor (Arm is optional)
IMAG0271.jpg


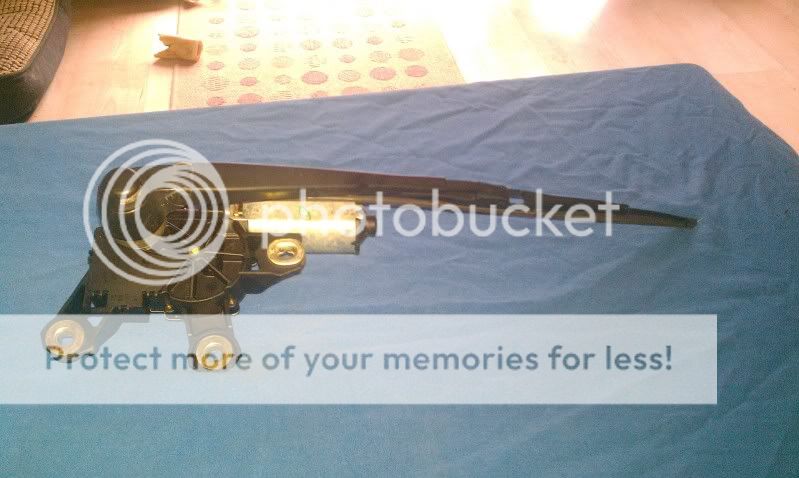
Remove wiper arm if still attached and remove the 6-8 screws thats holding the plate on.
IMAG0273.jpg


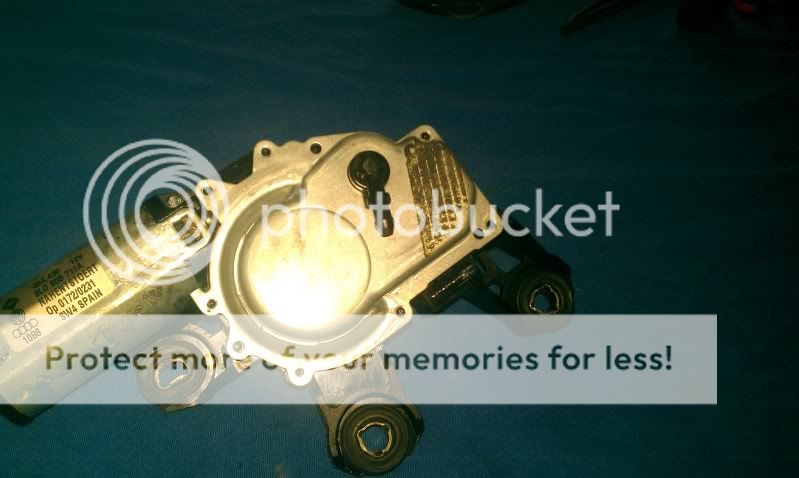
This is what you'll see when you pull the backing off. That long metal tube is where the washer fluid goes through.
IMAG0274.jpg


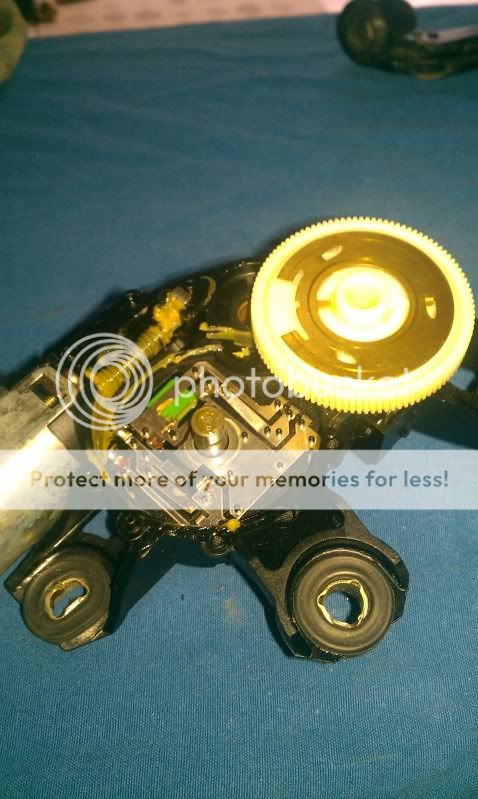
Next pull out the arm and wiper shaft.
IMAG0277.jpg


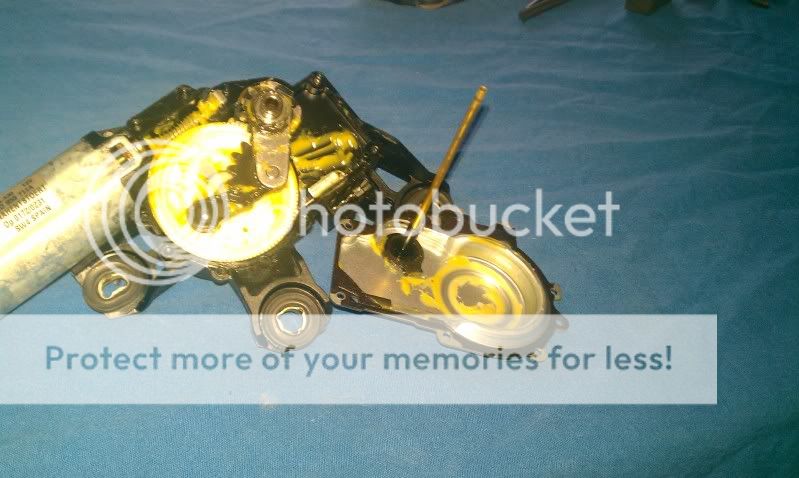
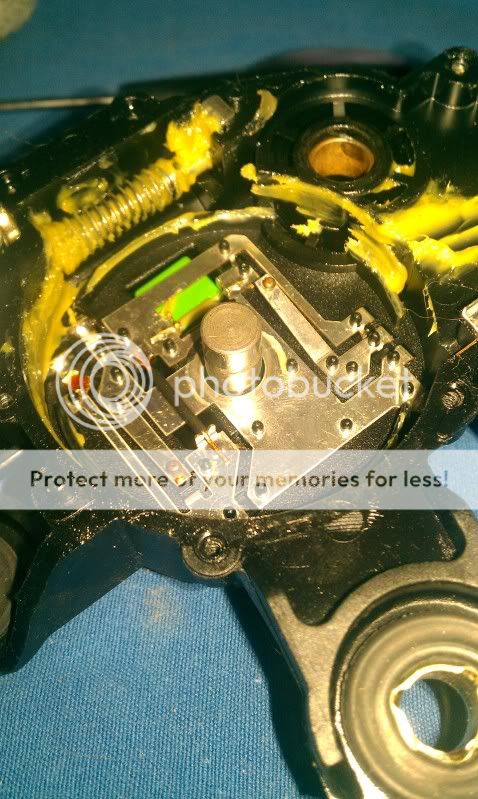
Next is the main cog. You can see some of the contacts and a relay. This stops the motor when it done a full rotation of the cog, which is a full left to right wipe or is it right to left?
IMAG0278.jpg


Closer pic for you
IMAG0279.jpg


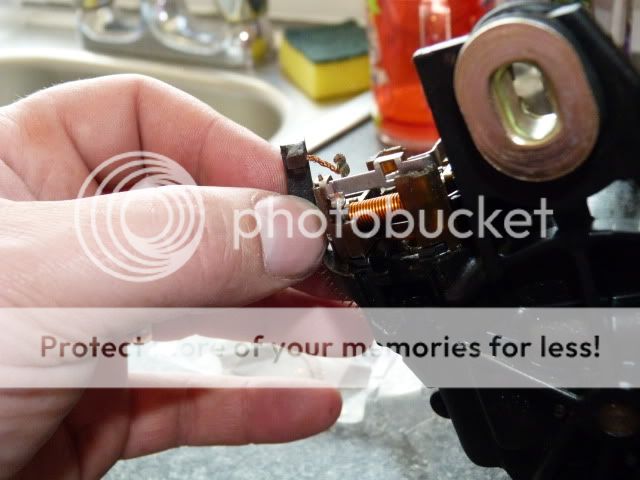
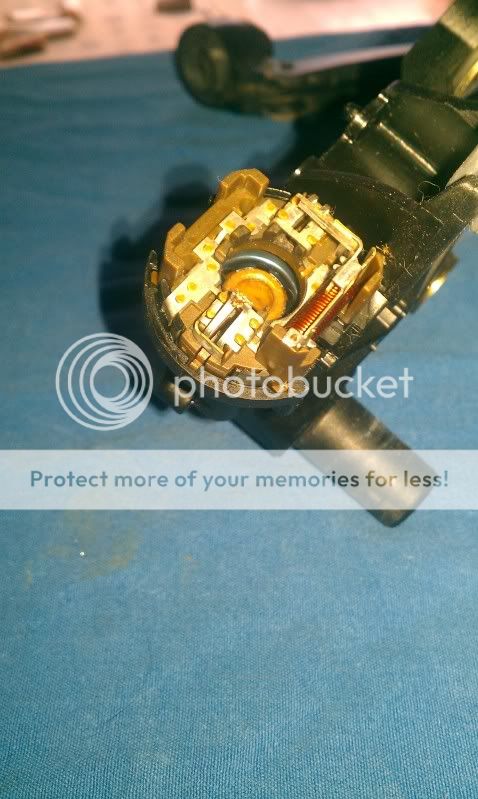
Next I took the motor out to check on the brushes and conections.
You can see the brushes are black and not very shiny.
IMAG0280.jpg


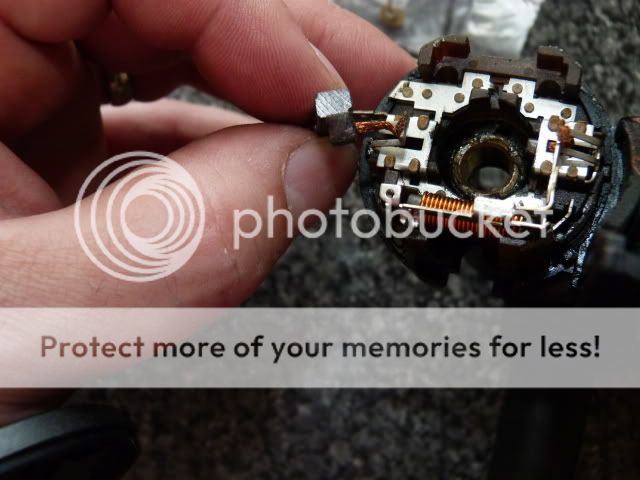
So I took them out to clean
IMAG0284.jpg


They look very black and a little warn down. This might have been the cause of my sticking rear wiper.
IMAG0282.jpg


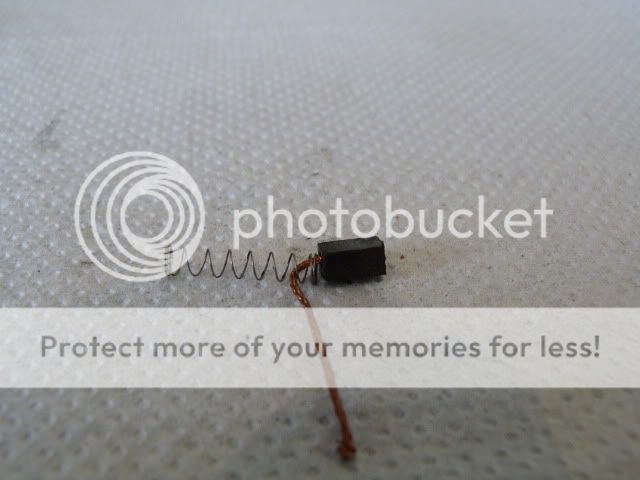
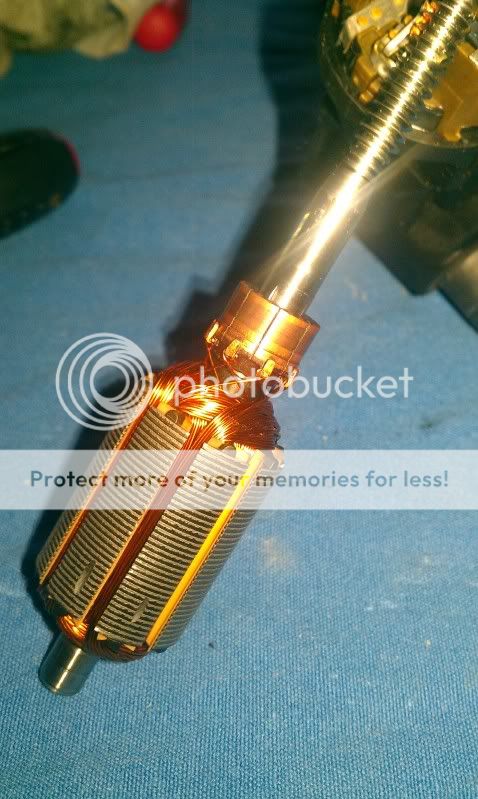
With the motor off I pulled the shaft out the middle and gave it a good clean on the contact area for the brushes. Little bit of wear but nothing near as bad at the fan motor.
IMAG0281.jpg


Thats it.
I stripped it all down, cleaned it all and put fresh grease in.
Ran 12v over the motor and it works and not sticking.
It looks like I got a fresh clean working motor.

I'm looking for new brushes for theses as I feel apart of the failure is due to the wear and carbon build up on the bushes.
If I find them I'll let you all know.
I have found theses as well, which is worth getting if your copper washer pipe has a hole in it.
http://www.ebay.co.uk/itm/320831382511

I
f any one is not confident in doing the work, I'm more than willing to undertake the work for you.
 
trust Audi to create a part with known faults and then fleece you £45 for a "repair kit"

good right up. mine suffers from a "staccato" movement. stop start though the sweep and then wont turn off for ages after I have turned it off.

any ideas?
 
trust Audi to create a part with known faults and then fleece you £45 for a "repair kit"

good right up. mine suffers from a "staccato" movement. stop start though the sweep and then wont turn off for ages after I have turned it off.

any ideas?

I'll trade you. :)

Test mine out and see if it works, If it does, keep it.
I'll strip yours down, clean it and hopefully it will work and then I got another one to pass on.

I'm happy to do the repair kit if on a motor but I'm not supply it :p
 
trust Audi to create a part with known faults and then fleece you £45 for a "repair kit"

good right up. mine suffers from a "staccato" movement. stop start though the sweep and then wont turn off for ages after I have turned it off.

any ideas?

Mine did this and I took the motor apart to find it was 1/2 full of washer fluid.
The copper washer pipe had perforated and each time I wash/wiped the rear screen I was inadvertently also irrigating the wiper motor,lol.
A replacement wiper motor only cost about £30 IIRC and touch wood it's been fine for the last 5 yrs.........that repair kit is a bit steep IMHO.
 
Scotty, might take you up on that!
Just removed mine and stripped it.
The tip of the copper (I suspect brass actually) has sheared inside the spindle.
must have seized on the nozzle and the force of the wiper has just snapped it off inside.

Question: is the jet meant to stay in one place or track with the wiper?

if it tracks then the end of the pipe must be constantly under force?
if it stays in one place then the nozzle is a very tight fit in the end of the spindle.

something has to give and obviously has.

I have some fine tube that might work as a repair, just need to figure out how to stop the nozzle jamming in the end of the spindle

BTW that eBay kit is £37 from the dealer, new motor is £107....
 
Scotty, might take you up on that!


Question: is the jet meant to stay in one place or track with the wiper?

Not a problem.

I think it moves.
I'll find out tomorrow.

I've not bout the brushes. I swapped mine over.
I had a quick look for them but no luck. I'll take another look.
 
next question, is there a particular position the centre plastic cog needs to be in?
mine is doing a weird stop start routine, I cant find any issue with either the breaker points or the element on the wheel, short of the circuit board being fritzed I cant work out why it doesnt complete a cycle without stopping and then wont respond to the on off switch on the column. it over runs for a minute but it a very slow stop start.

any idea?

Mine use to do that but then I removed it.

I tested it on the desk after I stripped it down and it did a full clean wipe, no issues.
So it could be dry or dirty contacts on the big cog. I cleaned all mine up and changed the brushes over and it worked.

I think the cog needs to be in a specific location but I can't remember where, does the images above help?
 
is the off centre hole on the cog pointing down to 7 o'clock?

mine was pointing away from the motor!
that may explain a few issues!
 
is the off centre hole on the cog pointing down to 7 o'clock?

mine was pointing away from the motor!
that may explain a few issues!

With the motor being north or 12:00. the whole for arm is at about west/09:00.

If you go slow you can run 12v through the motor and watch it turn and make sure its at the right angle.
It tends to sorts it self out from when I did mine.
 
mine was way off then, at least 90 deg
 
sorted!
one repair kit fitted. cog re-aligned, refitted to boot, bit of tweaking as I wiped my number plate!
judders a bit but that is just old rubber I think

BTW, nozzle stays stationary, blade rotates around it.
The cog drive hole position is probably closer to 8pm when viewed with motor vertical.

fitting instructions for those that want them.


007.jpg
 
yeh the nozzle doesnt move, but eventually the rotating shaft binds onto the nozzle and twists it with the wiper snapping it!
 
aha, the parts kit comes with parts that were NOT there originally.
Most significant is the O-ring that sits around the end of the brass tube between the outside of the brass and the inside of the splined shaft.

when greased up it supports the nozzle.
greased everything to within and inch of its life.
To be honest I would advise anyone to pull the nozzle on theirs now and squirt some grease down in-between the brass and steel tubes. save you £30 odd quidi n future!
 
Just stripped mine down...again.

Removed and measured the brushes and replaced them the opposite way round (very little brush left) so the little round spring stop is now pressing on the coil part. Went and tested and works a treat again now.

So after an hour of searching i finally found some that would fit but they are in america and they were $73.99 for four!!!! total inc delivery was $112.98!! No thanks.

I did a bit more scouring and found some that are 4mm x 5mm. Slightly larger than the originals but i've ordered them anyway. I have a grinder to reduce the size a little :)

My next problem is the brass wash tube. Mine has corroded itself to the silver tube body and snapped. Drilled out the remaining brass pipe and then a 'shaved' some clear washer tube so it would insert the silver tube and make up for the poor brass pipe.

Result?

I now have a rear wash wipe that works! lol. Albeit, the wash bit is a bit slack...but still works until i can get hold of a brass tube piece.

I didn't take any pics regrettably. Wish i had now. But all very easy to do.

Dan
 
I couldn't find my calipers for measuring 100% but going from a tape, i got 3.5mm wide x 4mm high.

Brushes I have ordered are 4mm x 5mm x 19mm. So they need cutting down and a slight trim. I might get away with 4mm x 4mm but can only tell once they've arrived.

£4.97 delivered.
 
I couldn't find my calipers for measuring 100% but going from a tape, i got 3.5mm wide x 4mm high.

Brushes I have ordered are 4mm x 5mm x 19mm. So they need cutting down and a slight trim. I might get away with 4mm x 4mm but can only tell once they've arrived.

£4.97 delivered.

Thats a cracking price.

Link?

I bet they will fit the 3.5mm size. .5 of a mm is nothing really. bit of sand paper will do it.
 
trust Audi to create a part with known faults and then fleece you £45 for a "repair kit"

good right up. mine suffers from a "staccato" movement. stop start though the sweep and then wont turn off for ages after I have turned it off.

any ideas?

Mine done the same until I cleaned the contacts inside the wiper motor (shown on the pics above) and now works great and has done for months.
 
didnt touch my motor tbh.
the movement was a misplaced cog, hitting the contacts in all the wrong places
 
The brushes have arrived. But seeing as today is some sort of special day for the wife (mother), my hands are a little tied to play with the motor at the moment.

Will take pics this time! lol.

Also, found these but at nearly 4 times the cost of the ones i have bought. Albeit, alot less hassle as no trimming seems to be required for these ones! eBay - The UK's Online Marketplace
 
Ok, so after filing down the brushes to the 4 x 4 mm size I then worked out the the length and decided that 5mm length is about right.

So i proceed to cut down through the brush and its a no go. The wire is fastened in 7mm from the end!! ****** daft things! lol

However, not all is lost, as I used the bits that I had filed down, I cut down again to 3mm (4mm x 4mm x 3mm) and slid back the original brush and pushed the little brushes in. So that the original brush presses the new bit of brush upto the coil part.

Did that for both sides and now we have lift off! lol. All is working as good as new. (if was since turning the original brush around but at least now I know have plenty of brush life left!!)

So....all an all, not all is lost but its not exactly as I would of hoped. I got pics of the filing down etc...but after the brush broke whilst cutting down I just put it all back together as above.
 
Width is the same as original....
P1000231.jpg

Height is a smidge bigger though...
P1000233.jpg

Again the height difference...
P1000232.jpg

Small spring is original, new spring is huge! Difference is size of brushes too!
P1000235.jpg

Some filing done and it took seconds to file down...
P1000240.jpg

Final brush shaped and sized....Here its at 8mm length. Too long so cut down to 5mm and was no good. :-(
P1000242.jpg
 

Similar threads

Replies
2
Views
515
Replies
10
Views
3K
Replies
6
Views
1K
Replies
19
Views
3K
Replies
12
Views
2K