Revo induction kit - install

JayA3sline

Well-Known Member
VCDS Map User
Joined
Feb 3, 2014
Messages
941
Reaction score
268
Points
63
Location
NULL
Afternoon all

So I'm trying to install revo induction kit onto my audi S3. As easy as it looks to install I'm having difficulties trying to take off the bottom clip on the turbo elbow I believe. Them stupid audi clips, definitely not made to be altered, no space and grips cant bite on the clip properly

Any suggestions?
 
You can twist the clip round to the left hand side using your fingers, then get a pair of long pliers or long grips.
That is what I did, then used the same tool to refit it.
 
As much as the clip is a pain in the **** to work with, it's the most successful clip I've ever used on that location. I've tried Norma clamps with expansion sections and NOTHING seems to be as reliable as the constant tension spring clip provided by Audi. Thankfully it can't be seen in the bay as it's ugly, but I used it with all 3 of my intakes on S3's.

Remember to degrease the outer edge of the turbo intake housing before fitting the next silicone hose as it will aid gripping. Also be INCREDIBLY careful that nothing falls down the aperture hole!

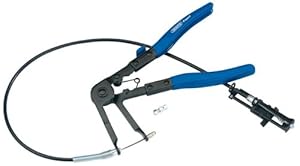
I used thin tipped mole grips to open and close the constant tension spring clip, but these are better if you fancy spending £26 (Constant tension spring clip pliers from Amazon)
41TymiBnqjL._SX300_.jpg
 
  • Like
Reactions: s3_trev and S3Alex
These grips are going to get thrown in a minute I know that. Is it best once the clip is gripped to raise the clips onto the elbow or try to lower it onto the engine framework?
 
I'd raise it as it will be easier to put it over the next hose.

DON'T whatever you do (assuming you're going to re-use it), let it slacken off. Keep it clamped in the open position (with mole grips or similar). I got the mole grips angled at 90 degrees to the clamp and then re-fitted it around the new hose (carefully), then slid it back down with the lugs at the easiest angle to refit, then unclamped. It's not easy, and unless you have a good eye you may not get it square on the housing at first refit attempt.
 
I've had to abandon it today until I can get some decent tools. The weather soon interfered too. Thanks for the input and advice
 
**** those circlip things. I hate them with a passion ....

Mainly because I attacked mine with the wrong tool and ended up clamping my finger to the turbo.
 
  • Like
Reactions: S3_Mat, s3_trev, RedDejavu and 2 others
Done mine with a simple set of mole grips....

Replaced it with a jubilee though for ease.
 
As much as the clip is a pain in the **** to work with, it's the most successful clip I've ever used on that location. I've tried Norma clamps with expansion sections and NOTHING seems to be as reliable as the constant tension spring clip provided by Audi. Thankfully it can't be seen in the bay as it's ugly, but I used it with all 3 of my intakes on S3's.

Remember to degrease the outer edge of the turbo intake housing before fitting the next silicone hose as it will aid gripping. Also be INCREDIBLY careful that nothing falls down the aperture hole!

I used thin tipped mole grips to open and close the constant tension spring clip, but these are better if you fancy spending £26 (Constant tension spring clip pliers from Amazon)
41TymiBnqjL._SX300_.jpg

I'll be trying these grips next week if the weather holds out. Good advice in this thread. Report back later.
 
I managed to do it with long nose pliers and then used the grips on the pliers as the clip is so tight! Was a pitta!
 
started with long nose pliers which i dropped god knows where and got large mole grips then came off easier
 
Today's attempt much better with some decent grips. She's on (thanks to the mrs lol) and nearly done
 
No way! Saying that I need to turn it round a bit but again rain caught up on me. Been for a drive and not quite sure if it's worth the £300 as I've not really noticed anything except a swooshing as the air is being pulled through the filter. But early days
 
You wont really notice anything spectacular by just fitting a CAI... Cai's are in aid of other things when you start the mapping process, thats when it plays its part :)
 
  • Like
Reactions: Revo Steve-W
I have a bluefin superchip stage 1... So that was the idea really.
 
You'll defo notice a difference if your going stage 2 tho... I had my Cai fitted before the map, so couldn't tell if there was any difference
 
Might take a wee while for your fuel trims to adjust too
 
I will give it a bit of time, but I know what I'm like. Can see it coming off pretty soon. Stage involves what other upgrades?
 
Two things I would say. 1. If this is your first CAI be prepared for some weird noises. 2. I recommend fitting an additional support bracket at the middle top point. See my image below showing totally stock install and then my improvements.

If you reached for the pipe in the before picture, at the right angle bend, you could actually move it up and down. Not anymore. I also trimmed a bit of the heatshield at the bottom, as the two silver clamps started to rub against it.
 
For stage 2....

Cai
Turboback Exhaust (3" downpipe)
Possibly High pressure fuel pump
Clutch... If running a standard clutch, it might last a wee while, if your s-tronic then ignore this bit...
 
  • Like
Reactions: JayA3sline
Two things I would say. 1. If this is your first CAI be prepared for some weird noises. 2. I recommend fitting an additional support bracket at the middle top point. See my image below showing totally stock install and then my improvements.

If you reached for the pipe in the before picture, at the right angle bend, you could actually move it up and down. Not anymore. I also trimmed a bit of the heatshield at the bottom, as the two silver clamps started to rub against it.

Yes it is my first CAI as I've never been one to mod things when it comes to engine/performance related anyway. Started with a remaps, DV+ and now the REVO CAI. Is that support bracket purely just to prevent movement or does that make a difference to induction noise?