Right then folks, the long awaited install steps.
First off, pop the large lens from the upper interior lighting cluster near the rear view mirror, followed by popping the trim around the map light switches - careful as there maybe a short wire between the two items.


Near the large round opening are two Philips screws that need removing, this will allow you to lower the whole assembly. At this point click the trim back onto the main housing to stop the risk of damaging the short wire. The whole assembly will now hang from the headlining.

Moving to the nearside of the car, pull down the dampened grab handles and unscrew the Torx screws behind the two flaps on each handle. These flaps can be a little tricky to pop open. So remove both front & rear handles, you could remove the driver grab handle at this point too if you wish.


Next pull the rubber seals down form the top of each nearside door revealing the open edge of the headlining.

Using a straightened metal wire coat hanger or some stiff garden wire (I didn't have a metal hanger to hand and couldn't straighten a plastic hanger without snapping it...) Put a U bend in one end of about an inch / 2cm. Use this to hook one end of the Blackvue AV cable and bind with insulation tape to protect and streamline the joint so it can slip between the headlining & roof space.
Placing the other end of the AV up through the light cluster pop it through out towards the front by the top of the windscreen, to the left of a central wide bracket. This will keep the AV & power cables nicely in line later on.
With the other end firmly attached to the wire, use the wire as a big needle and also feed it up through the light cluster hole, this time aiming for the front passenger door. Once there head rearward to the rear passenger door.
Briefly move to the boot and remove the rubber seal from the upper edge by the large plastic trim panel located centrally above the rear head restraints. Pop the nearside edge of this panel down and using the handle of a screwdriver wedge it open.
Next get a hold of the edge of the headlining which is tucked into the nearside quarter light window and feed the needle rearwards towards the screwdriver.


Gently remove the insulation tape from the end of the AV cable and carefully pull the excess AV cable checking back along the various access points you created to ensure the cable doesn't foul or snag anywhere, making sure the cable is clear and not wrapped around the curtain airbags. With the AV cable sitting to the left of the rear plastic roof panel, feed it upwards behind the tailgate plastic trim.


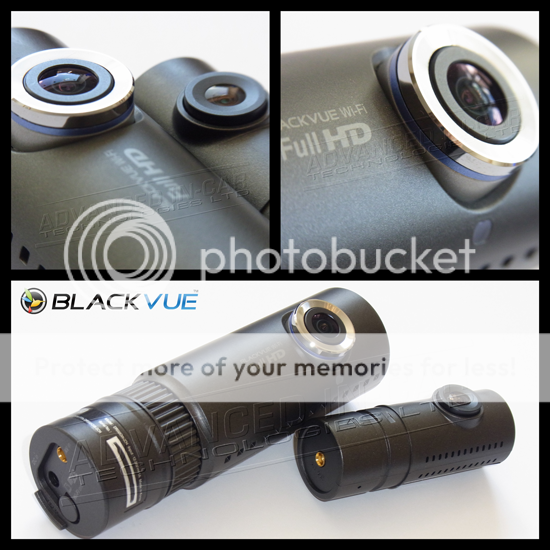
Then pop it out centrally to where the rear camera will be mounted. Tuck the excess AV cable neatly back into the roof void and replace all the trim, seals and grab handles on the nearside of the car. Next thoroughly clean the whole rear window and stick the rear camera centrally into position and plug in the AV cable jack to the camera.


This completes the rear camera installation.
Now to complete the front camera installation drop the drivers door seal from the top, down the A-pillar to below the fuse box access panel.
Using the wire needle again, tape up the Blackvue power lead jack plug and thread it from the door opening towards the front roof light cluster.


Unwrap the power lead jack plug and like the AV cable feed it through behind the roof lining, left of the large central bracket, out towards the top edge of the front windscreen. Stick the larger front camera in position and plug in the two jack plugs.

Once in position, adjust the two short lengths of visible lead to make them as neat & straight as possible. This maybe different if you have the auto wiper / light sensors behind your rear view mirror - I don't, so these two wires will be more visible so it's key these look neat. Keeping left of the wide central bracket of the head lining will position the wires to fall vertically down the windscreen to the camera.

The main interior light cluster can now be secured back in place, remembering to pop the trim panel off it to gain access to the two screw holes. Once back in position clip the lens in place.
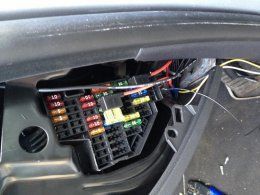
Pop the side cover panel to the fuse box.
Taking care again not to foul the offside curtain airbag, feed the power lead down the A-pillar and into the fuse box area.
Drop the knee panel from the underside of the steering column to gain better access. There is a hex bolt either side, towards the bottom near the bonnet release and the other is left most in line. There is a third hex bolt in the upper left corner of the fuse panel. This will then allow the panel to drop down off a series of hooks along the top edge near the light switch.
I then fixed the Power Magic in place with cable ties wiring it into the 12v+ of the permanent live cigar socket circuit and the switched 12v+ of the A/C / blower circuit and an earth point on the chassis nearby.


Plugging the cigar sized jack plug of the Blackvue power lead into the cigar socket of the Power Magic I ran a full test of all systems to ensure compatibility of the new ancillaries and existing circuits with success. Finally refit all the panels, seal & drivers grab handle.
I then used the Blackvue App on my iPhone 5 to view the live footage and set the correct viewing angle of both cameras.
With standard privacy glass you cannot see the rear camera from outside the car unless you get right up to it and look for it. As for the front it sits nicely by the rear view mirror. I may add a strip of black insulation tape to the front camera bracket which is grey in colour to further blend it into its surroundings.

Overall I think it took longer and more grey matter to scribble this write up than install the camera system. Have a look at the Blackvue Facebook page
https://www.facebook.com/BlackvueUK?ref=ts&fref=ts for more images & actual footage.
Finally I would like to thank Tim at Advanced In-Car Technologies and ASN members Trups & NHN for their assistance in the purchase and advice prior to my installation.