

- Joined
- Mar 17, 2011
- Messages
- 3,543
- Reaction score
- 881
- Points
- 113
- Location
- Lanark, Scotland
- Website
- www.brotek.co.uk
Right then. After much faffing around and looking at a multitude of threads and other websites to get info on how to fit the RNSE I have been asked by our Mod Sandra to post this as she found exceptionally easy to understand.
My 8P2 S3 had Bose, Bluetooth and thats about it. It had NO MFSW. The instructions are for changing from Symphony to RNSE if you have double DIN.
After removing Symphony unit IF you have a quadlock adaptor on the back that looks like this then the job is a piece of cake
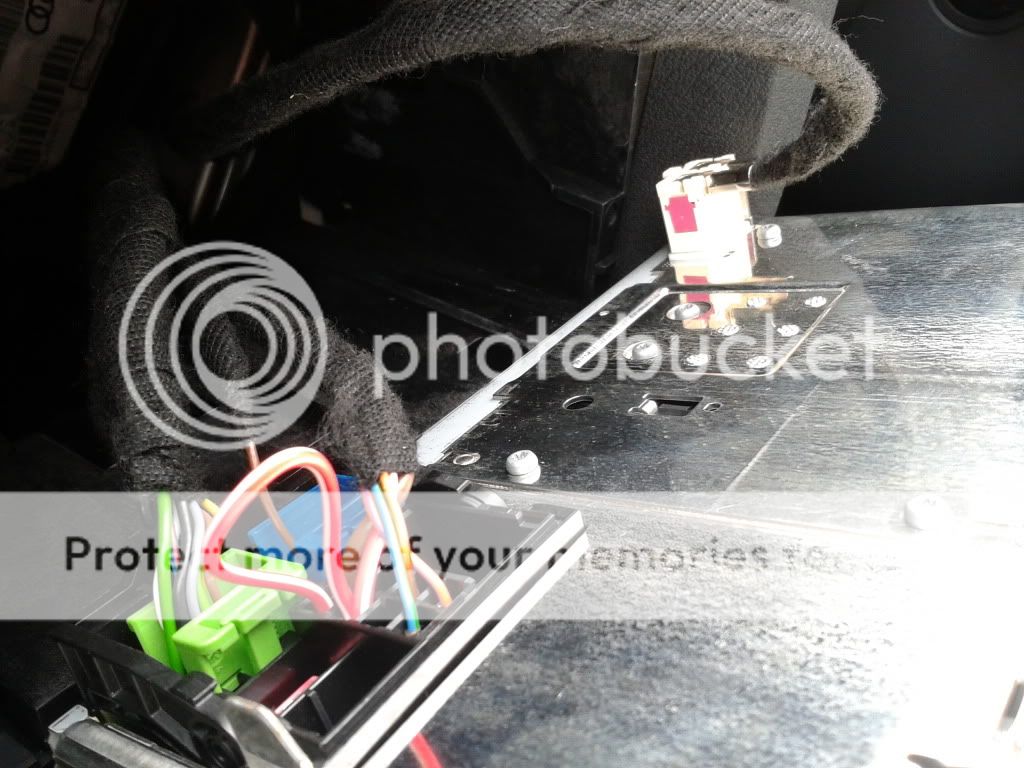
Simply disconnect the quadlock adaptor and then the antenna and remove the unit from the car.
If you have the Bose set-up then you need to swap the brown wire in the blue plug from pin 5 to pin 7. Small screwdriver needed to unlock the pin and slide it out and reposition in pin 7. You will hear an audible click when its located properly in the plug. Slide the casing back into the plug and thats it.
Gently reconnect the quadlock adaptor, aerial antenna and GPS antenna to the back of the RNS-E unit and slide it into the dash. Maybe worthwhile not locking it at this stage IF you want to relocate the GPS antenna.
For positioning the antenna its up to you. I located mine ontop of the glovebox but some people put it ontop of the clocks under the dashboard. Im getting good satellites with it ontop of the dashboard so 6 and 2 threes as they say.
If you have access to VCDS then great. I did alot of research this morning trying to figure out the correct coding and came up with what is mentioned below. It all works for my S3 so Im not promising it will for yours as mine had very little extras.
[h=3]Your Vehicle & Installed Options[/h]Audi S3 / S3 Cab (8P), English (UK), BOSE, SDS, Bluetooth Telephone, Tyre: 225/40 ZR18 (Summer)
You should make a note of ALL existing codings before making any changes, if you later need support and don't have access to these it may cause difficulty.
RNSE Coding:
[ 37 - Navigation ] --> [ Coding - 07 ] --> Software Coding: --> 0209711 -->[ Do It! ]
Adaption Channels:
[ 37 - Navigation ] --> [ Adaption 10 ]
Channel 001: 1943
Channel 002: 43
Channel 003: 1
Channel 004: 0
Channel 005: 0
Channel 008: 255
Channel 010: 0
Channel 018: 1
Channel 067: 000
Channel 099: 0
Channel 136: 00013
Once you have changed all the required channels you can click [ Done, Go Back ] to return to the control module screen, then
[ Close Controller, Go Back - 06 ] to close the current control module.
Bluetooth Coding:
[ 77 - Telephone ] --> [ Coding - 07 ] --> Software Coding: --> [ Do It! ]
Adaption Channels:
[ 77 - Telephone ] --> [ Adaption 10 ]
Use steps 1 - 4 for the RNS-E with the bluetooth adaption channels, again you may find that the values already configured match those required.
Channel 133: 1 (Bluetooth ON)
Channel 134: 0
Channel 135: Enter your 4 digit bluetooth pin code (default: 1234)
Once you have changed all the required channels you can click [ Done, Go Back ] to return to the control module screen, then
[ Close Controller, Go Back - 06 ] to close the current control module.
CAN-Gateway Coding
You need to ensure the following items are enabled/ticked in your CAN-Gateway, LEAVE ALL OTHER OPTIONS UNCHANGED.
We strongly recommend that you use the Long Coding Helper in VCDS to do this.
[19 - CAN-Gateway] --> [7 - Coding]
IMPORTANT! - Copy the coding from 'Current Coding' and make a backup of it somewhere
Click 'Long Coding Helper'
Select Byte 3 (the 4th pair of digits along line 3) - it should say "Byte 3" in the box
Change bits 3 to 7 on your gateway to match those below, leave bits 0 to 2 UNCHANGED.
Byte 03
Check that the number in 'Current Coding' has changed from what you noted down (a maximum of 2 digits should changed)
[Do It!]
[ Done, Go Back ] to return to the control module screen, then [ Close Controller, Go Back - 06 ] to close the current control module.
Reboot RNS-E
To reboot the unit, hold RADIO (or AM/FM) and SETUP for more than 10 seconds.
Clear Fault Codes
Clear any fault codes as some of these generated whilst coding can prevent the system from functioning.
To clear fault codes, select the module you wish to check
e.g.
[ 37 - Navigation ] --> [ Fault Codes - 02 ] --> [ Clear Codes - 05 ] --> [ Done, Go Back ] --> [ Close Controller, Go Back - 06 ]
[ 77 - Telephone ] --> [ Fault Codes - 02 ] --> [ Clear Codes - 05 ] --> [ Done, Go Back ] --> [ Close Controller, Go Back - 06 ]
You may find it easier to run a complete auto scan on your vehicle and that will show you which modules have faults that need to be cleared. You can then use the above procedure examples to work through and clear them.
Once I knew what I was doing which became apparent after speaking to afew on here then it doesnt take long at all. Remember this is only for having a quadlock in the first instance.
Now I aplogise if this is duplicating any other threads but having spent hours over the last few days searching for info and not really coming up with any - as its dotted all over the forum some people felt this had to be done.....and this is it. It worked for me....IN THE END!!!
My 8P2 S3 had Bose, Bluetooth and thats about it. It had NO MFSW. The instructions are for changing from Symphony to RNSE if you have double DIN.
After removing Symphony unit IF you have a quadlock adaptor on the back that looks like this then the job is a piece of cake
Simply disconnect the quadlock adaptor and then the antenna and remove the unit from the car.
If you have the Bose set-up then you need to swap the brown wire in the blue plug from pin 5 to pin 7. Small screwdriver needed to unlock the pin and slide it out and reposition in pin 7. You will hear an audible click when its located properly in the plug. Slide the casing back into the plug and thats it.
Gently reconnect the quadlock adaptor, aerial antenna and GPS antenna to the back of the RNS-E unit and slide it into the dash. Maybe worthwhile not locking it at this stage IF you want to relocate the GPS antenna.
For positioning the antenna its up to you. I located mine ontop of the glovebox but some people put it ontop of the clocks under the dashboard. Im getting good satellites with it ontop of the dashboard so 6 and 2 threes as they say.
If you have access to VCDS then great. I did alot of research this morning trying to figure out the correct coding and came up with what is mentioned below. It all works for my S3 so Im not promising it will for yours as mine had very little extras.
[h=3]Your Vehicle & Installed Options[/h]Audi S3 / S3 Cab (8P), English (UK), BOSE, SDS, Bluetooth Telephone, Tyre: 225/40 ZR18 (Summer)
You should make a note of ALL existing codings before making any changes, if you later need support and don't have access to these it may cause difficulty.
RNSE Coding:
[ 37 - Navigation ] --> [ Coding - 07 ] --> Software Coding: --> 0209711 -->[ Do It! ]
Adaption Channels:
[ 37 - Navigation ] --> [ Adaption 10 ]
- Type the adaption channel you wish to change into 'Channel' and click 'Read'.
- Make a note of the existing 'Stored value' (You may find that the stored value already matches the value you need to enter in which case you can skip to the next channel).
- Enter the new value required into the 'New Value' box, click [ Test ] --> [ Save ]
- Repeat 1 to 3 for each RNS-E adaption channel below
Channel 001: 1943
Channel 002: 43
Channel 003: 1
Channel 004: 0
Channel 005: 0
Channel 008: 255
Channel 010: 0
Channel 018: 1
Channel 067: 000
Channel 099: 0
Channel 136: 00013
Once you have changed all the required channels you can click [ Done, Go Back ] to return to the control module screen, then
[ Close Controller, Go Back - 06 ] to close the current control module.
Bluetooth Coding:
[ 77 - Telephone ] --> [ Coding - 07 ] --> Software Coding: --> [ Do It! ]
Adaption Channels:
[ 77 - Telephone ] --> [ Adaption 10 ]
Use steps 1 - 4 for the RNS-E with the bluetooth adaption channels, again you may find that the values already configured match those required.
Channel 133: 1 (Bluetooth ON)
Channel 134: 0
Channel 135: Enter your 4 digit bluetooth pin code (default: 1234)
Once you have changed all the required channels you can click [ Done, Go Back ] to return to the control module screen, then
[ Close Controller, Go Back - 06 ] to close the current control module.
CAN-Gateway Coding
You need to ensure the following items are enabled/ticked in your CAN-Gateway, LEAVE ALL OTHER OPTIONS UNCHANGED.
We strongly recommend that you use the Long Coding Helper in VCDS to do this.
[19 - CAN-Gateway] --> [7 - Coding]
IMPORTANT! - Copy the coding from 'Current Coding' and make a backup of it somewhere
Click 'Long Coding Helper'
Select Byte 3 (the 4th pair of digits along line 3) - it should say "Byte 3" in the box
Change bits 3 to 7 on your gateway to match those below, leave bits 0 to 2 UNCHANGED.
Byte 03
- Bit 0 [3D] Special Function - LEAVE UNCHANGED
- Bit 1 [47] Sound System - LEAVE UNCHANGED
- Bit 2 [75] Telematics - LEAVE UNCHANGED
- Bit 3 [37] Navigation
- Bit 4 [57] TV-Tuner
- Bit 5 [0F] Digital Radio
- Bit 6 [56] Radio
- Bit 7 [77] Telephone
Check that the number in 'Current Coding' has changed from what you noted down (a maximum of 2 digits should changed)
[Do It!]
[ Done, Go Back ] to return to the control module screen, then [ Close Controller, Go Back - 06 ] to close the current control module.
Reboot RNS-E
To reboot the unit, hold RADIO (or AM/FM) and SETUP for more than 10 seconds.
Clear Fault Codes
Clear any fault codes as some of these generated whilst coding can prevent the system from functioning.
To clear fault codes, select the module you wish to check
e.g.
[ 37 - Navigation ] --> [ Fault Codes - 02 ] --> [ Clear Codes - 05 ] --> [ Done, Go Back ] --> [ Close Controller, Go Back - 06 ]
[ 77 - Telephone ] --> [ Fault Codes - 02 ] --> [ Clear Codes - 05 ] --> [ Done, Go Back ] --> [ Close Controller, Go Back - 06 ]
You may find it easier to run a complete auto scan on your vehicle and that will show you which modules have faults that need to be cleared. You can then use the above procedure examples to work through and clear them.
Once I knew what I was doing which became apparent after speaking to afew on here then it doesnt take long at all. Remember this is only for having a quadlock in the first instance.
Now I aplogise if this is duplicating any other threads but having spent hours over the last few days searching for info and not really coming up with any - as its dotted all over the forum some people felt this had to be done.....and this is it. It worked for me....IN THE END!!!


