

So you car is overboosting? More than likely the vanes inside the turbo have jammed, this is due to carbon build up and its fairly common. First thing is make sure they are sticking before removing turbo.
Checking if the vanes are sticking.
Get underneath the car with the engine running, remove any undertrays to gain access to turbo and locate the turbos actuator. Now you've found the actuator, remove the vacuum hose while watching the reaction of the actuator rod, it should move freely and about 1 inch, maybe just short, you get the idea. If it moves the full travel but appears to have spots of delay (rod should move quickish and smooth) this is a sign your vanes are sticking, in a lot of cases the rod moves very little or not at all, this also means the vanes are sticking.
So you've discovered the vanes are sticking, great find! What now? Simple... Remove the turbo and clean the carbon build up from inside the turbo causing the 'sticky vanes'. Heres a how to guide with step by step instructions.
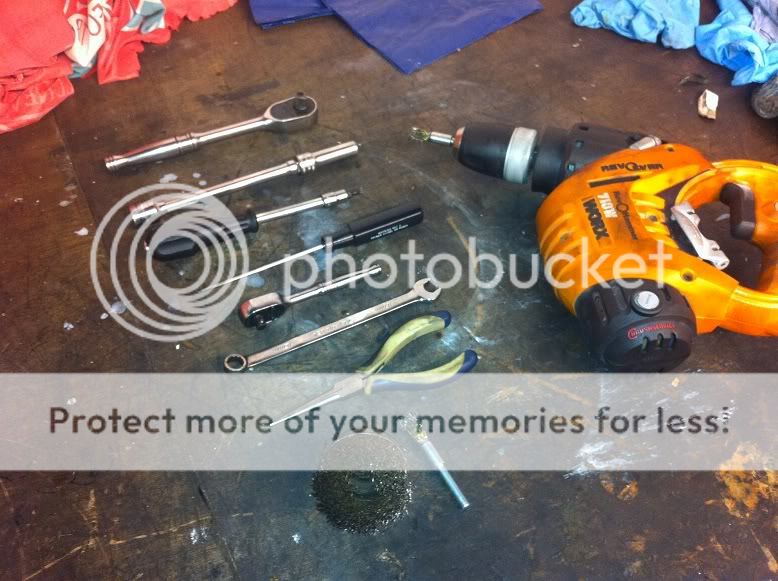
Tools required:
5mm allen for ratchet (I use 3/8's ratchet)
6mm allen for ratchet
12mm deep socket
13mm socket
16mm socket
short extention
long extention
Flat blade screw driver
T30 on ratchet (I use quarter inch ratchet)
17mm spanner
22mm spanner
Pliers suitable to remove the springy circular clip (Jubilee alternative type)
(This is off top of my head, if I have missed anything I will update as I'm replacing a turbo tomorrow)
Removing the turbo.
First off, lets take the downpipe with catalytic converter. You will need to remove a plate held up by 4x 13mm nuts, once removed undo the 2x 13mm bolts on the exhaust clamp and slide the clamp along. Then remove the 2x 13mm bolts that hold the exhaust up these are at the back of the subframe. Now this is done there is a flat bar from the cat to the gearbox, remove 2x 16mm bolts and put to one side. Lastly get the 5mm allen with long extension and undo the clamp holding the exhaust to the turbo, there is a gasket so make sure you don't lose this, the clamp usually doesn't 'fall off' it has to be persuaded because its a tight fit, once loose the exhaust can come away.
Exhaust removed you now have access through the exhaust tunnel which the turbo will be coming through. Firstly get your 22mm spanner and take off the oil return pipe from the block, small amount of oil will drain/drip out. Then get your 17mm spanner and undo the oil feed pipe, if it feels tight do not keep trying you will twist and snap the oil feed pipe. The reason is theres like a connecting piece that screws into the turbo that the oil feed pipe screws on to, you will need to modify a crappy 17mm spanner to fit inbetween hot and cold side housings to stop this turning. Once oil feed pipe is undone follow it along to the left of the manifold and there will be a clamp with a 12mm bolt, remove this and carefully bend the oil feed pipe up and away.
On the top of the manifold is a pipe to the EGR held to the manifold by 2x 12mm nuts and to the EGR cooler by 2x 6mm allen bolts. Remove these and pull out the pipe.
Now, get your T30 and remove a bolt holding the turbo inlet pipe to the engine, there are two, one located top right of the turbo and one under the bonnet next to where the flexy inlet piping is, remove these two bolts and then get your pliers and squeeze the clip holding the turbo inlet pipe into the turbo slide it over and pull the pipe out, would be easier to remove altogether to make room, its a little awkward but does come out.
Now get your flat head and pull out the C clip holding the boost pipe into the turbo, then pull out the boost pipe, again a little awkward but can be made easy by removing the full boost pipe to intercooler.
Pull the vacuum hose off the actuator and move out of way. Now everything is out of way its just a case of unbolting the turbo.
First theres a 13mm bolt at the bottom of the exhaust side of the turbo that connects to a bracket to the block, remove this. Now if you look on the right side of the manifold there is a heat shield, held on by 2x 12mm bolts, remove these and remove the heat sheild. Now you left with the 8x 12mm bolts holding the turbo to the head, remove these and then its time to pull out the turbo, it will come through the exhaust tunnel as mentioned earlier, I tend to get the left side of the manifold coming out first.
Thats it, its a fairly simple job once you've done a couple, I removed one today in just 40 minutes. But give your self a couple hours if you've not done one before, and take your time keeping all bolts grouped.
Good stuff you've got the turbo off! Now time to sort out these sticking vanes
Cleaning out the carbon build up.
Tools required for this part:
10mm spanner,
10mm socket,
small/thin long nose pliers,
small flat head,
T25 for ratchet or screwdriver,
Drill with wire brush attatchments,
Cleaning agents can be used, but its perfectly fine to do without,
A vice would be handy but today I never had one, so I made do without.
First while the turbo is off check for any play, or damage to compressor/exhaust wheels
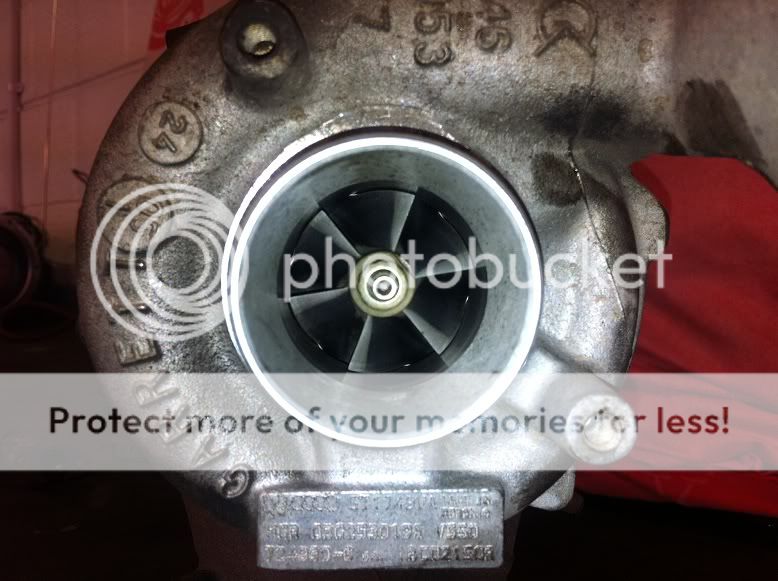
Look at that horrible carbon build up just there! This turbo was spot on in terms of play/damage.
Moving on, remove the oil return pipe

With this off, now remove the actuator starting with the clip
Now remove 2 bolts holding the actuator to turbo

Remember to mark with tipex, its not needed its just a reminder where the turbo goes, although there is a peg its just handy to do.

Now there are 3 more 10mm bolts holding the turbo together 2 of which are

Now the turbo should come apart, some easily some not, get a hammer to persuade it. Don't be an idiot with it though as I've broke the lug for the bottom 13mm bolt before luckily it was a knackered turbo and I was just experimenting.
Once you've seperated the turbo you should have this

Look at all the black crap, it may not look much but it does cause the vanes to stick.
Moving on, grab the exhaust side of the turbo and take out the ring being careful not to drop the 3 guide wheels and pins (Circled in yellow)


Now go back to the turbo and remove the 3x T25 bolts being very careful not to snap them. If they feel tight work them in and out, little by little, trust me take your time the last thing you want is one of these snapping. (Sorry for not putting circles round but I'm sure you can see them (Please bear in mind when rebuilding, the 3x T25's are offset and can only go one way, you'll see two are closer together than the other)

Take this out there are 3 spacers underneath

On this turbo there is evidence of the vanes sticking, this is actually another plate that comes out, sometimes they don't fall out sometimes they do

Lets get cleaning! I use a wire brush attatchment for a drill
And a small one for the vanes you can see it among the tools I used
Here are my cleaned parts

The plate on the left of the vanes is the plate I mentioned above that sometimes comes out sometimes doesn't (It just get stuck!) Try your best to get it out though.
Now we are ready to rebuild!
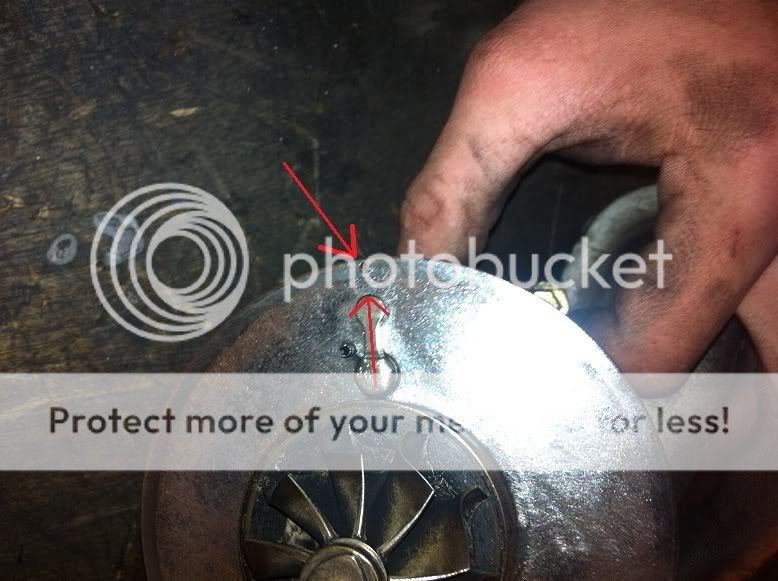
Insert the plate if removed, lining up the holes. Now put the 3 spacers over the holes and grab your vanes and put it on top of the spacers being careful to keep everything in line, we don't want the spacers moving and the bolt not going through them do we? Now put the 3 pins in the holes, put the ring over the vanes then slot in the rolers, please take a look at this picture making sure you have the ring in the right position, the yellow circle is where the control arm control by actuator sits and the red circle is a hole for the peg I mentioned earlier, line these up. Ok so you should get to this point.

Grab the compressor part of the turbo and line the control arm and the peg up
Now slot the two parts of the turbo together carefully, you may have to waggle to lever about the make the control arm slot on to place, once turbo is back together move the lever
It should feel like its not even connected properly don't worry because it is, if it wasn't it would be jammed and the turbo wouldn't sit flush. Make sure your tipex marking line up too.
Put the 3 bolts with large washers in these holes (The 3rd is further round anti-clockwise)
Fit your actuator, snap the C clip back in place and your all done! Re fit your turbo in reverse order of this guide and happy days.
Wow that took a while! I hope this helps people.
Craig.
Checking if the vanes are sticking.
Get underneath the car with the engine running, remove any undertrays to gain access to turbo and locate the turbos actuator. Now you've found the actuator, remove the vacuum hose while watching the reaction of the actuator rod, it should move freely and about 1 inch, maybe just short, you get the idea. If it moves the full travel but appears to have spots of delay (rod should move quickish and smooth) this is a sign your vanes are sticking, in a lot of cases the rod moves very little or not at all, this also means the vanes are sticking.
So you've discovered the vanes are sticking, great find! What now? Simple... Remove the turbo and clean the carbon build up from inside the turbo causing the 'sticky vanes'. Heres a how to guide with step by step instructions.
Tools required:
5mm allen for ratchet (I use 3/8's ratchet)
6mm allen for ratchet
12mm deep socket
13mm socket
16mm socket
short extention
long extention
Flat blade screw driver
T30 on ratchet (I use quarter inch ratchet)
17mm spanner
22mm spanner
Pliers suitable to remove the springy circular clip (Jubilee alternative type)
(This is off top of my head, if I have missed anything I will update as I'm replacing a turbo tomorrow)
Removing the turbo.
First off, lets take the downpipe with catalytic converter. You will need to remove a plate held up by 4x 13mm nuts, once removed undo the 2x 13mm bolts on the exhaust clamp and slide the clamp along. Then remove the 2x 13mm bolts that hold the exhaust up these are at the back of the subframe. Now this is done there is a flat bar from the cat to the gearbox, remove 2x 16mm bolts and put to one side. Lastly get the 5mm allen with long extension and undo the clamp holding the exhaust to the turbo, there is a gasket so make sure you don't lose this, the clamp usually doesn't 'fall off' it has to be persuaded because its a tight fit, once loose the exhaust can come away.
Exhaust removed you now have access through the exhaust tunnel which the turbo will be coming through. Firstly get your 22mm spanner and take off the oil return pipe from the block, small amount of oil will drain/drip out. Then get your 17mm spanner and undo the oil feed pipe, if it feels tight do not keep trying you will twist and snap the oil feed pipe. The reason is theres like a connecting piece that screws into the turbo that the oil feed pipe screws on to, you will need to modify a crappy 17mm spanner to fit inbetween hot and cold side housings to stop this turning. Once oil feed pipe is undone follow it along to the left of the manifold and there will be a clamp with a 12mm bolt, remove this and carefully bend the oil feed pipe up and away.
On the top of the manifold is a pipe to the EGR held to the manifold by 2x 12mm nuts and to the EGR cooler by 2x 6mm allen bolts. Remove these and pull out the pipe.
Now, get your T30 and remove a bolt holding the turbo inlet pipe to the engine, there are two, one located top right of the turbo and one under the bonnet next to where the flexy inlet piping is, remove these two bolts and then get your pliers and squeeze the clip holding the turbo inlet pipe into the turbo slide it over and pull the pipe out, would be easier to remove altogether to make room, its a little awkward but does come out.
Now get your flat head and pull out the C clip holding the boost pipe into the turbo, then pull out the boost pipe, again a little awkward but can be made easy by removing the full boost pipe to intercooler.
Pull the vacuum hose off the actuator and move out of way. Now everything is out of way its just a case of unbolting the turbo.
First theres a 13mm bolt at the bottom of the exhaust side of the turbo that connects to a bracket to the block, remove this. Now if you look on the right side of the manifold there is a heat shield, held on by 2x 12mm bolts, remove these and remove the heat sheild. Now you left with the 8x 12mm bolts holding the turbo to the head, remove these and then its time to pull out the turbo, it will come through the exhaust tunnel as mentioned earlier, I tend to get the left side of the manifold coming out first.
Thats it, its a fairly simple job once you've done a couple, I removed one today in just 40 minutes. But give your self a couple hours if you've not done one before, and take your time keeping all bolts grouped.
Good stuff you've got the turbo off! Now time to sort out these sticking vanes
Cleaning out the carbon build up.
Tools required for this part:
10mm spanner,
10mm socket,
small/thin long nose pliers,
small flat head,
T25 for ratchet or screwdriver,
Drill with wire brush attatchments,
Cleaning agents can be used, but its perfectly fine to do without,
A vice would be handy but today I never had one, so I made do without.
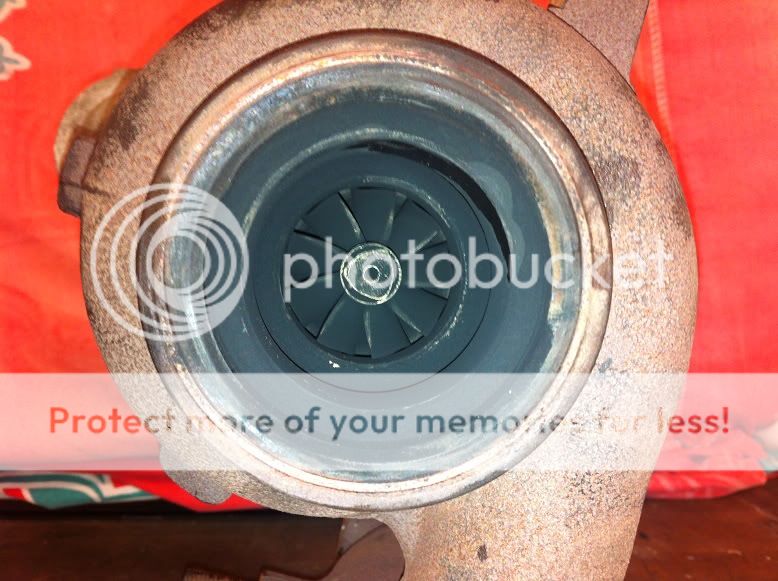
First while the turbo is off check for any play, or damage to compressor/exhaust wheels
Look at that horrible carbon build up just there! This turbo was spot on in terms of play/damage.
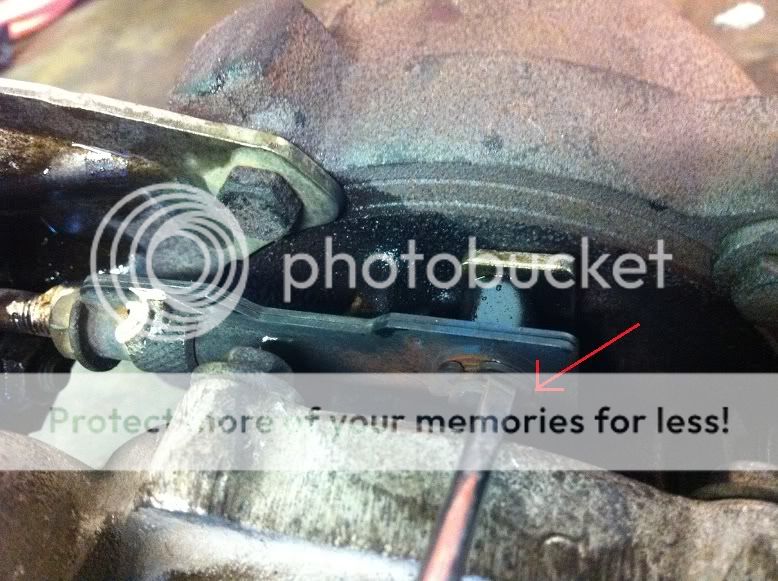
Moving on, remove the oil return pipe
With this off, now remove the actuator starting with the clip
Now remove 2 bolts holding the actuator to turbo
Remember to mark with tipex, its not needed its just a reminder where the turbo goes, although there is a peg its just handy to do.
Now there are 3 more 10mm bolts holding the turbo together 2 of which are
Now the turbo should come apart, some easily some not, get a hammer to persuade it. Don't be an idiot with it though as I've broke the lug for the bottom 13mm bolt before luckily it was a knackered turbo and I was just experimenting.
Once you've seperated the turbo you should have this
Look at all the black crap, it may not look much but it does cause the vanes to stick.
Moving on, grab the exhaust side of the turbo and take out the ring being careful not to drop the 3 guide wheels and pins (Circled in yellow)
Now go back to the turbo and remove the 3x T25 bolts being very careful not to snap them. If they feel tight work them in and out, little by little, trust me take your time the last thing you want is one of these snapping. (Sorry for not putting circles round but I'm sure you can see them (Please bear in mind when rebuilding, the 3x T25's are offset and can only go one way, you'll see two are closer together than the other)
Take this out there are 3 spacers underneath
On this turbo there is evidence of the vanes sticking, this is actually another plate that comes out, sometimes they don't fall out sometimes they do
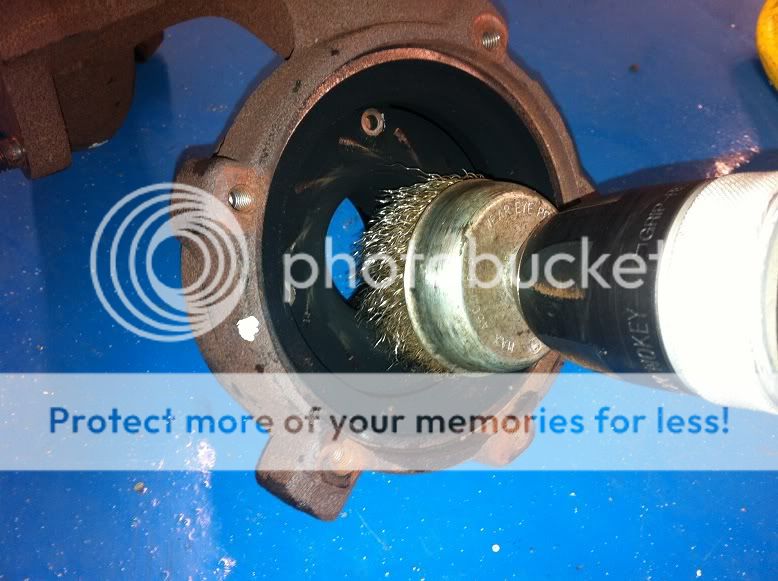
Lets get cleaning! I use a wire brush attatchment for a drill
And a small one for the vanes you can see it among the tools I used
Here are my cleaned parts
The plate on the left of the vanes is the plate I mentioned above that sometimes comes out sometimes doesn't (It just get stuck!) Try your best to get it out though.
Now we are ready to rebuild!
Insert the plate if removed, lining up the holes. Now put the 3 spacers over the holes and grab your vanes and put it on top of the spacers being careful to keep everything in line, we don't want the spacers moving and the bolt not going through them do we? Now put the 3 pins in the holes, put the ring over the vanes then slot in the rolers, please take a look at this picture making sure you have the ring in the right position, the yellow circle is where the control arm control by actuator sits and the red circle is a hole for the peg I mentioned earlier, line these up. Ok so you should get to this point.
Grab the compressor part of the turbo and line the control arm and the peg up
Now slot the two parts of the turbo together carefully, you may have to waggle to lever about the make the control arm slot on to place, once turbo is back together move the lever
It should feel like its not even connected properly don't worry because it is, if it wasn't it would be jammed and the turbo wouldn't sit flush. Make sure your tipex marking line up too.
Put the 3 bolts with large washers in these holes (The 3rd is further round anti-clockwise)
Fit your actuator, snap the C clip back in place and your all done! Re fit your turbo in reverse order of this guide and happy days.
Wow that took a while! I hope this helps people.
Craig.


