A3 8l 1.8t thermostat location
- Thread starter seafar99
- Start date
You are using an out of date browser. It may not display this or other websites correctly.
You should upgrade or use an alternative browser.
You should upgrade or use an alternative browser.
A3 T
Lord Of The Rings
- Joined
- Feb 23, 2011
- Messages
- 1,079
- Reaction score
- 16
- Points
- 38
I found it:
Thermostat replacement procedure..>> - AudiWorld Forums
But i think its been so long the picture have stopped working
Also buy yourself a new dipstick tube as the one you have is going to break
Thermostat replacement procedure..>> - AudiWorld Forums
But i think its been so long the picture have stopped working
Also buy yourself a new dipstick tube as the one you have is going to break
A3 T had saved the pics so here goes,
you can undo the housing bolts with a 10mm socket and small ratchet did it at the weekend no extension bars required.
these pics are from a tt but the almost the same as my s3
Well, here it is: I'm not going to say it is simple, but it actualy is. All the procedure should take 15 to 30 minutes,
Here are the tools you will need to do this: 3/8" ratchet, as many extensions as you can get (about 24"), a 10mm short socket, 10mm box end (or long socket), flex joint , 5mm allen wrench or socket, a magnetic pickup (or needle nose pliers) and a channelock.

We will asume the engine covers are removed, NEGATIVE post of the battery removed (check radio code first!) and of course, car IS cool, no pressure. Also, a clean engine bay will help a lot.
Start removing the following screws:
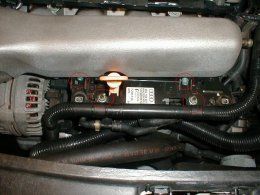
pull the tray up to release the hook for the oil dipstick and then separate from the manifold about 2 inches. Remove the connector on your left

put the whole assembly to the right and hold it is place (I use a ty-rap for this)
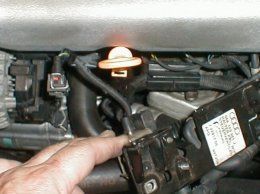
Here is the first "catch", the oil dipstick tube gets very (I mean very) brittle after a couple of years, so as it has to be removed for clearance, it may break so will need to be replaced. Be careful that when it breakes it leaves a little piece or plastic (orange)tube inside the metal part that goes to the oil pan. This has to be removed too, use an old flat screw driver with a bent tip to pull this piece. This looks like this:

Pull the orange tube up, it will do a little snap and release like this:
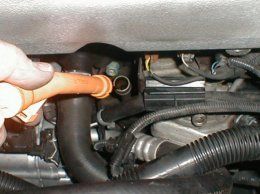
Now we can see where are we going: here!

With the Channel lock, remove the clamp that holds the [FONT=inherit !important][FONT=inherit ! important]hose[/FONT][/FONT] (center of picture above, push it towards the engine block) and separate the hose from the thermostat housing. Now, assemble the tools like this, the bottle is just a dimensional reference...
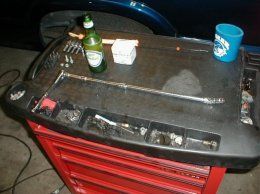
Put a rag on top of the open dipstick tube to avoid getting any or debree into the oil. With the tools assembled as above, loose the top that holds the t'stat housing to the block, like this:
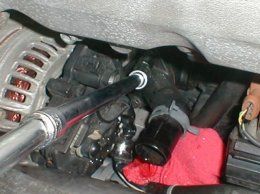
There is enough space to work the bolt by hand:

Now let's work with the lower bolt, like this:
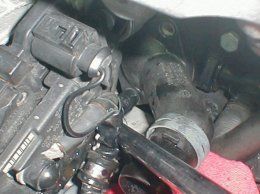
when it's loose you'll be able to remove the housing from the block, it will look like this:
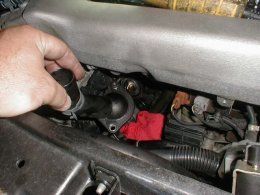
Remove the old o-ring and pull the old t'stat from the block, if you do a quick change (quick as in normal, not lightning fast) you should loose only very little coolant. Remember that the o-ring goes on the outside, over the t'stat! Now it should look like this:

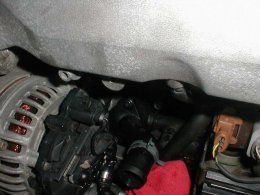
Time to reasemble. put the housing back in place, caution to not move the o-ring, the housing should be flush with the [FONT=inherit !important][FONT=inherit !important]block[/FONT][/FONT]. Hold everything with the top bolt, which can be worked by hand, like this:
Now, with the magnetic pickup, hold the lower bolt like this and insert it into the lower hole on the housing:

Bolt towards the housing:

Bolt onthe housing:
Now, use the short 10mm socket and the long extensions again to secure the lower bolt in place, then do the top bolt. Reattach the coolant hose. Now, insert the oil dipstick tube back into the metal base, remember that the square part on the side is to be reinserted on the manifold base later. Release the ty-rap (if used) that holds the tray that we moved to the right and put it back into it's position, on the manifold. Remeber to secure the oil dipstick tube into it's slot and reattach the connector we removed from the left side of the tray.. Reattach the 2 10mm nuts and the 2 5mm allen screws.
Open the [FONT=inherit !important][FONT=inherit !important]reservoir[/FONT][/FONT] and top it off with coolant or water, depending on how much you did loose. Remember, that the OEM coolant, PENTOSIN G12 (Pink color), DOES NOT MIX WITH OTHER COOLANTS. If you do, it wil gel and create a mess.
After filling the coolant, reattach the battery and turn on the car, leave it idling for 5 minutes and keep an eye on the[FONT=inherit !important] [FONT=inherit !important]evel[/FONT][/FONT] as it may empty the reservoir filling the bubbles on the block. After the engine has idled for 10 to 15 minutes, check for leaks and go for a test drive.
Hope this helps!
thanks to RafaTT audi world
you can undo the housing bolts with a 10mm socket and small ratchet did it at the weekend no extension bars required.
these pics are from a tt but the almost the same as my s3
Well, here it is: I'm not going to say it is simple, but it actualy is. All the procedure should take 15 to 30 minutes,
Here are the tools you will need to do this: 3/8" ratchet, as many extensions as you can get (about 24"), a 10mm short socket, 10mm box end (or long socket), flex joint , 5mm allen wrench or socket, a magnetic pickup (or needle nose pliers) and a channelock.

We will asume the engine covers are removed, NEGATIVE post of the battery removed (check radio code first!) and of course, car IS cool, no pressure. Also, a clean engine bay will help a lot.
Start removing the following screws:

pull the tray up to release the hook for the oil dipstick and then separate from the manifold about 2 inches. Remove the connector on your left

put the whole assembly to the right and hold it is place (I use a ty-rap for this)

Here is the first "catch", the oil dipstick tube gets very (I mean very) brittle after a couple of years, so as it has to be removed for clearance, it may break so will need to be replaced. Be careful that when it breakes it leaves a little piece or plastic (orange)tube inside the metal part that goes to the oil pan. This has to be removed too, use an old flat screw driver with a bent tip to pull this piece. This looks like this:

Pull the orange tube up, it will do a little snap and release like this:

Now we can see where are we going: here!

With the Channel lock, remove the clamp that holds the [FONT=inherit !important][FONT=inherit ! important]hose[/FONT][/FONT] (center of picture above, push it towards the engine block) and separate the hose from the thermostat housing. Now, assemble the tools like this, the bottle is just a dimensional reference...

Put a rag on top of the open dipstick tube to avoid getting any or debree into the oil. With the tools assembled as above, loose the top that holds the t'stat housing to the block, like this:

There is enough space to work the bolt by hand:

Now let's work with the lower bolt, like this:

when it's loose you'll be able to remove the housing from the block, it will look like this:

Remove the old o-ring and pull the old t'stat from the block, if you do a quick change (quick as in normal, not lightning fast) you should loose only very little coolant. Remember that the o-ring goes on the outside, over the t'stat! Now it should look like this:

Time to reasemble. put the housing back in place, caution to not move the o-ring, the housing should be flush with the [FONT=inherit !important][FONT=inherit !important]block[/FONT][/FONT]. Hold everything with the top bolt, which can be worked by hand, like this:

Now, with the magnetic pickup, hold the lower bolt like this and insert it into the lower hole on the housing:

Bolt towards the housing:

Bolt onthe housing:
Now, use the short 10mm socket and the long extensions again to secure the lower bolt in place, then do the top bolt. Reattach the coolant hose. Now, insert the oil dipstick tube back into the metal base, remember that the square part on the side is to be reinserted on the manifold base later. Release the ty-rap (if used) that holds the tray that we moved to the right and put it back into it's position, on the manifold. Remeber to secure the oil dipstick tube into it's slot and reattach the connector we removed from the left side of the tray.. Reattach the 2 10mm nuts and the 2 5mm allen screws.
Open the [FONT=inherit !important][FONT=inherit !important]reservoir[/FONT][/FONT] and top it off with coolant or water, depending on how much you did loose. Remember, that the OEM coolant, PENTOSIN G12 (Pink color), DOES NOT MIX WITH OTHER COOLANTS. If you do, it wil gel and create a mess.
After filling the coolant, reattach the battery and turn on the car, leave it idling for 5 minutes and keep an eye on the[FONT=inherit !important] [FONT=inherit !important]evel[/FONT][/FONT] as it may empty the reservoir filling the bubbles on the block. After the engine has idled for 10 to 15 minutes, check for leaks and go for a test drive.
Hope this helps!
thanks to RafaTT audi world
Last edited:
Quick update, changed the temperature sensor first as it's the easiest - still no change in the gauge .
Changed the thermostat, both housing bolts are 10mm socket headed But also have 5mm Allen head
socket centre's which was the way to get proper purchase on tightening, anyway topped it up with anti-freeze
and took it for a run, success ! Temperature gauge now reading 90* Happy days.
Changed the thermostat, both housing bolts are 10mm socket headed But also have 5mm Allen head
socket centre's which was the way to get proper purchase on tightening, anyway topped it up with anti-freeze
and took it for a run, success ! Temperature gauge now reading 90* Happy days.
Glad u sorted it mate. It's a nice feeling inside when u sort some thing
Yes ,the bottom bolt is awkward to get to but the 5mm Allen key socket worked a lot better than the 10mm socket.
An hours work and not much more than a £10 for the parts.
Good write up! Took me 4 attempts to do this, cheers to ev one who makes contributions BTW :thumbsup: Once you've done it you'll wonder why you had probs in 1st place! Cabin heats up real quick now, 90 degrees all day and more boost in 3rd gear Next job, drop the sump, pick up pipe & oil pump.
 Next job, drop the sump, pick up pipe & oil pump.
Wallm0nkey
Registered User
I've done the thermostat and pickup not too long back it is nice once those jobs are out the way!
Good job! Apart from oil pump are there any other jobs I could do when sump is off? Any hickups to look out for when dropping sump, I#ve heard its easy enough job but beware of corroded bolts on the sump!?
Wallm0nkey
Registered User
I did my dogbone bushes at the same time as it's roughly the same place and that was quite an improvement. I went for the red powerflex and it's isn't harsh but has stopped the knocking I was getting.
With the pick up mine went surprisingly well nothing seized and I didn't have a problem with the bolts 10mm socket with extension and wobble on it and long Allen keys are handy! Just gt the car high as possible no fun under there scrabbling about! Only issue came at the end torqueing up the little bolts it sheared the first one I tried so finished the rest by feel. It was getting late so I left the one that had sheared off and luckily no leaks so I'm gonna have a mess when it's a bit warmer no fun in the middle of winter! Hoping my screw extractors will do it but might drop the sump again if needs be. I didn't do anything past the pick up as it wasn't as bad as I'd expected all seemed ok down there.
With the pick up mine went surprisingly well nothing seized and I didn't have a problem with the bolts 10mm socket with extension and wobble on it and long Allen keys are handy! Just gt the car high as possible no fun under there scrabbling about! Only issue came at the end torqueing up the little bolts it sheared the first one I tried so finished the rest by feel. It was getting late so I left the one that had sheared off and luckily no leaks so I'm gonna have a mess when it's a bit warmer no fun in the middle of winter! Hoping my screw extractors will do it but might drop the sump again if needs be. I didn't do anything past the pick up as it wasn't as bad as I'd expected all seemed ok down there.
Thanks WallmOnkey! You sound way more advanced than me, think I may be a little naïve about this job. If I do it rkn I'll stick to pick up pipe and cleaning sump out, possibly oil pump. Also heard that good oil, larger filter & 5k oil /filter changes can clear out a lot of sludge - another way of cleaning the engine out!? sounds easier than grovelling in oily overalls & scrapping knuckles, but its a good job to do I guess
Did you change your oil pump?

Did you change your oil pump?
Wallm0nkey
Registered User
It was the first job like that I'd done to be honest having this S3 has been a big learning experience! I have done 5k oil changes for a few years on my old cars I figure anything to keep them running is a bonus and it's relatively low cost! I left the pump as it was as I hadn't had any issues with the car and it was surprisingly good down there I did consider it. I guess it doesn't hurt whilst your down there.
Cheers again! Like me then, learning as I go. Had a look at an S3 a month ago, rkn next will be 2.0 A3 quattro or S3 - ultimately an R8 Loving the A3 quatty so far though '99 plate & clutch pedal breaking only real prob so far.
Cheers for share of info tho, think I'll do the oil filter/pickup pipe in one, I'll defo look at dogbone bushes too, I read the yellow powerflex were the babies!? You're rolling an S3 though!? Are there different recs than an A3? Did you have probs compressing the assembled bush to fit into place?
 Loving the A3 quatty so far though '99 plate & clutch pedal breaking only real prob so far.
Cheers for share of info tho, think I'll do the oil filter/pickup pipe in one, I'll defo look at dogbone bushes too, I read the yellow powerflex were the babies!? You're rolling an S3 though!? Are there different recs than an A3? Did you have probs compressing the assembled bush to fit into place?
Cheers again! Like me then, learning as I go. Had a look at an S3 a month ago, rkn next will be 2.0 A3 quattro or S3 - ultimately an R8Loving the A3 quatty so far though '99 plate & clutch pedal breaking only real prob so far.
Cheers for share of info tho, think I'll do the oil filter/pickup pipe in one, I'll defo look at dogbone bushes too, I read the yellow powerflex were the babies!? You're rolling an S3 though!? Are there different recs than an A3? Did you have probs compressing the assembled bush to fit into place?
Me bad, I'm talking about the yellow powerflex engine mount bush - amateur I am lol
Wallm0nkey
Registered User
For the dogbone I'd heard a few horror stories of seized bolts and needing the break the mount to get it off so I ordered the ths one ready assembled. It did cost a bit more but I couldn't have the car off the road for more then a day at the time. So obviously after doing that it all came apart perfectly no drama lol. A few people said the yellow was too harsh so I played it safe with a red one!
Just finished my nightshift, pleasure to get in the car and see 90 degrees after a few miles, warmer in the cab too lol. Good tip for the pre assembled unit Sounds ideal for my situation too. Can't wait for next w/end to get on with things!
One more que: how'd the S3's drive? I've never driven one but heard they handle like on rails, quick too? How does upgrading change the performance? I'm torn between leaving mine/remapping, its never been modified & is in really good shape, I'm certain it'll go for another 100k as it is with little probs (jinx lol). But heard remaps turn it into another car If I go for power though, I want proper power, not just another 30/50 BHP! Rkn I'd want to throw 3-5K at it & ramp it to 240+ BHP...1st things 1st though lol, drop that sump to achieve a really clean motor. Cheers for your feedback Wallmonkey:thumbsup:
One more que: how'd the S3's drive? I've never driven one but heard they handle like on rails, quick too? How does upgrading change the performance? I'm torn between leaving mine/remapping, its never been modified & is in really good shape, I'm certain it'll go for another 100k as it is with little probs (jinx lol). But heard remaps turn it into another car
 If I go for power though, I want proper power, not just another 30/50 BHP! Rkn I'd want to throw 3-5K at it & ramp it to 240+ BHP...1st things 1st though lol, drop that sump to achieve a really clean motor. Cheers for your feedback Wallmonkey:thumbsup:
Wallm0nkey
Registered User
I do really like the S3 I had a TDI 150 Bora last the Audi does stick the power down a lot better and I feel more confident in it going quicker. I spend 90% of my time in a work van and my girlfriend drives the S3 I only really get chance on the weekend lol. I'm in a bit of a similar situation currently it's on standard power but want to wait til everything else is ready before starting on the engine.
Seems like a long road ahead as we are currently saving so the car gets a treat once a month! I think engine will be last on the list try and get all the parts together new clutch, rods, turbo and have it all done wish it was all happening now these build threads are terrible for my bank account!
Seems like a long road ahead as we are currently saving so the car gets a treat once a month! I think engine will be last on the list try and get all the parts together new clutch, rods, turbo and have it all done wish it was all happening now these build threads are terrible for my bank account!


