FMIC fitted :)

vrbob

Thats no Moon, Thats a space station!
Joined
Jun 19, 2007
Messages
2,374
Reaction score
172
Points
63
Location
Southampton
Hello Peeps,

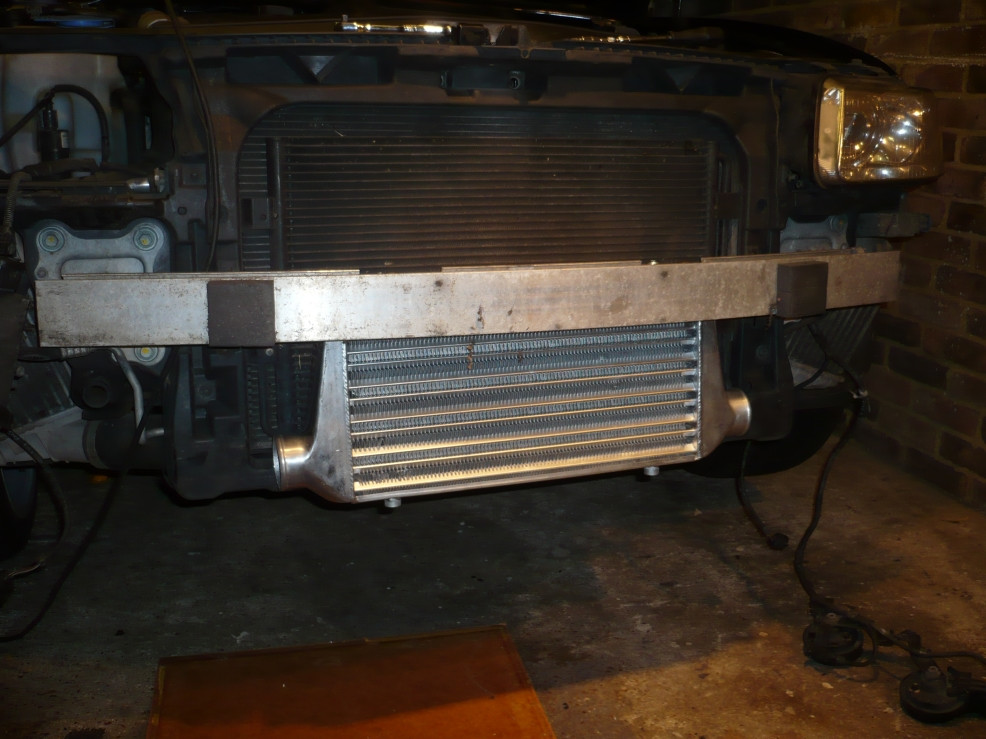
Well had another late night mechanics session with Tom (Future) and we managed to get my new Apexi FMIC installed.

Tom was the expert in this matter as he has mocked up an install for his car so he advised me on what to buy etc and i also had a read through both Westy`s build thread (cheers) and the FMIC sticky.

We started about 6pm last night and by 10pm we had got the FMIC on the car (bumper on with a couple of fixings) and went for a few test runs to see if we had any boost leaks etc. All was good so grabbed a Maccy D`s and then got back to fitting it back together.

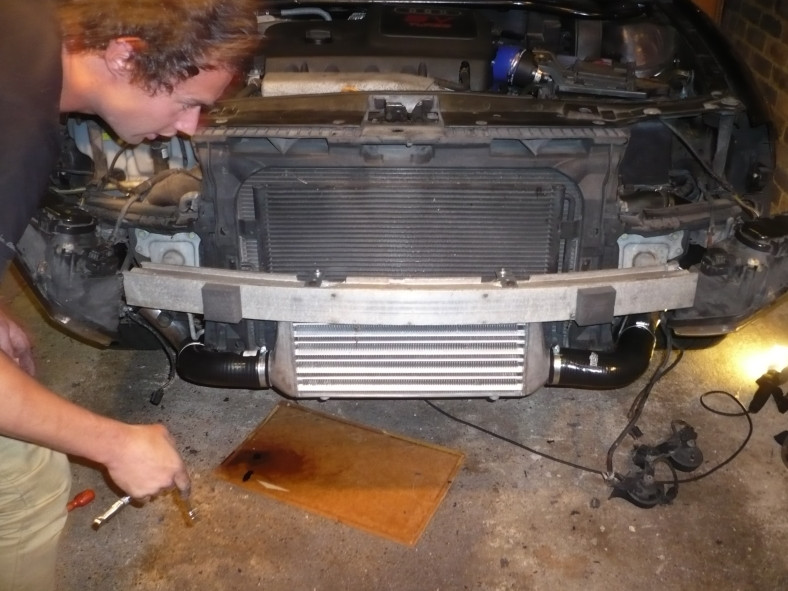
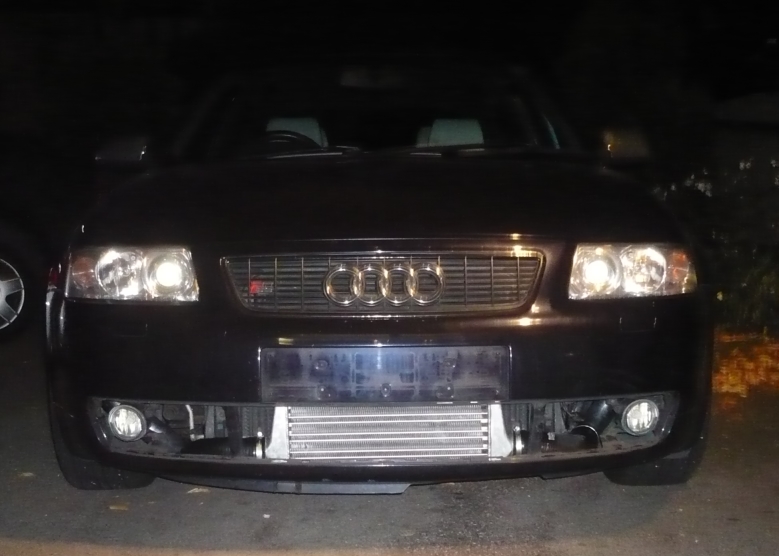
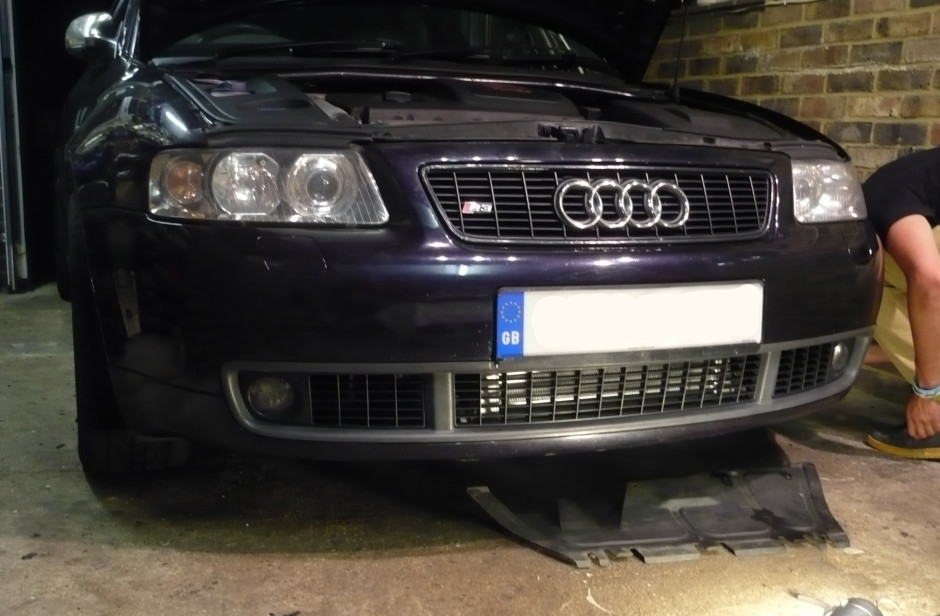
Relocated the horn etc to the passenger side location where the SMIC was and then got the bumper back on properly. We had removed the whole lower grill from the bumper while it was off so we could see if there was any issues refitting it. I am using 63mm pipe work and with only a very small amount of trimming i managed to get the whole grill, foglights etc back in and sitting flush so was very pleased aboout that as i wanted to keep the OEM look as much as possible.

Went for some more test runs about midnight as Tom was also dong a few bits to his car now as he thinks either his wastegate actuator or N75 is being a bit faulty.

Car pulls really well infact we logged a reading of about 210g/s from about 4200rpm and then peaked and 230g/s but basically held about 220g/s for most of the top end.

We did about 3 or 4 3rd gear runs after the car had warmed up and then we popped the bonnet open and the throttle body was proper cold to the touch so was very impressed at the new coolers ability.

Gonna get booked in for the stage 2 revo upgrade asap now :)
 
Nice one mate,I love the fact that it looks oem aswell.any pics of fitting of how it looks now?should also add so to the fmic stickies thread
 
Got some pics so will post up later on as they are on my parents laptop. Will take a few more in the daylight.

Did a few logs but not sure if we got AIT`s so will have a look. What is the sensor that monitors the AIT`s?
 
  • Like
Reactions: S3 Rav
Got some pics so will post up later on as they are on my parents laptop. Will take a few more in the daylight.

Did a few logs but not sure if we got AIT`s so will have a look. What is the sensor that monitors the AIT`s?

The sensor is mounted in the front of the inlet manifold just after the TB, you can't miss it.
 
is it on the black pipe you connect the FMIC to on the throttle body side? as if so i think mine might need replacing as i tried to remove it to give it a clean and its welded in and the screws just turn but wont undo.

So probably need to get the pipe and the sensor any ideas on what this might cost and whats the sensors name is it the map sensor?

Just checked dont have logs of AIT`s in the logging as was just testing for boost leaks etc but it has to be better than the SMIC`s but a long way as Toms`s throttle boday after a couple of runs (hes still on the SMIC setup) is so hot you cant touch it. whereas mine is now cold and slowly warms up while it sat on the driveway switched off.

Will get some piccies up in a mo.
 
get some pics up rob :) and think it needs to go in the sticky fmic thread, still cant believe how well it sat with basically no cutting and the bottom bumper bolts went in no problem :arco:
 
but very sad that may have been are last late night mechanic session for a while :3sadwalk:
 
but very sad that may have been are last late night mechanic session for a while :3sadwalk:

Yeah how dare you goto Uni to get a degree when we have stuff to play with on our cars lol

Still your not a million miles away so am sure we can sort something out especially during the hols etc.

Thanks again mate
 
a few pics from last night

The cooler
ktLT0.jpg


First test fit 1
D9oJZ.jpg


First test fit 2 (brackets)
0HvfX.jpg


Hoses on
ryADK.jpg


Bumper on after test run
r6C0x.jpg


Bumper grills back on and looking quite OEM
0Oc2V.jpg


Close up (a bit dark)
iLF1A.jpg
 
happydays! never liked the look of losing the fogs its a bit in the face in my opinion with pipes on show so this is looking like the one for me .
 
I did have to trim a little off the back of the big lower grill as the pipes are slightly pushing on the bumper but not much and then all went back together swimmingly which i was impressed with as i went for the 63mm (2.5") pipe work.

Its not the biggest cooler in the world but should defo suit my Stage 2 requirements and for the money almost a no brainer especially with the delta fin design.
 
Just been looking on ECP and ebay at map sensors and they say they monitor boost pressure not ambient air temp so does it do 2 jobs?
 
Just been looking on ECP and ebay at map sensors and they say they monitor boost pressure not ambient air temp so does it do 2 jobs?

How many times do you want me to say it!? The AIT sensor is mounted in the front of the inlet manifold just to the left of the TB. Open up your bonnet and you'll be able to see it. :)
 
sorry bud being a bit dense lol.

Is it the one near the dipstick which you have to disconnect to get to the thermostat etc? what would i search for on ECP for a replacement?
 
sorry bud being a bit dense lol.

Is it the one near the dipstick which you have to disconnect to get to the thermostat etc? what would i search for on ECP for a replacement?

Lol.

You know where the throttle body is? Well the throttle body attaches to the inlet manifold. The metal thing that is above the dipstick that then bolts onto the engine. Well in the manifold, on the front is a black sensor screwed in by 1 Allan key type bolt. It should have an electrical connector to it. I'd get you a pic but I'm currently on the train.
 
yeah i am proper muppet just looked at the car and found it in 2 secs lol.

Removed it and its pretty oily so gonna clean it up and see if that helps a bit.

part number is 0 280 130 085 but whats it called?
 
It's an AIT or Air Intake Temp sensor. They rarely break so I probably just needs a clean. Get some carb cleaner or brake cleaner on there and all that oil will come off.

When doing data logging in VCDS the AIT temps are on block 118. Give it a clean and see what figures you're getting.
 
this looks great mate, gutted i wasn't around to help. this is in fact the first time i've been on internet in over 2 weeks! nice to see it's all working, and 230 g/s nice!

Hows the training going Bud?

Glad to see your still checking out the forum when you can, Yeah me n Tom have had a good couple of late night mechanics and basically have got my car to stage 2 readiness now :) so gonna get it booked in with JKM asap for the software upgrade.

Hows your beast running did you get the stage 2 software sorted?
 
I miss the late night mech sessions, glad you lads are having fun. Be good to see what this does on the rollers when mapped.

Mine is going into rtech in 2 weeks time for a custom map with as many mods as any stage 2 I know of so I'm hoping to get close to 300bhp on a stock K04.
 
that's the equivalent to 287bhp is that right! I can't remember the spec of this car?

Yup :)

spec is as in my sig and the g/s readings have steadily gone up over the last few months and mods.

Was getting about 205g/s begining of summer, i then got an 80mm TIP and a jetex induction kit which boosted it to about 217g/s but then my maf died so get a new Bosch and got 223g/s! fitted 3" DP and 200 cell cat got me to 226g/s and lastly the FMIC last night we saw it get to 220g/s at about 4200rpm and held this too 6980 peaking at 229-230g/s.

All this on revo stage 1 software
 
I miss the late night mech sessions, glad you lads are having fun. Be good to see what this does on the rollers when mapped.

Mine is going into rtech in 2 weeks time for a custom map with as many mods as any stage 2 I know of so I'm hoping to get close to 300bhp on a stock K04.

Yeah me n Tom and Josh (when he was still local) have hjad quite alot of fun tinkering with our cars over the summer and have learnt a hell of alot.

I used your build thread as a guide for my car and think i have done really well as have managed to go to stage 2 from stage 1 for about £700

Am sure you will hit the 300bhp mark as we know the mingers are pretty quick lol.
 
  • Like
Reactions: Nilz
I can't see your sig at the moment as I'm using tapatalk on my iPhone :(

****** good going on stage 1 software. Mine is making that g/s on stage 2 with a large port head.

You might want to start logging your injectors with a g/s reading like that as mine were running at 130% on a 3 bar fuel pressure regulator. I started using a 4 bar regulator that brought them down to 90%. Rtech will be mapping in some nice Bosch 550cc injectors for me to be safe. Don't want to be runnin lean bud :faint:
 
Thanks for the advice westy :)

thise is my spec : Mods : Revo Stg 1, FMIC, 3" DP & 200Cell Cat, 007P & Yellow Spring, Jetex Induction Kit, Silicone : TIP (80mm), DV & N75 Hoses, N249 Delete, LED Sidelamps & Fogs, Aero Wipers, Full Powerflex PolyBush Kit, RNS-E, 25mm drop on AP Shocks & Springs, 15mm front & 20mm rear spacers.

Yeah will do some more logging soon, found the AIT sensor on ebay as looks like ECP dont stock one Intake Air Temperature Sensor for Audi A3 96-04 | eBay
 
I'll be surprised if you need a new AIT mate, do some logging first.

Will do bud but tonight is movie and wine night lol so will do that in the week :)
 
Hi Rob,
great looking install, good for those who intend to stay with the stock K04.
Can you list the pipes you used ? Also where did you source the bracket from ?
Cheers
fs
 
I miss the late night mech sessions, glad you lads are having fun. Be good to see what this does on the rollers when mapped.

Mine is going into rtech in 2 weeks time for a custom map with as many mods as any stage 2 I know of so I'm hoping to get close to 300bhp on a stock K04.

I Was there recently and i think you'll hit the 300 bhp mate with your spec.
 
Bob top job there mate, very neat install and your S3 is making some really good power! Awesome
 
Hi Rob,
great looking install, good for those who intend to stay with the stock K04.
Can you list the pipes you used ? Also where did you source the bracket from ?
Cheers
fs

Thanks

The credit for the pipework needed goes to Tom (future on here) as he basically was my fmic guru but its also listed in the fmic sticky its just a long read ;)

I used :

4 x 90 degree silicone bends (i went for 63mm pipe work as theats the same as the OEM setup)
2 x 90 degree alloy bends with beaded edges
1 x alloy joiner
10 x jubilee clips 55 -70 mm

you use 2 x silicon and 1 alloy on each side and the alloy joiner is used on the drivers siade of the car to marry up the pipes.


The bracket i made using 2 x steel plates i drilled 2 holes in each and Tom used washers to space out the bolts (i found i my dads garage) so the cooler sat at the right height. We then drilled holes in the crash bar (its hollow aluminium) and used loger bolts to secure it.

I used an angle grinder to trim the edge off the crash bar so the beack can sit flush with it. ik also used it to trim the plastic behind the bumper near the raditor pipes as this meant the pipework for the cooler could sit furthur back aloowing the bumper to fit better.

The horn and temp sensor were relocated to the passenger side wing where the smic was and i used one of the smic mounting points to fit it too and then cable tied it for good measure. i cable tied the temp sensor to the crash bar.

Oh and a word of caution if yours is anything like my car there was quite alot of oil in the old smics and pipework so it does get a bit messy and some of the bolts to remove the old kit were a bit of an **** to get to on my post facelioft bam car.
 
  • Like
Reactions: guzzy_431
Lovely! :) another thread to add to my big turbo info build bookmark :cool:
 
Top job there mate I may invest in one of these was going to go for a fabs v2 but I really don't think I need something so big for around 270 bhp and it will save me afew quid to :)
 
  • Like
Reactions: vrbob

Similar threads

Replies
9
Views
1K
Replies
13
Views
1K
Replies
32
Views
2K
Replies
1
Views
1K