Here is how I fitted cruise control to my car. Some steps aren't there such as trim removal etc. because it's pretty self explanatory once you get there.
I found this guide also very useful from a TT website: http://www.ttoc.co.uk/absolutte/Archive/A16/A16_P36_41_FINAL.pdf
And I used the instructions I got with the kit which are the same as these here from VW Teeside: http://vwgolfr32.co.uk/ccs.pdf
Firstly the tool to remove the steering wheel, an M12 spline tool:

IMG_0523 by Endacy, on Flickr
New stalk, part number 1J0 953 513 01C

IMG_0524 by Endacy, on Flickr
Loom for the stalk that goes to the fusebox and bulkhead connectors part number 1J0 971 425 A:

IMG_0525 by Endacy, on Flickr
Extra loom required for 1.8T because basically the loom above goes to the bulkhead connectors, these then connect to the ECU loom, however on 1.8T's there is no connection to the bulkhead connectors to the ECU, so you have to run extra wires from the bulkhead connectors to the ECU and open the ECU connector and connect to the 4 pins required. This one I bought is part number 1J0 971 425 B which is actually for a 1.4 VW engine, however one end of this connects to the bulkhead connector, this is same on all cars, the other end has the ECU pins on, however for the 1.8T the ECU connector already has unused spare pins with no wires connected, SO you can buy the proper 1.8T one with the proper ECU pins already in place and slot them in (£24 from VW Teeside on ebay) or buy this one I bought, cut the pins off that have the red rubber seals on and solder the bare wires to the ECU pins (cable £3 from VW Teeside on ebay) OR buy a few bits of wire, and three pins from Vehicle Wiring Products (part numbers 3 x 3-8020 and 1 x 3-7209) and make one yourself (very easy indeed).
I wouldn't mind betting VW Teeside sell the 1.4 cable so cheap because nobody buys them, bet they'll go up now!! These have genuine VAG part numbers are are the genuine product BUT are not available from dealers. Go figure.

IMG_0526 by Endacy, on Flickr
This is the end result when in the car, the loom from the stalk on the left, the loom to the ECU on the right, the pins get connected as shown but through the bulkhead connector:

IMG_0527 by Endacy, on Flickr
To the car then, remove battery, leave 30 minutes, remove airbag (2 x T30 screws on rear), pull electrical connector off the back (yes the yellow plug comes out the back of the airbag, pull!), release metal clip across centre of wheel. Use new M12 spline tool to undo big nut:

IMG_0528 by Endacy, on Flickr
Closeup, disconnect yellow rubber plug from airbag, not this plastic yellow plug (yet).

IMG_0529 by Endacy, on Flickr
Nut removed, marks exist to line up wheel, notice slightly offset, remember this position, mine was offset either to the right or left, it could not be lined up exactly due to the splines:

IMG_0530 by Endacy, on Flickr
Pull off yellow plug, pull off steering wheel. Now the slip ring is visible, on some models with ESP this shouldn't be played with (I think), better safe than sorry so I taped it up:

IMG_0531 by Endacy, on Flickr
And pulled it off, release connector on rear as you do so:

IMG_0532 by Endacy, on Flickr
OK so I skipped a little here, steering column shroud needs to come off, then undo locking ring and slide off the stalks and unplug them. Then separate then using the little plastic clip on the windscreen wiper side, the official instructions are wrong and show the screwdriver in the wrong side, just be careful. Basically to the left of the right hand barcode is a little clip, slide a screwdriver between the plastic ring and this and they just slide apart without any effort, if it doesn't come apart you're probably doing it wrong so take a closer look as you do it:

IMG_0533 by Endacy, on Flickr
Loads of trim removed, loads of screws and bolts undone:

IMG_0534 by Endacy, on Flickr
Remove windscreen wipers, mine were properly stuck so I used a puller, a bit big but it worked. I put a spare M8 nylock nut on the spindle to locate the pullers central bolt and prevent damage:

IMG_0535 by Endacy, on Flickr
Remove scuttle plastics, what a pain, it pulled the trim off the bottom of the glass and cracked a bit, so BE CAREFUL!

IMG_0536 by Endacy, on Flickr
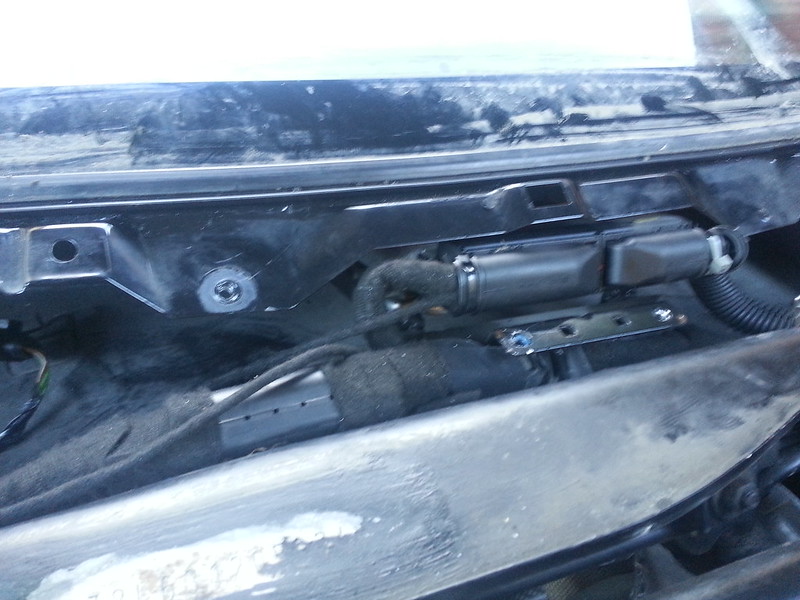
Remove wiper motor a mechanism (3 bolts) and you can open the bulkhead connector box:

IMG_0537 by Endacy, on Flickr
Black connector is the one we want, notice the lack of connections in it, unclip the top one, unclip the bottom part of it and push it into the car:

IMG_0538 by Endacy, on Flickr
View from inside footwell showing the back of the bulkhead box. Relay plate unbolted to see this (2 nuts):

IMG_0539 by Endacy, on Flickr
ECU is located centre of bulkhead under scuttle below windscreen. Pull the big plastic thing on the left outwards while pulling connector off ECU:

IMG_0540 by Endacy, on Flickr
Cut cable tie, squeeze the back and remove, pull out purple thing from inside wires, slide out purple thing from the other side of connector, pull out plug boards and seals (yeah I skipped some steps but it's obvious when you get there and I took pics below as I reassembled):

IMG_0541 by Endacy, on Flickr
Here are the pins that are unsued, identify proper pins from the instructions (mine's an AJQ engine but any of the 1.8T's have the same pins like AUM, AUQ etc.), there is a number at one end of the board next to the first pin on that side, you then count along to identify the right pins. Once you have the right one, use a tiny screwdriver to poke into the side and release the clip and then slide out the pin:

IMG_0542 by Endacy, on Flickr
Poke new wire through seal, strip off end, solder to pin. These pins are designed to have the wire just pushed in and they cut into the insulation however the wires I have are slightly too wide for this, and I like the solder more anyway. The pin needed a little tab slightly bending to the allow the stripped wire to sit right, again it'll make sense when you try it probably. The locking tab needs bending back out slightly to get the pin to lock back into the plug board.

IMG_0543 by Endacy, on Flickr
Couple more done:

IMG_0544 by Endacy, on Flickr
Push pins back, push boards and seals back into connector, push purple thing back in:

IMG_0545 by Endacy, on Flickr
Like this:

IMG_0546 by Endacy, on Flickr
Push purple thing into the back (pain because of wires):

IMG_0547 by Endacy, on Flickr
Cable tied back together with the back on:

IMG_0548 by Endacy, on Flickr
No, wait, black one:

IMG_0549 by Endacy, on Flickr
Run new wiring along main loom:

IMG_0550 by Endacy, on Flickr
Push this purple thing out of the connector a bit, rubbish thing it is. Install new wires as per instructions into the connector, put purple thing back. This means the ECU is now connected to the bulkhead connector on one side.

IMG_0551 by Endacy, on Flickr
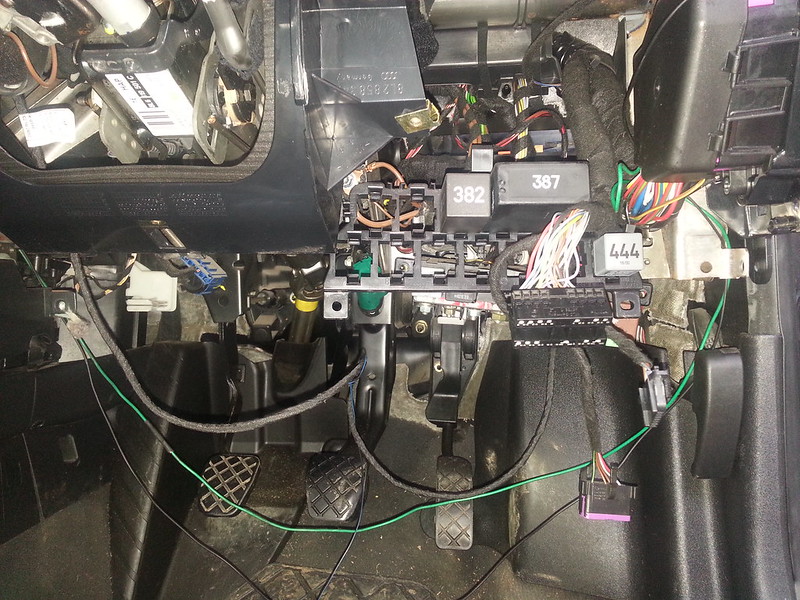
Moving to the fusebox you need to run one wire for the main power. What it doesn't tell you is this purple thing is a lock and MUST BE MOVED to allow the connector to be installed. It moves all of 1mm to the left in the photo, the securing bit you can just see on the bottom right:

IMG_0552 by Endacy, on Flickr
I found this guide also very useful from a TT website: http://www.ttoc.co.uk/absolutte/Archive/A16/A16_P36_41_FINAL.pdf
And I used the instructions I got with the kit which are the same as these here from VW Teeside: http://vwgolfr32.co.uk/ccs.pdf
Firstly the tool to remove the steering wheel, an M12 spline tool:
IMG_0523 by Endacy, on Flickr
New stalk, part number 1J0 953 513 01C
IMG_0524 by Endacy, on Flickr
Loom for the stalk that goes to the fusebox and bulkhead connectors part number 1J0 971 425 A:
IMG_0525 by Endacy, on Flickr
Extra loom required for 1.8T because basically the loom above goes to the bulkhead connectors, these then connect to the ECU loom, however on 1.8T's there is no connection to the bulkhead connectors to the ECU, so you have to run extra wires from the bulkhead connectors to the ECU and open the ECU connector and connect to the 4 pins required. This one I bought is part number 1J0 971 425 B which is actually for a 1.4 VW engine, however one end of this connects to the bulkhead connector, this is same on all cars, the other end has the ECU pins on, however for the 1.8T the ECU connector already has unused spare pins with no wires connected, SO you can buy the proper 1.8T one with the proper ECU pins already in place and slot them in (£24 from VW Teeside on ebay) or buy this one I bought, cut the pins off that have the red rubber seals on and solder the bare wires to the ECU pins (cable £3 from VW Teeside on ebay) OR buy a few bits of wire, and three pins from Vehicle Wiring Products (part numbers 3 x 3-8020 and 1 x 3-7209) and make one yourself (very easy indeed).
I wouldn't mind betting VW Teeside sell the 1.4 cable so cheap because nobody buys them, bet they'll go up now!! These have genuine VAG part numbers are are the genuine product BUT are not available from dealers. Go figure.
IMG_0526 by Endacy, on Flickr
This is the end result when in the car, the loom from the stalk on the left, the loom to the ECU on the right, the pins get connected as shown but through the bulkhead connector:
IMG_0527 by Endacy, on Flickr
To the car then, remove battery, leave 30 minutes, remove airbag (2 x T30 screws on rear), pull electrical connector off the back (yes the yellow plug comes out the back of the airbag, pull!), release metal clip across centre of wheel. Use new M12 spline tool to undo big nut:
IMG_0528 by Endacy, on Flickr
Closeup, disconnect yellow rubber plug from airbag, not this plastic yellow plug (yet).
IMG_0529 by Endacy, on Flickr
Nut removed, marks exist to line up wheel, notice slightly offset, remember this position, mine was offset either to the right or left, it could not be lined up exactly due to the splines:
IMG_0530 by Endacy, on Flickr
Pull off yellow plug, pull off steering wheel. Now the slip ring is visible, on some models with ESP this shouldn't be played with (I think), better safe than sorry so I taped it up:
IMG_0531 by Endacy, on Flickr
And pulled it off, release connector on rear as you do so:
IMG_0532 by Endacy, on Flickr
OK so I skipped a little here, steering column shroud needs to come off, then undo locking ring and slide off the stalks and unplug them. Then separate then using the little plastic clip on the windscreen wiper side, the official instructions are wrong and show the screwdriver in the wrong side, just be careful. Basically to the left of the right hand barcode is a little clip, slide a screwdriver between the plastic ring and this and they just slide apart without any effort, if it doesn't come apart you're probably doing it wrong so take a closer look as you do it:
IMG_0533 by Endacy, on Flickr
Loads of trim removed, loads of screws and bolts undone:
IMG_0534 by Endacy, on Flickr
Remove windscreen wipers, mine were properly stuck so I used a puller, a bit big but it worked. I put a spare M8 nylock nut on the spindle to locate the pullers central bolt and prevent damage:
IMG_0535 by Endacy, on Flickr
Remove scuttle plastics, what a pain, it pulled the trim off the bottom of the glass and cracked a bit, so BE CAREFUL!
IMG_0536 by Endacy, on Flickr
Remove wiper motor a mechanism (3 bolts) and you can open the bulkhead connector box:
IMG_0537 by Endacy, on Flickr
Black connector is the one we want, notice the lack of connections in it, unclip the top one, unclip the bottom part of it and push it into the car:
IMG_0538 by Endacy, on Flickr
View from inside footwell showing the back of the bulkhead box. Relay plate unbolted to see this (2 nuts):
IMG_0539 by Endacy, on Flickr
ECU is located centre of bulkhead under scuttle below windscreen. Pull the big plastic thing on the left outwards while pulling connector off ECU:
IMG_0540 by Endacy, on Flickr
Cut cable tie, squeeze the back and remove, pull out purple thing from inside wires, slide out purple thing from the other side of connector, pull out plug boards and seals (yeah I skipped some steps but it's obvious when you get there and I took pics below as I reassembled):
IMG_0541 by Endacy, on Flickr
Here are the pins that are unsued, identify proper pins from the instructions (mine's an AJQ engine but any of the 1.8T's have the same pins like AUM, AUQ etc.), there is a number at one end of the board next to the first pin on that side, you then count along to identify the right pins. Once you have the right one, use a tiny screwdriver to poke into the side and release the clip and then slide out the pin:
IMG_0542 by Endacy, on Flickr
Poke new wire through seal, strip off end, solder to pin. These pins are designed to have the wire just pushed in and they cut into the insulation however the wires I have are slightly too wide for this, and I like the solder more anyway. The pin needed a little tab slightly bending to the allow the stripped wire to sit right, again it'll make sense when you try it probably. The locking tab needs bending back out slightly to get the pin to lock back into the plug board.
IMG_0543 by Endacy, on Flickr
Couple more done:
IMG_0544 by Endacy, on Flickr
Push pins back, push boards and seals back into connector, push purple thing back in:
IMG_0545 by Endacy, on Flickr
Like this:
IMG_0546 by Endacy, on Flickr
Push purple thing into the back (pain because of wires):
IMG_0547 by Endacy, on Flickr
Cable tied back together with the back on:
IMG_0548 by Endacy, on Flickr
No, wait, black one:
IMG_0549 by Endacy, on Flickr
Run new wiring along main loom:
IMG_0550 by Endacy, on Flickr
Push this purple thing out of the connector a bit, rubbish thing it is. Install new wires as per instructions into the connector, put purple thing back. This means the ECU is now connected to the bulkhead connector on one side.
IMG_0551 by Endacy, on Flickr
Moving to the fusebox you need to run one wire for the main power. What it doesn't tell you is this purple thing is a lock and MUST BE MOVED to allow the connector to be installed. It moves all of 1mm to the left in the photo, the securing bit you can just see on the bottom right:
IMG_0552 by Endacy, on Flickr