W3STY's Progress Thread

What colour S3 Avus for the Track?

  • Porsche Guards Red

    Votes: 43 57.3%
  • Kawasaki Green

    Votes: 32 42.7%

  • Total voters
    75
Yeah they fit when you cut a spice it in to the loom. It didn't look a bad job, Tuffty done mine in about an hour but I know he had done it before so made it look easy. That is one of the reasons I wanted to take it to Bills as I did not trust any old auto electrician to do it as I spoke to few in my area and they just did not seem very confidant
 
That number is a generic loom replacement and is the same as the one ECS supply.... not sure if thats the one with or without the oil sensor part... just go for the cheapest as you are going to need to cut it anyway...

<tuffty/>
 
  • Like
Reactions: Westy
That number is a generic loom replacement and is the same as the one ECS supply.... not sure if thats the one with or without the oil sensor part... just go for the cheapest as you are going to need to cut it anyway...

<tuffty/>

I'm hoping that my VW parts advisor can work out which part I need for my car ;)

Is there anything else that you advise doing like heat wrapping it all with extra wrap?
 
Oi, get off my other forum :laugh:

Lol. This forum seems to have shutdown for the winter!

All this loom business is still very up in the air. ETKA is a pain to track down the exact loom required for my engine code. I just want as simple a change as possible, I don't really want to be cutting in additional wires and stuff. I hate soldering as it is!
 
I didn't do a step by step tbh... I tend to just do it and provide the highlights...

Basics are to strip the convoluted trunking off to reveal the wires and follow it back to a suitable point past the head... identify the correct wires from the original loom as they will be a different colour to the new loom for the actual coil trigger wires... the power (purple/black iirc) and earth (brown) should be the same...

I cut the power cables just down from the joiner on the new loom where it then splits into two wires...

Sorry but doing this from memory...

There will be a couple of power and earth wires in the looms, you just need to splice them all together... I can't remember off hand but it should be obvious once in there...

<tuffty/>
 
  • Like
Reactions: Westy
It's all well sketchy on the net for info. Some of the ECS looms say they are for 1.8t cars with oil sensors but the. Say that they are not suitable for 210/225bhp cars! Hasn't anyone done a specific look for the S3/TT/LCR?
 
I looked into this when I asked Jason before... the PN iirc came back as the generic loom...

Personally I just bought the cheaper non oil sensor one from TPS and cut into the existing loom... to fit the loom as is (assuming it would fit) requires you to wire back to the ECU plug which can a little more daunting for some than just splicing...

<tuffty/>

Would it not be easier to buy the loom for the oil sensor then just cut in what needs cutting in instead of having to add the oil sensor in too?

What a PITA, a nice plucg and play loom with connector blocks would have been lovely lol
 
Would it not be easier to buy the loom for the oil sensor then just cut in what needs cutting in instead of having to add the oil sensor in too?

What a PITA, a nice plucg and play loom with connector blocks would have been lovely lol

I didn't need the oil sensor part tbh... plus its tucked in between the transfer box and the engine block...

<tuffty/>
 
Have a look at my thread mate I took a picture of the old harness when Tuffty cut it off may give you an idea
 
Have a look at my thread mate I took a picture of the old harness when Tuffty cut it off may give you an idea

Cheers bud, Just pinched these pics for reference :thumbsup:

IMGP0331.jpg


IMGP0361.jpg
 
I picked the wiring up as it splits off for the throttle body, injectors etc... more round the front of the engine...

<tuffty/>
 
Fitted the new coil pack loom today. Big thanks to Tuffty for putting up with my constant questions on FB but I like to know what I'm doing before I start cutting wires related to the ignition ;)

Anyway, it was fairly straight forward once I'd begun to strip both looms back. It took my around 3 hours to do the full job but most of that time was spent stripping the looms then taping it back up afterwards.

Started by getting everything out the way. This meant removing the strut brace, charge pipe, air filter, and disconnecting the battery:

1EA9A66B-C06B-4B38-B028-AA26DF7FCDF9-2567-0000011AA1A577D1.jpg


I then removed the coil pack wiring and removed all the black tape to reveal all the wires:

C137F48A-D354-4C26-B4C0-70E281C576AA-2567-0000011A959E3F27.jpg


As you can see, it was pretty bad!:

624CEAFD-854E-49ED-99DA-09F88149FC56-2567-0000011A9B1FDAB5.jpg


18138510-57EC-43DD-96FE-EBDDE8145F37-2567-0000011A8F93D3BF.jpg


I traced the wiring to see where the cracking stopped and it was pretty much as soon as it was away from the manifold area. I found it easier to remove the injector harness and restricting sensors:

D8D628B9-4A22-499E-8403-2977EC971D25-2567-0000011A891F0E53.jpg


The 2 wires seperated to the right in this pic were my extended N249 wires as I'd relocated it out of sight.
As well as seperating the N249 wiring I also seperated the N75 wiring so I didn't cut it by accident:

F41E6F94-E26C-4C88-9410-32A9F7228B3F-2567-0000011A82B50AEE.jpg


As you can see from this pic, the quality of the wiring where it meets the injector harness is fine so this is where I chose to splice the new loom in:

D47D6E0E-107F-477F-BB67-8A181445CB0C-2567-0000011A7D2D7DB3.jpg


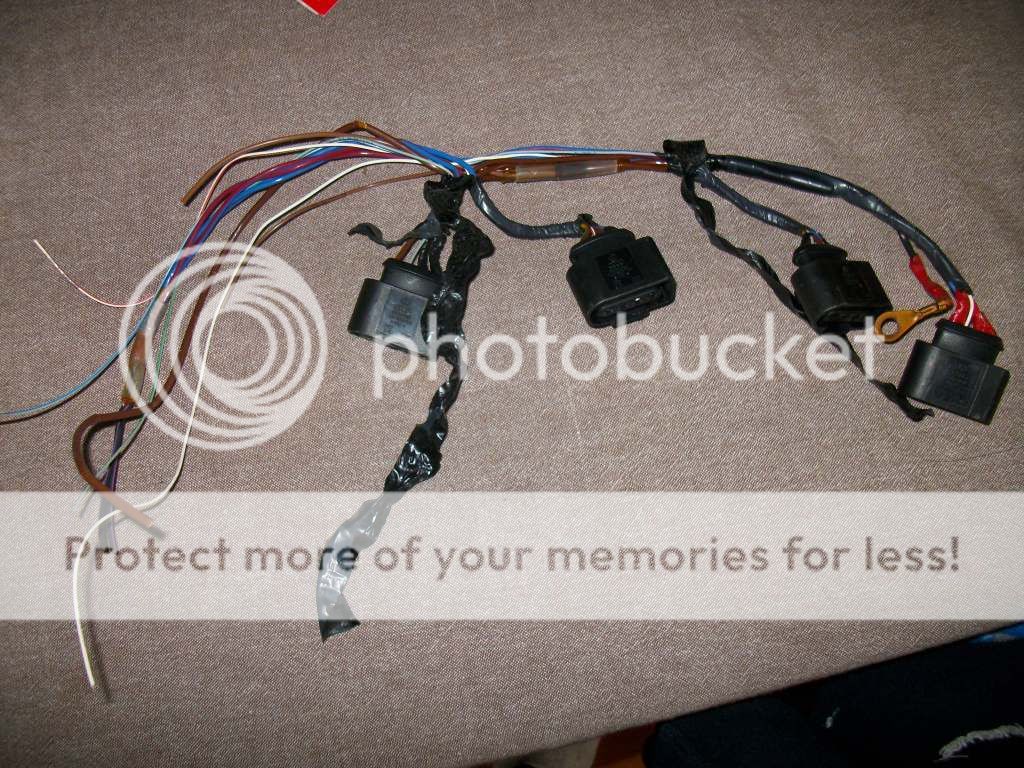
It was now time to have a proper look at the ECS harness I'd purchased from Awesome GTI:

103F9E04-D629-4642-8FA5-BCD839ADF074-2567-0000011A6B8C30F4.jpg


It comes with a load of sensors and connectors that are no good for us as we're only interested in the coil pack stuff. I started to remove the insulation tapes:

You should end up with this:

5929D1AF-19D2-4B7D-A593-E5CBE2736303-2567-0000011A44291519.jpg


Now it's easier to trace each individual wire.

When tracing the wire between old and new looms I found it easiest to break it down into 3 sections. These 3 sections are the thick heat shrinked junction sections. 1 junction shown here:

123A90F1-C507-45EF-9B38-024C08E11816-2567-0000011A58A03FA8.jpg


The only difference I spotted is that one of the coil pack connector wires loops out the bottom of one of the junctions instead of straight out the top like the standard one:

4C642F83-057B-4448-AB45-F3C7524715E3-2567-0000011A2AD8D1F5.jpg


I laid both looms side by side and started working out what went where:

241B1463-B0F4-4B6B-A08E-87CAEDF0ABC9-2567-0000011A3710A684.jpg


It's a simple case of tracing each wire 1 at a time, cutting the old, and soldering on the new. Once they were all done I was left with this:

C8EB8E68-F0D5-44DF-8D2A-7E48BFAB077E-2567-0000011A1C0DF526.jpg


2E0A0B46-F41B-4D80-980C-9955B581B703-2567-0000011A23818EFE.jpg


I then spent a good hour wrapping everything back up and making sure it all routed correctly. I started up the car and everything was fine. Went out for a blast and the car feels brand new, really smooth. I must have had slight missfires for a while looking at the state of the wiring. Really happy with it now.
 
Last edited:
Nice one westicles.

How much was that ECS loom from awesome mate? I'm hugely tempted by one of these looms, and a set of TFSI coils for mine to do an ICM delete as I've heard good things, but I'm a bit scared to get stuck into it!
 
Nice one westicles.

How much was that ECS loom from awesome mate? I'm hugely tempted by one of these looms, and a set of TFSI coils for mine to do an ICM delete as I've heard good things, but I'm a bit scared to get stuck into it!

£30 mate. I was pretty scared about doing this still I started. Once you've cut the first wire you have to crack on lol.
 
Nice work mate it's really daunting at first but once you get going it's no where near as bad as originally thought :)
 
Great write up! Now just have to get the loom and call some friend who has garage...
 
Great write up! Now just have to get the loom and call some friend who has garage...

This is not a job for doing in the winter if you're outside as you need your finger tips. I struggled to twist two of the wires together at one point as my fingers were so cold.

I could have done a better write up letting you all know exactly what wire numbers to cut but it really is straight forward once you've stripped back the wiring and identified where the damage is.
 
Did the misfires show up in VCDS? Mine's been acting a bit odd recently but haven't checked the loom. Has had new coils and plugs recently. I know it could be a number of things but this seems common...
 
Did the misfires show up in VCDS? Mine's been acting a bit odd recently but haven't checked the loom. Has had new coils and plugs recently. I know it could be a number of things but this seems common...
Mine has the slightest of hesitation around 2k no faults/misfires...im hoping my loom comes tomorrow
 
Westy - thanks for this - most useful.

I've had the loom ready to splice in for ages just haven't plucked up the balls to do it.

I also want to get the splices perfect so they don't cause any problems - I've seen some people using those ****ty crimp/spade terminals ...

Did you stagger the splices? i.e. do them at slightly different lengths down the cable?

I found this manual on how to properly splice wires ... page 84 I'm going to splice using that type of connection. Thanks NASA!

http://www.hq.nasa.gov/office/codeq/doctree/87394.pdf

When I get around to doing this I will take some photos.

Liam
 
Yeah solder + head shrink would do the trick. Just make sure there's no dry joints. I might grab some proper heat proof sleeving to prevent it happening again. (This is when I do mine...)
 
The only hesitations I used to get we're due to "torque intervention" on my revo map. Since the rtech map this has gone. I noticed misfires on a recent track day at Bedford Autodrome and I swapped my coil packs on the day. These showed up in VCDS as "multiple misfires". I thought the coils had fixed the issue till a week ago when the car started hesitating big time when I drove over to the cinema. Again these appeared in VCDS. Yesterday's test drive felt so much smoother then before and you can see how bad the cracked wirin was and my car is a 51 plate registered in 02 so some of the older cars must be as bad. It's only a matter of time before it becomes a problem.
 
Ok done my coil loom replacement, pretty easy to be fair....

Westy do you want to copy and paste this into your how too? Ive made a note of the old loom v new loom colours im sure it will help others out...

OLD AUDI LOOM V NEW AUDI LOOM

Thick blue/red x4 = Thick purple/black x 4
2 thin brown = 2 thin brown
2 thick brown = 2 thick brown
white = lilac black
grey/blue = black yellow
grey/blue = black brown
grey/green = black purple

Thats it..;) it will save you stripping the new loom right back too....:beerchug:


Done mine also very easy, but i fitted the full lot inc the oil level, Gear box sensor wires

Nice one Dave..... Sticky i thing with this one
 

Similar threads

Replies
9
Views
2K
Replies
26
Views
2K
Replies
225
Views
22K
Replies
1
Views
881