Can you recommend a Boost Gauge?

coyle

From Show... to GO
Joined
Nov 16, 2010
Messages
435
Reaction score
2
Points
16
Location
Stafford
Hey guys,
I want to get myself a boost gauge for my S3,
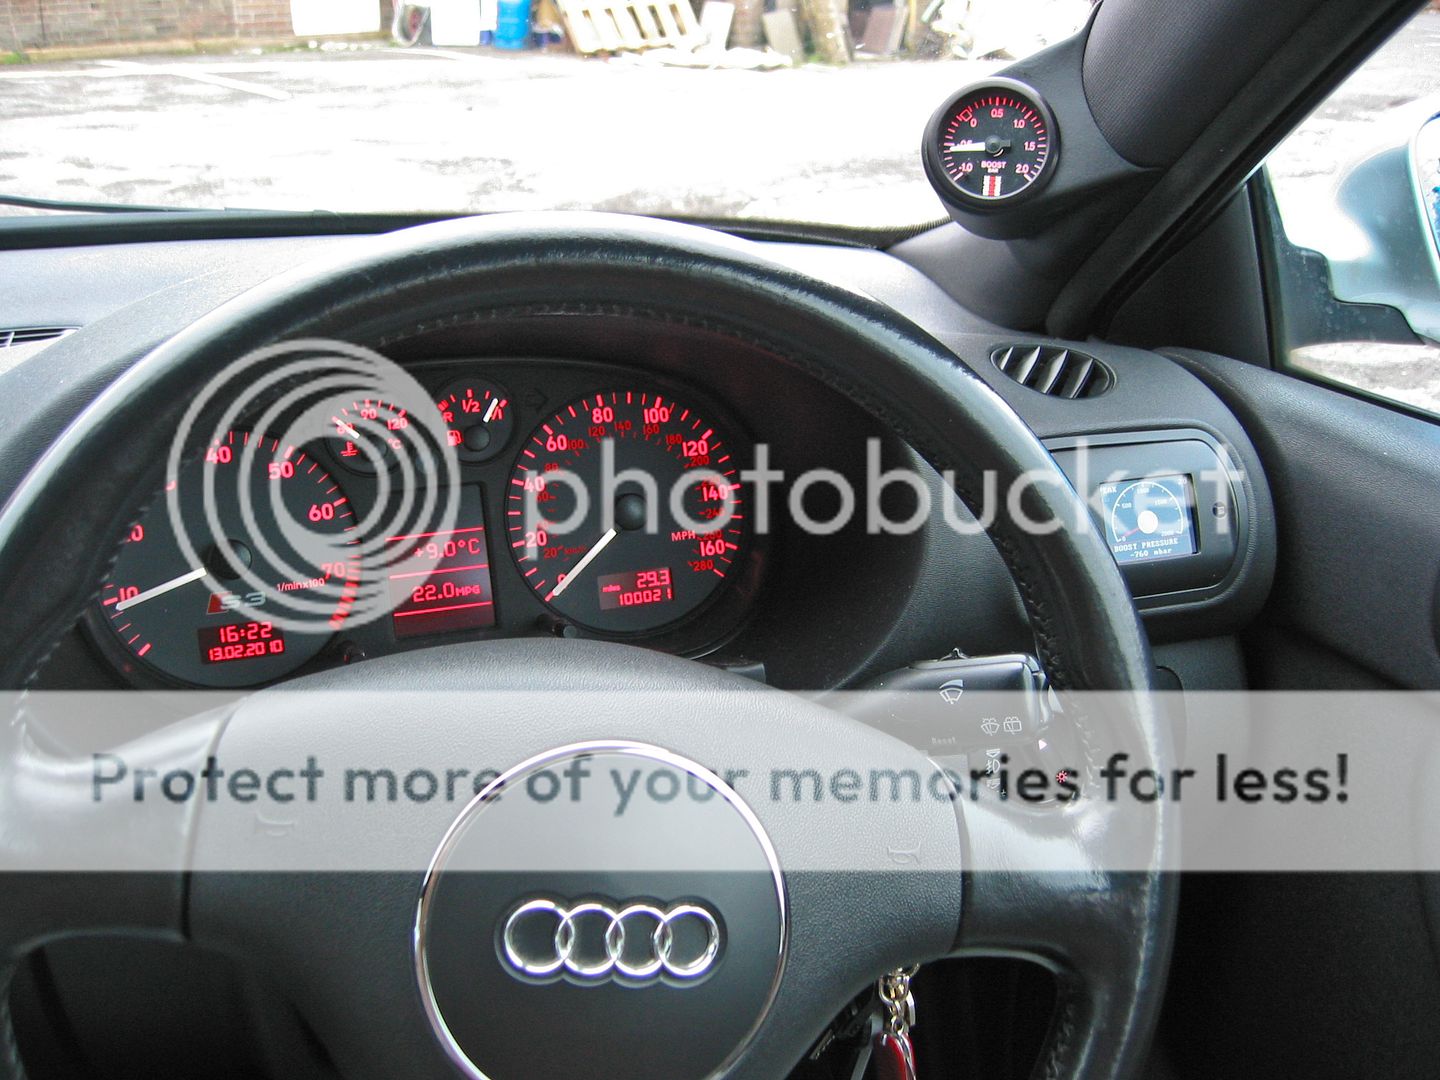
can anyone recommend a decent one? and also a holder too, where have you mounted yours if you have one? i dont want it to look stupidly out of place.
cheers
Jon
 
Stack do a good one that can be made to match the S3 clocks...

20100213_IMG_4006.jpg


20100213_IMG_4005.jpg


<tuffty/>
 
that looks good to me! do they sell the holder to fit the pillar too?
website?
 
also, do i need -1 to +2 or -30 to +30
i know one is bar and the other PSI, but what gauge would be best for the s3? or does it make no odds?
 
also, do i need -1 to +2 or -30 to +30
i know one is bar and the other PSI, but what gauge would be best for the s3? or does it make no odds?

Personal preference tbh... makes no difference what so ever... I tend to find myself talking in psi more these days so kinda wish I had gone for that over the 2bar one but that only because we use psi as a measurement on the dyno... mbar is the measurement used by the ecu which you will see through vagcom... 1psi = 0.0689 bar

<tuffty/>
 
ahhh good haha

just spoke to my mate and mentioned the £50 stack one and he said it sounds too cheap as his stacks were about £150 a piece, he must of had the pro ones which are semi digital.. suckerrrrr haha

i'll get one ordered, you got a link to the pod/ seller on ebay too and i'll order up
 
brilliant thanks mate, i'll order it all now.
it is easy enought to mod the shape?
what did you use to cut the plastic?
 
Combination of a stanley knife, scissors, sand paper, power file etc... also had to gently heat one side with a hot air gun to form it better round the A pillar trim...

There are a few more pics in my build thread to give you an idea...

<tuffty/>
 
ordered!

merlin are charging 20% vat though even though the increase isn't until tomoro! tut tut
 
right, pillar pod came today, so couldnt stop myself trying to fit it, trimmed a few bits like you said tuffty,
got myself a heat gun too.. ( i know see why yours looks abit wavey in some pics! its ****** difficult to keep the plastic flowing smoothly! haha)
countersunk my holes, but rather than use glue on the underside of the screws, i got some m3 nylon locking nuts, this allowed me to tighten the screws nicely to pull the pod and pillar together perfectly :)

im currently waiting for the filler to dry so i can sand it nice and flat! then crack on with painting.. what sort of paint did you use? rubber effect acrylic? i dont want it to stand out too much so would rather avoid gloss or satin.

a few questions though. all about the gauge :p

firstly how does it come apart?
second, where did you get the red film? i saw kev painted his, put dont know what sort of paint it would have to be? i was thinking a red nail varnish might work if i did a few layers.

finally, where do you get the earth and positive from for the LED?

muchas gracias for all the help so far mate
 
I used Rustoleum Hard Hat matt black top coat but any acrylic paint should do it...

To take the gauge apart you have to carefully lift the back edge of the gauge bezel... it peels back a bit to allow you to lift the bezel and glass off the lip around the top of the plastic part of the gauge...

The red film is disco lighting gel... its the material used (red, green, blue etc) on the flashing light rigs and I bought mine from ebay... Painting doesn't work as well as you would think... I tried painting a clear piece of plastic as I didn't want to **** up the dial and it looked pink... lighting gel is the best stuff tbh...

Positive is an ignition feed, can't remember where I picked it up from tbh... I think it was from the back of the fuse box... the earth is just one of the earth points near the steering column...

Get some pics up... :thumbsup:

<tuffty/>
 
cheers mate,
still not positive on gauge dismantle..

what do i remove first? the black plastic ring around the face? as it feels pretty well secured..

do i need to remove the nut off the back?
 
cheers mate,
still not positive on gauge dismantle..

what do i remove first? the black plastic ring around the face? as it feels pretty well secured..

do i need to remove the nut off the back?

No need to remove the nut at the back... the black 'plastic' ring is actually metal... its kinda 'crimped' round the top of the top of the gauge... think of it like putting a table cloth over a round table then tucking it under... you get a small flat blade screw driver to gently prise it back (not glass side but the bit where it curls under).... the actual gauge housing has a lip on it.. the ring fits over that...

Here is Kev's original thread...
http://www.audi-sport.net/vb/a3-s3-forum-8l-chassis/55649-pillar-gauges-finished.html


Yarp... use this...

<tuffty/>
 
I have a Autoboost gauge mounted on my dash which looks good and matches my dials. Well my dials are the same as the 8P S3, not 8L but still a nice cheap gauge


100_1758.jpg
 
this is mine, its a TurboSmart gauge. cost around £40 via ebay. seems to be pretty spot on

i have also used a red film to get a red back light, put the stand on the round vent in the dash, this way didn't need to cut or drill any holes in the car

DSC_0342.jpg
 
ive just fitted my boost guage tonight! i bought one of those moulds that replaces the slats in your drivers side blower vent, looks like it was grown there! lol, dead impressed. will get a pic tomorrow
 
Tuffty one more thing :p

Got it all apart, n got my red gel..
Do i use the red gel instead of the clear one?or aswell as it?
 
Tuffty one more thing :p

Got it all apart, n got my red gel..
Do i use the red gel instead of the clear one?or aswell as it?

By the clear one I assume you mean the frosted plastic one behind the dial... leave that in, sandwich the red gel between that and the dial...

<tuffty/>
 
Finally all done,put the gauge back together,n pillar pod is on the a pillar all painted too :) id take pics but ive not fitted them in the car yet,need to work out where to get the ignition power, and where to take the vacuum through the bulkhead.

Also had to get towed home today,think its the cv joint, :(
I'll have a better look on tuesday when im free

12V feed is easy, best place to get it is from the back of the headlight switch. You have a selection there, +12, Permalive and switch live for turning the lights on only if the headlights are on.

Running a vac tube through to the bay is easy as well, under the scuttle panel on the driver's side is a white box which a load of wires come through. Best best is to feed it in through there. It comes directly into the cabin that way.

brilliant, so do i remove the headlight switch to wire on to that? the +12v feed.. does that only come on with the ignition? as thats the one i'd probs use, as the lights are on in the on the dash/clocks even when the headlights are off.
And vaccuum sounds easy enough then, is it quite visible from the cabin when i feed it through the white box? or do you have to move any of the dash?
 
mines wired into the dashlight adjuster. I have an autogauge one which matches dials nicely. nicely tacked with blue tac lol until i find a suitable pod
 
mines wired into the dashlight adjuster. I have an autogauge one which matches dials nicely. nicely tacked with blue tac lol until i find a suitable pod

if you wire it in to there does it adjust the brightness of the gauge like it does the rest of the dash?
 
yep thats right mate adjusts perfectly and turns on and off with the lights
 
Exactly what he said, it's a variable feed from the switch, and only comes on with ignition.
 
The variable brightness control drives LED illumination IIRC and therefore may well not be 12v... the Stack gauge is LED illumination but needs a 12v input... varying this may not adjust the brightness of the gauge as it will be internally regulated to drop 11-14v from the car to 5v for the LED..

I wired mine to the same ignition feed I used for the cruise control in the fuse box.. can't remember the fuse position but it was a blue wire... my preference was to have the gauge illuminated by ignition the same as the dash... you don't lose the gauge when going through wooded areas and when its overcast etc...

<tuffty/>
 
that looks pretty cool mate, im keeping that free incase i go for a liquid gauge :)
 
How much was the pod for the gauge and were did u wire it up to,was it hard and did u run the boost pipe through the ecu plasic shuttle ?
 
i spy my little gem mod being copied here lol

871.jpg
 
come on kev, its not like i bought a stack gauge.. then took it apart and fitted a red screen so the LED's are red and the needle white so it matches the S3 dash..

ohh actualy.. thats exactly what i did haha